
Acuarela
Paints the picture as a watercolour, with flat washes of colour and the grain of the paper. Darker paint gathers where the washes meet and shapes stay readable, so it works on moving footage as well as on stills.
Group: Light & Stylize · How to add an effect
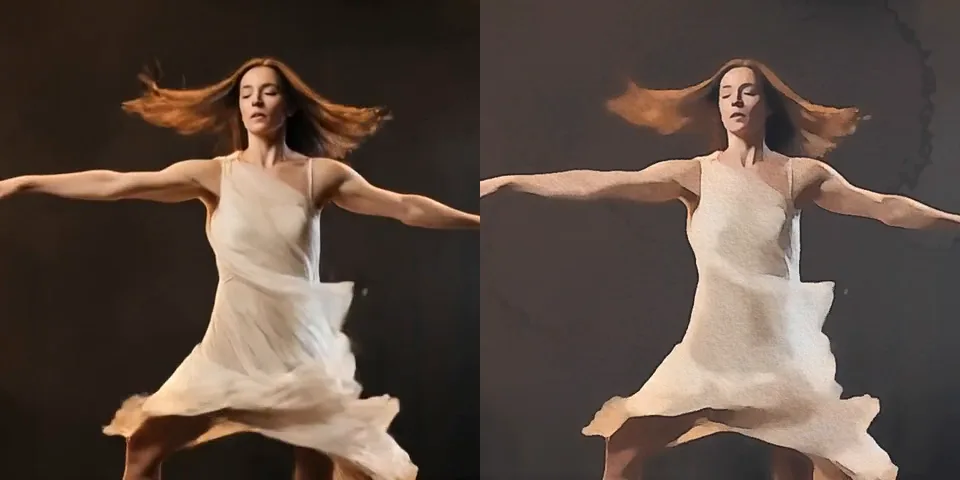
Use it for: a painted, storybook look · softening busy projections into calm fields of colour · a hand-made feel for titles and backgrounds.
- Wash – how flat the colour gets.
- Bleed – how far wet paint runs over the edges.
- Edges – the darker paint along every border.
- Granulation and Paper – the grain and relief of the paper.
Tip: for a still picture or a slow shot, set Flow to 0.3 or more: the wet edges and patches keep moving, as if the paint were still drying.
Presets
Section titled “Presets”Pick one in the Preset row of the effect card. It sets all controls at once, in one undo step, and the row then shows its name until you change something. A control with keyframes keeps them, and the card says so.
Fine Study – small washes, crisp dark edges and little paper. Faces and hands stay readable; a careful study rather than a sketch.
Loose Wash – big, flat patches in a few tones with hard, dark edges and few stains. A quick, loose sketch; faces lose their features, so use it for bodies, crowds and places.
Wet in Wet – colour runs far over soft borders, big blooms stain the background, and the wet areas drift with the playhead. For dreams and memories, and for slow or still shots.
Pale Paper – a thin wash on coarse, strongly grained paper that shows through, with the shadows lifted to indigo. A faded page from a sketchbook; calm enough to put text over.
Controls
Section titled “Controls”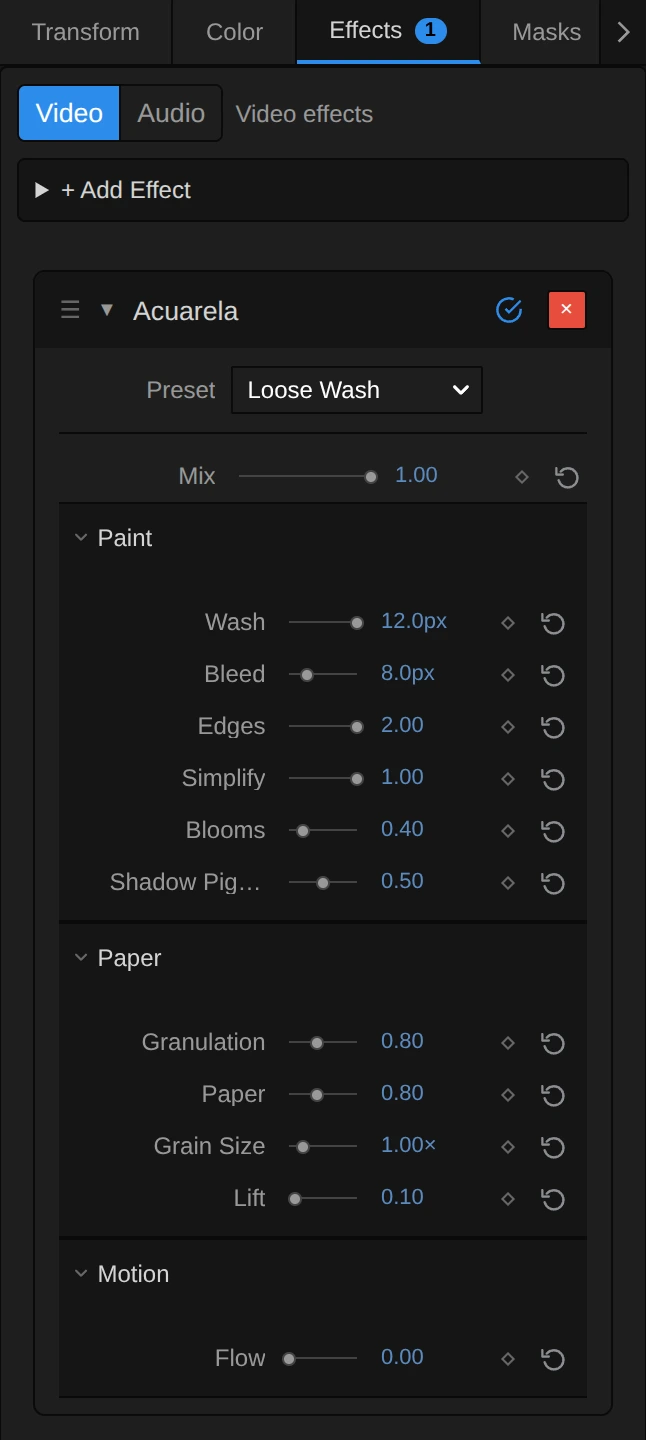
The card sorts the controls into Paint, Paper and Motion sections that fold away; the preview updates while you drag. The loops beside Mix, Paint and Paper run on a still photo of the dancer, so only the control changes; Flow, which is about movement, runs on the moving dancer.
General
Section titled “General”Mix – how much of the painting covers the original. 1 is the full watercolour, 0.5 lays it half over the photo, so faces get some detail back. At 0 the picture is untouched and the effect costs nothing. 0 to 1, default 1.
Wash – how far the colour flattens into washes. The wash stops at the borders of shapes, so they stay sharp while their inside turns into one colour. 1–2 keeps fine detail, 5 is a classic watercolour, 8 and more paints loose patches and wipes out small features such as eyes. Even 0 still smooths by half a pixel. 0 to 12 px, default 5.5 px.
Bleed – how wet the paint is. A few large wet patches lie over the frame; there the outlines wobble and colour runs across the borders. 0 keeps every edge dry and still, 8 gives a gentle wobble, 20 and more lets colour flood out of shapes. The wobble stops growing at 16 px (the card says so); higher values only widen the bleeding. 0 to 30 px, default 8 px.
Edges – the darker paint that gathers along the border of every wash, as it does when real watercolour dries. Without it (0) the painting looks pale and flat; 1 to 1.5 is natural; 2 draws a clear dark rim, almost like ink. The darkest pooled paint is a deeper tone of the same colour, never black. 0 to 2, default 1.2.
Simplify – how far the brightness steps into a few flat tones, like glazes laid one over another. 0 keeps the photo’s smooth gradients, 0.5 hints at the steps, 1 gives six clear tones; the colours stay as they are. 0 to 1, default 0.5.
Blooms – a few stains with a lighter inside and a dark, ragged rim, where water ran back into drying paint. They appear only in flat areas such as a sky or a dark stage, never on busy detail. 0.5 is a hint, 1–2 makes them a strong part of the picture. They stay in place on the frame. 0 to 2, default 0.5.
Shadow Pigment – watercolour has no true black. This lifts the darkest parts, the pooled edges too, to a dark indigo paint. 0 keeps the black of the footage, 1 paints all shadows in indigo, softer and cooler. 0 to 1, default 0.5.
Granulation – pigment that settles in the valleys of the paper, as coarse paint does. It shows most in the mid tones and on dense paint; light skin and white stay cleaner. 0 gives smooth washes, 0.6 a fine speckle, 2 a strong, sandy grain. 0 to 2, default 0.6.
Paper – the relief of the paper, lit from one side, as if the painting lay under a lamp. It shows on light and middle tones; dense dark paint hides it. 0 turns it off, 0.6 is a subtle texture, 2 a rough, handmade sheet. 0 to 2, default 0.6.
Grain Size – how coarse the paper is, for Granulation and Paper together. 1 is a standard cold-pressed sheet; 0.5 is smooth hot-pressed paper, 2–4 a rough sheet whose grain reads even on a large projection. 0.25 to 4×, default 1×.
Lift – lets the white paper shine through, like a wash that was lifted with a sponge. 0.1 softens the darkest tones a little, 0.4 gives a pale, airy page, 1 leaves only a faint tint (80 % paper). 0 to 1, default 0.1.
Motion
Section titled “Motion”Flow – lets the wet paint move on its own: the wobble of the outlines and the wet patches drift slowly with the playhead, while the paper and the blooms stay put. At 0 everything holds still, which suits moving footage; 0.3–1 gives a still picture a quiet life; 2 makes the edges crawl. It reads the timeline time, so the export matches the preview; keyframing Flow makes the paint jump, so set it once per clip. Its effect grows with Bleed. 0 to 2, default 0.
Node setup
Section titled “Node setup”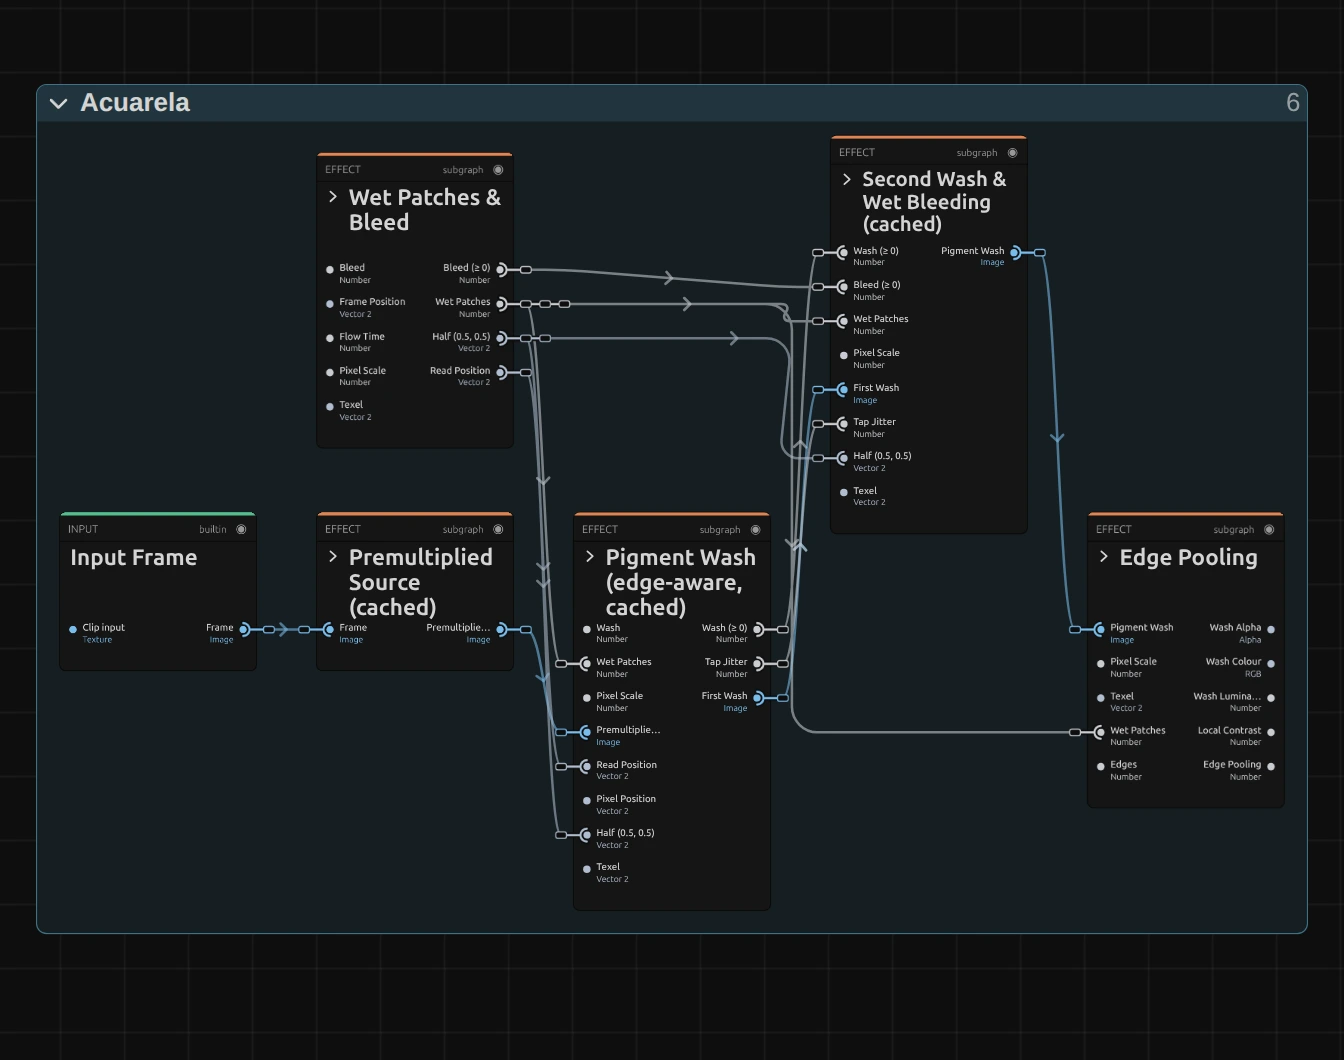
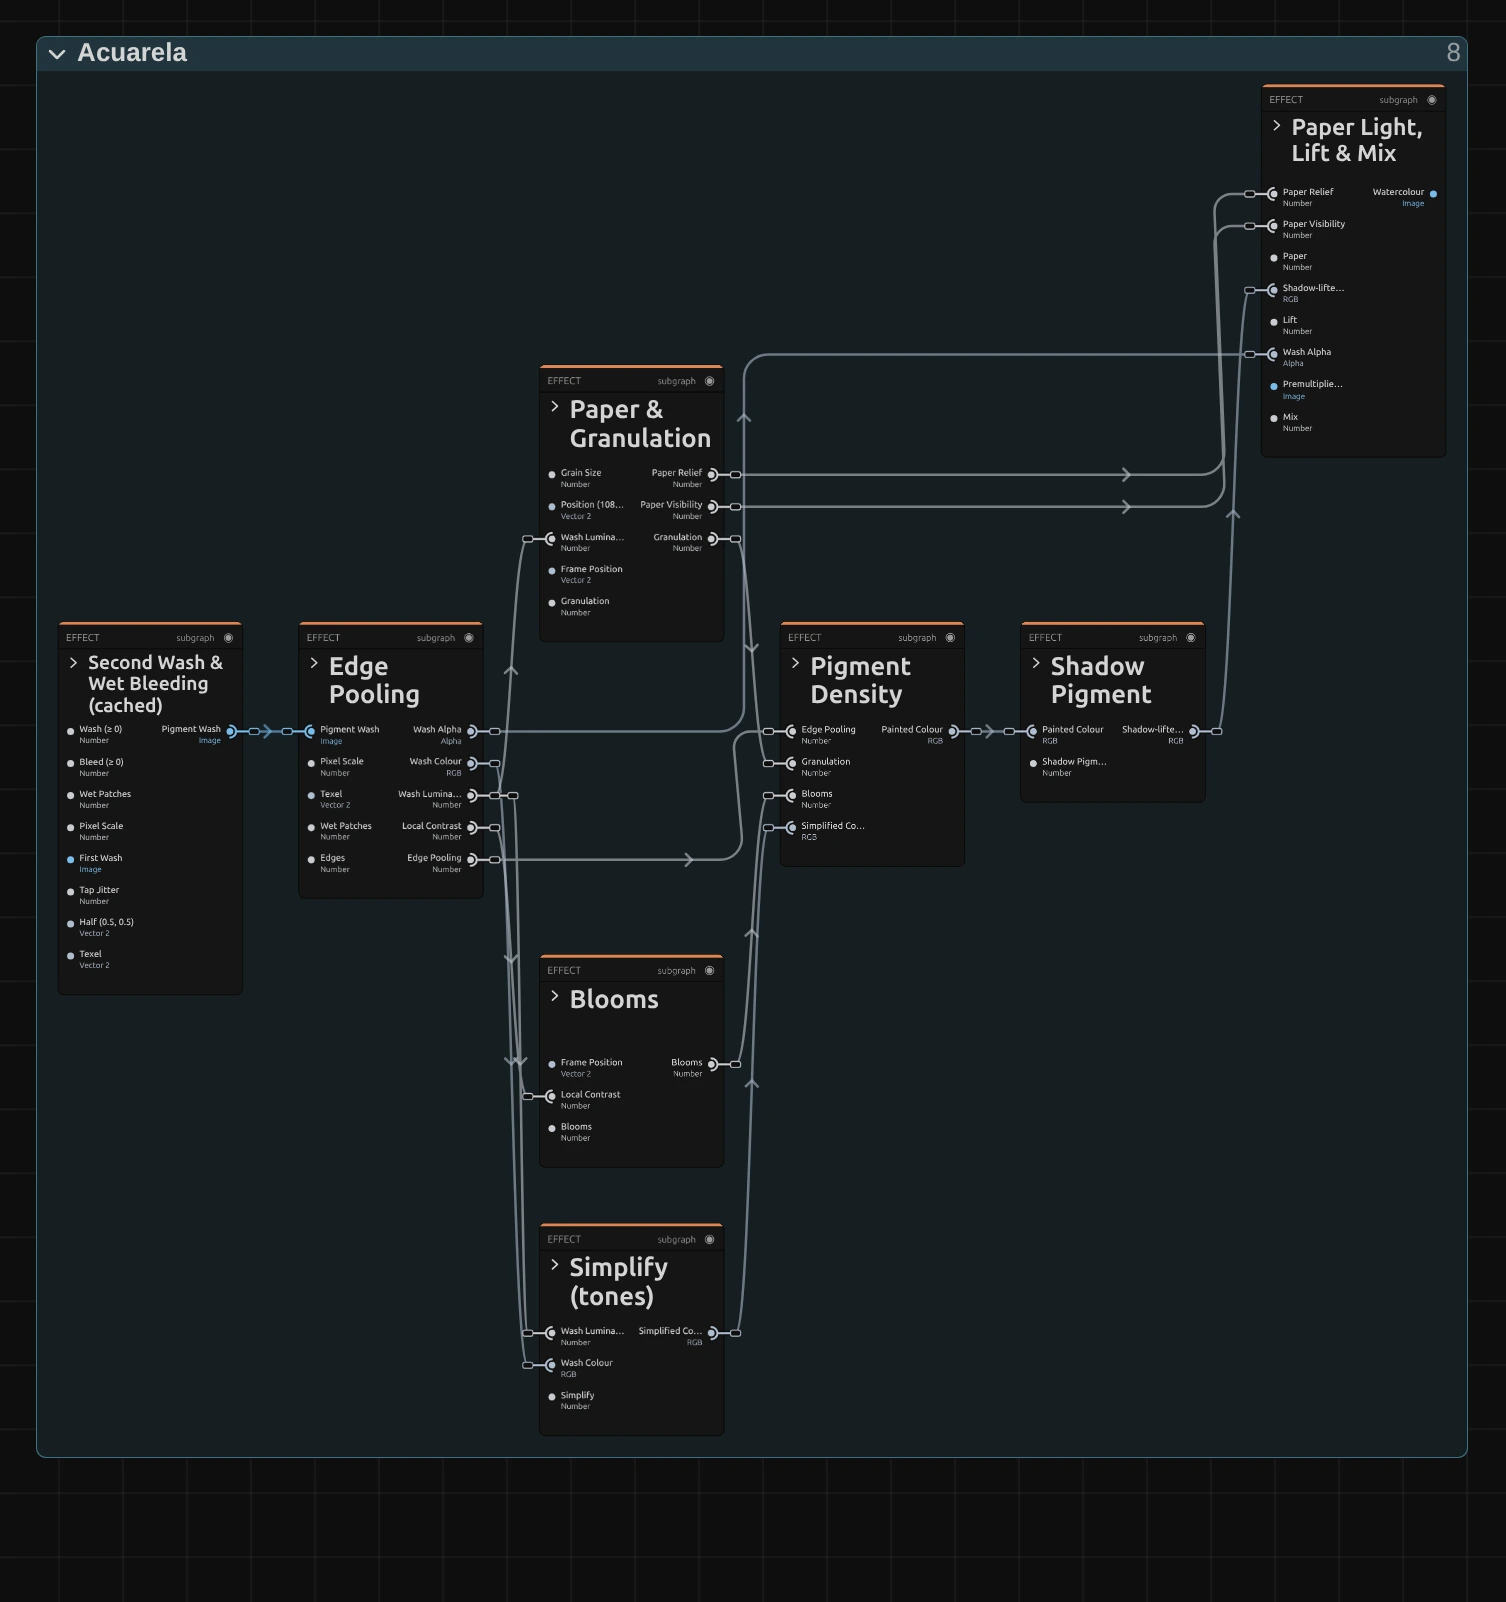
Acuarela paints in the order a painter works, one folder per stage in the Nodes tab. Premultiplied Source (cached) keeps the frame ready for clean reads, also at transparent edges. Wet Patches & Bleed decides where the paint is wet, Pigment Wash (edge-aware, cached) and Second Wash & Wet Bleeding (cached) flatten the colour, and Edge Pooling finds the borders. Paper & Granulation, Blooms and Simplify (tones) prepare the paper, the stains and the tones; Pigment Density turns all of it into more or less paint, Shadow Pigment lifts black to indigo, and Paper Light, Lift & Mix lights the paper and blends with the original. Frame & Paper Coordinates measures every size in pixels of a 1080p frame. Click a folder’s header to open it; the sections below show what is inside.
Wet Patches & Bleed
Section titled “Wet Patches & Bleed”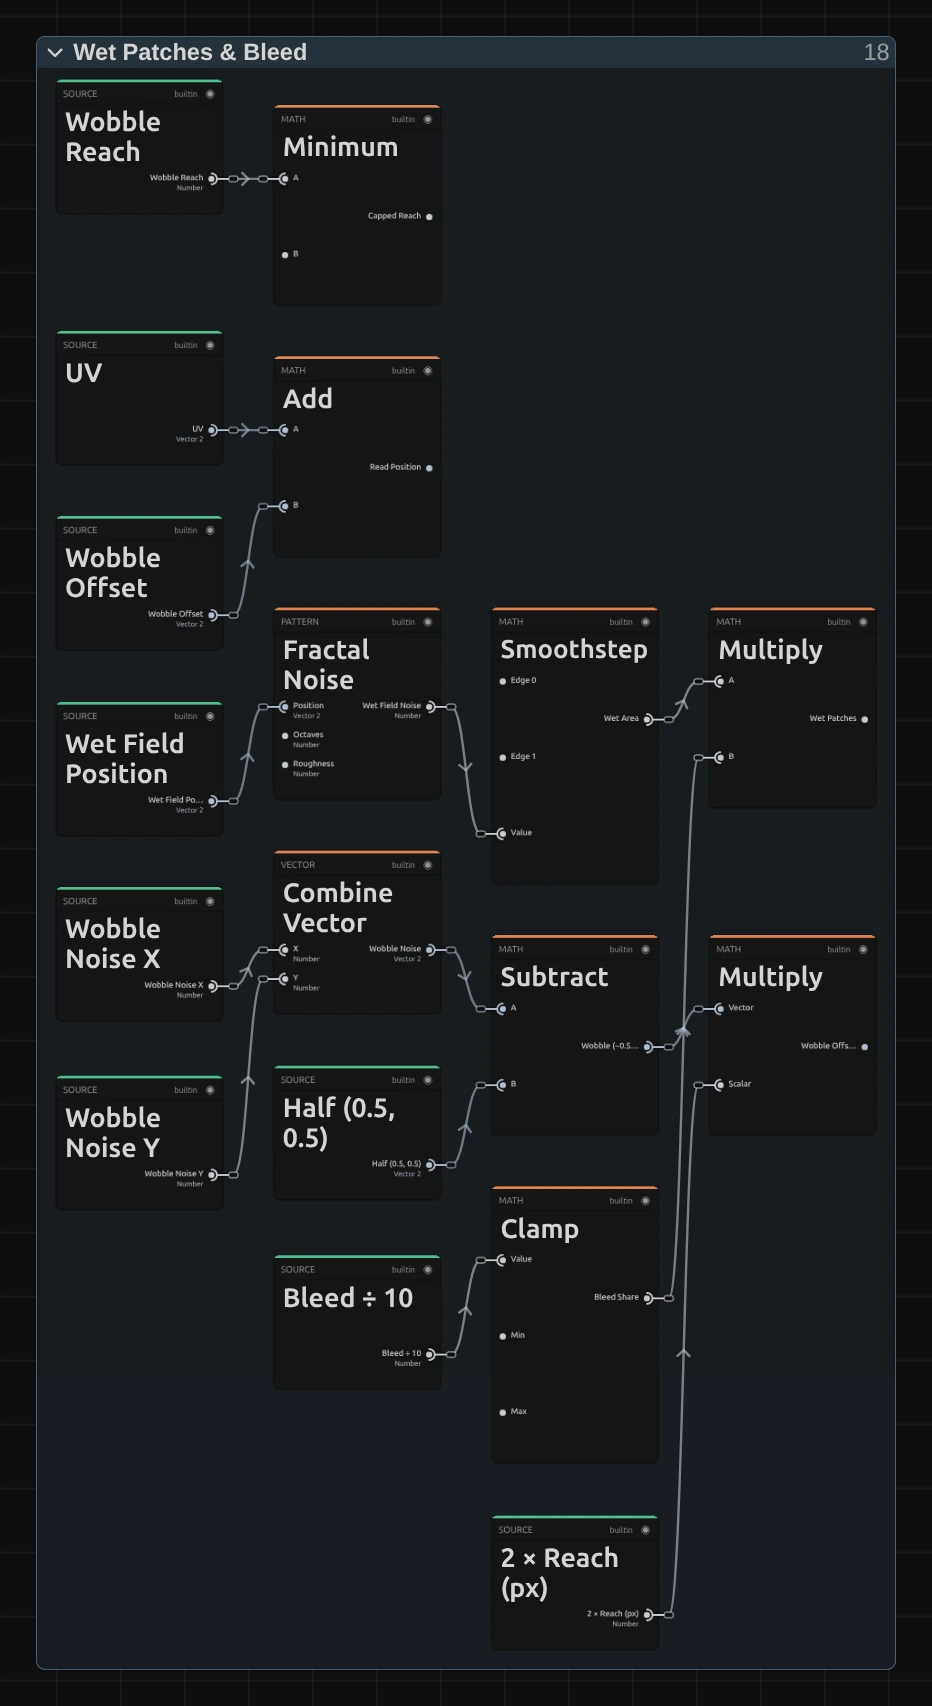
Wet Area – a slow noise field over the frame, cut by a Smoothstep between 0.55 and 0.75: a few large, soft-edged patches. Flow moves the noise, so the patches drift.
Wet Patches – the Wet Area times the Bleed Share (Bleed ÷ 10, at most 1). From Bleed 10 on, the patches are fully wet; the washes widen there and their colour runs.
Capped Reach – how far the read position may wobble: Bleed × (0.25 + 0.5 × wet), at most 12 px. The cap keeps neighbouring pixels from reading rows far apart, which would fold the picture into stepped copies.
Wobble Offset (px) – two smooth noise fields, centred around zero, times twice the reach: the shift of every pixel’s read position.
Read Position – the pixel’s own place plus that shift. The first wash reads the frame there, so outlines wobble a little, most of all in the wet patches.
Pigment Wash (edge-aware, cached)
Section titled “Pigment Wash (edge-aware, cached)”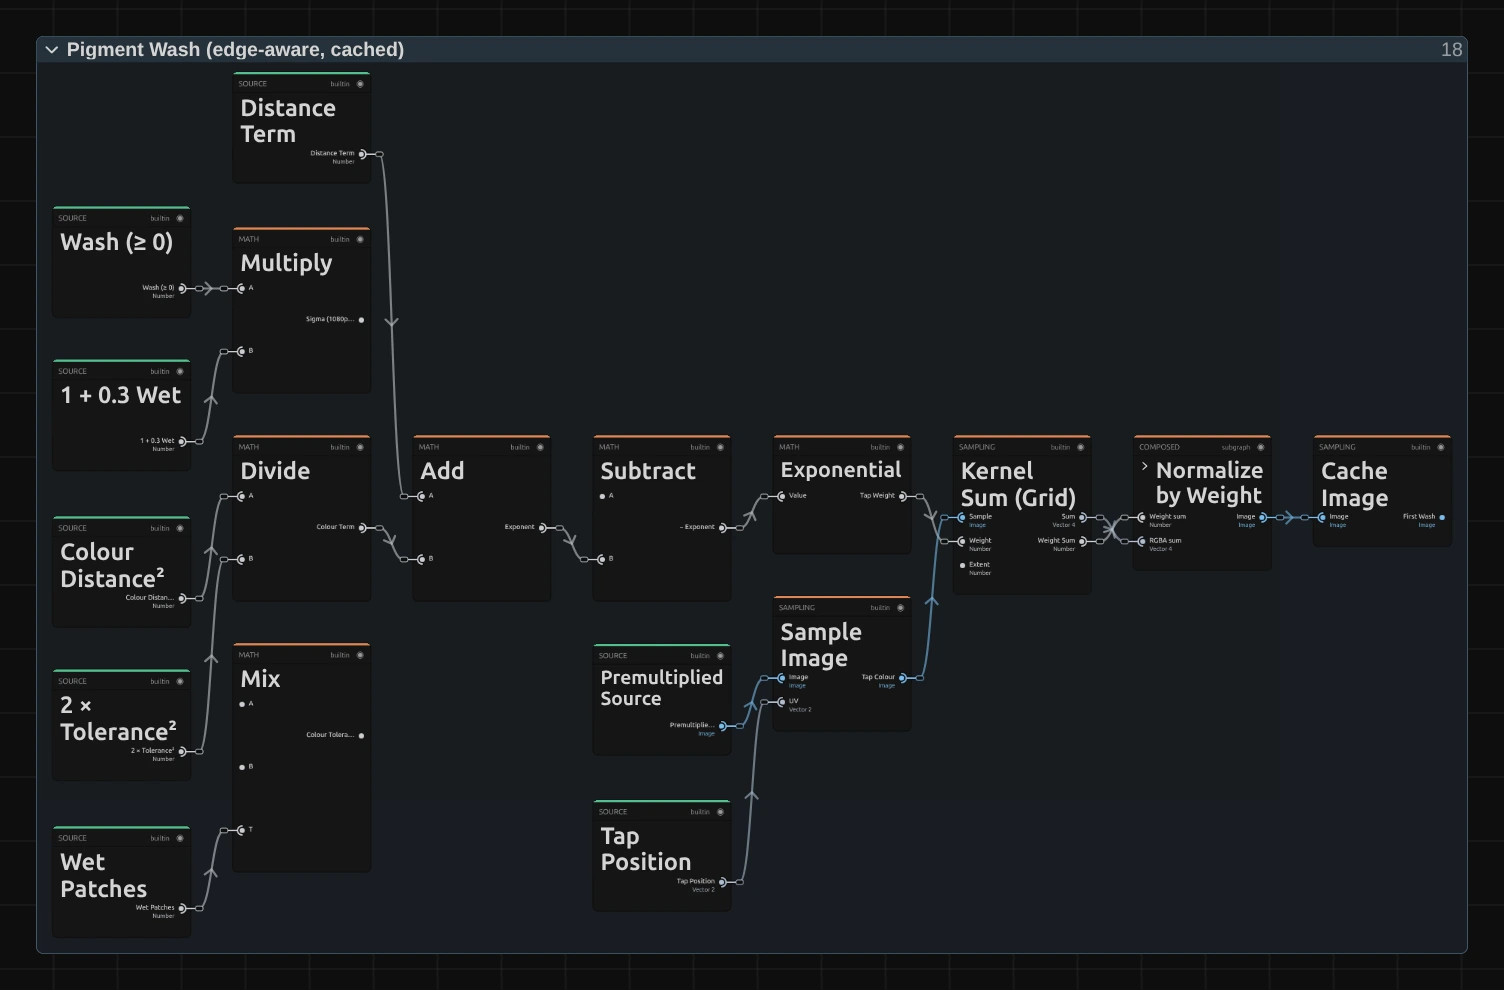
Multiply – the wash size in pixels of a 1080p frame: Wash, 30 % wider in wet patches.
Mix – the colour tolerance: 0.1 where the paper is dry, 0.3 where it is wet. A tap whose colour differs more than that from the centre barely counts, so the wash stops at borders.
Exponential – the weight of every tap: it falls with the distance from the centre (relative to the wash size) and with the colour difference. This is an edge-aware (bilateral) blur.
Kernel Sum (Grid) – adds 7 × 7 weighted taps around the read position. The grid is turned and shifted a little for every pixel, so thin lines turn into fine grain instead of ghost copies; Normalize by Weight divides by the summed weights.
Cache Image – stores the first wash for the next pass.
Second Wash & Wet Bleeding (cached)
Section titled “Second Wash & Wet Bleeding (cached)”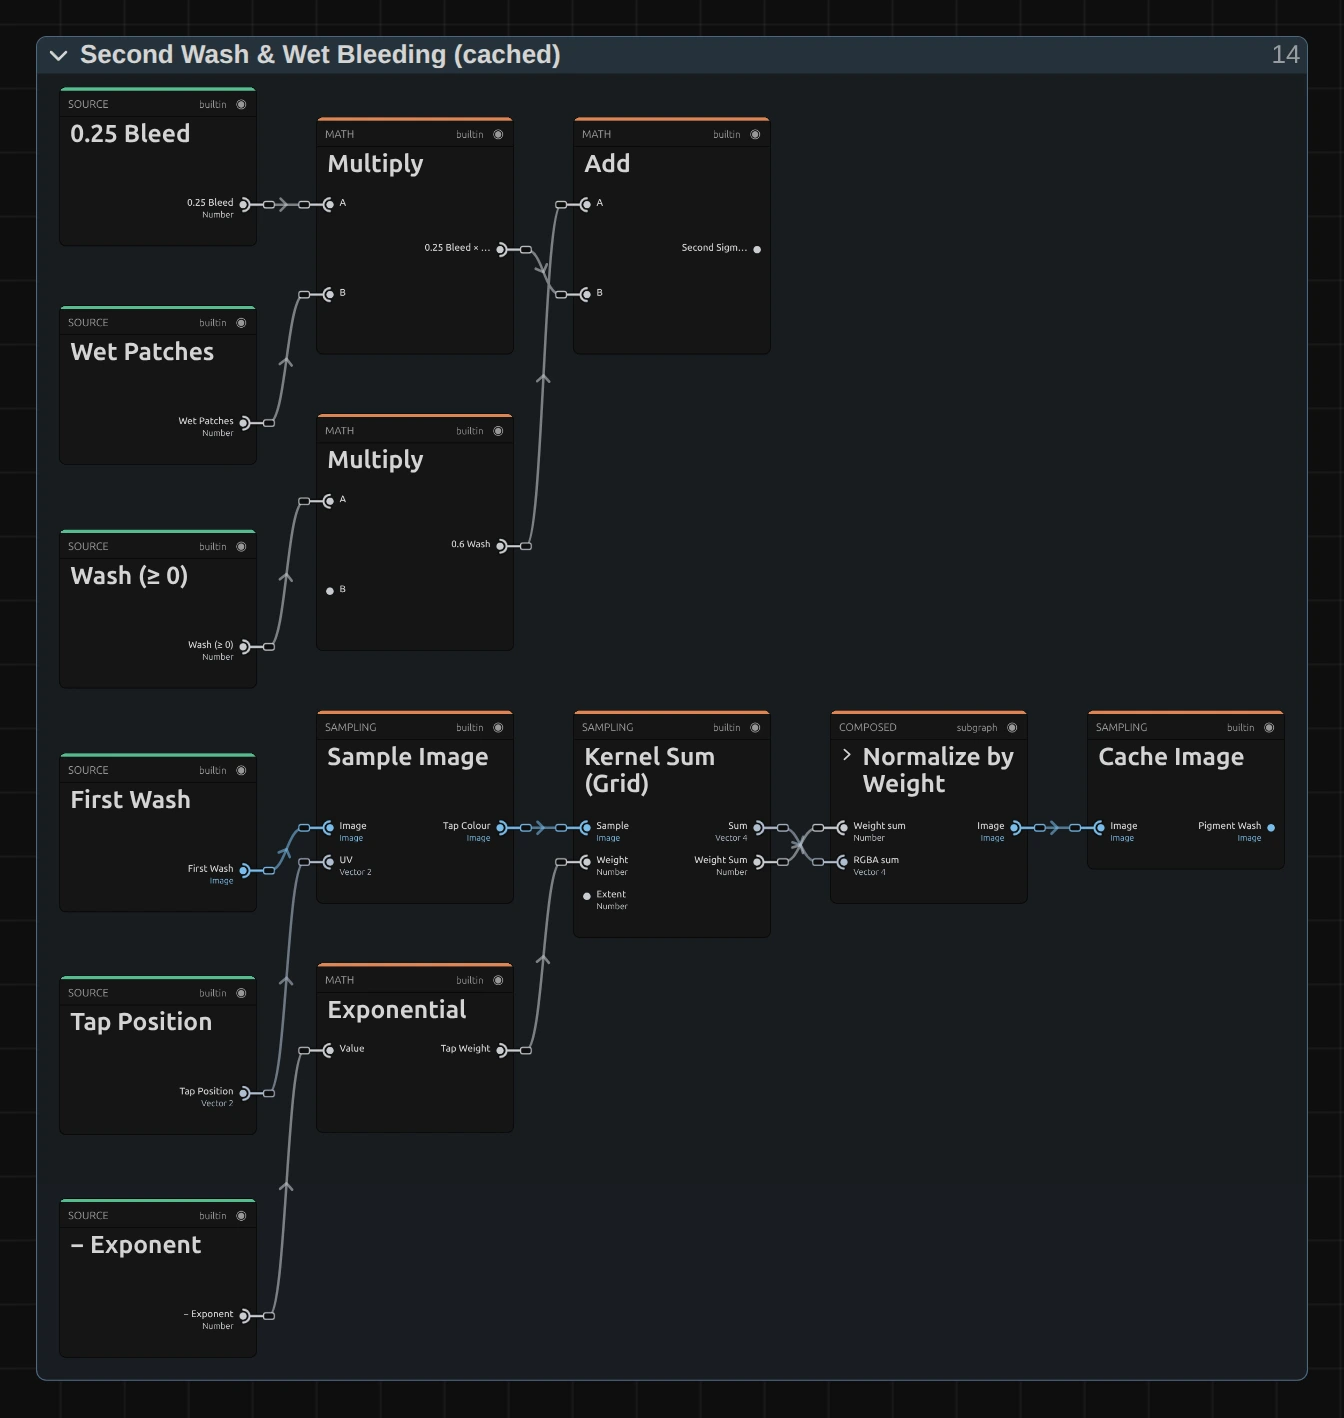
Add – the size of the second wash: 0.6 × Wash, plus 0.25 × Bleed in the wet patches. Washing a wash again flattens the colour inside shapes further and keeps their borders, like a painter’s second layer.
Exponential – the same tap weight as in the first wash, but with a colour tolerance that grows to 0.5 where the paint is wet: there colour crosses the borders and runs.
Kernel Sum (Grid) – the 7 × 7 taps around the pixel, read from the first wash at its own place (no wobble this time).
Cache Image – the finished pigment wash. Edge Pooling, Simplify and the paper stages all read it.
Edge Pooling
Section titled “Edge Pooling”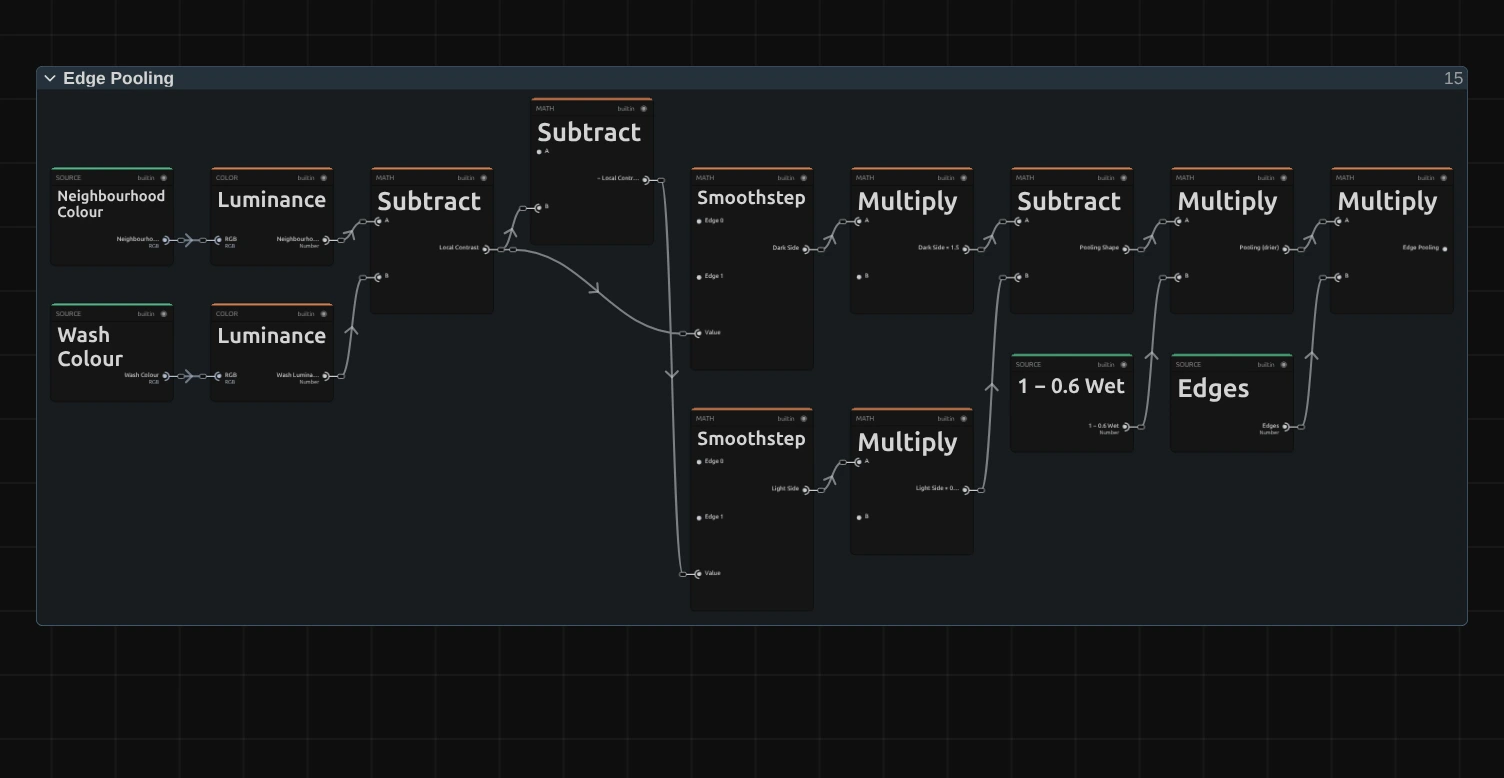
Local Contrast – the brightness of the neighbourhood (a soft average over about 6 px) minus the pixel’s own. Next to a border it is positive on the darker side and negative on the lighter one, and it fades over a few pixels.
Dark Side – a Smoothstep from 0.005 to 0.08 of that contrast: a soft band 2–4 px wide on the darker side of every border, where pigment pools. It counts 1.5 times.
Light Side – the same on the lighter side, counted 0.25 times and taken away: the paper next to a pooled edge looks a little brighter.
Pooling (drier) – the pooling shape times 1 − 0.6 × wet: in wet paint the edges stay softer.
Edge Pooling – times Edges. This is the extra pigment Pigment Density adds along the borders.
Paper & Granulation
Section titled “Paper & Granulation”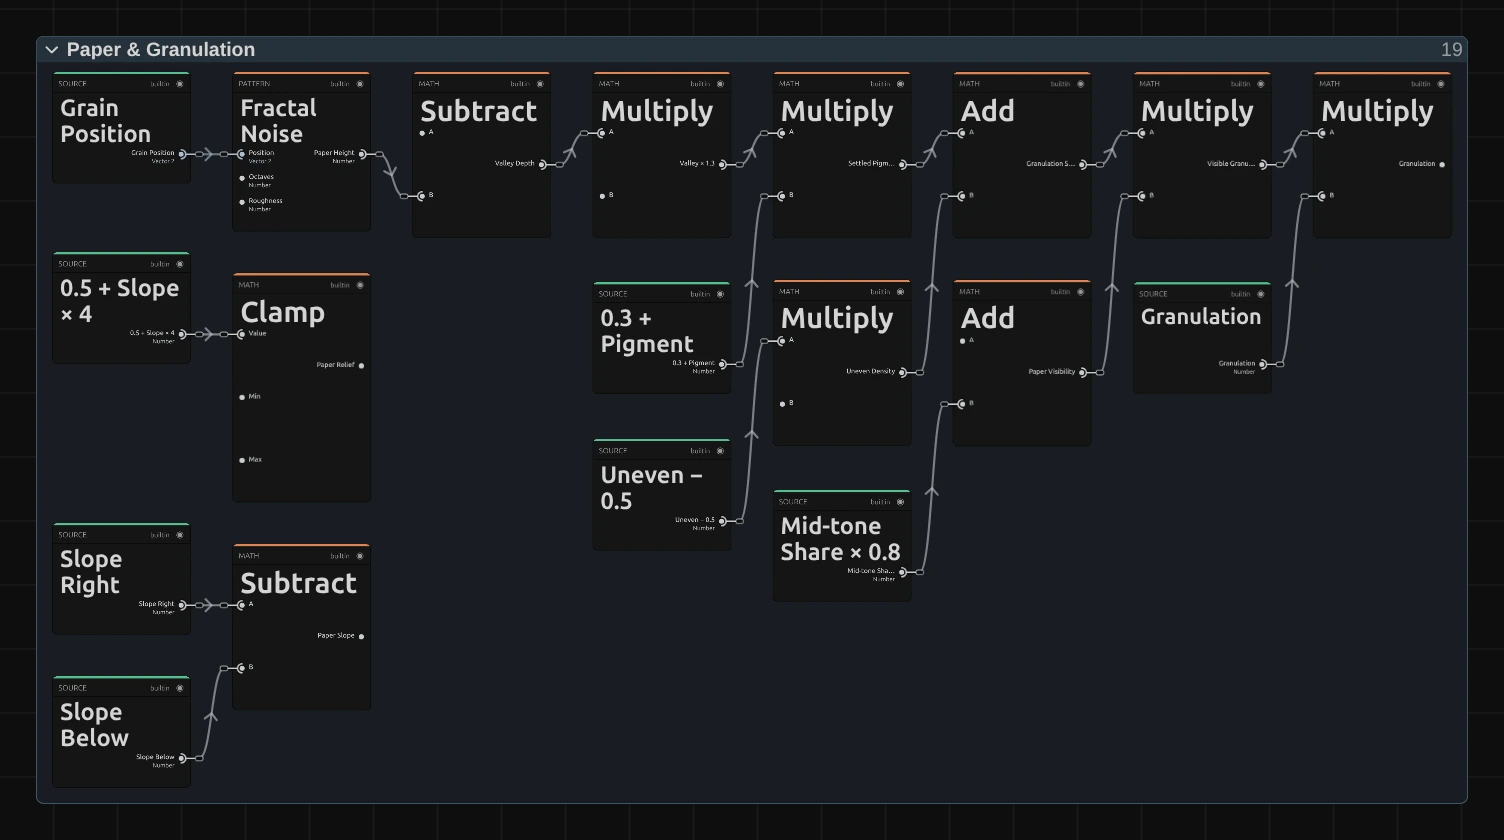
The paper is three layers of Fractal Noise, the Paper Height, its size set by Grain Size. It stays fixed on the frame.
Paper Slope – the height one pixel to the right and one below, each minus the height here: the tilt of the paper, as if lit from one side.
Paper Relief – 0.5 plus four times the slope, kept between 0 and 1: light where the paper faces the lamp, shade where it turns away. Paper Light, Lift & Mix uses it.
Paper Visibility – where the paper shows: 0.2 everywhere, up to 1 in the middle tones of the wash; dense dark paint and near-white (skin, a white dress, sky) show less of it.
Granulation – pigment that settles in the valleys: (0.55 − height) × 1.3 × (0.3 + the amount of pigment), plus a slow, uneven density, times the visibility and Granulation.
Blooms
Section titled “Blooms”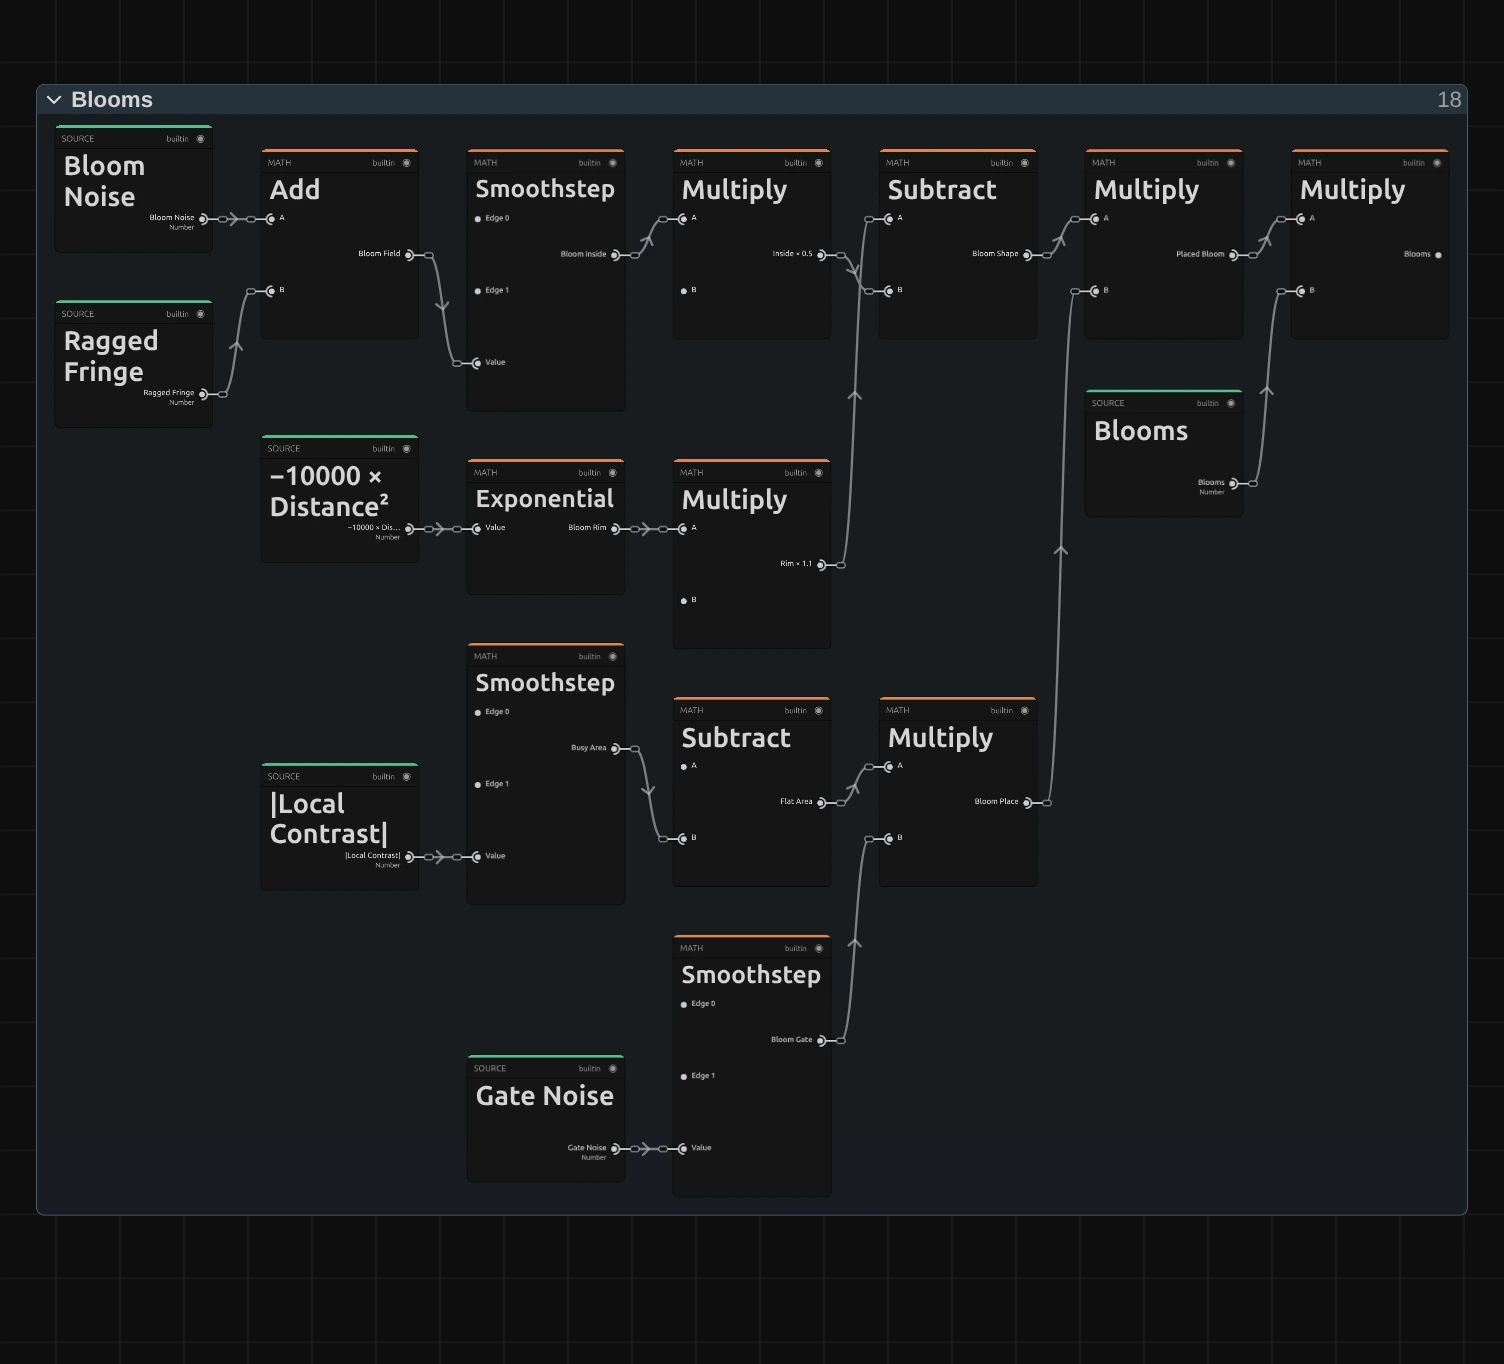
Bloom Inside – a noise field with a ragged fringe, cut sharply at 0.6: the inside of a stain.
Bloom Shape – a thin rim right at that cut (an Exponential of the distance, counted 1.1 times) minus half the inside: the rim gets more pigment, the inside less, like water that pushed the paint outwards.
Bloom Gate – a second, coarser noise lets stains appear only in a few places of the frame.
Bloom Place – the gate times the Flat Area: where the wash has almost no contrast (a sky, a dark stage). On busy detail a stain would look like dirt, so there is none.
Blooms – the placed stain times Blooms: the pigment it adds or takes away in Pigment Density.
Remix: open the Constants folder and set Bloom Gate Low from 0.56 to 0.4: the gate opens in many more places, and stains spread over every flat area of the frame.
Simplify (tones)
Section titled “Simplify (tones)”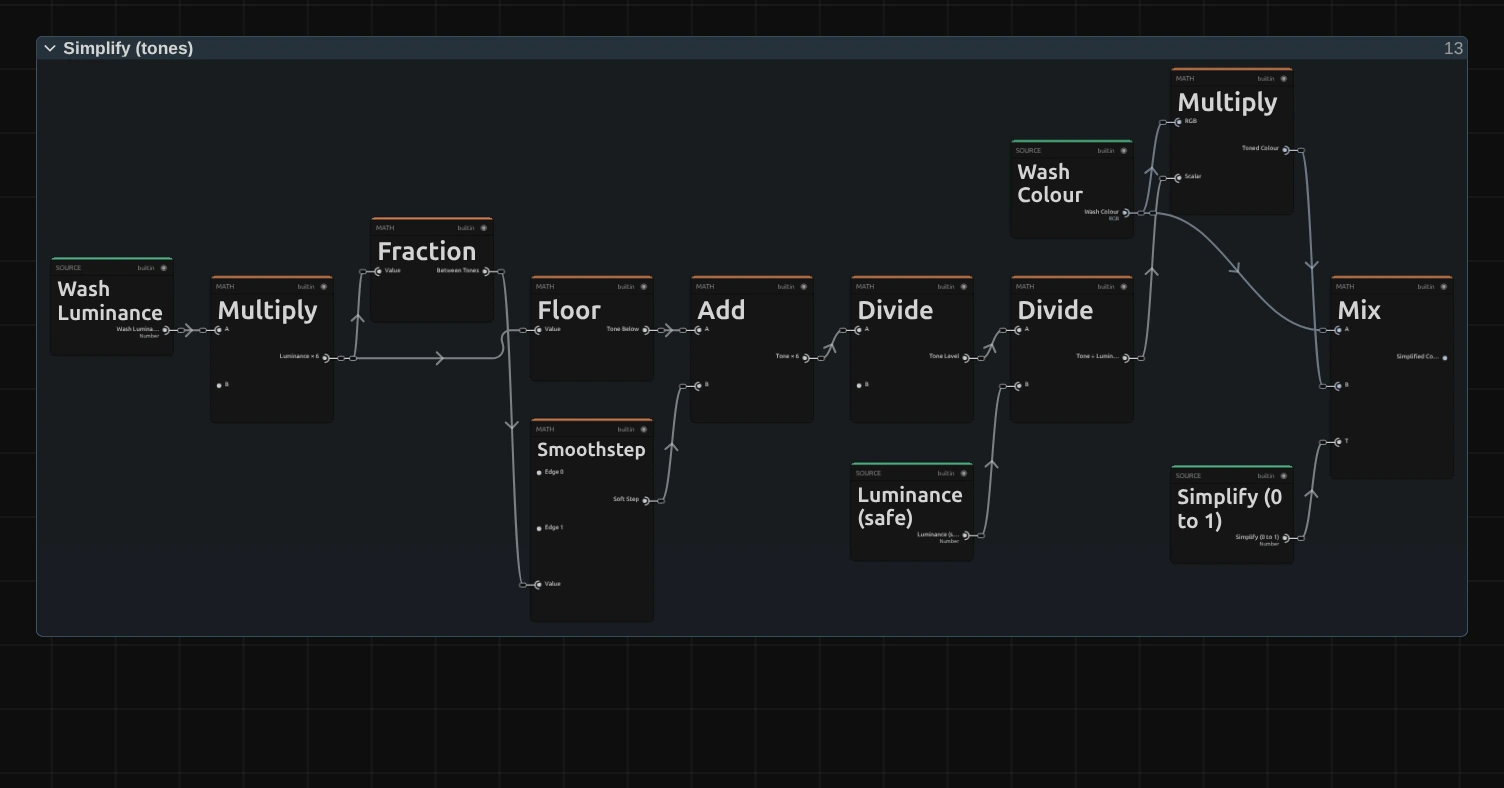
Tone Below – the wash brightness times 6, rounded down: which of six tones lies just below the pixel.
Soft Step – a Smoothstep of what is left between 0.3 and 0.7: the step to the next tone is soft, so no hard contour lines appear.
Tone Level – Tone Below plus the Soft Step, divided by 6. Multiply scales the wash colour so its brightness matches the tone and the colour stays the same.
Simplified Colour – the wash mixed towards that toned colour by Simplify.
Pigment Density
Section titled “Pigment Density”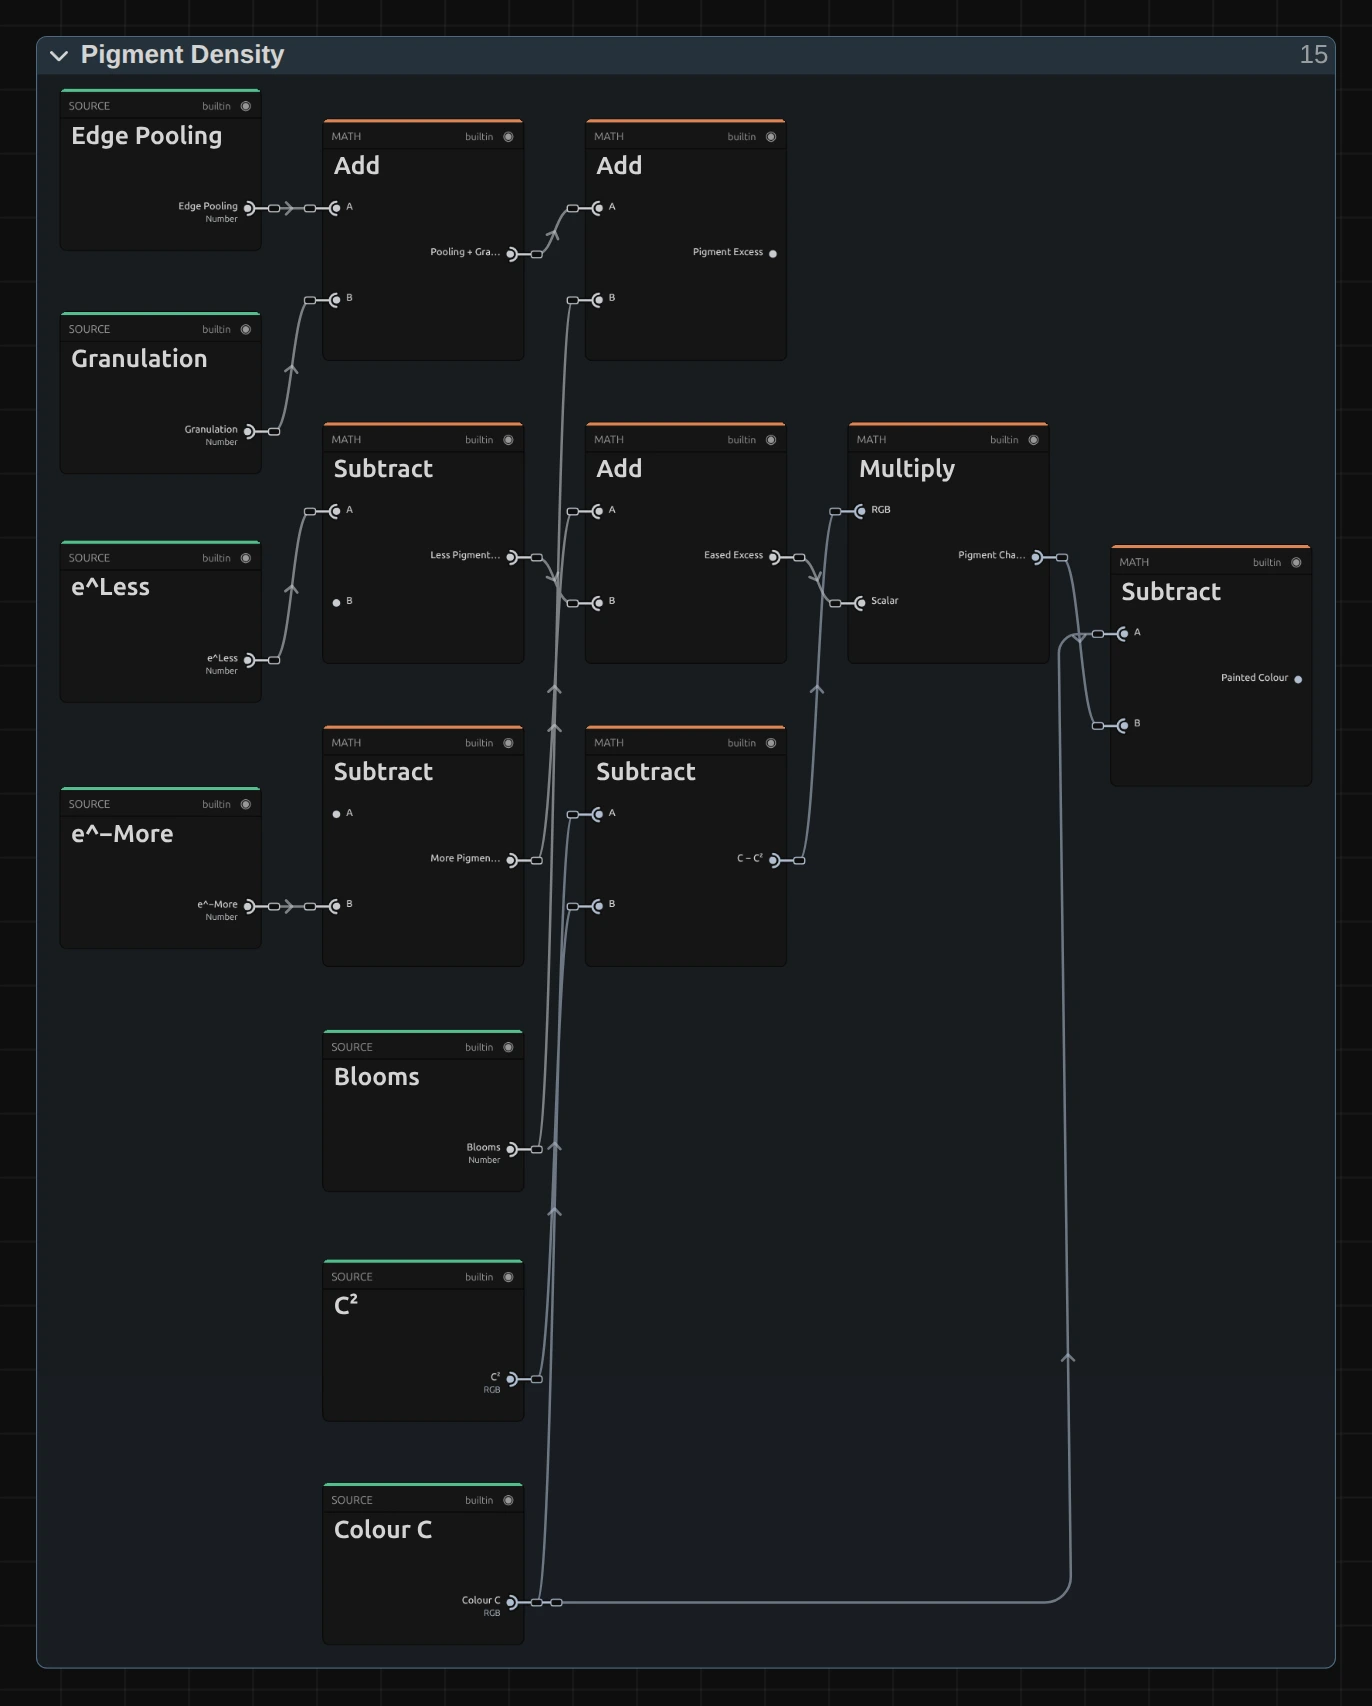
One formula from watercolour research does the painting: new colour = C − (C − C²) × e, with C the simplified colour and e the extra pigment.
Pigment Excess – Edge Pooling plus Granulation plus Blooms. Before it is used it eases: more pigment can at most square a colour (C², a deeper tone of the same paint), less pigment can at most lighten it to 2C − C². No colour is pushed to black or past white.
C − C² – how far a colour can move at all: nothing for white paper (C = 1) and for black, most for the middle tones.
Pigment Change – C − C² times the eased excess.
Painted Colour – C minus that change: darker where pigment pooled, lighter inside a bloom.
Shadow Pigment
Section titled “Shadow Pigment”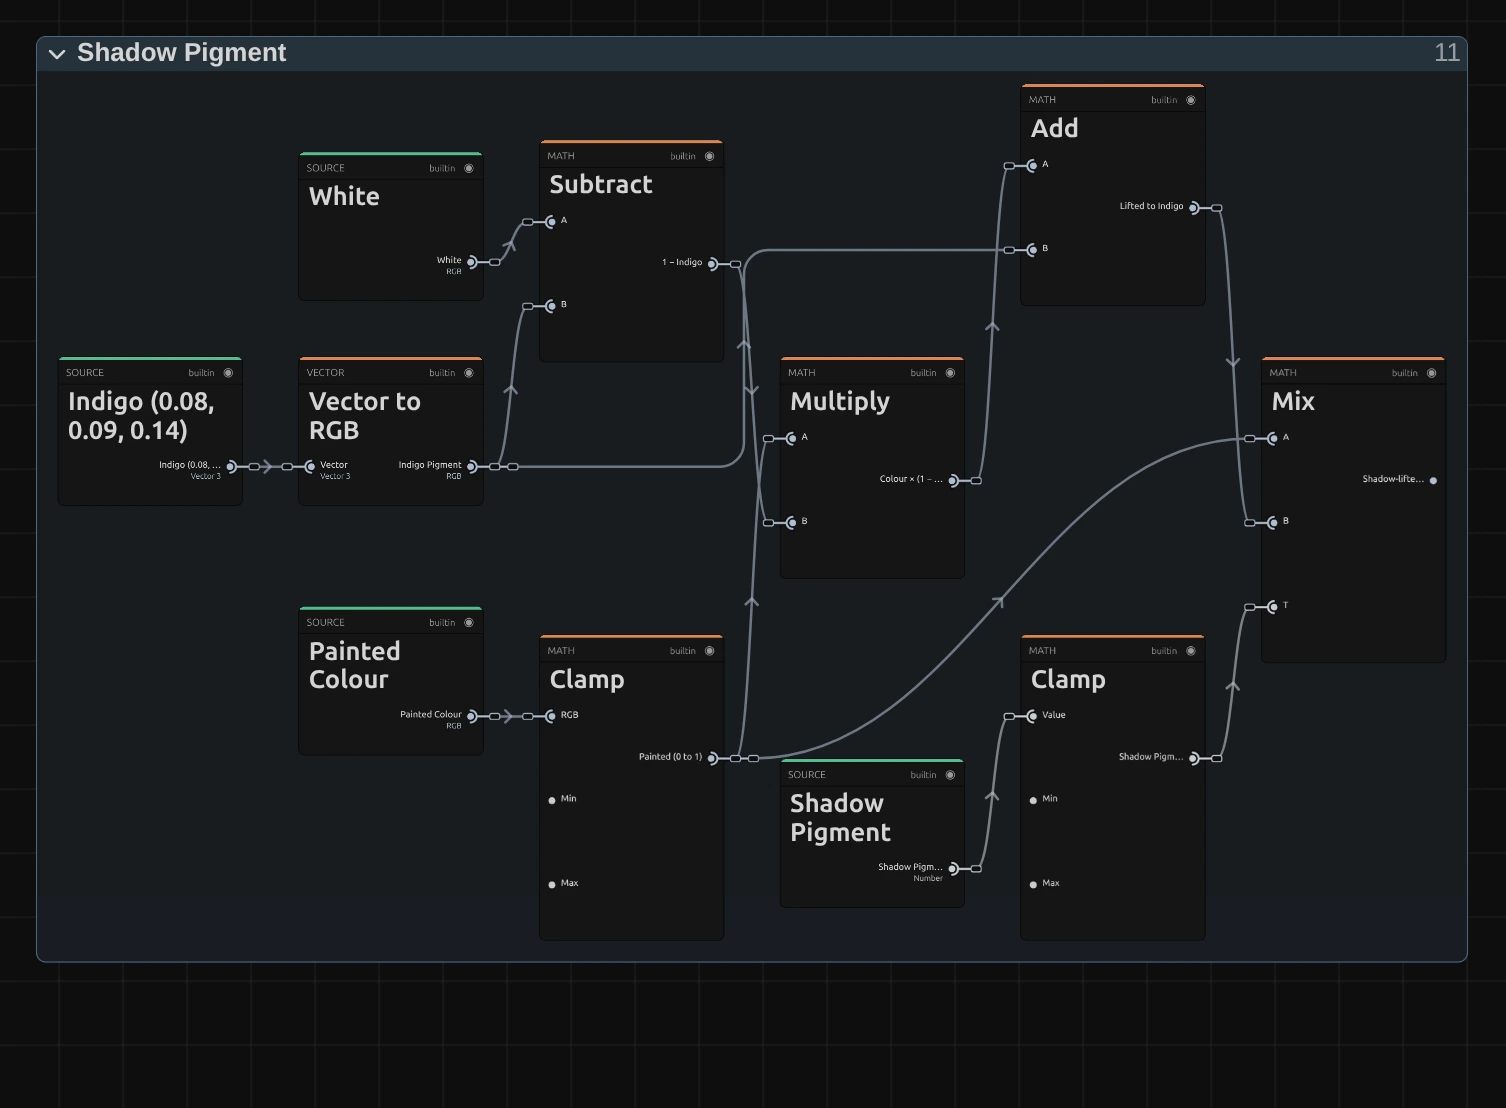
Indigo Pigment – the darkest paint of the palette: a deep blue-grey (0.08, 0.09, 0.14).
Colour × (1 − Indigo) – the painted colour scaled down by what is left above the indigo.
Lifted to Indigo – plus the indigo: black becomes indigo, white stays white, and everything between keeps its order.
Shadow Pigment (0 to 1) – the control, kept between 0 and 1.
Shadow-lifted Colour – the painted colour mixed towards the lifted one by Shadow Pigment.
Remix: open the Constants folder and set the three Shade Pigment values (R, G, B) to 0.18, 0.08 and 0.05: the shadows turn into a warm sepia ink.
Paper Light, Lift & Mix
Section titled “Paper Light, Lift & Mix”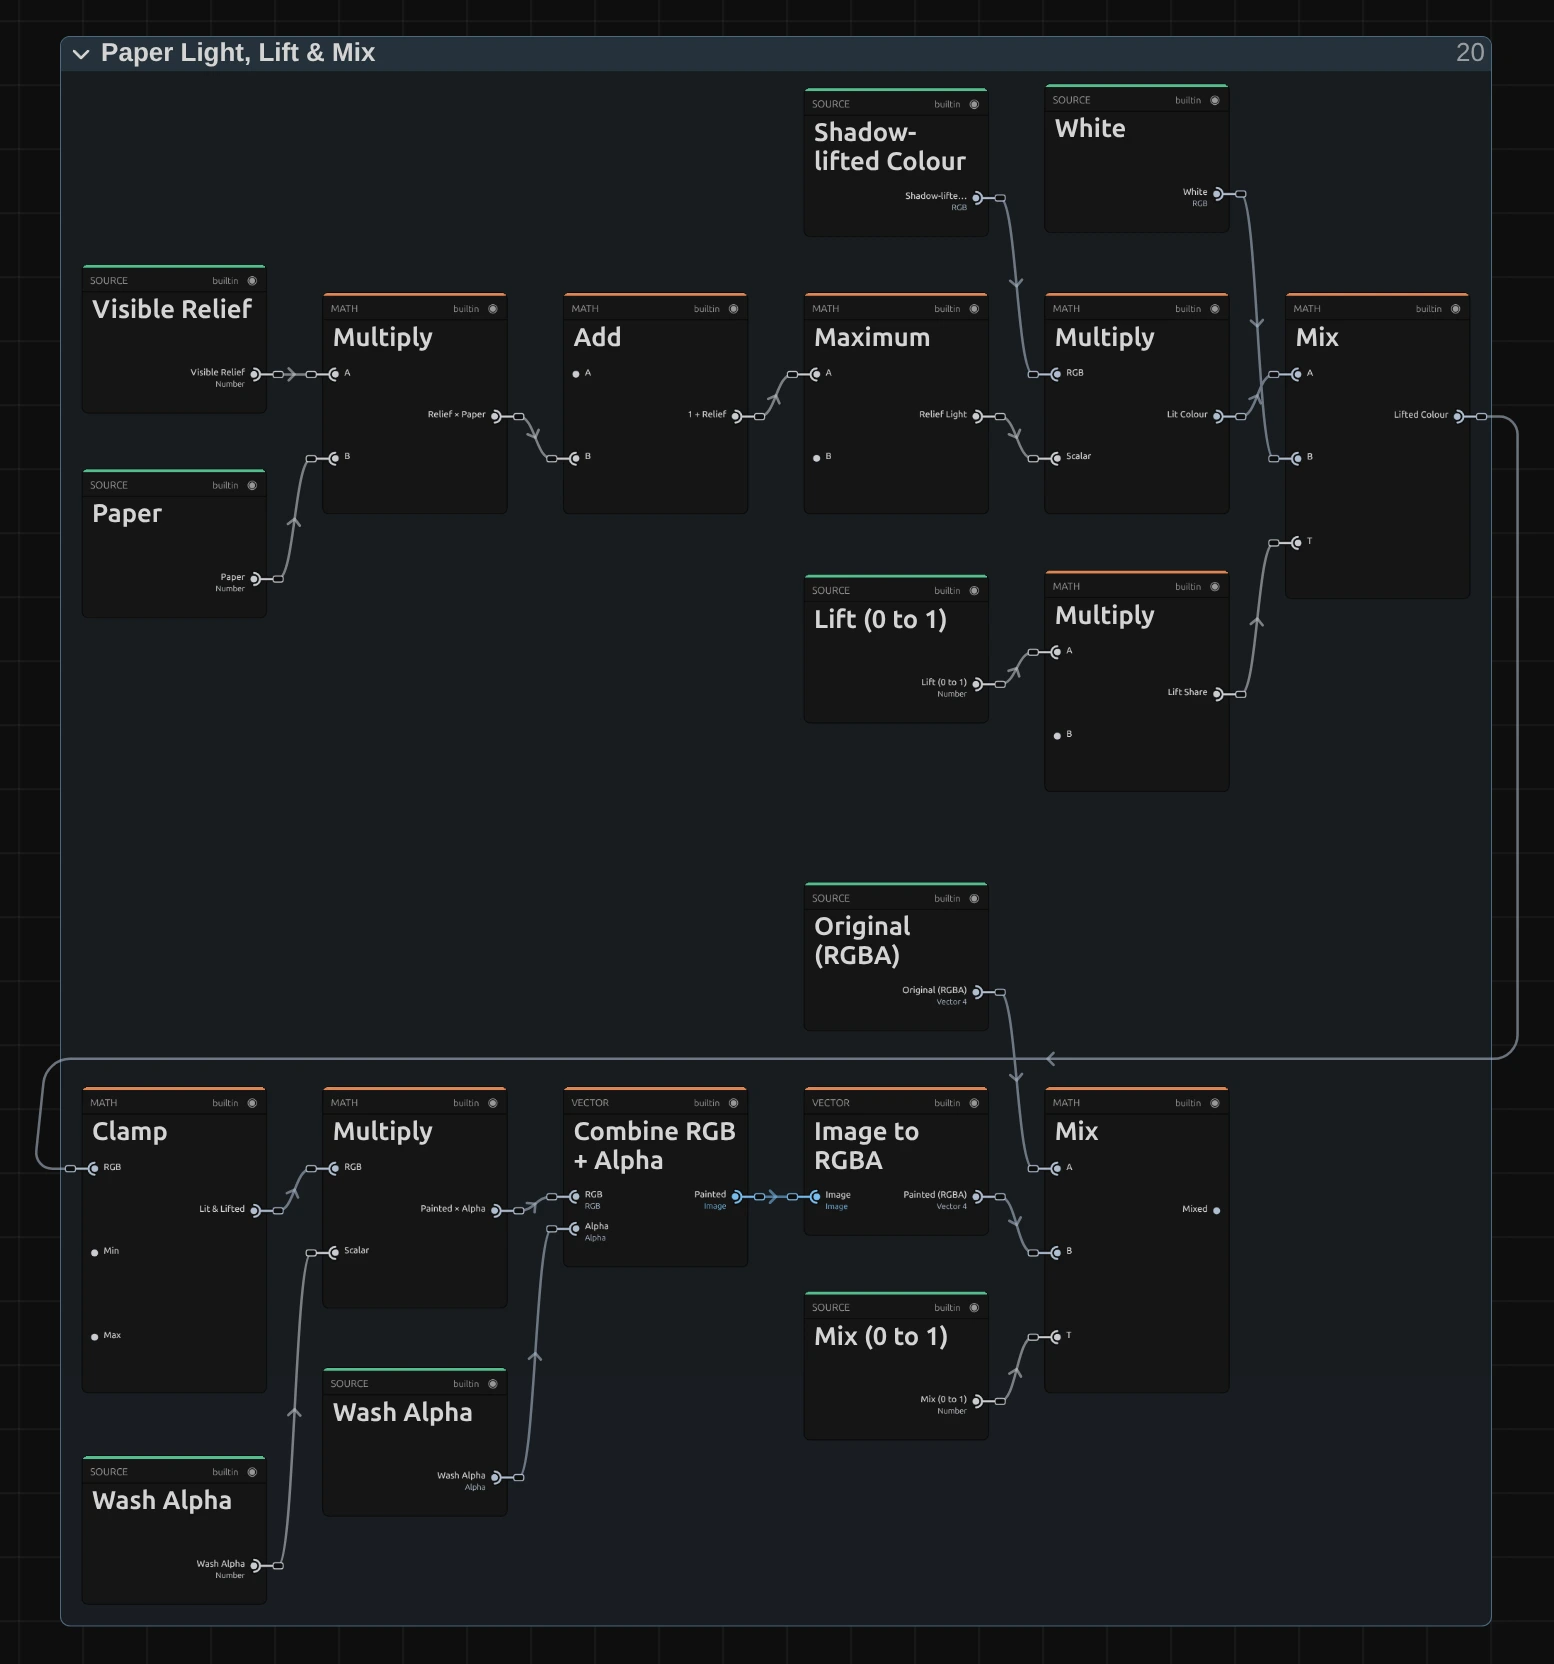
Relief × Paper – the paper’s light and shade (relief − 0.5) times 0.25, times where the paper shows, times Paper. Plus 1, it brightens or darkens the colour slightly; it never goes below 0, even for an extreme Paper.
Lift Share – Lift times 0.8, so at Lift 1 a faint tint of the wash is left.
Lifted Colour – the lit colour mixed towards white paper by the Lift Share.
Painted – the colour with the wash’s own transparency, premultiplied.
Mixed – the painting blended with the original frame by Mix, premultiplied, so a cut-out figure gets no dark fringe; at the end the colour is divided by alpha again.
Technical details
Section titled “Technical details”- Size. Wash, Bleed and the paper count pixels of a frame whose shorter side is 1080: a 4K export, a portrait frame, a lower Preview Quality and the thumbnails show the same painting. Grain Size is a scale factor of the paper grain (1 = standard).
- Passes and cost. Four passes: a premultiplied source cache, two edge-aware 7 × 7 washes and one pass for pooling, tones, pigment density, paper and Mix. About 3–4 ms per 1080p frame after a first frame of about 250–350 ms that compiles the graph (desktop Vulkan). At Mix 0 the passes are skipped.
- Time. Without Flow the result depends only on the frame and the settings. Flow reads the timeline time, so scrubbing, playback and export give the same frame; the paper and the blooms stay put on the frame, the wet patches and the wobble move.
- Limits. Values from keyframes or tools outside a control’s range are named in the card and the tool result: a negative Wash or Bleed renders as 0, Grain Size below 0.25 as 0.25, and Mix, Simplify, Shadow Pigment and Lift are kept within 0 to 1. A negative Edges, Blooms, Granulation or Paper inverts its look (the card says so). The wobble stops growing at Bleed 16 px.
- Transparency. The washes read premultiplied colour, so transparent surroundings never bleed dark into a cut-out figure; the painting keeps the wash’s alpha.
- Saved projects. Acuarela effects saved with the earlier smoke look keep it (their Gain is clamped to 0–1); that look is now Rom1. Untouched node setups saved before 2026-10-22 carried two unused cards (an extra Pigment Density sum and a constant 3); they open as the standard recipe, with its stage folders in the Nodes tab, and look the same.
- Software preview. The worker software preview falls back to the main-thread GPU renderer for the watercolour; the smoke look runs on the CPU.
- More: Effect system · Node Catalog · Styles and presets.