
Flocking
A swarm of birds, fish or sparks that moves by itself in 3D, with real depth, above the clip. The clip stays visible underneath, so put it on a black clip for the swarm alone.
Group: 3D & Particles · How to add an effect
Use it for: birds, fish or insects around a performer · dust and sparks in a stage space · data sculptures and abstract swarms.
- Preset – the kind of swarm: points, krill, a school on a path, a network.
- Population – how many there are.
- Cohesion, Separation and Alignment – how they flock: together, apart, in step.
- Speed – how fast the whole swarm moves.
Tip: the swarm starts with the clip as a round ball that unfolds over the first two seconds. To have it formed on the first frame, set Warm-up to 3 s.
Presets
Section titled “Presets”Pick one in the Preset row of the effect card. A preset builds a whole swarm, so it replaces the swarm and every value in the card in one undo step; when you have keyframed values of the swarm, the card asks first, because those keyframes go with it. Each preset brings its own controls: Krill Cloud adds Line Density, Follow Path a Path Strength.
Free Swarm – fine pale blue points that flock together, fold, split and gather again, like starlings at dusk or dust in a beam of light. Where they crowd they glow brighter but stay blue. A quiet, living haze around a figure; the default.
Krill Cloud – thousands of small orange krill that swim in step and gather in drifting clusters, joined by faint lines. Warm and organic: under water, a shoal, a crowd.
Follow Path – a school that swims a figure eight and draws its path as fine trails. A loop that never ends, for a cycle, a ritual or a waiting scene.
Technical Network – points joined to their neighbours by blue lines, with small square markers, drifting in a flat band held by an invisible box. A data sculpture for surveillance, networks and digital space.
Violet Filaments – a violet cloud in clusters that fills about half the frame, with long curved filaments and small wire cubes at their tips, brightest where the points crowd. Rich and slow, for a large projection surface.
Under More swarms the menu offers four larger scenes, made for a big frame or a camera move rather than for the default picture: Vortex (a swirling shell of points), Shrimp Pullback (one large shrimp inside a huge swarm, made for a camera move) and two sculptures, Terracotta and Lilac, which are not swarms but a sheet of colour settling in folds inside a lit box.
Controls
Section titled “Controls”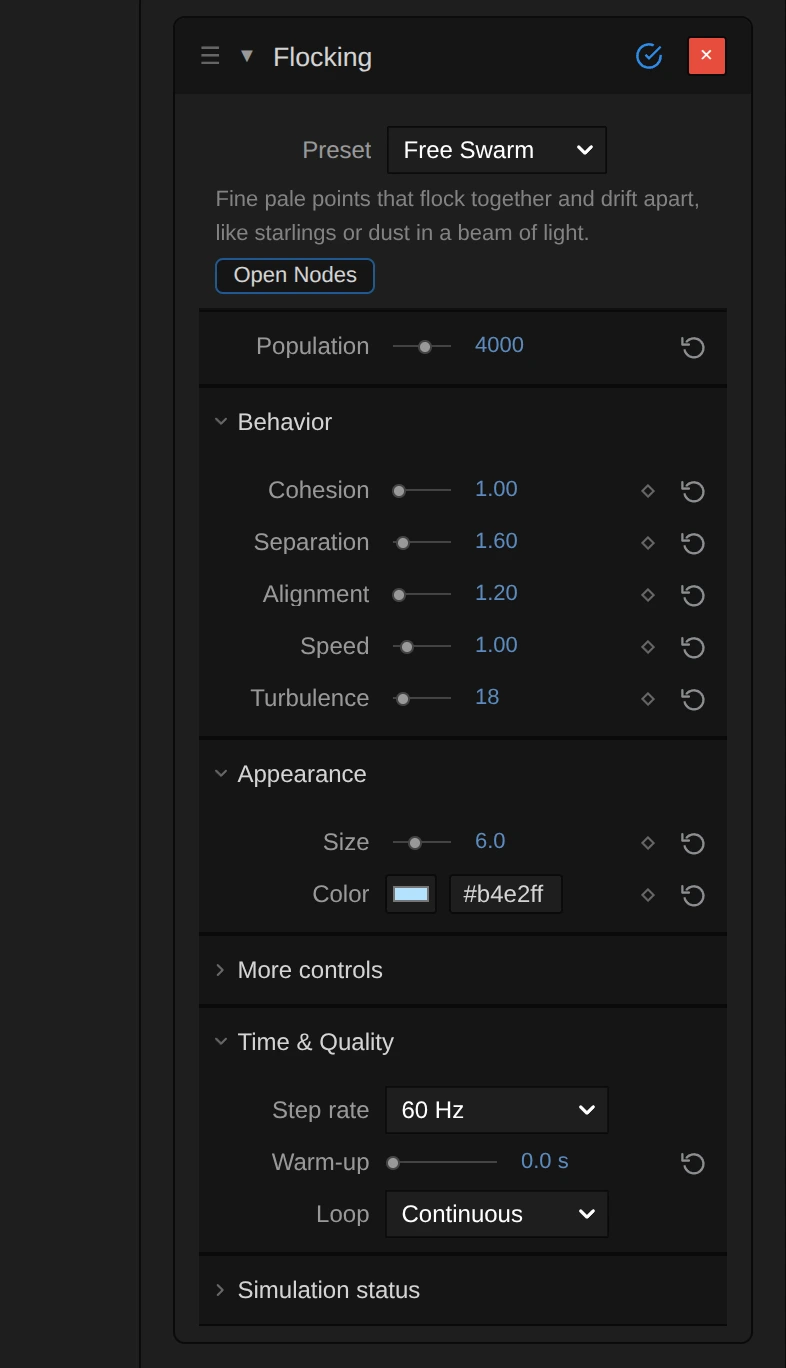
The Preset row sets up a whole swarm, see above. It names the preset the swarm was built from, also after you changed values in the card or the Nodes tab; Own graph means the swarm came from elsewhere. Below the row, one sentence says what the preset is.
The rows below are those of the default swarm, Free Swarm. Other presets show other rows, each with its own range, and Add puts any value of the swarm into the card.
Population
Section titled “Population”Population – how many particles fly. 500 gives a sparse flight of single points, 4000 a light haze, 20 000 a dense, glowing cloud; more costs more graphics power. Its slider runs from 100 to 100 000 on a logarithmic scale, so small and large swarms are both in reach; type a number for more. A new value restarts the swarm from the start of the clip, so it cannot be keyframed and a drag applies when you let go: to let a swarm thin out or grow, add the Emitter’s Active Fraction with Add and keyframe that. 1 to 4 194 304, default 4000.
Behavior
Section titled “Behavior”Cohesion – how strongly each particle steers towards the middle of its neighbours. From 0 to the default 1 the swarm stays one loose, hazy cloud; at 10 it pulls into a tight, bright core and splits off clumps that drift apart. It works against Separation. 0 to 10, default 1.
Separation – how strongly each particle keeps its distance from its nearest neighbours. At 0 they pack into thin, bright sheets and knots; 1.6 spaces them evenly; 10 spreads them into a wide, airy cloud that fills the whole space. 0 to 10, default 1.6.
Alignment – how strongly each particle flies the way its neighbours fly. At 0 every point keeps its own course and the swarm spreads into an even haze; 1.2 lets it turn together as one cloud; 10 draws it into one compact body with a trailing tail, like a school of fish. 0 to 10, default 1.2.
Speed – how fast the whole swarm moves, as a multiple of the preset’s own pace. Every particle flies, steers and turns that many times faster, so the swarm keeps its shape and character and only its tempo changes: at 0.3 the swarm stays a round ball that unfolds only slowly, 1 is the calm flight of the preset, and at 3 it gathers early into a dense cloud that keeps turning and throwing out tails. At 0 it stands still. Above 4 the steps get too large to stay smooth, so the card stops there and a tool that asks for more is refused with that reason. Keyframes ease the tempo up or down without a jump. 0 to 4, default 1.
Turbulence – how hard a slowly changing current pushes the swarm around. At 0 only the flocking rules act and the swarm stays a calm, round ball; 18 makes it swirl and fold; 80 tears it into eddies and long, stringy arms. 0 and up, default 18.
Appearance
Section titled “Appearance”Size – how large each point is drawn, in pixels on the screen: a point keeps its size near and far. 2 gives fine dust, 6 soft specks, 16 and more large dots that blend into a glow. 0 to 200 px, default 6 px.
Color – the colour of the points. The points add up where they crowd, so a saturated colour keeps its hue in the dense core while a very pale one turns white there; you can keyframe it to let the swarm change colour on a cue, and a warm colour reads well under stage light. Type a hex value into the field beside the swatch; the reset arrow returns to the preset’s colour: a colour, default #b4e2ff.
More controls
Section titled “More controls”Add – lists every value of the swarm’s node setup, node by node; pick one and it becomes a row in the card, in a section named after its node. A row added this way has a ×, which takes it out of the card again and leaves its value as it is; the preset’s own rows have none: any value of the swarm graph, default none.
Time & Quality
Section titled “Time & Quality”Step rate – how often per second the swarm is calculated. 60 Hz is smooth for most swarms; 30 Hz halves the work for a very large one; 120 Hz keeps fast swarms clean in slow motion. A new value restarts the swarm from the start of the clip. 30, 60 or 120 Hz, default 60 Hz.
Warm-up – seconds the swarm flies before the clip begins, so it is already formed on the first frame instead of unfolding from a ball. 2 to 3 s is enough for the presets; the preview takes that much longer to prepare. 0 to 30 s, default 0 s.
Loop – Continuous lets the swarm fly on for the whole clip. Reset each loop starts it again from the beginning every Loop length seconds (10 s unless you change it), so each round of a looping projection looks the same. Continuous, Reset each loop, default Continuous.
The folded Simulation status section shows how much memory the swarm needs and how far it is calculated, and has Precompute: it calculates a part of the clip ahead, so playback runs smoothly from the first frame.
Node setup
Section titled “Node setup”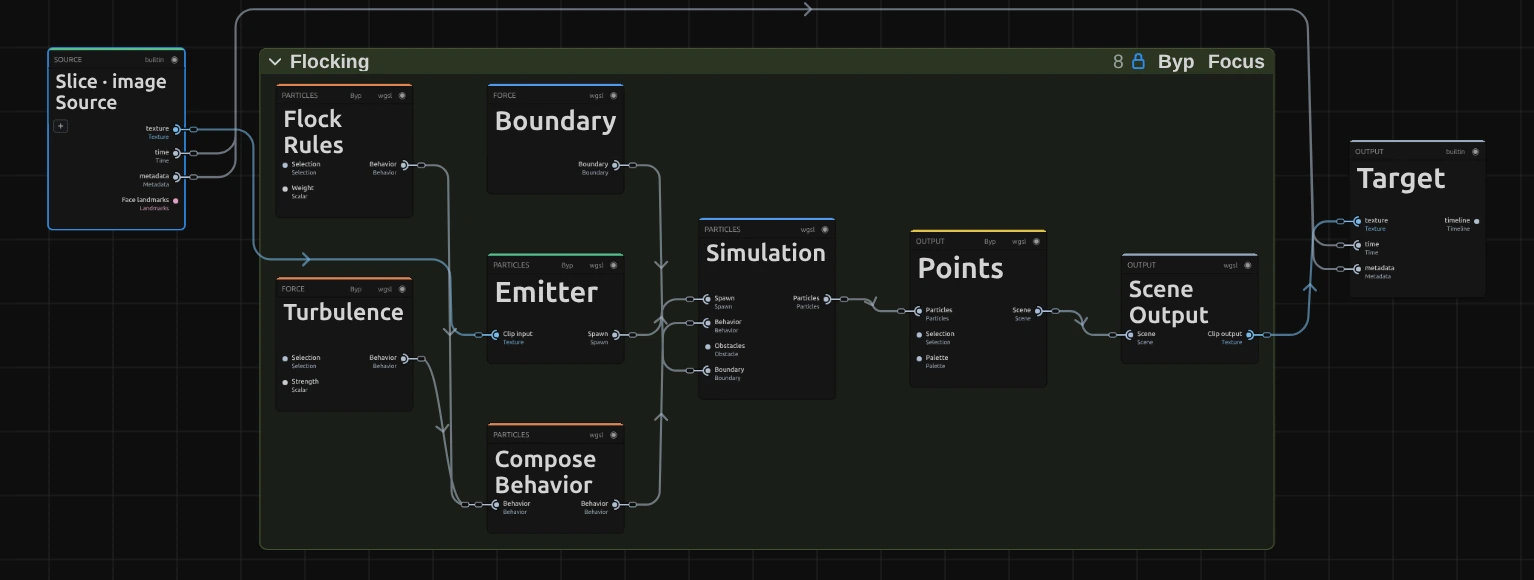
The swarm is a node setup of its own: Open Nodes in the card shows it in the Nodes tab, as the green Flock group of the clip. Its nodes work on particles, not on pixels: the Emitter places them, Flock Rules and Turbulence steer them, the Boundary keeps them in a sphere, the Simulation moves them step by step and Points draws them. The values in the card are values of these nodes.
Emitter – places the particles when the clip starts: 4000 of them, at random in a ball. Its Count is the card’s Population; it can also fill a box, a disc, a line or a grid, let particles be born in bursts and die after a lifetime.
Turbulence – a slowly changing current that pushes every particle; its Strength is the card’s Turbulence. Without it a swarm settles into calm, even motion.
Flock Rules – the three classic rules of a flock: steer towards the neighbours (Cohesion), keep a distance from them (Separation) and fly their way (Alignment). Each particle looks only at neighbours within 12 units, except right behind it. Compose Behavior adds these forces to Turbulence, and the Boundary pushes particles back into a sphere, so the swarm stays in the picture.
Simulation – moves every particle one small step at a time, 60 times per second, never faster than its Max Speed; its Pace (the card’s Speed) makes each step carry the swarm further or less far. It runs on the graphics card and keeps checkpoints, so jumping back in the timeline is quick.
Points – draws every particle as a soft dot that adds light, in the card’s Size and Color. Other draw nodes give the presets their looks: Instances (krill, fish, arrows), Neighbor Links, Trails and Curves, Endpoint Glyphs.
Remix: select Points in the Nodes tab and set its Sprite Motion Blur to 0.05 s: every point draws a short streak along its flight, and the swarm turns into fast strokes.
Technical details
Section titled “Technical details”- 3D. The swarm is drawn into the shared 3D scene, with depth against other 3D layers, and moves with the clip’s transform. The clip’s own picture stays underneath unchanged. One swarm per clip: adding Flocking again selects the existing one.
- Time. The swarm is simulated from the start of the clip in fixed steps, so scrubbing, playback and export show the same swarm at the same moment. Keyframes of swarm values count in the swarm’s own time and survive splits, trims and speed changes. Population, Step rate and Warm-up restart the simulation and cannot be keyframed.
- First frames. After adding the effect or changing a structural value, the preview shows “Preparing simulation” while it calculates up to the playhead.
- Saved projects. A clip stores its whole swarm. Changed presets only affect swarms built from them afterwards; a saved swarm keeps its look. Swarms made before Speed became the simulation’s Pace show the Simulation’s Max Speed as their Speed row, which only caps the fastest particles.
- Reset. The reset arrow of a row returns it to the value of the swarm’s preset (Free Swarm’s Turbulence 18, Technical Network’s Population 1800), not to the node’s general default.
- Removing the effect deletes the swarm and its keyframes; switching it off only hides the swarm.
- More: Flock Clips (node catalogue, simulation, rendering, AI tools) · Node Workspace · Effect system.