
Saturation
Makes colours stronger or weaker, from black and white to rich and glowing. When you push it, every colour stops at the strongest version the screen can show, so it keeps its shade and its brightness instead of turning into a flat block.
Group: Color & Tone · How to add an effect

Use it for: dull, washed-out footage · a black-and-white picture · a quiet, muted mood · matching the colour strength of two shots.
- Amount – 0 is black and white, 1 unchanged, 1.3–1.8 rich.
Tip: keyframe Amount from 0 up to 1 to let the colour flow into a black-and-white scene, for a memory that turns into the present. On faces in close-up, use Vibrance instead, so skin does not turn orange.
Presets
Section titled “Presets”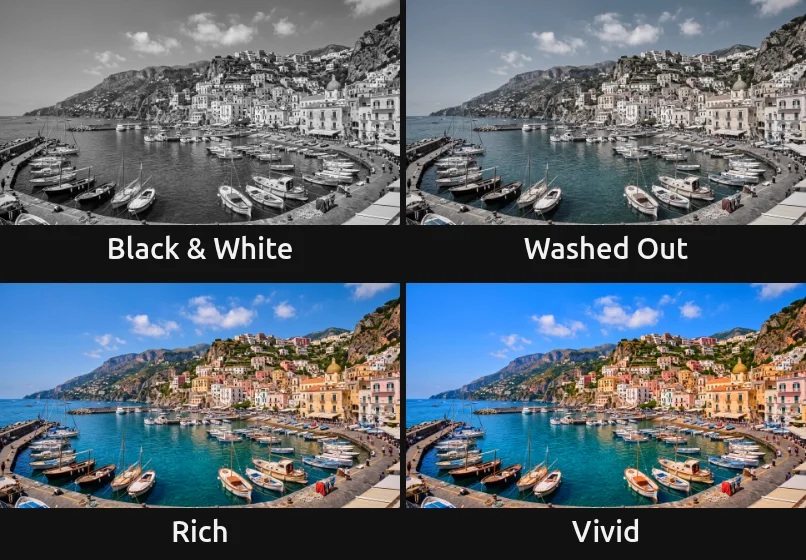
Pick one in the Preset row of the effect card. It sets Amount in one undo step, and the row then shows its name until you change the value. A keyframed Amount keeps its keyframes, and the card says so.
Black & White – no colour at all (Amount 0). Each pixel becomes the grey of its own brightness, measured the way the eye sees it: green counts most, blue least.
Washed Out – only a memory of colour is left (Amount 0.3), like a flashback or a sun-bleached poster. The brightness stays as it was. For a faded print with lifted blacks, use Contrast or Levels.
Rich – fuller colour without a garish look (Amount 1.35). A good first step for dull footage.
Vivid – strong, glowing colour (Amount 1.8). The brightest colours have reached the edge of what the screen can show and stay there, so the sky does not clip into a flat blue and white stays white.
Controls
Section titled “Controls”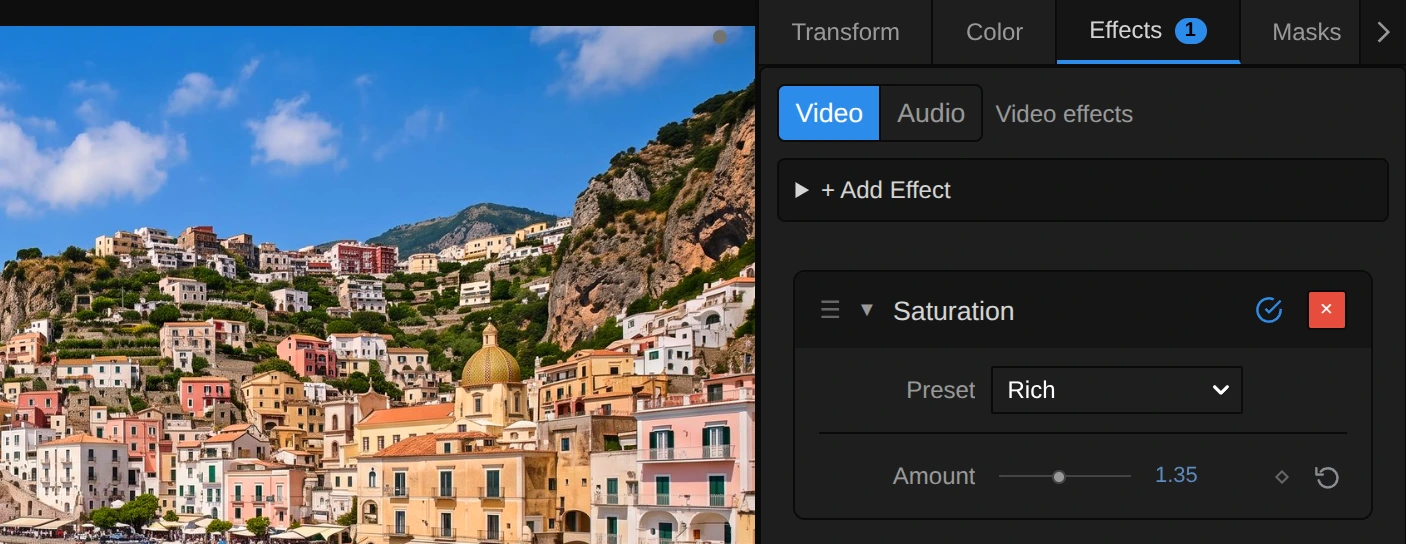
Preset – one of the four starting points above; it sets Amount.
Amount – how strong the colours are. 0 is black and white, 1 leaves the picture as it is, and below 1 the colours fade toward grey. Above 1 they grow stronger: 1.2 is a gentle lift, 1.5–1.8 rich and glowing. Each colour stops where its first colour channel reaches full or nothing, so the strongest colours stop growing first and higher values change less and less; 3 looks only a little stronger than 2. On dark, compressed footage high values also bring out coloured noise in the shadows. 0 to 3, default 1. In the number field you can type up to 10; beyond that, and below 0, the picture uses the limit and the inspector says so.
Node setup
Section titled “Node setup”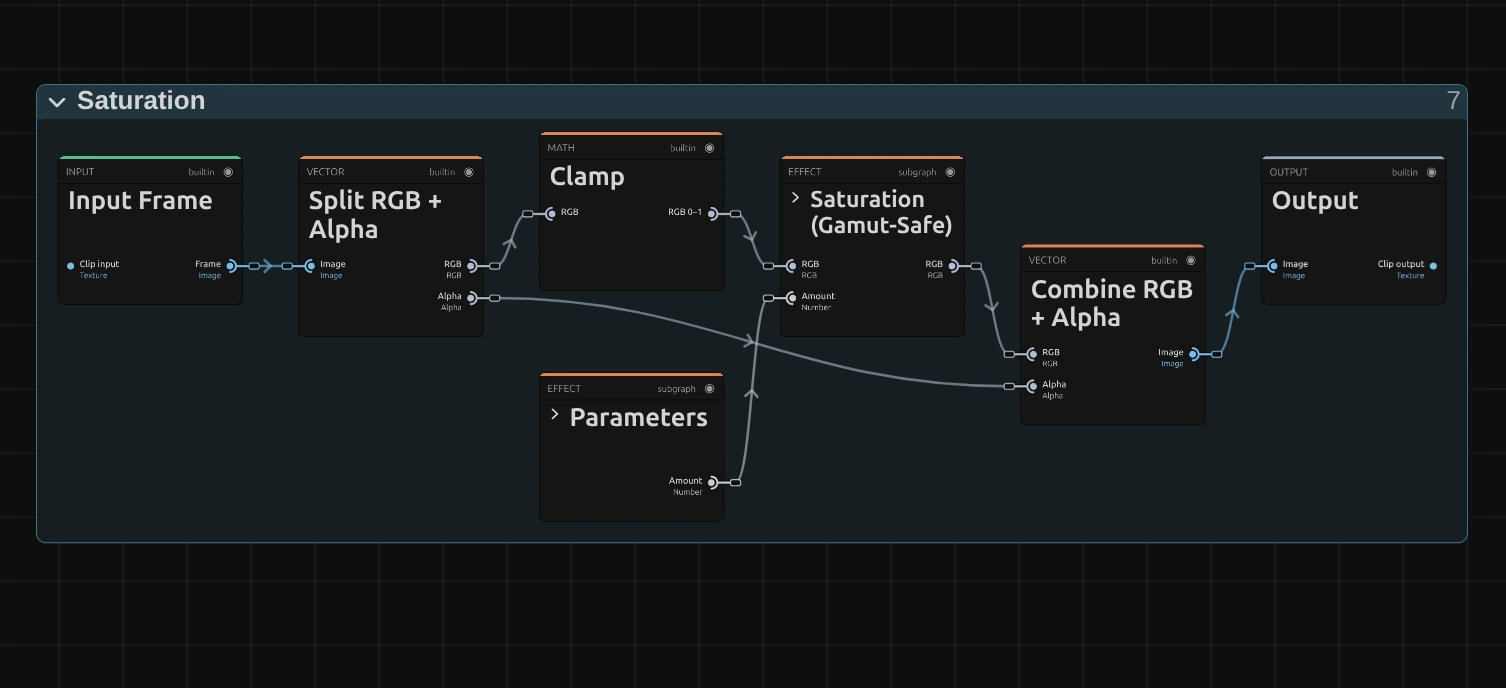
Saturation works in three steps (Color & Tone shows the shape all colour effects share): Parameters holds Amount, a Clamp keeps each colour channel of the picture between 0 and 1, and the block Saturation (Gamut-Safe) does the work. Split RGB + Alpha takes the transparency aside first and Combine RGB + Alpha puts it back untouched. Click a folder’s header to open it; the sections below show what is inside. The same block is in right-click → Reusable Nodes, and Vibrance uses it too.
Parameters
Section titled “Parameters”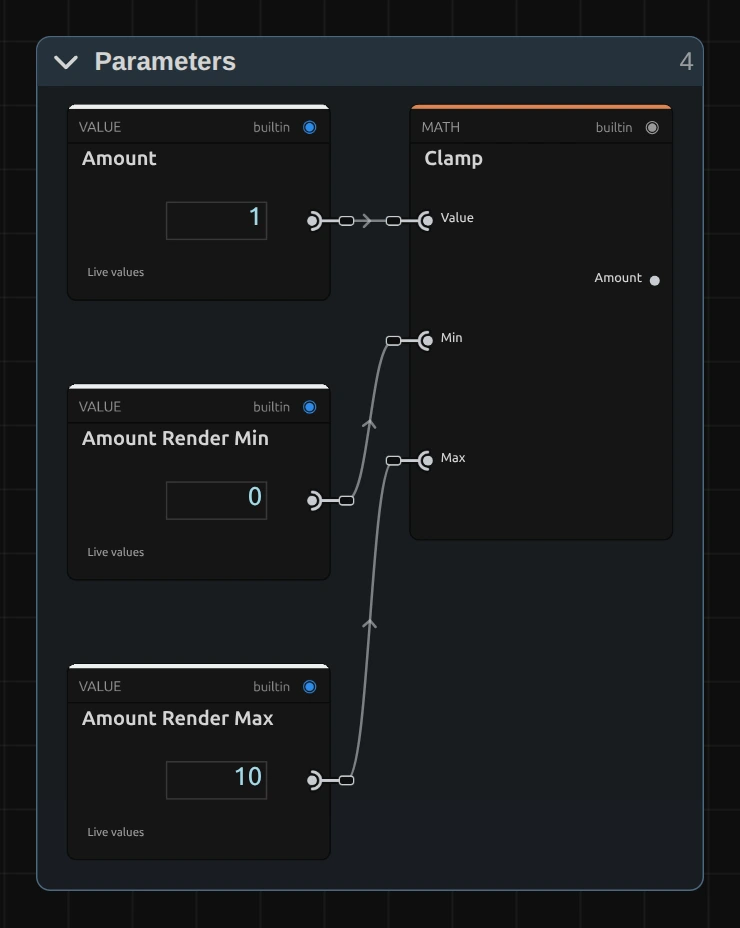
Clamp – keeps Amount between 0 and 10, the values in Amount Render Min and Amount Render Max. Below 0 there is no colour less than none (a negative of the colours is Invert), and above 10 nothing visible changes any more. A keyframe, a node or the AI agent may send more; the block then uses the limit, and the card and the tool result say so.
Saturation (Gamut-Safe): the mix
Section titled “Saturation (Gamut-Safe): the mix”The block has two parts: a mix between grey and colour, and the limit that keeps that mix inside what the screen can show (next section).
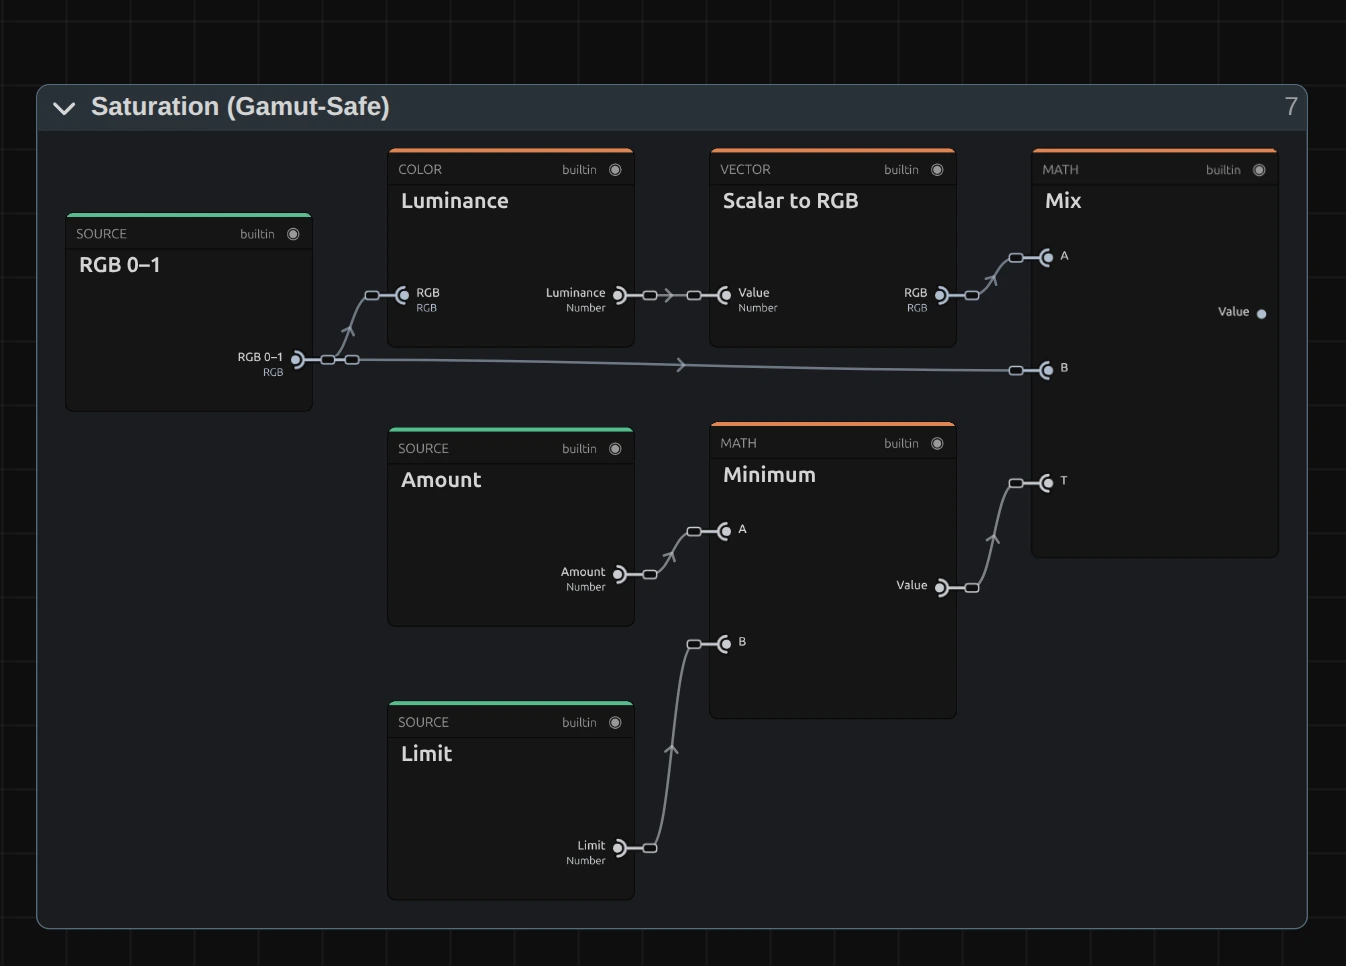
Luminance – the brightness of each pixel as the eye sees it (Rec.709: 21 % red, 72 % green, 7 % blue). Scalar to RGB turns it into a grey of the same brightness.
Minimum – takes the smaller of Amount and the Limit below. Up to the limit Amount acts as it is; past it the colour of that pixel stays where it is.
Mix – blends from A, the grey, to B, the original colour, by T: 0 gives the grey, 1 the original, and above 1 the mix goes beyond the colour, away from the grey. Since the grey has the brightness of the colour, the brightness stays the same at every value.
Remix: wire Amount straight into T of Mix, past the Minimum: you get the classic, harsher saturation, where strong colours run into the edge, clip and change their shade.
Saturation (Gamut-Safe): the limit
Section titled “Saturation (Gamut-Safe): the limit”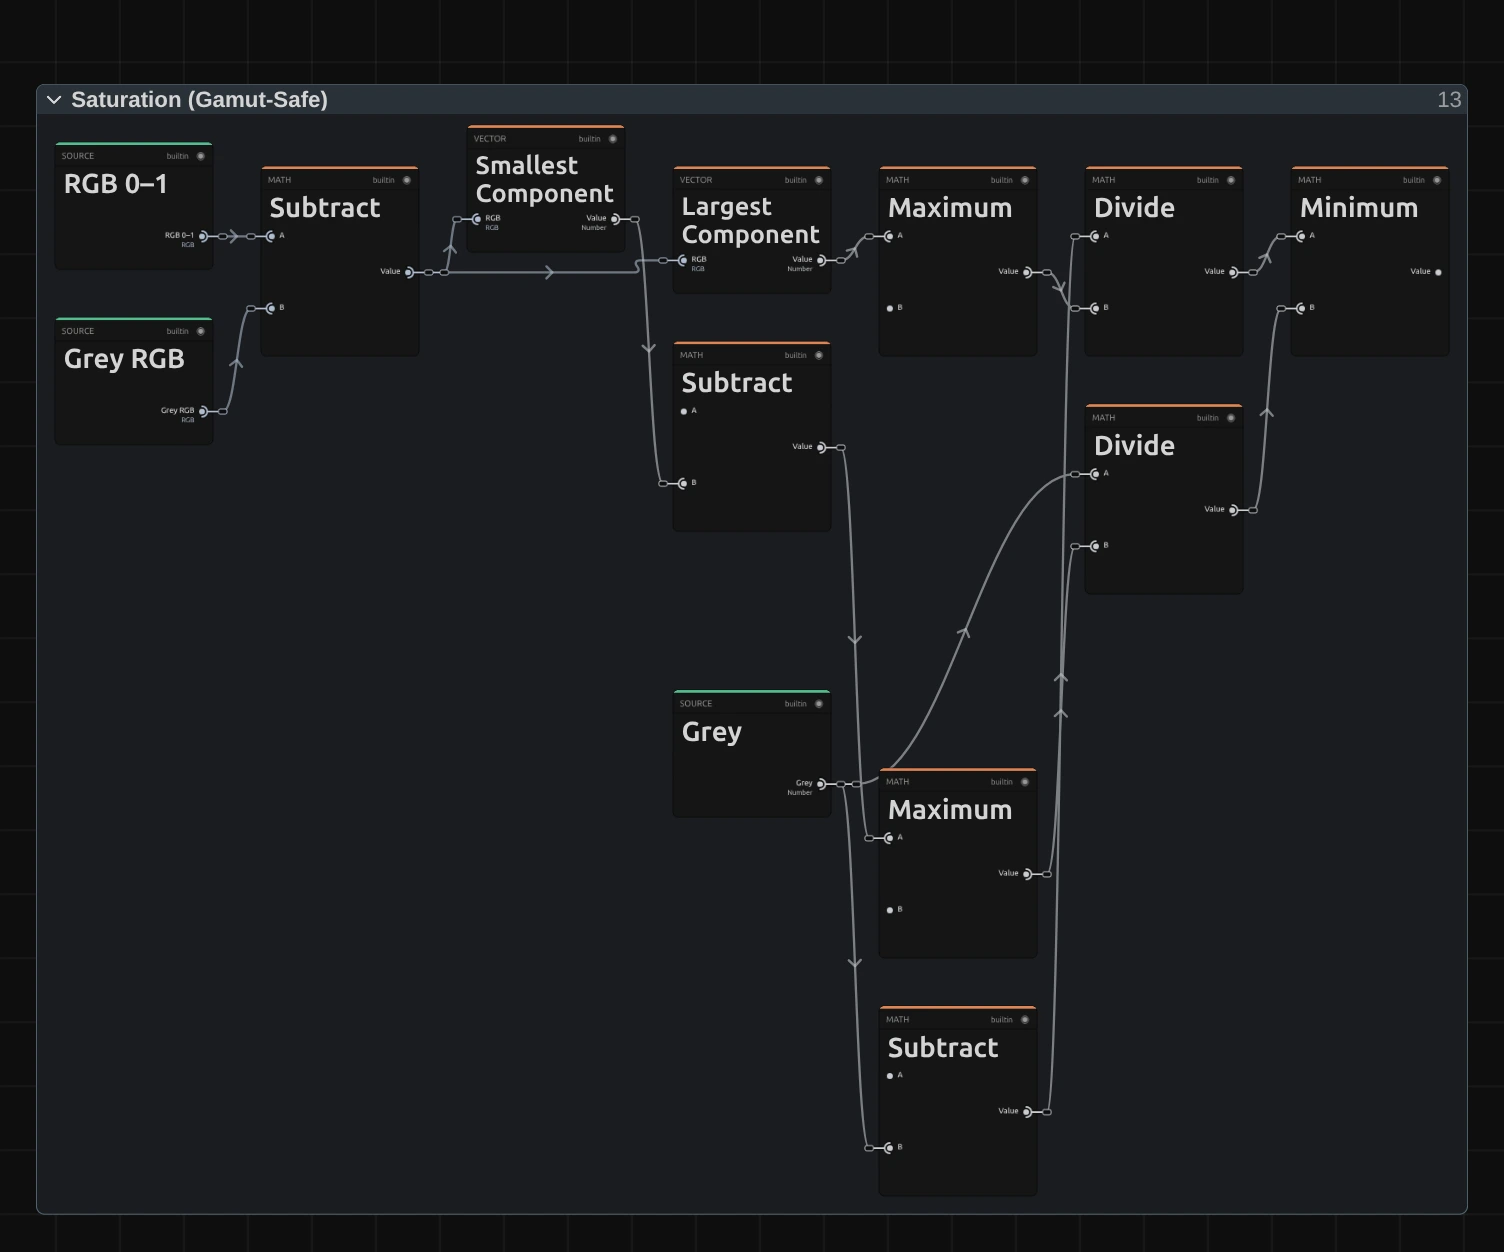
Subtract – the colour minus its grey: what makes the pixel coloured. A grey pixel has nothing left here.
Largest Component – the channel that lies furthest above the grey; Smallest Component the one furthest below it, which a second Subtract turns into a positive distance. The two Maximum cards keep both at least 0.000001, so a grey pixel does not divide by zero.
Divide – there are two, one per edge. The upper one divides the room up to white (one more Subtract: 1 minus the grey) by the largest channel: the Amount at which that channel reaches 1. The lower one divides the grey by the lowest channel’s distance: the Amount at which that channel reaches 0.
Minimum – the nearer of the two edges. That is the Limit: the strongest Amount at which this pixel still keeps its shade. For a grey pixel it is huge, so grey stays grey at every Amount.
Technical details
Section titled “Technical details”- Formula.
y = L + (x − L) · min(Amount, limit)withL = 0.2126 R + 0.7152 G + 0.0722 B(Rec.709), andlimitthe Amount at which the first channel reaches 0 or 1. An orange of (0.9, 0.5, 0.2) reaches its limit at Amount 1.3 as (1, 0.48, 0.09) and stays there; its brightness stays 0.56 throughout. - Range. The slider covers 0 to 3; typed values, keyframes and nodes render up to 10. Below 0 and above 10 the block uses the limit, and the inspector and the tool result say so.
- Colour. Hue and brightness stay; only the distance from grey changes. Pure black, white and grey stay as they are at every value.
- Transparency. Only the colour is changed; the transparency passes through untouched.
- What all colour effects share (8-bit range, saved projects, adjustment layers): Color & Tone. Formulas: Effect system; blocks: Node Catalog · Styles and presets.