
RGB Split
Shifts the red and blue colour layers apart, like a misprinted poster, a cheap lens or a glitching screen.
Group: Lens & Distort · How to add an effect

Use it for: glitch hits on the beat · a cheap-lens or 3D-glasses look · nervous, unsettled moments · a misprinted poster.
- Amount – how far red and blue move apart.
- Angle – which way they move.
- Mode – a straight shift of the whole picture, or a lens that stays clean in the middle.
Tip: keyframe Amount in short bursts from 0 for glitch hits on the beat.
Presets
Section titled “Presets”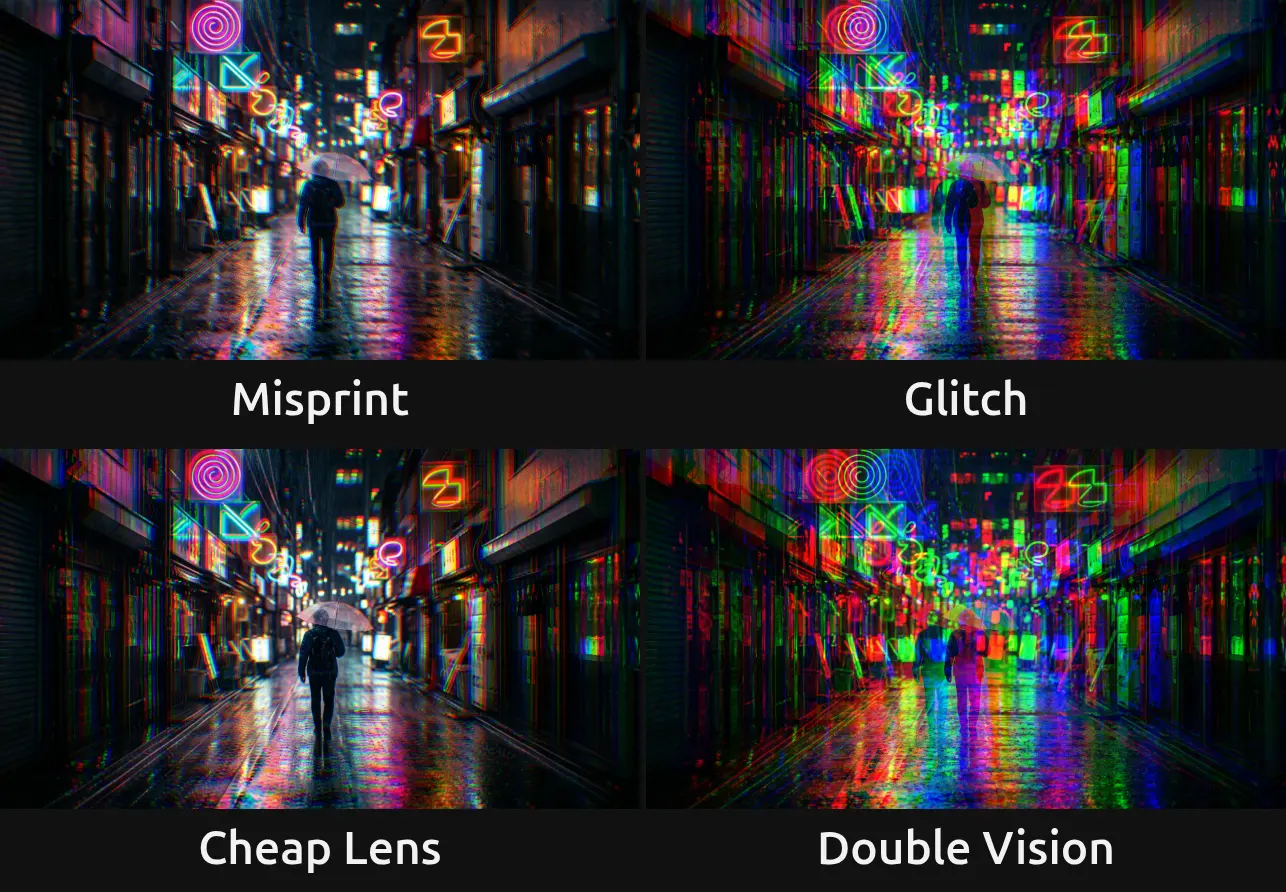
Pick one in the Preset row of the effect card. It sets all controls at once, in one undo step, and the row then shows its name until you change something. A control with keyframes keeps them, and the card says so. Each preset sets Amount, Angle and Mode; Frame Edges goes back to its default, Mirror, so choose another edge mode after the preset.
Misprint – Amount 0.004 at 30°: a fine diagonal edge of colour, like a poster printed with slightly shifted plates. Best seen on sharp lines and lettering.
Glitch – Amount 0.02, sideways: a clear red and blue double image for a hit on the beat.
Cheap Lens – Lens mode, Amount 0.012: the middle stays sharp, and the colour fringes grow towards the left and right edges, as through an old or cheap lens.
Double Vision – Amount 0.05, sideways: red, green and blue lie far apart, so everything appears three times, as in a dizzy spell.
Controls
Section titled “Controls”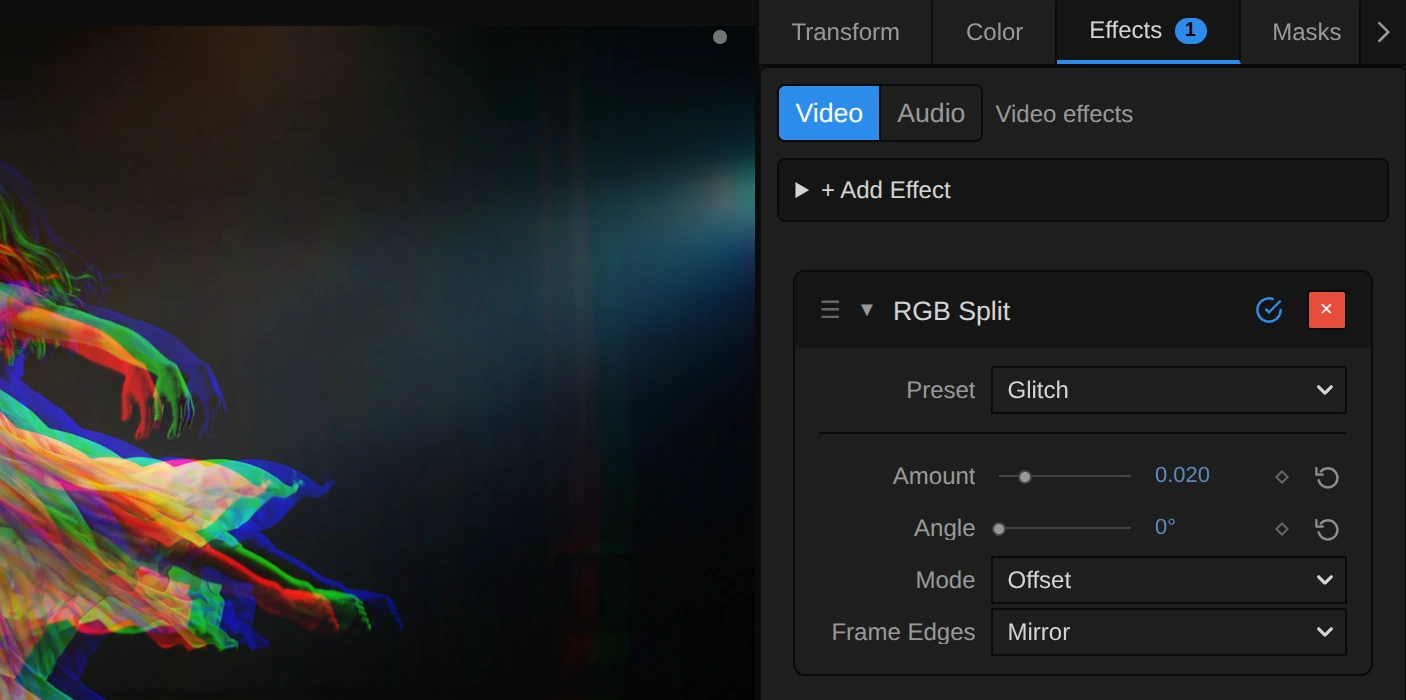
Preset – a starting point for Amount, Angle and Mode; see Presets.
Amount – how far red and blue move, each in its own direction, while green stays in place. It is a share of the picture width for a sideways split and of the height for an upright one, so a 4K export and the preview look the same. 0.005 (the default) is a fine fringe, 0.01 to 0.02 a clear glitch, and from 0.05 the picture falls apart into three copies. At 0 the picture is unchanged. In Lens mode it is the split at the left and right edges. 0 to 0.1, default 0.005.
Angle – the direction of the split, as an angle on screen: 0° sideways, 90° up and down, 45° diagonal. Red moves one way and blue the other, so 180° swaps their sides. Only in Offset mode; in Lens mode the card dims it, because the lens splits outwards from the centre. 0 to 360°, default 0°; a typed or keyframed angle may go further and goes round again.
Mode – Offset shifts the whole picture by the same amount; Lens leaves the middle clean and lets the split grow towards the edges, like the colour fringes of a cheap lens. Offset, Lens, default Offset.
Frame Edges – what fills in where a shifted colour reads from beyond the frame, a strip as wide as the split along the edges. Mirror reflects the picture at the edge, so the colours keep going; Clamp repeats the outermost pixels; Transparent leaves that colour empty there, so a coloured rim lets the layer below show through. Mirror, Clamp, Transparent, default Mirror.
Node setup
Section titled “Node setup”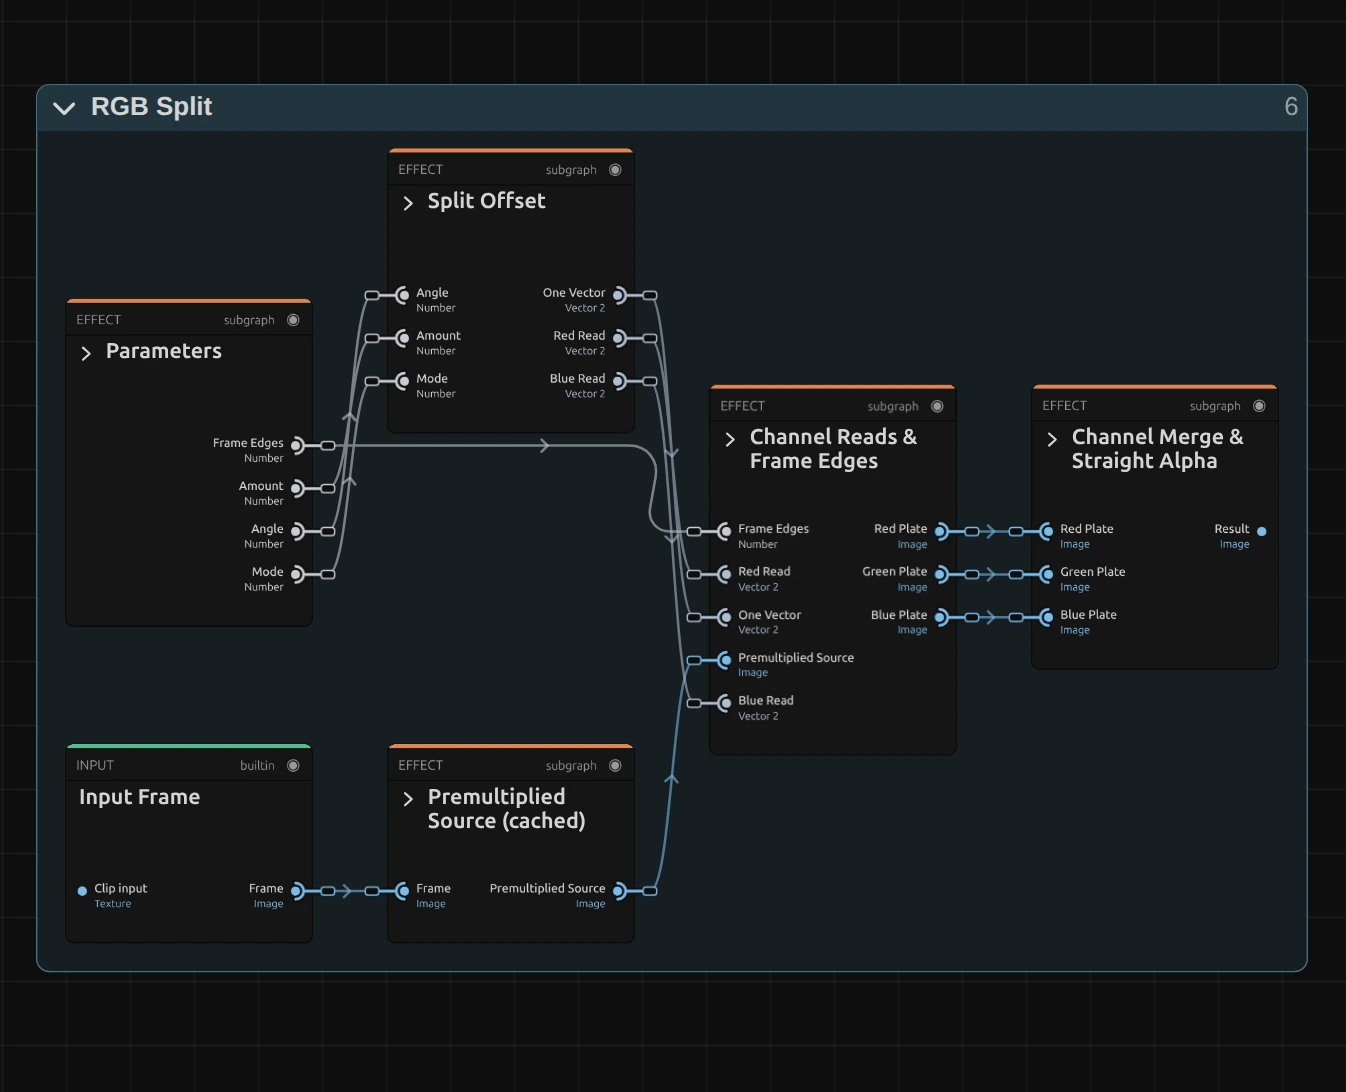
RGB Split does not paint anything: it reads the picture three times at slightly different places, like every effect in its group moves where a pixel reads (the shared idea). Split Offset works out how far and in which direction red and blue move, Channel Reads & Frame Edges reads the picture there and in place, from the Premultiplied Source prepared once per frame, and Channel Merge & Straight Alpha takes red from the first read, green from the second and blue from the third. Click a folder’s header to open it; the sections below show what is inside.
Split Offset
Section titled “Split Offset”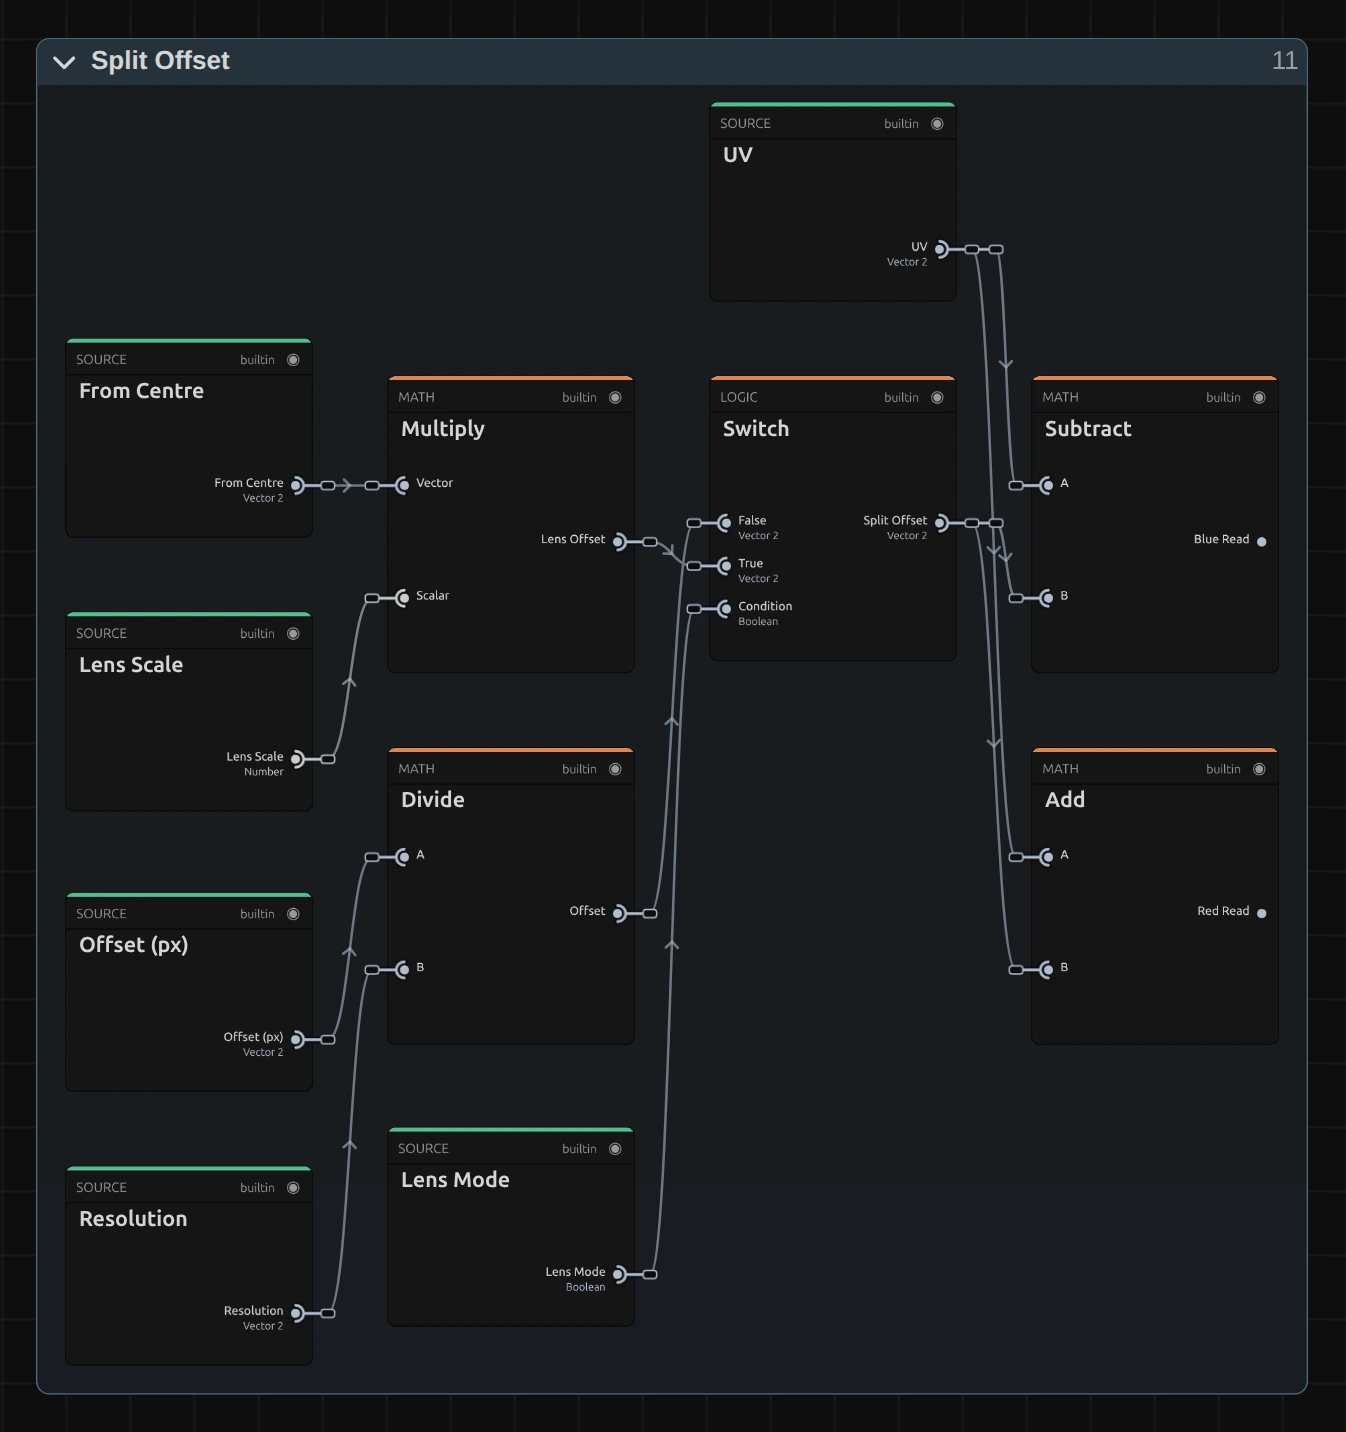
Divide – the straight offset of Offset mode. Before it, Cosine and Sine of Angle give the direction, and Amount times the frame’s reach in that direction gives the length in pixels; Divide turns those pixels back into a share of the frame.
Multiply – the lens offset of Lens mode: the place of the pixel measured From Centre, times −2 × Amount. It is zero in the middle and grows towards the edges.
Switch – picks the straight or the lens offset, by Mode.
Add – the place where red reads: the pixel’s own place (UV) plus the Split Offset.
Subtract – the place where blue reads: UV minus the Split Offset, the same distance the other way. Green reads at UV itself.
Premultiplied Source
Section titled “Premultiplied Source”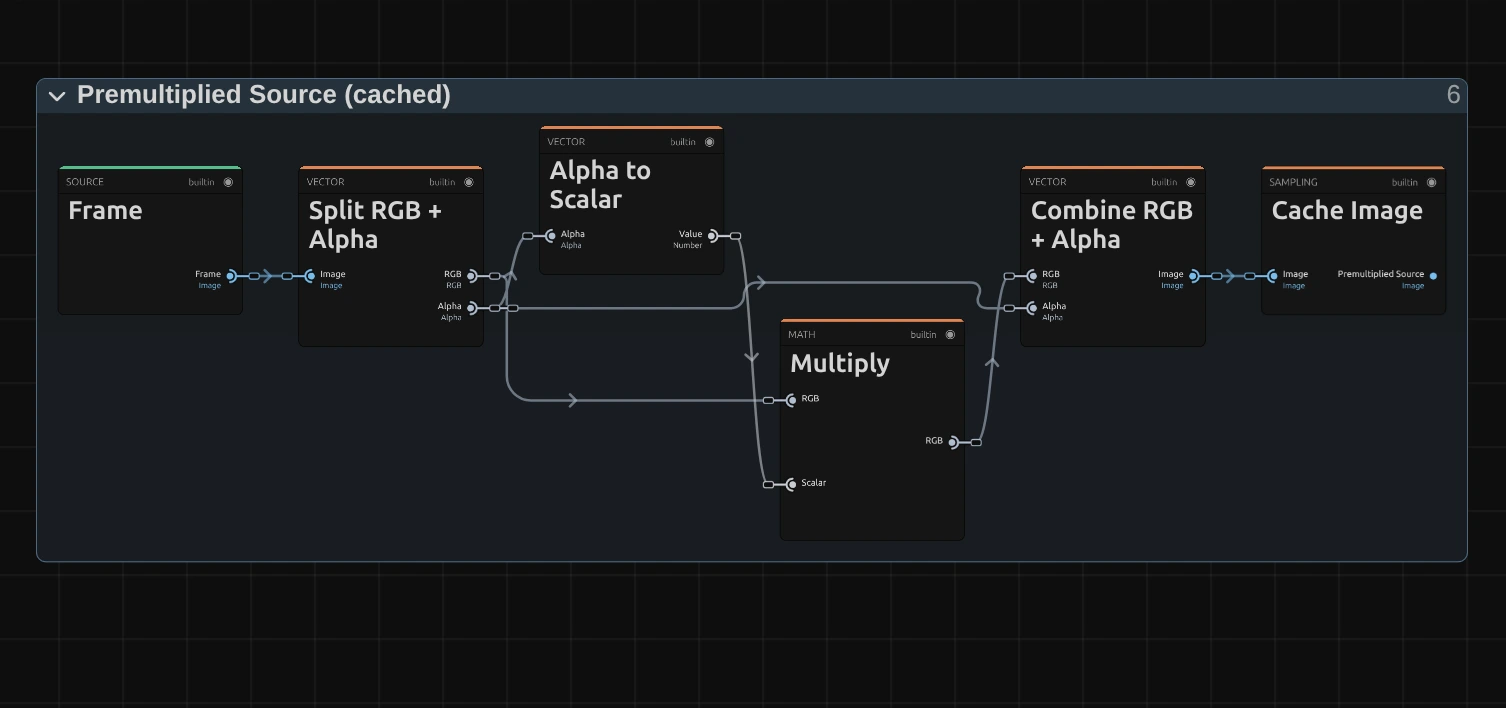
Multiply – multiplies every pixel’s colour by its transparency. When a read later blends two neighbouring pixels, a transparent one then adds no colour, so a cut-out figure keeps clean coloured fringes instead of dark ones.
Cache Image – keeps the prepared picture, so it is made once per frame, not once per pixel, and all three reads share it.
Channel Reads & Frame Edges
Section titled “Channel Reads & Frame Edges”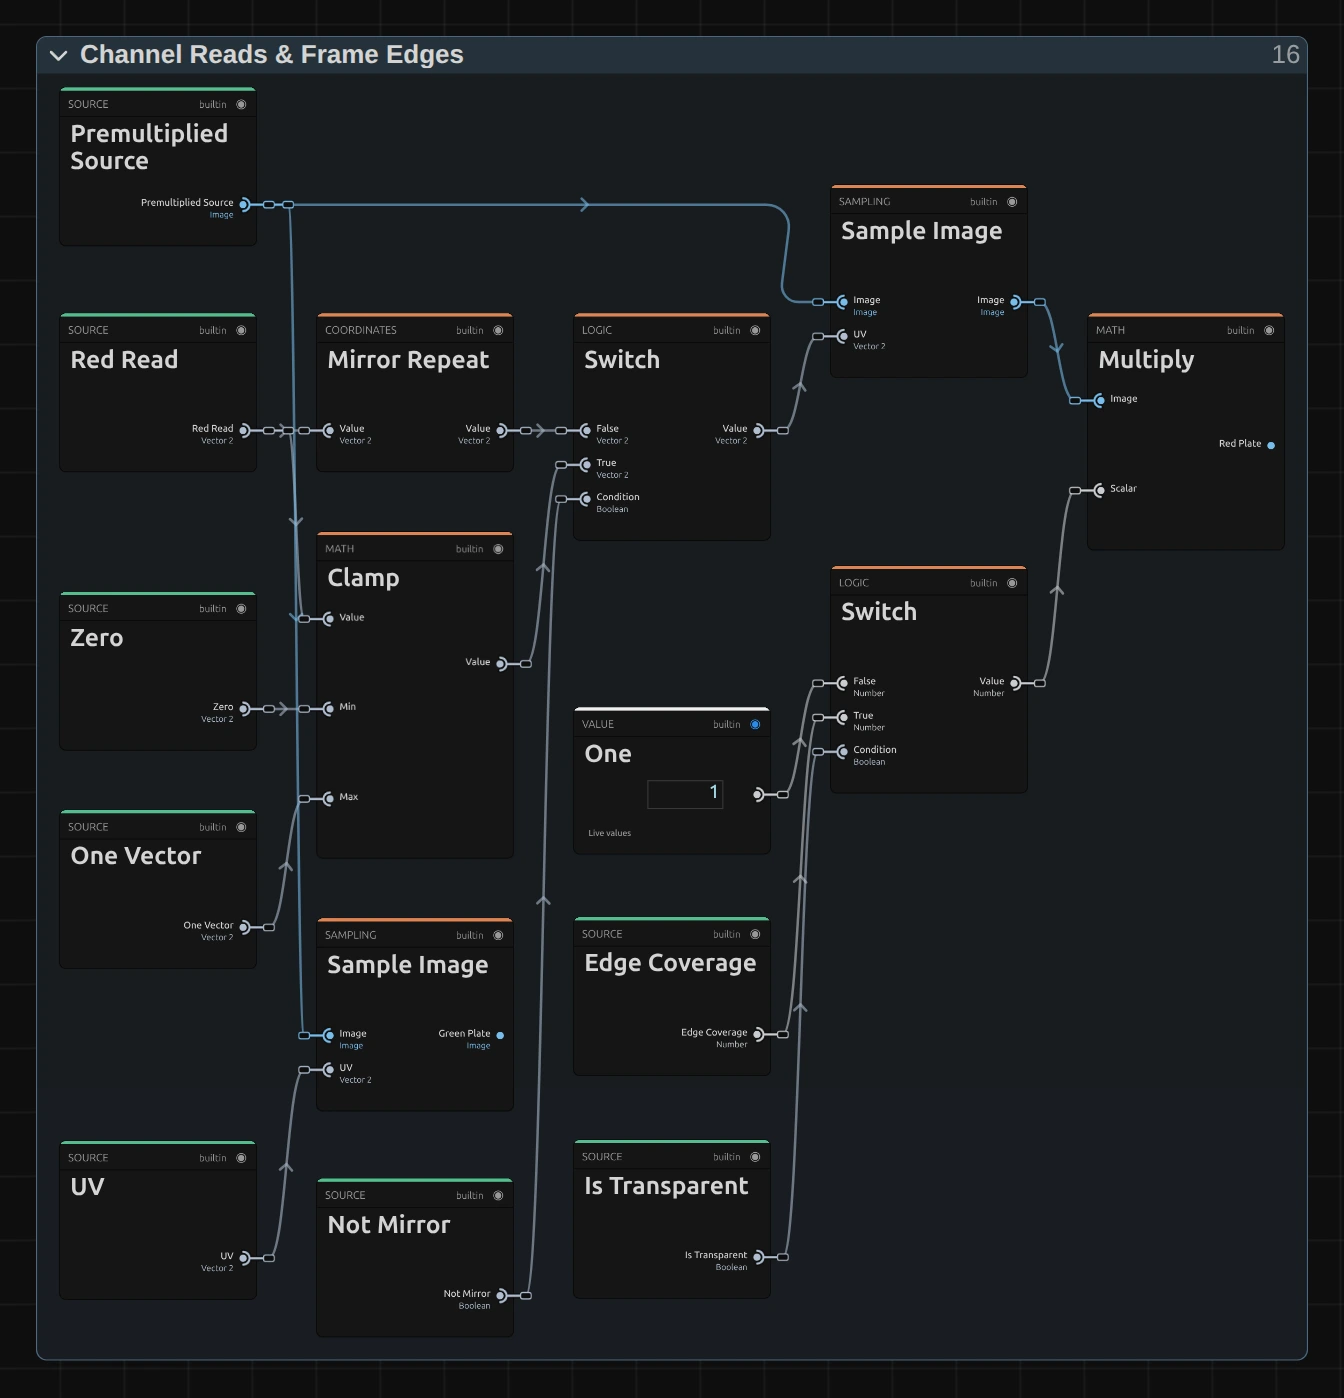
Mirror Repeat – folds a Red Read beyond the frame back in, as in a mirror: the Mirror choice.
Clamp – holds the Red Read between Zero and One, so it stops at the outermost pixel: the Clamp choice, and the base of Transparent.
Switch – picks the mirrored or the clamped position. Not Mirror is true for Clamp and Transparent.
Sample Image – reads the Premultiplied Source at that position, blending the four nearest pixels. The Switch and Multiply after it scale the read by Edge Coverage for Transparent, which falls from 1 to 0 within one pixel of the frame edge, and by One otherwise.
Sample Image – the green read, at the pixel’s own place (UV). It never leaves the frame, so it needs no edge handling.
Channel Merge & Straight Alpha
Section titled “Channel Merge & Straight Alpha”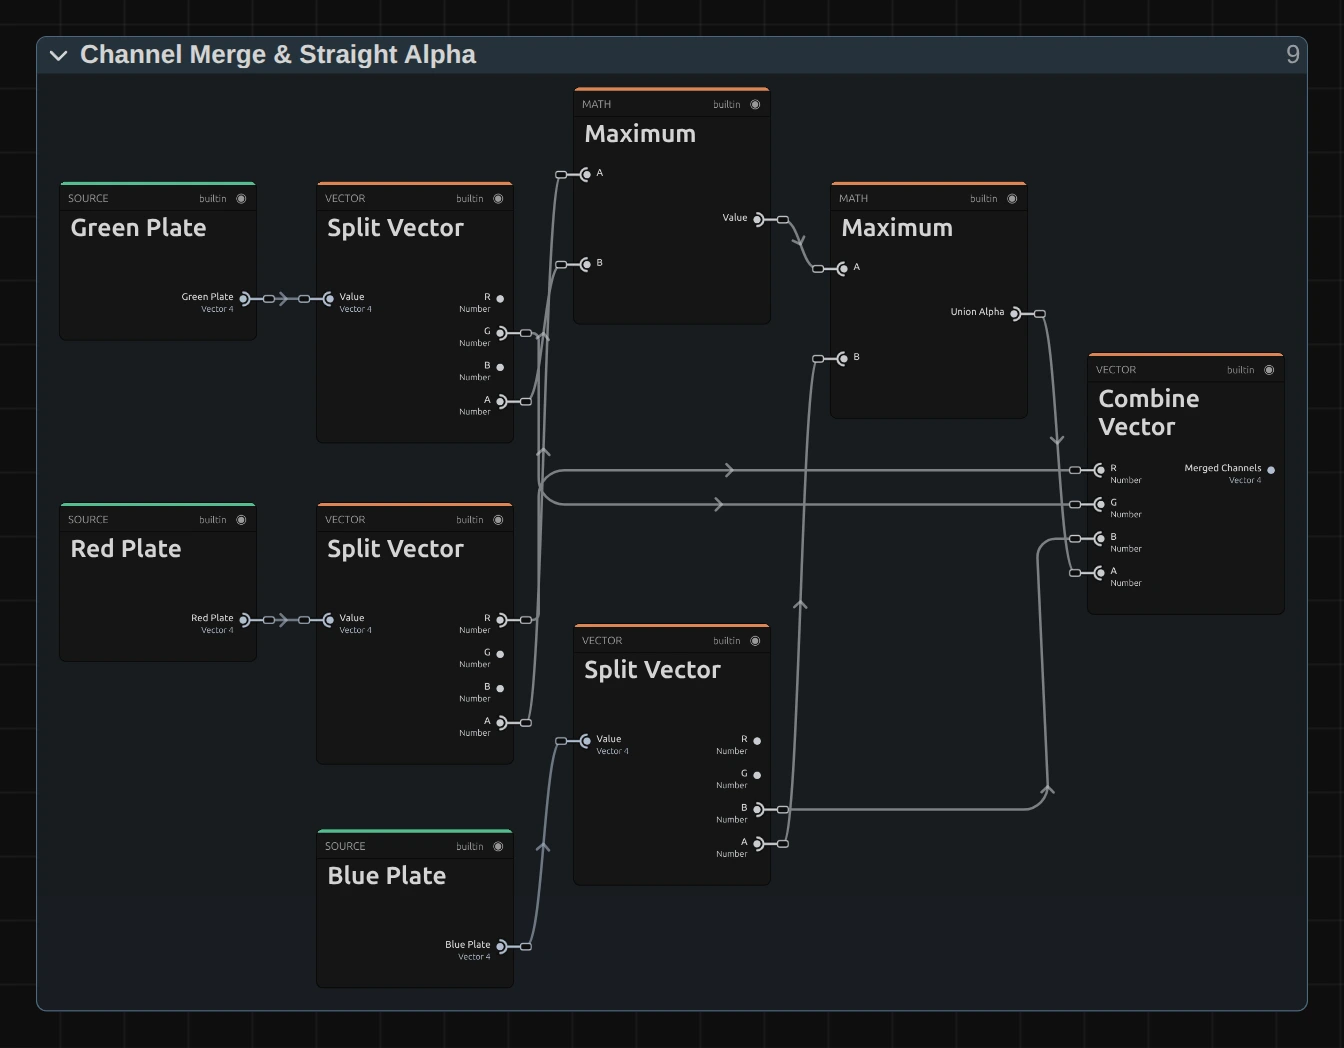
Split Vector – takes each read, here the Blue Plate, apart into its red, green, blue and alpha numbers.
Maximum – keeps the largest of the three alphas, the Union Alpha. Over transparency, a split logo then shows every coloured fringe, not only the place where all three overlap.
Combine Vector – joins red from the Red Plate, green from the Green Plate and blue from the Blue Plate with the Union Alpha. The straight-alpha step after it divides the colour by the alpha again, so half-transparent fringes keep their real colour.
Remix: for red and cyan like 3D glasses, plug the B output of the Green Plate’s Split Vector into B of Combine Vector. Blue then stays with green, and only red moves away.
Technical details
Section titled “Technical details”- Offset mode moves red and blue Amount × |(cos × width, sin × height)| pixels along the on-screen Angle, in opposite directions; green stays in place. The slider stops at 0; a negative Amount from a node cable is used as it is and swaps the sides of red and blue, like Angle + 180°.
- Lens mode offsets their reads by ∓2 × Amount × the distance from the centre: no split in the middle, Amount × width at the left and right edges. Angle is dimmed there.
- Alpha is the largest of the three reads, so a split logo on transparency shows its fringes. The picture is read premultiplied, so cut-out figures keep clean edges; the preview and the export match.
- Units. Angle is stored in radians and shown in degrees; keyframe lanes, MIDI and tools use radians. Amount is a share of the frame, so a 4K export, a portrait frame and the thumbnails show the same split. RGB Split does not move with time: a still frame stays still.
- Saved projects keep their look; diagonal splits point exactly along the on-screen angle.
- More: Effect system: Lens & Distort · Editable mirror, split and pixel graphs · Node Catalog · Styles and presets.