
Sharpen
Brings out detail and crisp edges in soft footage, without the thick bright and dark outlines of strong sharpening.
Group: Blur & Sharpen · How to add an effect
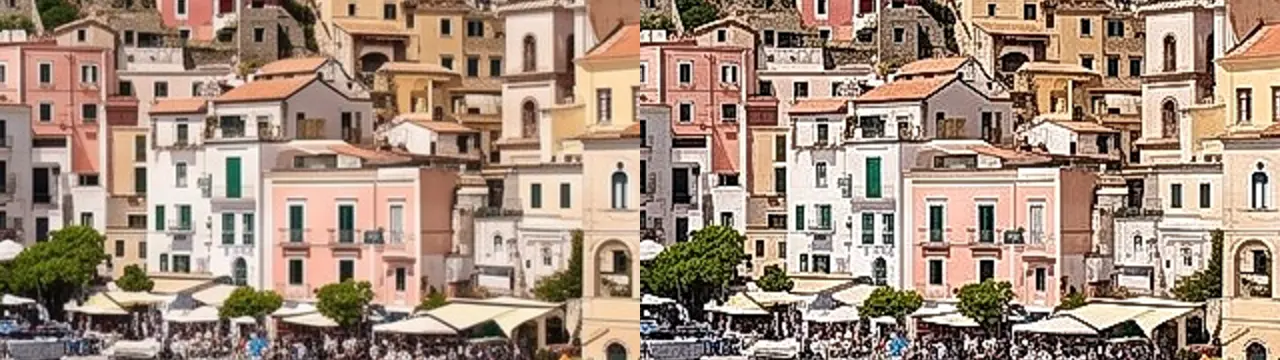
Use it for: slightly soft camera footage · upscaled or compressed clips · a rough, gritty texture.
- Amount – how much crisper.
- Radius – the size of the detail it works on.
Tip: put Sharpen last in the stack, after scaling and colour effects: each card works on the result of the cards above it (Order matters).
Presets
Section titled “Presets”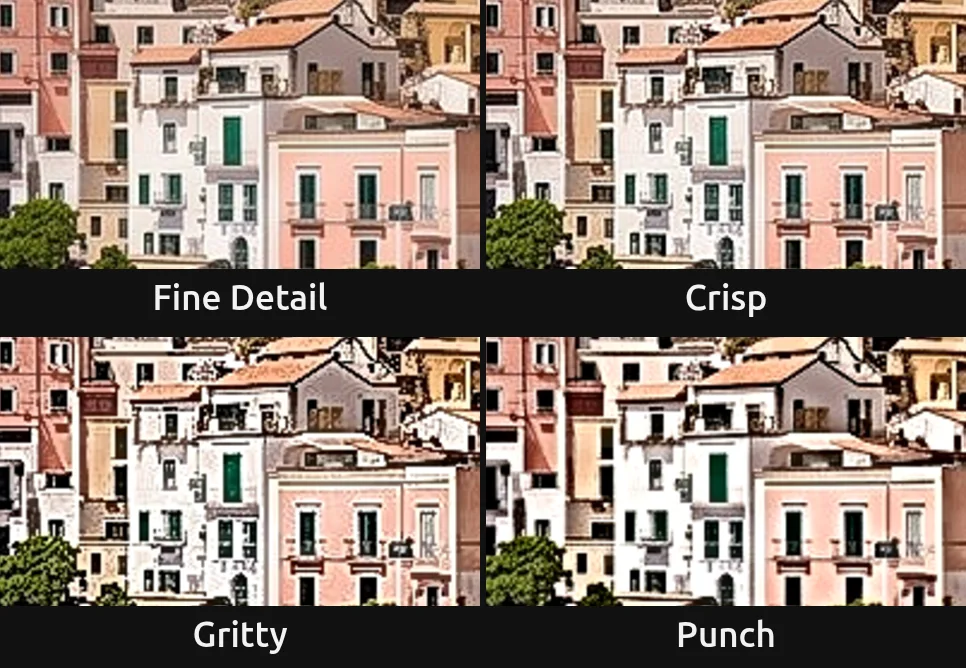
Pick one in the Preset row of the effect card. It sets Amount and Radius in one undo step, and the row shows its name until you change something. A control with keyframes keeps them, and the card says so.
Fine Detail – Amount 1, Radius 0.7: hair, fabric and fine texture a touch crisper, without looking processed. A safe start for faces.
Crisp – Amount 2, Radius 1: slightly soft camera footage becomes clearly crisp. The everyday setting for a clip that looks a little out of focus.
Gritty – Amount 5, Radius 1.5: every grain and texture is pulled out, a rough, high-contrast look. It also shows noise and compression, so use it as a style.
Punch – Amount 1.5, Radius 4: larger shapes stand out against each other, more depth than detail. Bright walls get brighter, so watch the highlights.
Controls
Section titled “Controls”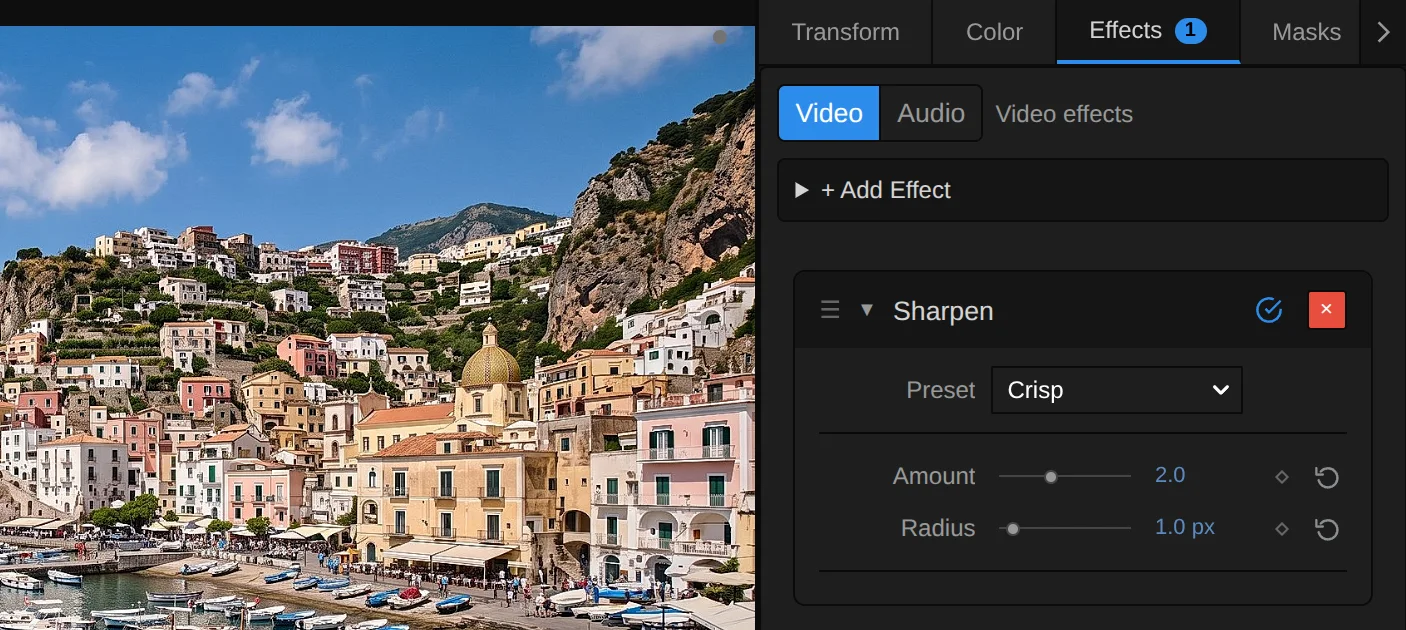
Preset – a starting point for Amount and Radius; see Presets.
Amount – how much crisper the picture gets. 1 is gentle, 2–3 clearly crisp, 4–5 a gritty, high-contrast look. Even at 5, edges get only a thin outline, because the halo limit (see Node setup) keeps them small. 0 leaves the picture untouched. A value below 0, typed or set by a tool, softens instead, and the card says so. 0 to 5, default 1.
Radius – the size of the detail it works on. 0.5–1 crisps fine texture such as hair, fabric and leaves; 2–3 works on the edges of faces and objects; 4–5 makes larger shapes stand out, more like local contrast than sharpening, and with a high Amount bright walls can turn white. It counts pixels of a 1080p picture, so a 4K export shows the same sharpening relative to the picture. It changes smoothly when animated. 0.5 to 5 px, default 1 px.
Node setup
Section titled “Node setup”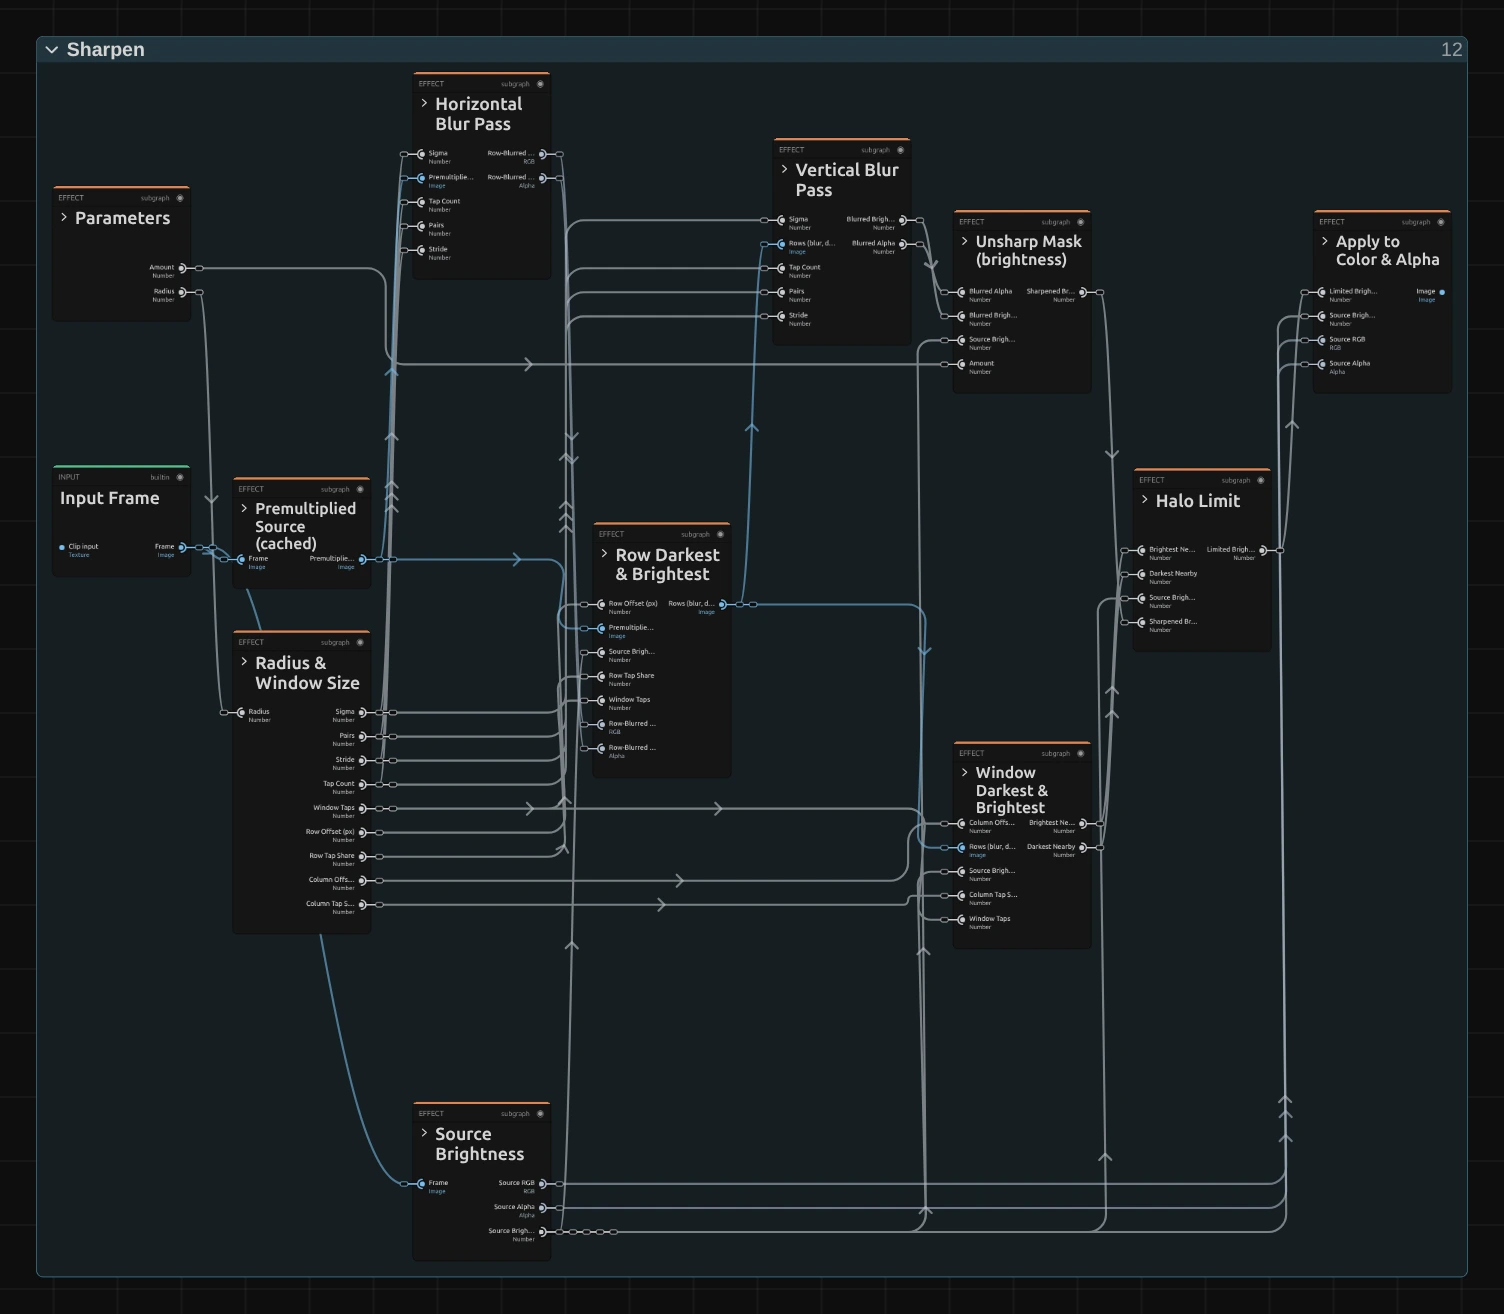
Sharpen does two things at once. It makes a soft copy of the picture and adds the difference between the picture and that copy, times Amount: the classic Unsharp Mask. And it measures how dark and how bright the picture is around each pixel, so the Halo Limit can stop the result from shooting far past that range, which is what draws the thick bright and dark outlines of strong sharpening. The soft copy comes from the same two passes as Gaussian Blur: Horizontal Blur Pass and Vertical Blur Pass, on the Premultiplied Source. The range is measured along the row first (Row Darkest & Brightest) and then over a column of those rows (Window Darkest & Brightest). Radius & Window Size sets how far both look, Source Brightness is the pixel’s own brightness that everything compares with, and Apply to Color & Alpha turns the brightness change into the finished picture. Click a folder’s header to open it.
Radius & Window Size
Section titled “Radius & Window Size”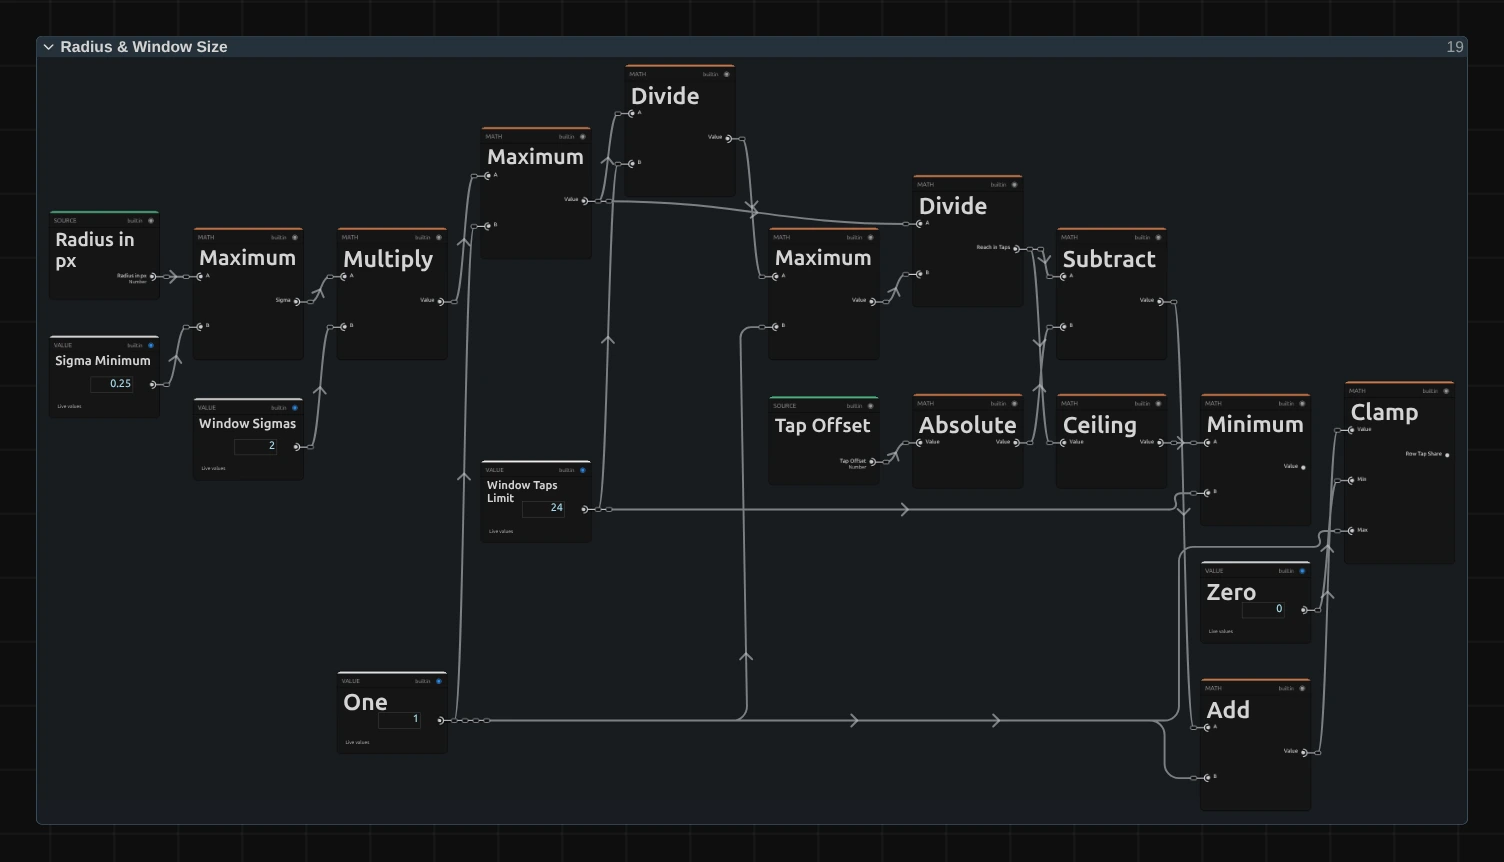
Maximum – the sigma of the soft copy: Radius in pixels of this frame (Radius × the shorter side ÷ 1080), but at least 0.25 px, so a tiny frame still gets a blur. The Gaussian passes read 3 sigma to each side, with the same pairs and stride as Gaussian Blur.
Multiply – the window reaches twice the sigma to each side, at least 1 px. That is as far as the blur’s own halo reaches, so the range covers every pixel that can push this one.
Ceiling – how many taps per side the window needs: the reach in taps, rounded up. Up to a reach of 24 px the taps sit one pixel apart; beyond that (only on frames far larger than 4K) they spread out.
Minimum – caps the taps at 24 per side, so the window never costs more than 49 reads in each direction.
Clamp – how much of each tap counts: 1 inside the reach, and for the outermost tap the share the reach covers (between 0 and 1). When an animated Radius makes the window one tap wider, the new tap starts at 0 and grows in, so the picture changes smoothly instead of jumping.
Source Brightness
Section titled “Source Brightness”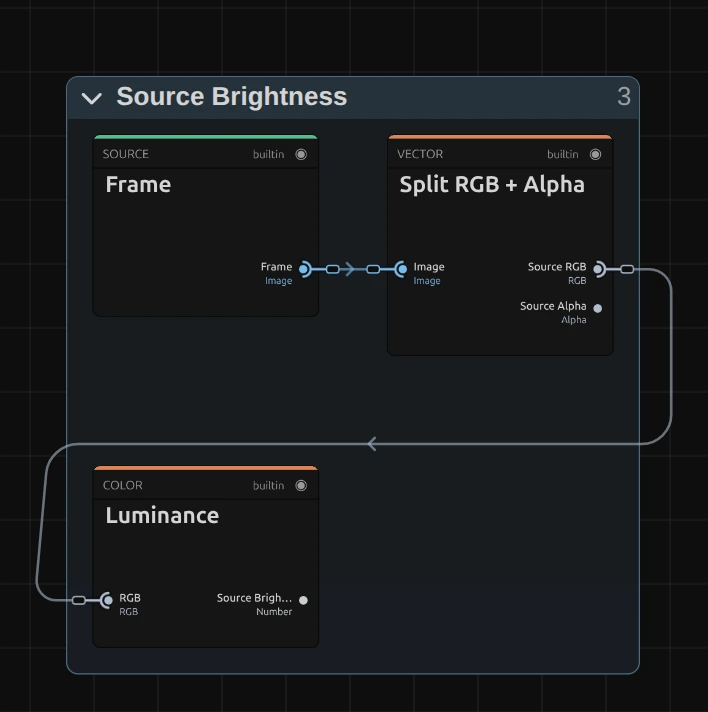
Split RGB + Alpha – splits the pixel into its colour and its transparency. Both go on to Apply to Color & Alpha, so the finished pixel keeps its colour and its alpha.
Luminance – the brightness of the pixel, weighted like the eye sees it (green counts most). Sharpen works on brightness only and adds the same change to red, green and blue, so edges get crisp without coloured fringes.
Premultiplied Source
Section titled “Premultiplied Source”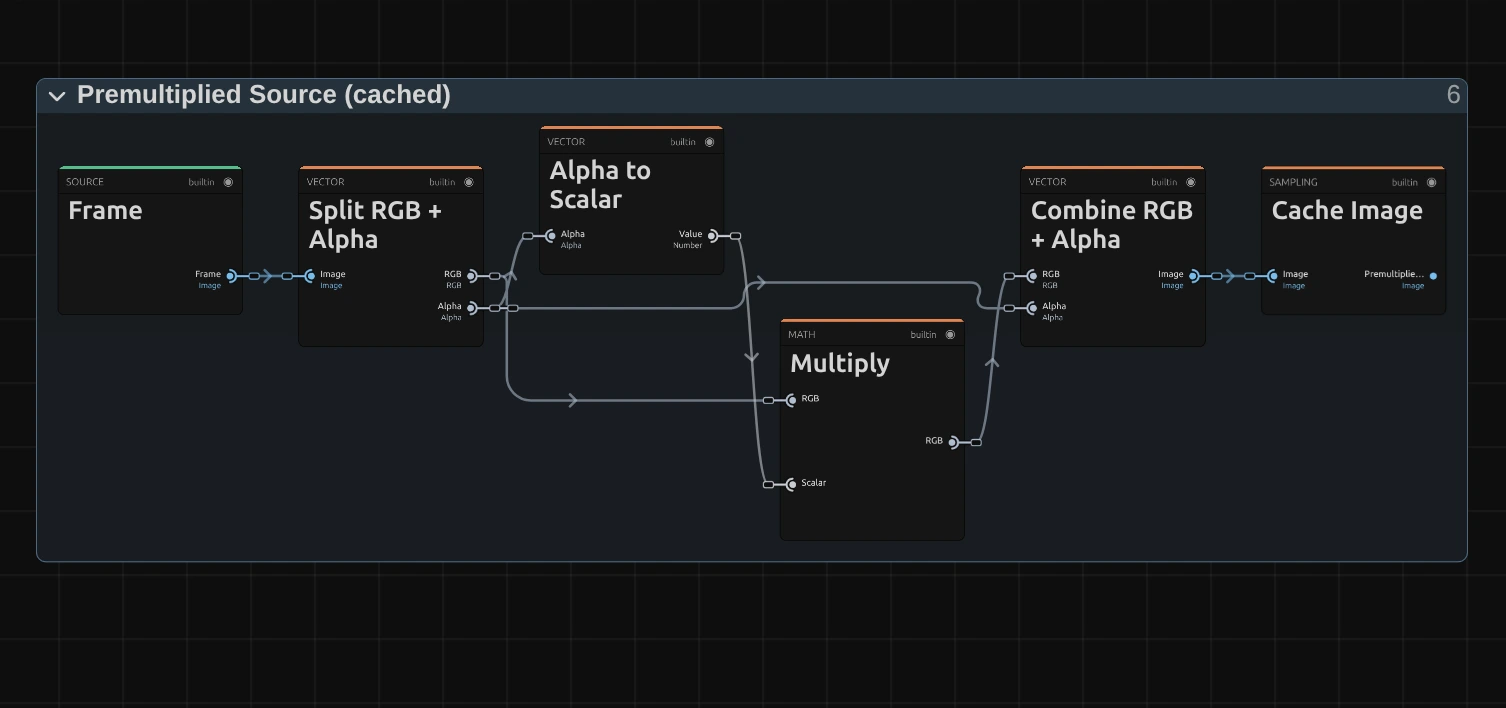
Multiply – multiplies each pixel’s colour by its alpha. A see-through pixel then adds almost nothing to the soft copy or the range, so the colour of its invisible part cannot darken the edge of a cut-out figure or a title.
Cache Image – keeps the prepared picture in a 16-bit float texture, which both the blur and the row range read.
Horizontal Blur Pass
Section titled “Horizontal Blur Pass”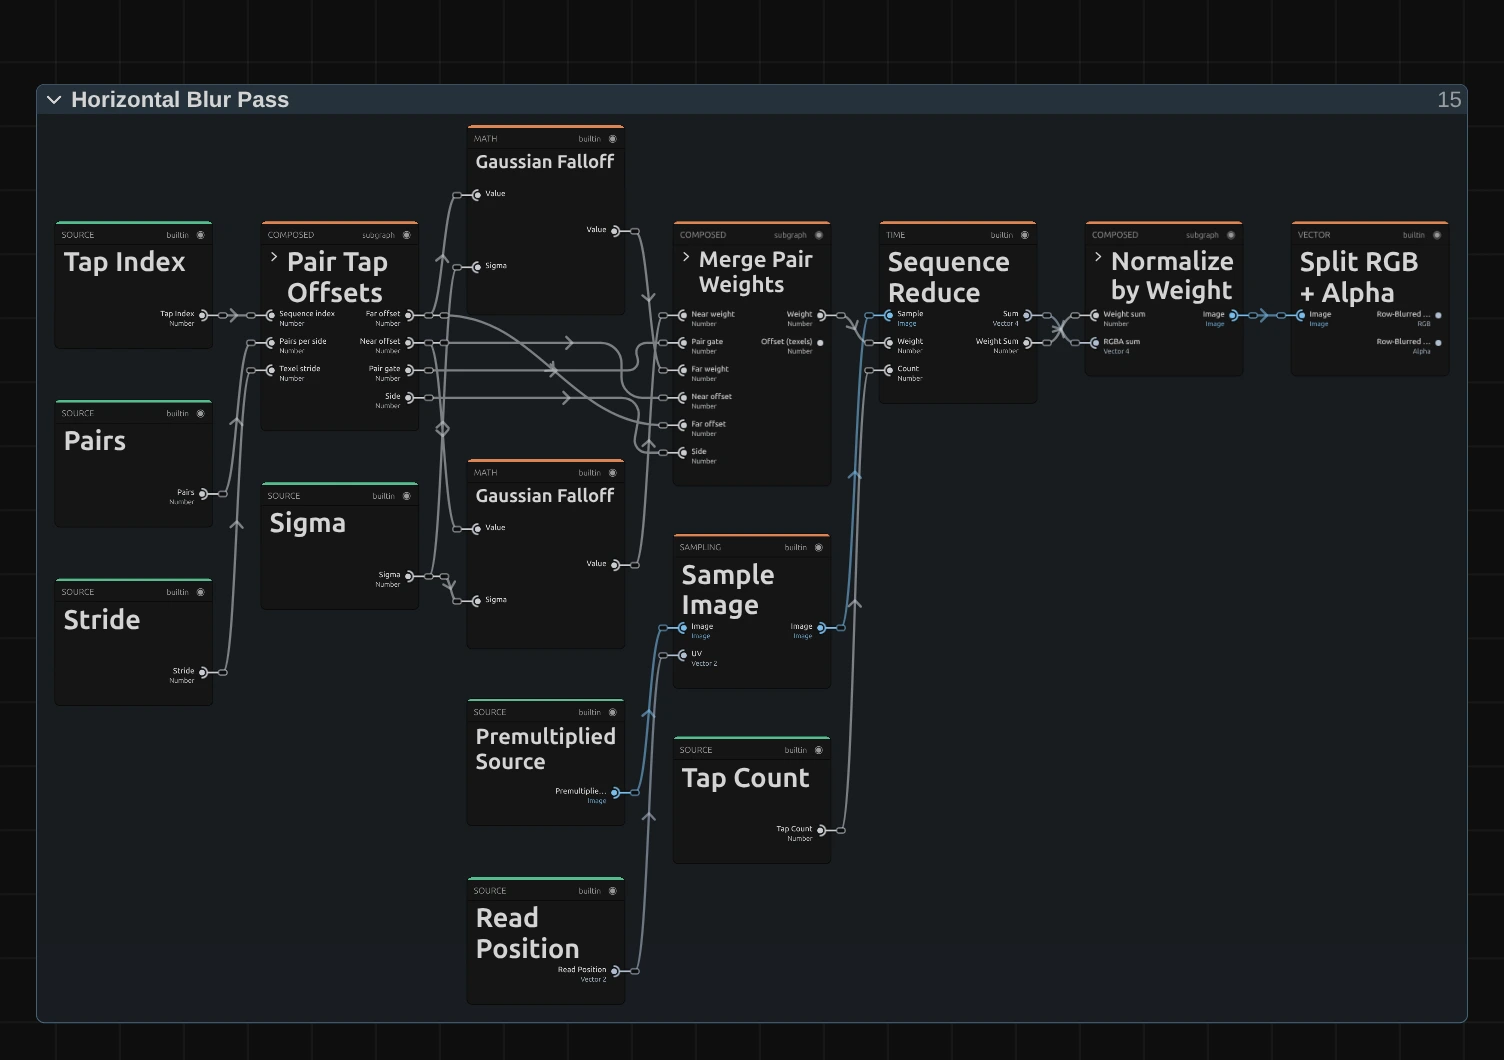
This is the horizontal pass of Gaussian Blur, unchanged.
Gaussian Falloff – the bell curve: how much a pixel at that distance counts, 1 at the centre and fading smoothly; the sigma from Radius & Window Size sets how wide.
Sequence Reduce – reads the Premultiplied Source along the row and adds up the reads, each times its weight; Normalize by Weight turns the sum into an average.
Split RGB + Alpha – hands the blurred colour and alpha to Row Darkest & Brightest, which stores their brightness in the same cache as the row range.
Row Darkest & Brightest
Section titled “Row Darkest & Brightest”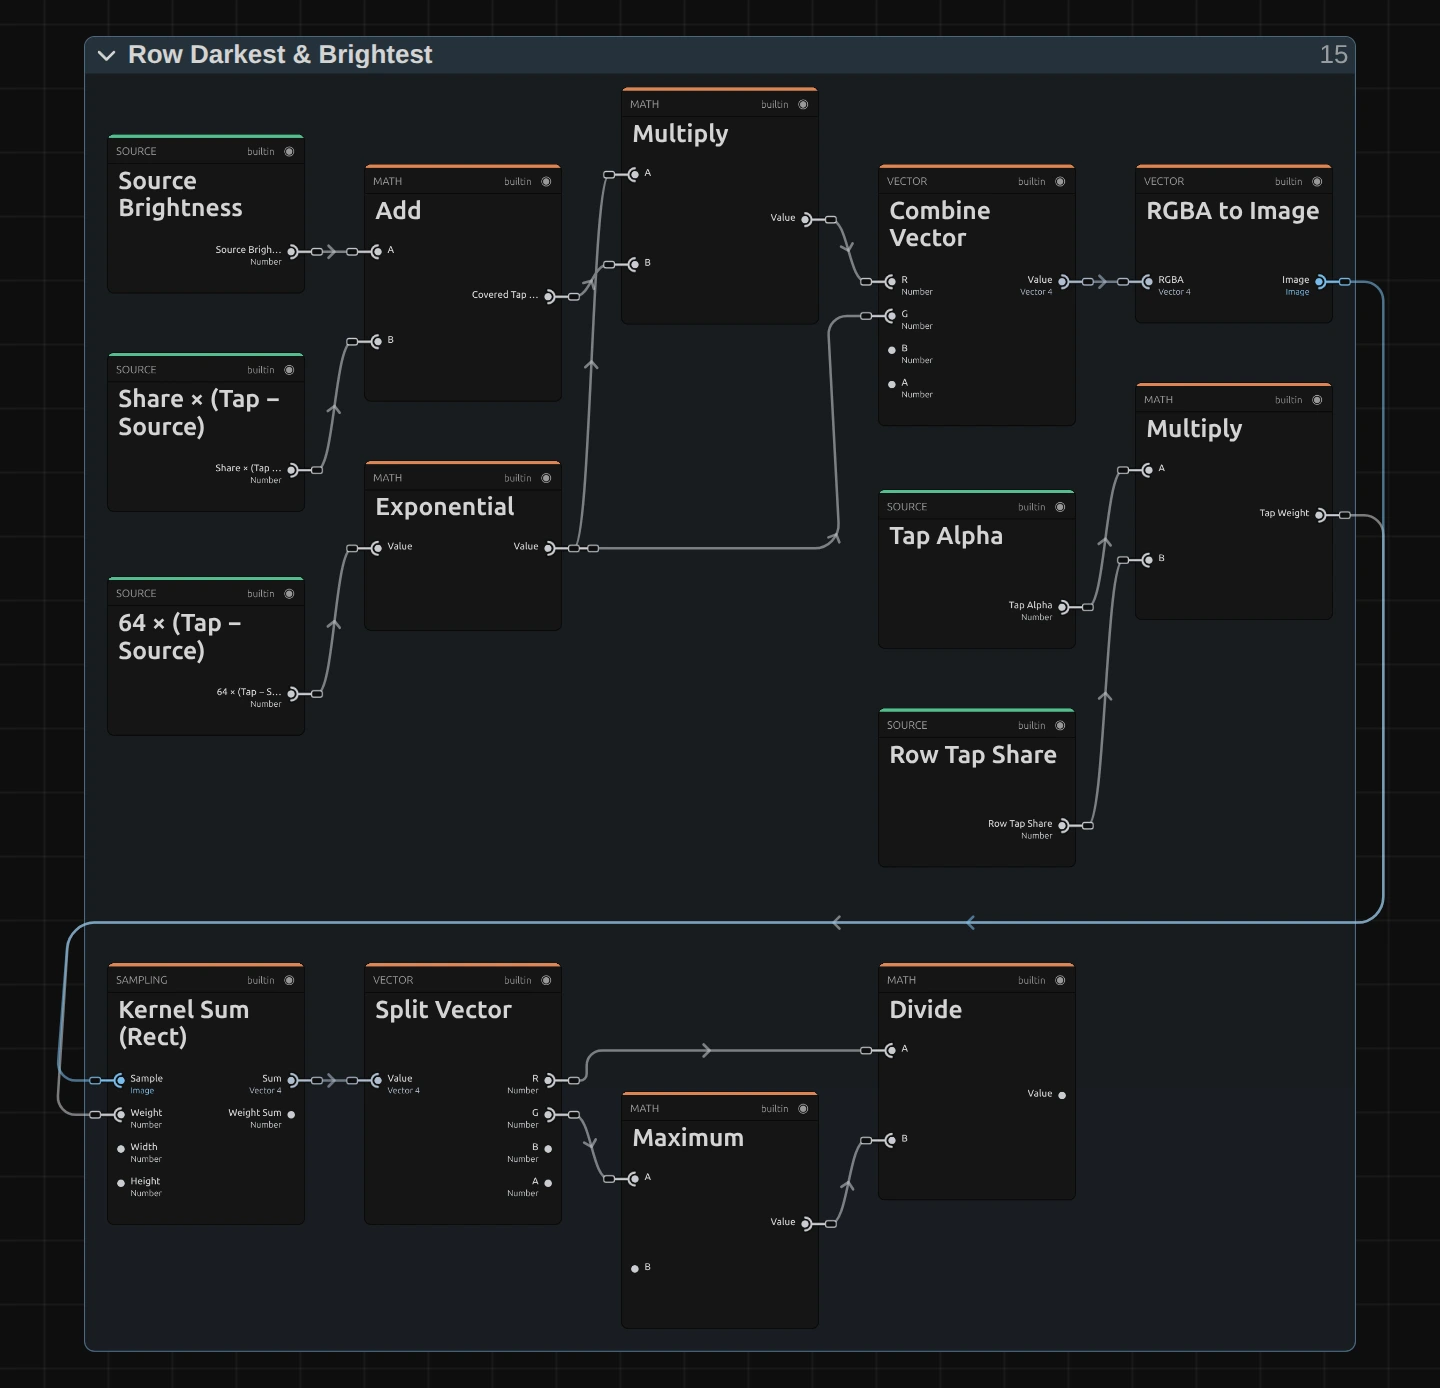
The folder reads every tap of the window along the row from the Premultiplied Source and turns it back into a plain brightness.
Add – the tap as it counts: for a tap inside the reach its own brightness; for the outermost, partly covered tap a value between this pixel’s brightness and its own, by the share from Radius & Window Size.
Multiply – the tap’s weight: its alpha times its share. Transparent pixels and the uncovered part of the outermost tap weigh nothing.
Exponential – a soft maximum. Each tap counts by e to the power of 64 × (tap − this pixel), so a tap a little brighter than the rest outweighs all of them; the result follows the brightest tap closely but moves smoothly from pixel to pixel instead of jumping. The darkest half does the same with the sign turned.
Kernel Sum (Rect) – adds up the weighted brightness and the weights over all taps of the row.
Divide – the sum by the summed weight: the row’s brightest. With the row’s darkest, the blurred brightness and alpha it goes into one cache image for the vertical pass. A row without any opaque pixel marks itself out of range, so the column ignores it.
Vertical Blur Pass
Section titled “Vertical Blur Pass”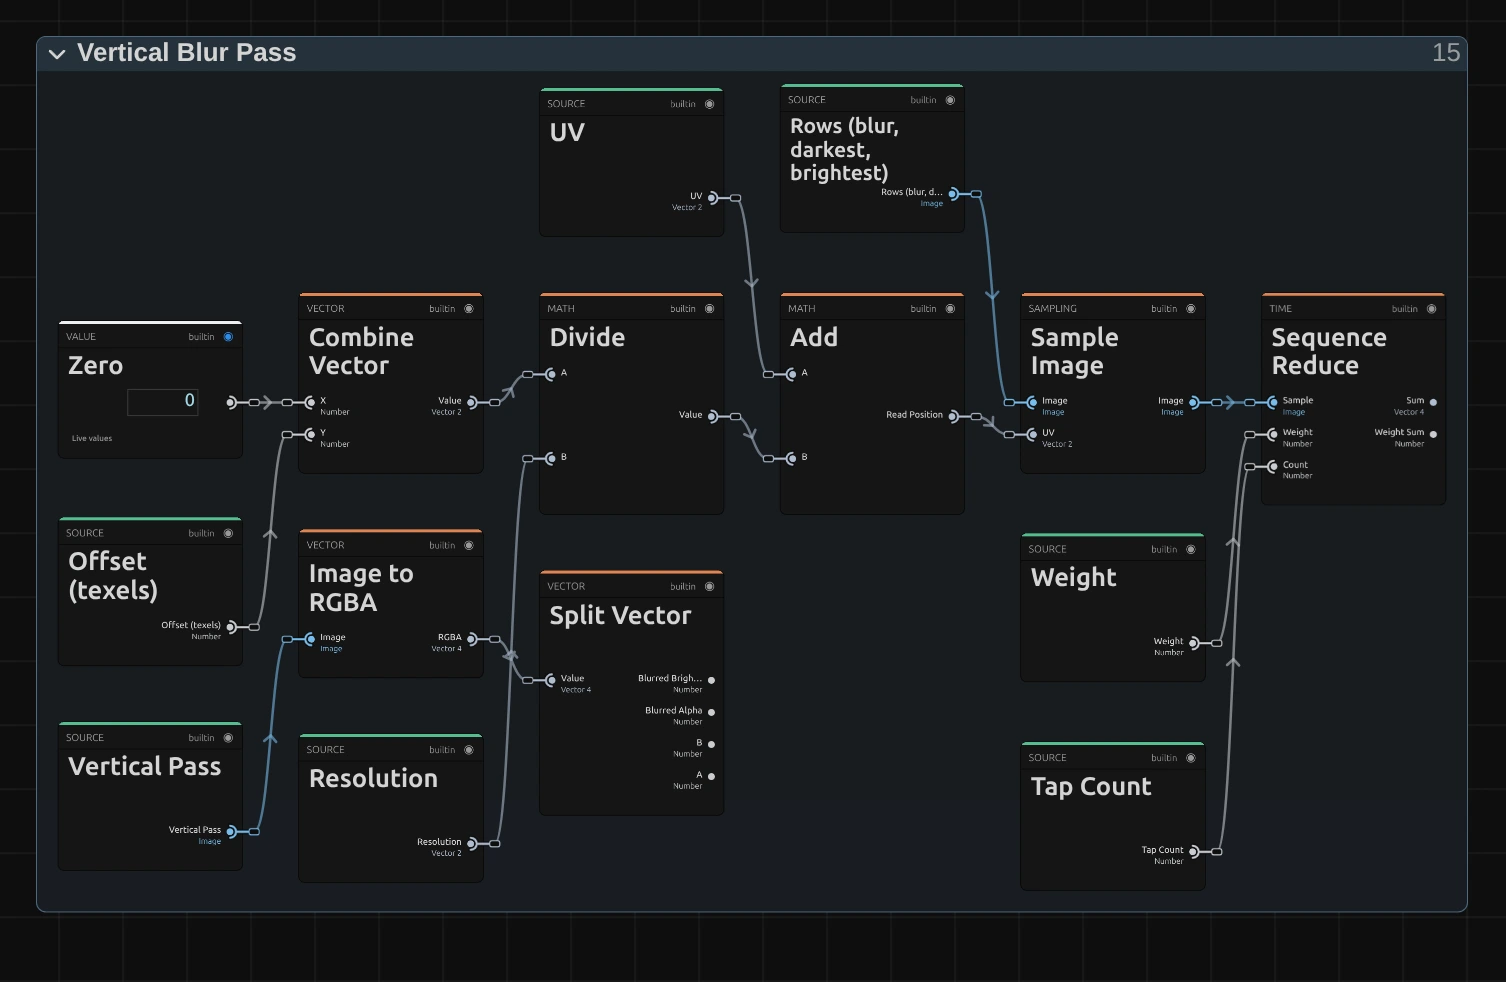
The same recipe as the horizontal pass, down the columns:
Combine Vector – puts the offset into the vertical place (the first is Zero), so the reads go up and down a column.
Sample Image – reads the rows cache, which holds the row-blurred brightness and alpha. A bell curve along the rows and then down the columns gives a round blur.
Split Vector – hands over the blurred brightness (still multiplied by alpha) and the blurred alpha to the Unsharp Mask.
Unsharp Mask
Section titled “Unsharp Mask”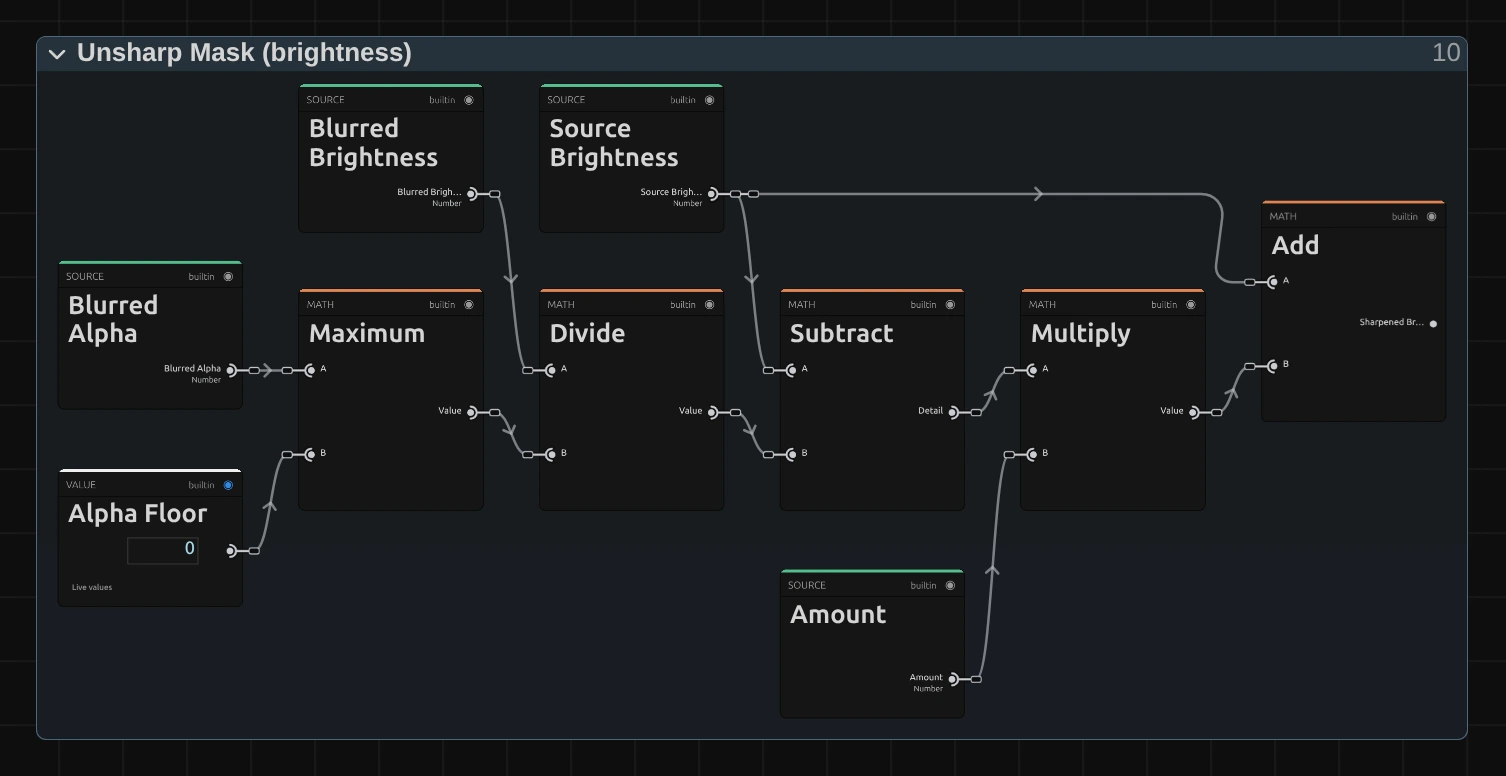
Divide – the blurred brightness divided by the blurred alpha (at least a tiny floor): the brightness of the soft copy, back at full strength at half-transparent edges.
Subtract – the pixel’s brightness minus the soft copy’s: the detail. It is large at edges and texture and zero on flat areas, which is why flat skies and walls stay as they are.
Multiply – the detail times Amount. A negative Amount turns it around and softens.
Add – the detail added back to the pixel’s brightness: the sharpened brightness, before the halo limit.
Window Darkest & Brightest
Section titled “Window Darkest & Brightest”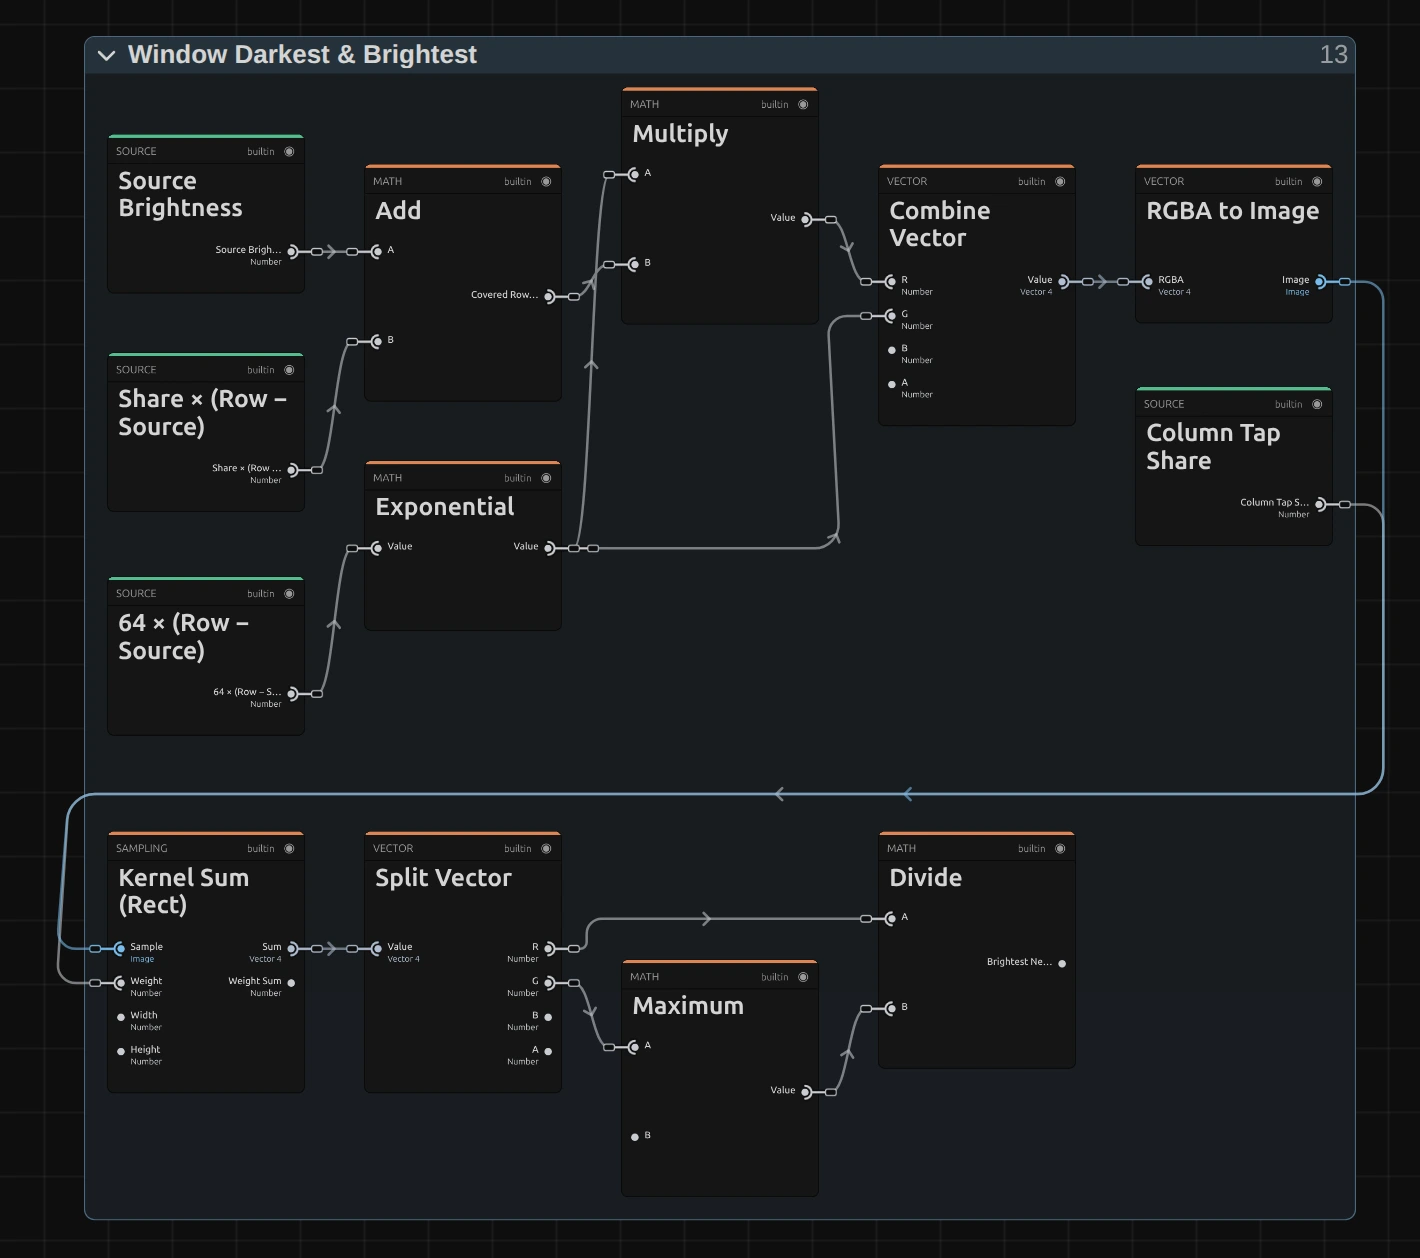
The same soft maximum and minimum, now down a column of the row results, so together they cover a square around the pixel.
Add – a row’s brightest, moved towards this pixel’s brightness by the share of that row the window covers, like the outermost tap of a row.
Exponential – brighter rows count far more, exactly as in Row Darkest & Brightest.
Kernel Sum (Rect) – adds them up down the column, each weighted by its share.
Divide – the result: the brightest brightness nearby. Its mirror image is the darkest nearby. Both go to the Halo Limit.
Halo Limit
Section titled “Halo Limit”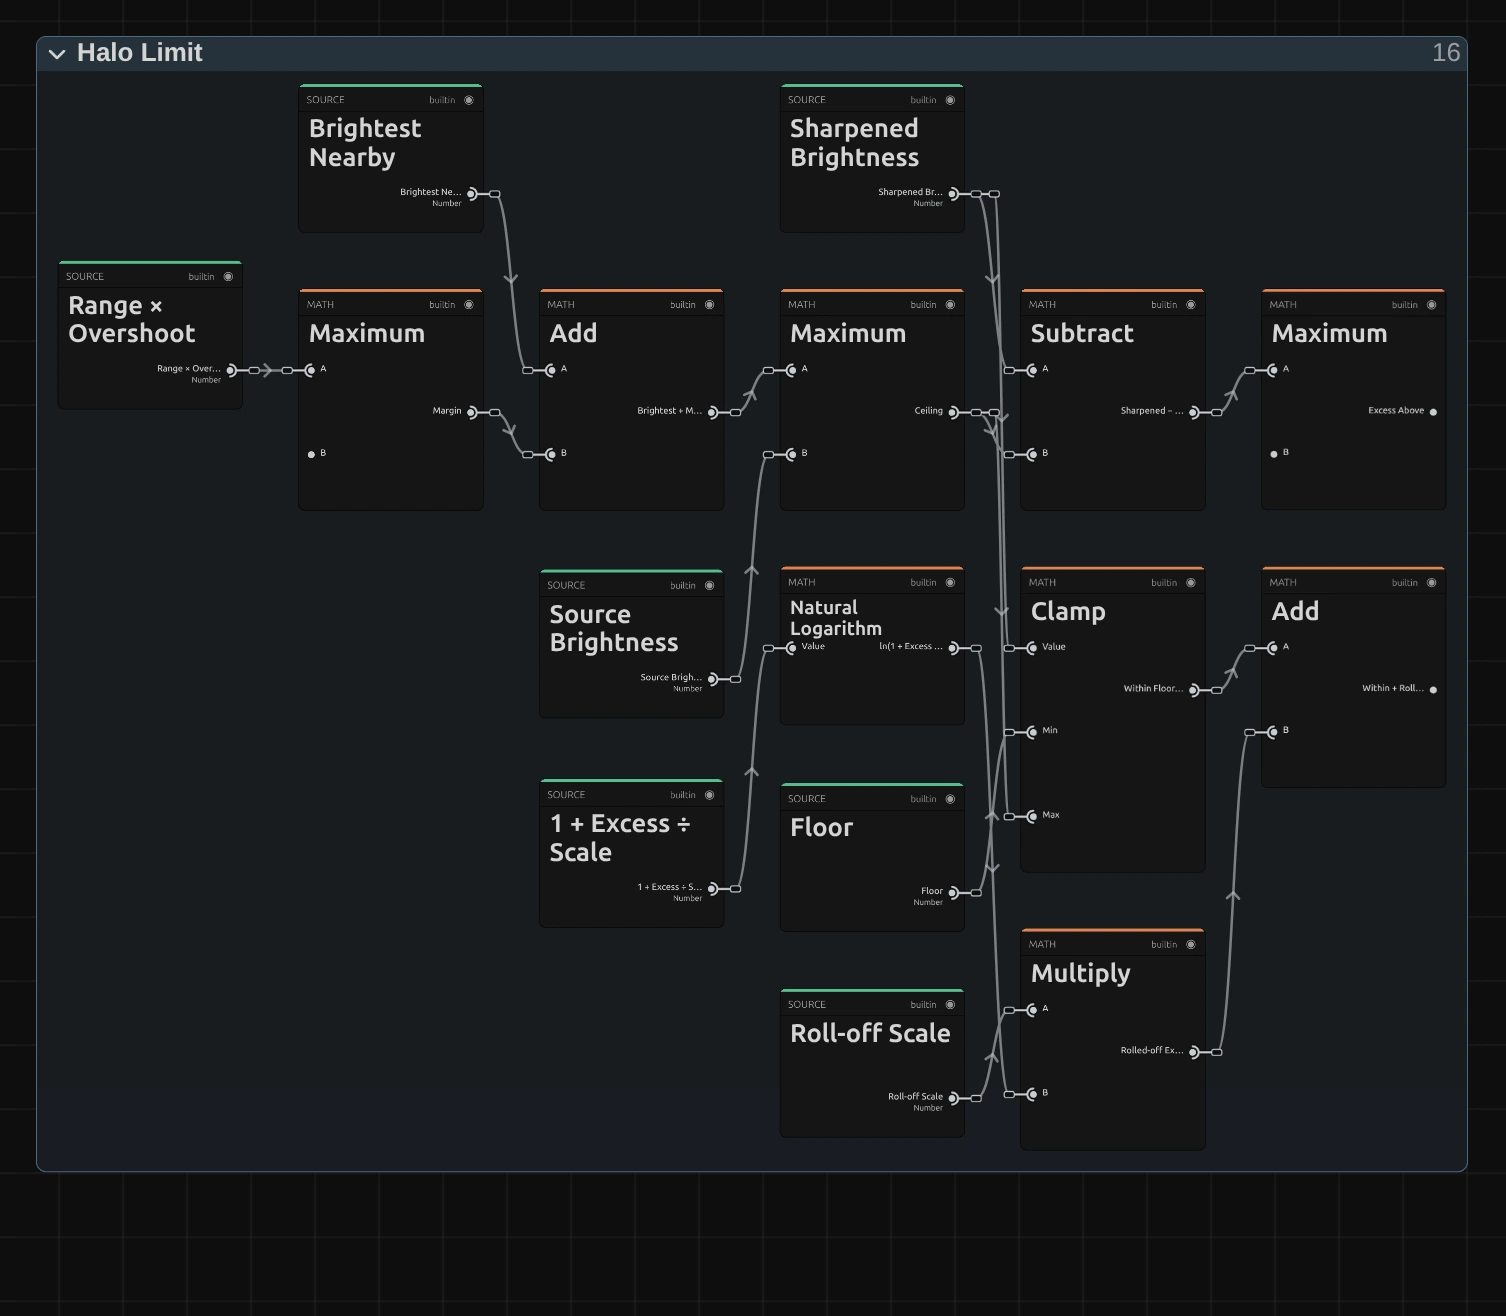
Maximum – the margin the result may go past the range: 5 % of the range between darkest and brightest nearby (Overshoot), but at least 0.04 (Margin Floor). Without it, flat areas could not gain any contrast at all.
Add – the Ceiling: the brightest nearby plus the margin, and never below the pixel itself. The Floor is the darkest nearby minus the margin.
Subtract – how far the sharpened brightness goes past the Ceiling (zero when it stays below). That excess is what would become a bright outline.
Multiply – rolls the excess off: the Roll-off Scale times the Natural Logarithm of 1 + excess ÷ Scale, with Scale half the margin. It keeps growing, only slower and slower, so a stronger Amount still adds a little contrast and neighbouring pixels never swap their order. A step edge keeps a halo of about 18 % of the step at Amount 1 and about 26 % at Amount 5; a plain unsharp mask overshoots by 40 % and more.
A Clamp keeps the sharpened brightness between Floor and Ceiling, and the last Add puts the rolled-off excess on top; the darkening half takes off what falls below the Floor the same way.
Remix: select Overshoot (0.05) in this folder and set it to 0.5 for a punchier look with visible halos, or to 0 to keep only the Margin Floor and the thinnest outlines.
Apply to Color & Alpha
Section titled “Apply to Color & Alpha”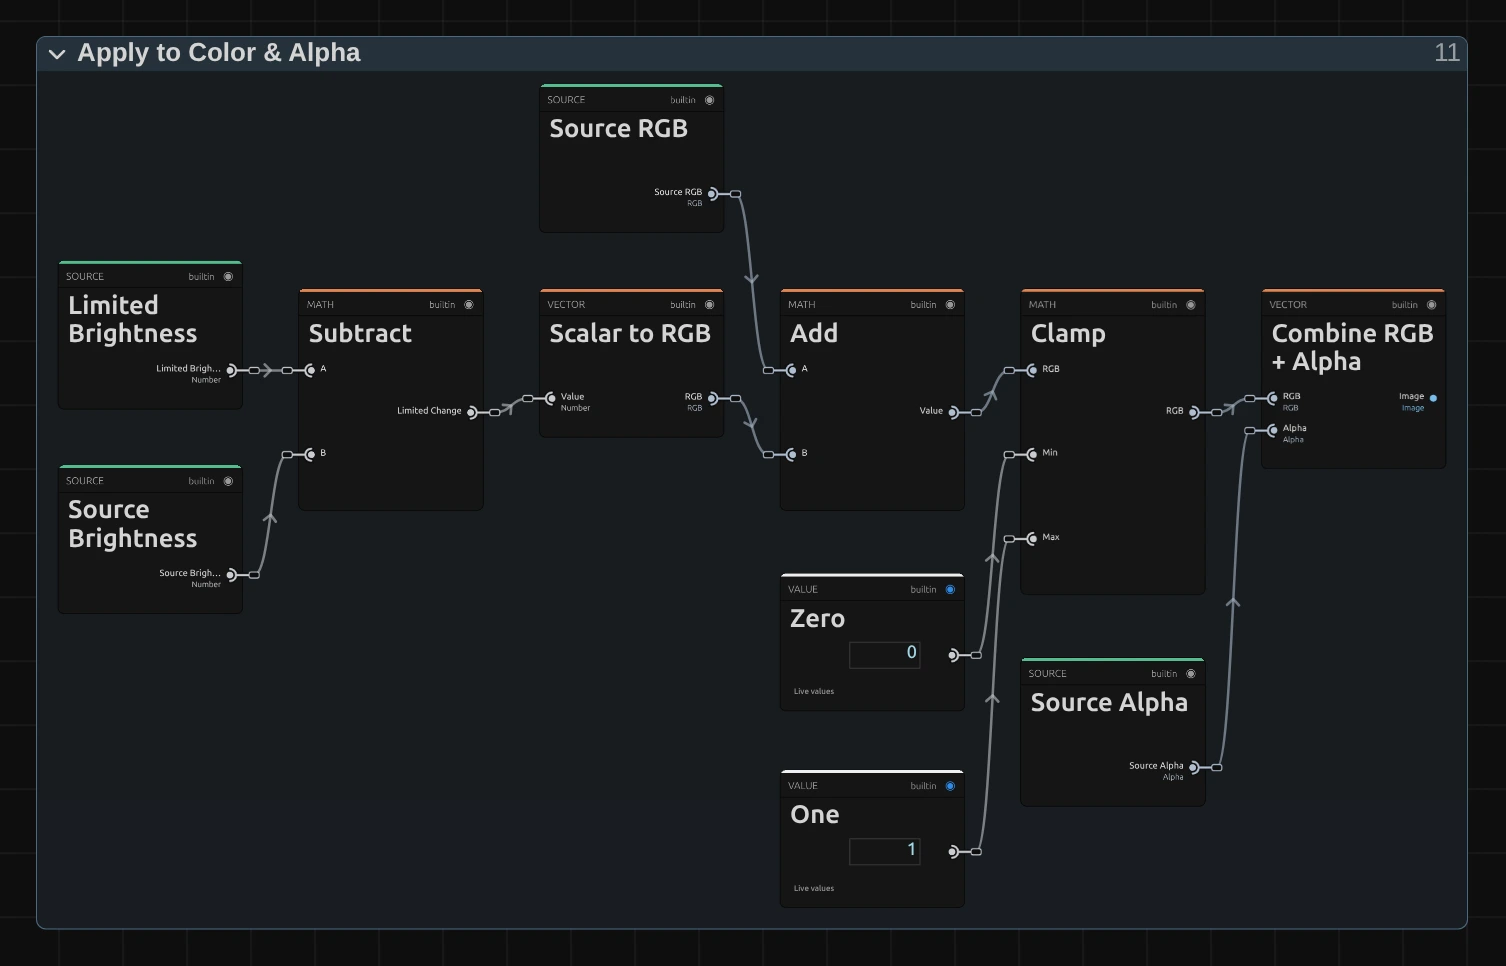
Subtract – the limited brightness minus the pixel’s brightness: how much this pixel gets brighter or darker.
Add – adds that change to red, green and blue alike, so the hue stays and no coloured fringes appear.
Clamp – keeps each channel between black and white.
Combine RGB + Alpha – joins the colour with the pixel’s own alpha: Sharpen never changes transparency.
Technical details
Section titled “Technical details”- Size. Radius is the sigma of the soft copy in pixels of a frame whose shorter side is 1080, at least 0.25 px: preview, export, 4K and portrait frames show the same sharpening. Below that the card and the tool result say it is used as 0.25 px.
- Halo limit. A smooth darkest and brightest brightness within ±2 sigma (at least ±1 px), one pixel apart, up to 24 taps per side (wider steps beyond, also reported), taken along each row in the horizontal pass and down a column of rows in the final pass. The outermost tap counts by the share the window covers, so an animated Radius changes smoothly.
- Colour and transparency. Only brightness is sharpened; the change goes to R, G and B alike and alpha is kept. The blur and the range read a premultiplied copy, so a cut-out on transparency gets no dark or bright rim.
- Zero and below. Amount 0 leaves the picture exactly as it was. An Amount below 0 (typed or via tools) softens and is reported.
- Cost. Three GPU passes, independent of the timeline time.
- Saved projects. A Sharpen keeps the recipe it was saved with, so a project looks the same when it opens again. One saved with version 3.2.7 has a halo limit that can jump a step while Radius is animated; its card says so and offers Use the new Sharpen. The two match at Radius 0.5, 1, 1.5 … on a 1080p frame; in between, a strong Sharpen differs on fine detail (up to about 60 of 255 levels at Amount 2 to 5). A Sharpen saved before 2026-10-21 keeps its earlier graph without a halo limit and offers the same button. An edited node setup keeps its own recipe. A Custom Look does not carry the 3.2.7 recipe: a Look that holds a Sharpen always applies the current one.
- More: Blur & Sharpen notes · Editable blur kernels · Node Catalog · Styles and presets.