
Wave
Ripples the picture with smooth, travelling waves, from a faint heat shimmer to a funhouse wobble.
Group: Lens & Distort · How to add an effect
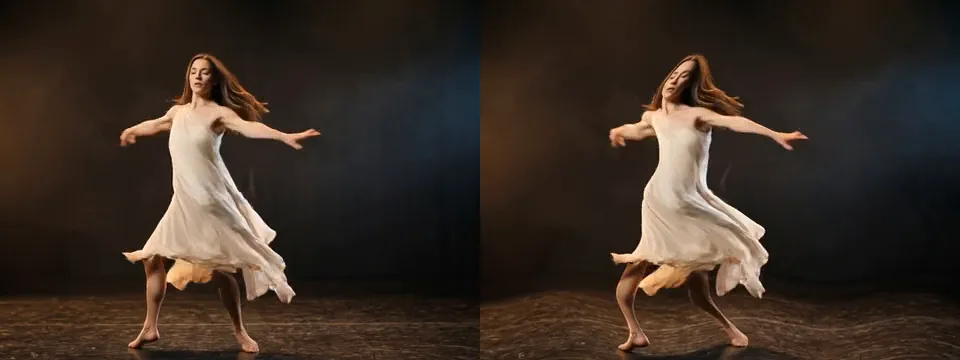
Use it for: heat over a hot floor · an underwater or dream look · a banner in the wind · a wobbly transition.
- Wave Height / Wave Count – waves that lift the picture up and down.
- Sway / Sway Count – waves that push it sideways.
- Speed – how fast the waves travel.
Tip: keyframe Wave Height and Sway from 0 up to 0.03 and back over one second: the picture melts for a moment, and a cut hidden at the peak disappears.
Presets
Section titled “Presets”Pick one in the Preset row of the effect card. It sets all controls at once, in one undo step, and the row then shows its name until you change something. A control with keyframes keeps them, and the card says so.
Heat Shimmer – fine, fast ripples, mostly sideways: edges tremble like air over a hot stage floor, and the picture stays easy to read. Good under text or for a quiet unease.
Dream – long, slow waves in both directions: the whole figure sways and breathes, as if seen through deep water. For memories, sleep and underwater scenes.
Flag – about one wave across the frame, up and down only: the picture bends like a banner in the wind. Strong on a projected flag, a poster or a curtain.
Funhouse Mirror – one broad sideways bend from top to bottom that drifts slowly: the figure curves like a reflection in a fairground mirror. For comedy, a dream or a distorted self-image.
Controls
Section titled “Controls”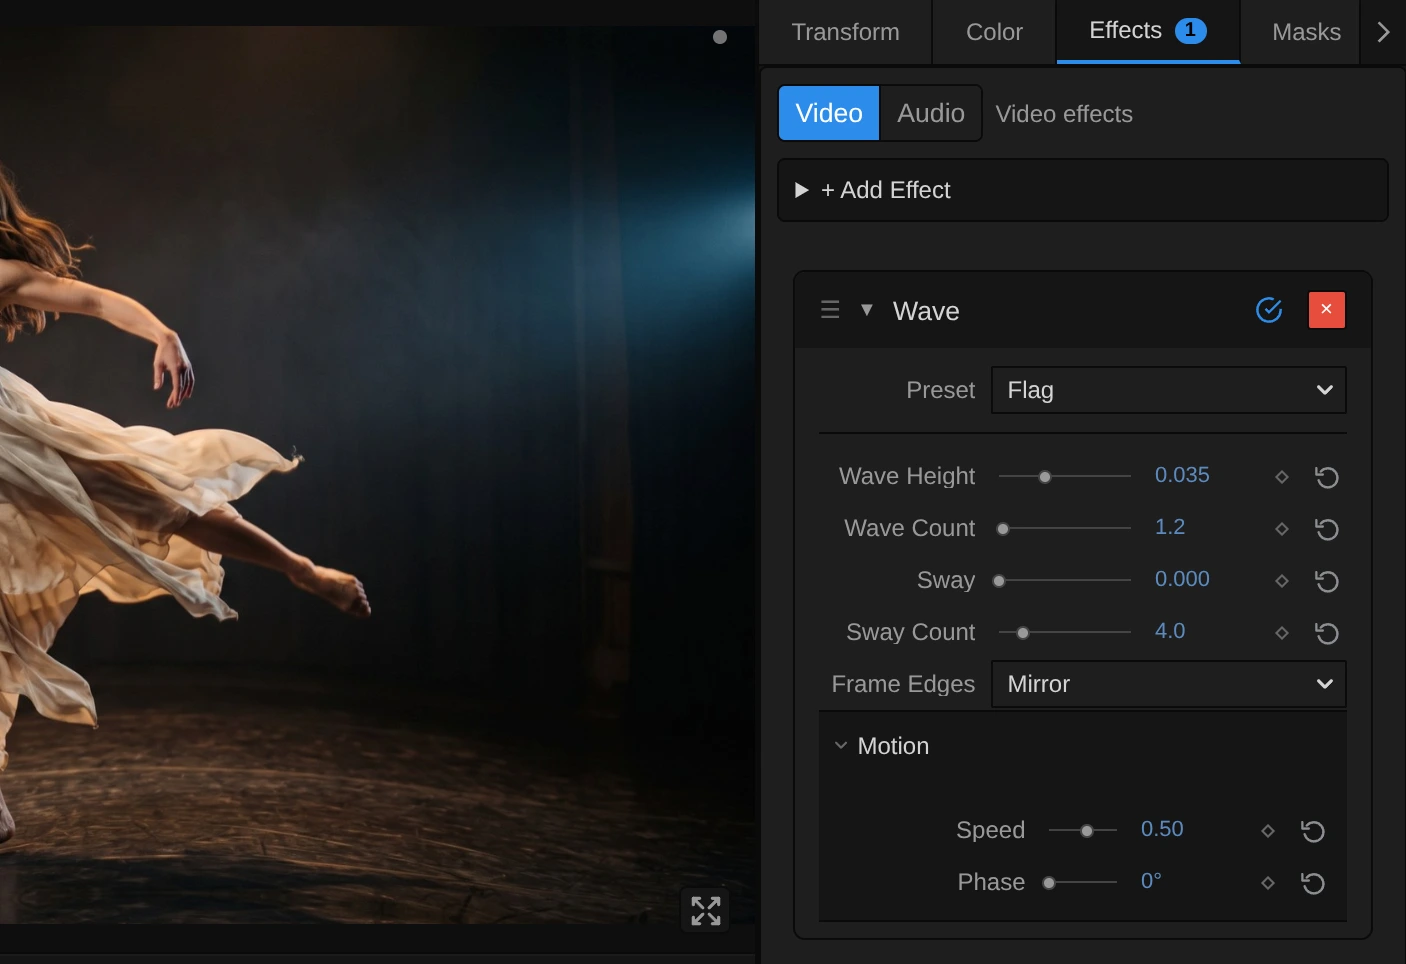
Preset – a starting point for the heights, the counts and Speed; see Presets.
General
Section titled “General”Wave Height – how far the waves that run across the picture lift it up and down, as a share of the picture height: 0.015 is 1.5 %. 0.005 is a shimmer, 0.015 a clear ripple, 0.05 and more bends a figure out of shape. At 0 these waves are off. 0 to 0.1, default 0.015.
Wave Count – how many of those waves fit across the picture. 1 or less bends the whole frame like a flag, 4 gives clear waves, 10 and more fine ripples that make outlines tremble. 0.5 to 20, default 4.
Sway – how far the waves that run down the picture push it left and right, as a share of the picture width. A standing figure turns into a snake-like curve. On a wide frame the same value moves further than Wave Height (1.78 times on 16:9), because the width is longer. At 0 these waves are off. 0 to 0.1, default 0.015.
Sway Count – how many of those waves fit from top to bottom. 1 is one broad bend, as in a fairground mirror; 16 a tight zigzag. 0.5 to 20, default 4.
Frame Edges – what fills in where a wave reads from beyond the frame, at the edges of a strong wave. Mirror reflects the picture at the edge, so the waves keep flowing; Clamp repeats the outermost pixels into streaks; Transparent leaves those places empty, so the layer below shows through. Mirror, Clamp, Transparent, default Mirror.
Motion
Section titled “Motion”Speed – how fast the waves travel, in waves per second: at 0.5 every wave moves on by its own length in two seconds. Positive values run them to the left and upwards, negative values the other way, 0 holds them still. It follows the playhead, so a paused picture stands still and the export matches the preview. −4 to 4, default 0.5.
Phase – shifts both sets of waves along by part of a wave: 180° swaps crests and troughs, 360° is one whole wave and looks like 0°. With Speed 0, keyframe Phase to move the waves exactly where and when you want, for example only during one musical phrase. 0 to 360°, default 0°; a typed or keyframed value may go further, since the waves repeat every 360°.
Node setup
Section titled “Node setup”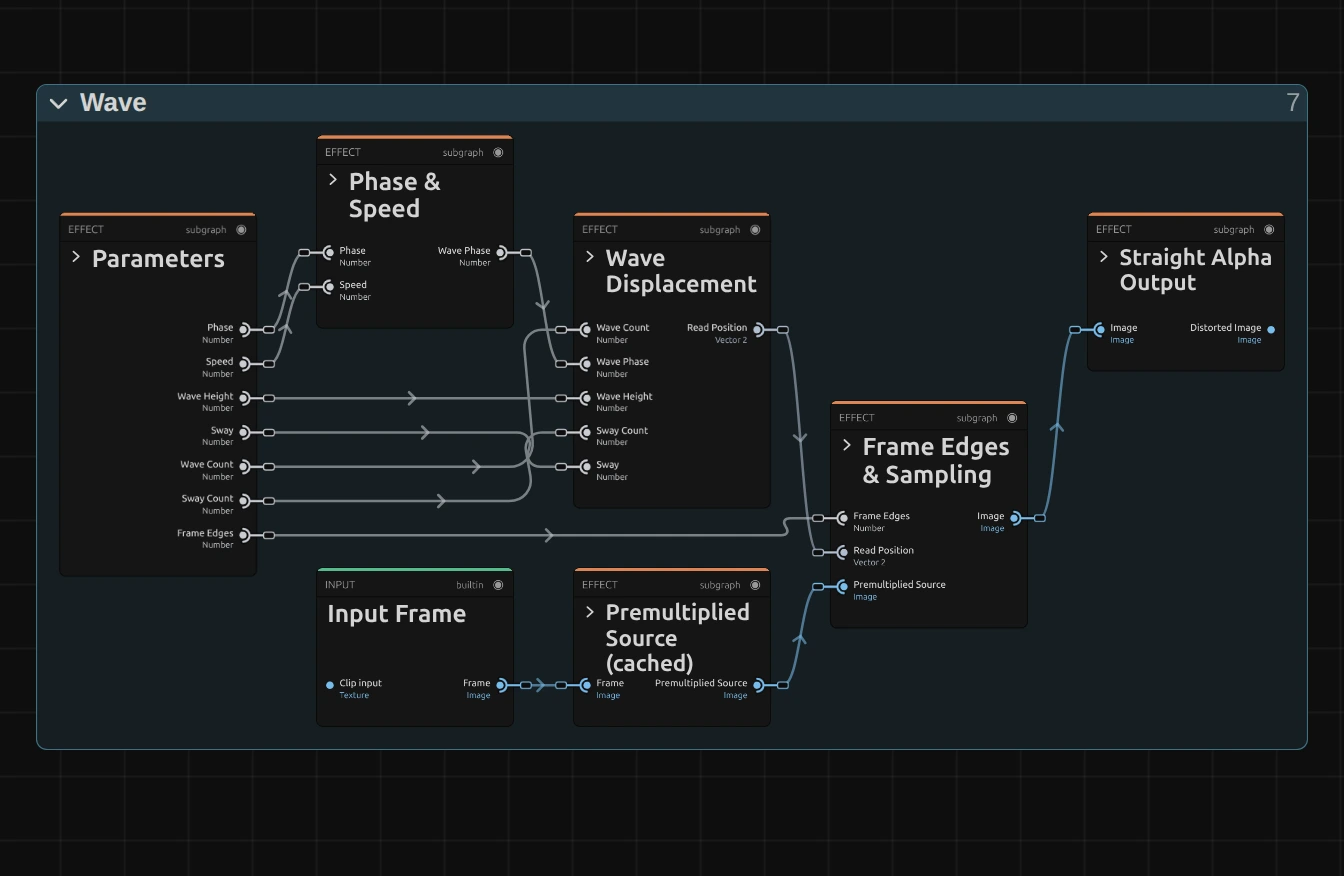
Wave does not paint anything: it moves where each pixel reads, like every effect in its group (the shared idea). Phase & Speed works out where the waves stand at this moment, Wave Displacement shifts each pixel’s place by two sine waves, Frame Edges & Sampling reads the picture at the shifted place, from the Premultiplied Source prepared once per frame, and Straight Alpha Output turns the result back into a normal picture. Click a folder’s header to open it; the sections below show what is inside.
Phase & Speed
Section titled “Phase & Speed”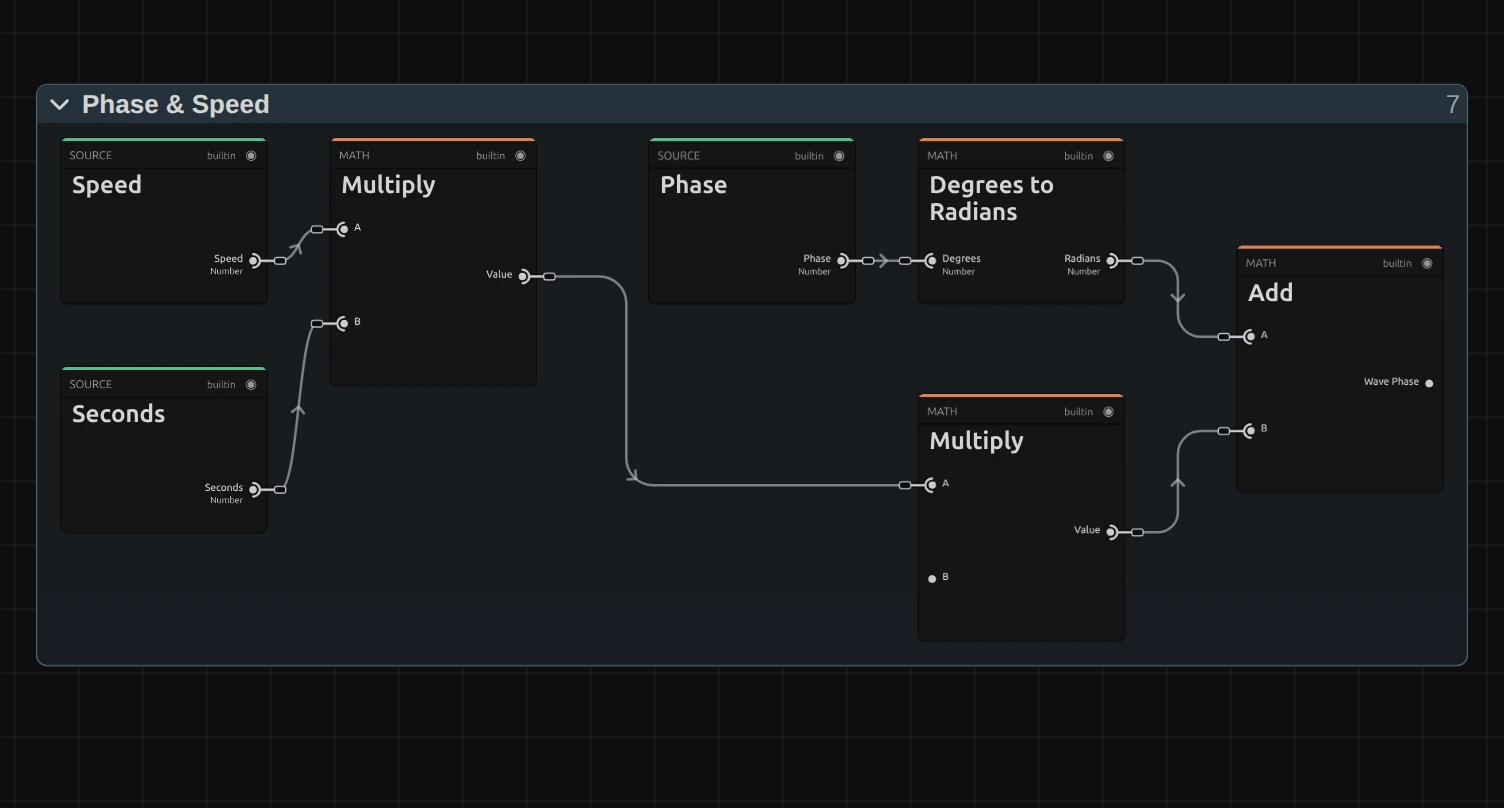
Multiply – Speed times Seconds, the timeline time of this frame: how many waves have passed by now. Seconds comes from the playhead, so scrubbing, playback and export agree.
Degrees to Radians – turns Phase from degrees into the angle the Sine nodes count in.
Multiply – the waves that have passed, times Tau (2π, one whole wave as an angle; its card sits in the Constants folder, so the input shows a free dot here).
Add – both together: the Wave Phase that goes on to Wave Displacement and moves every wave along.
Wave Displacement
Section titled “Wave Displacement”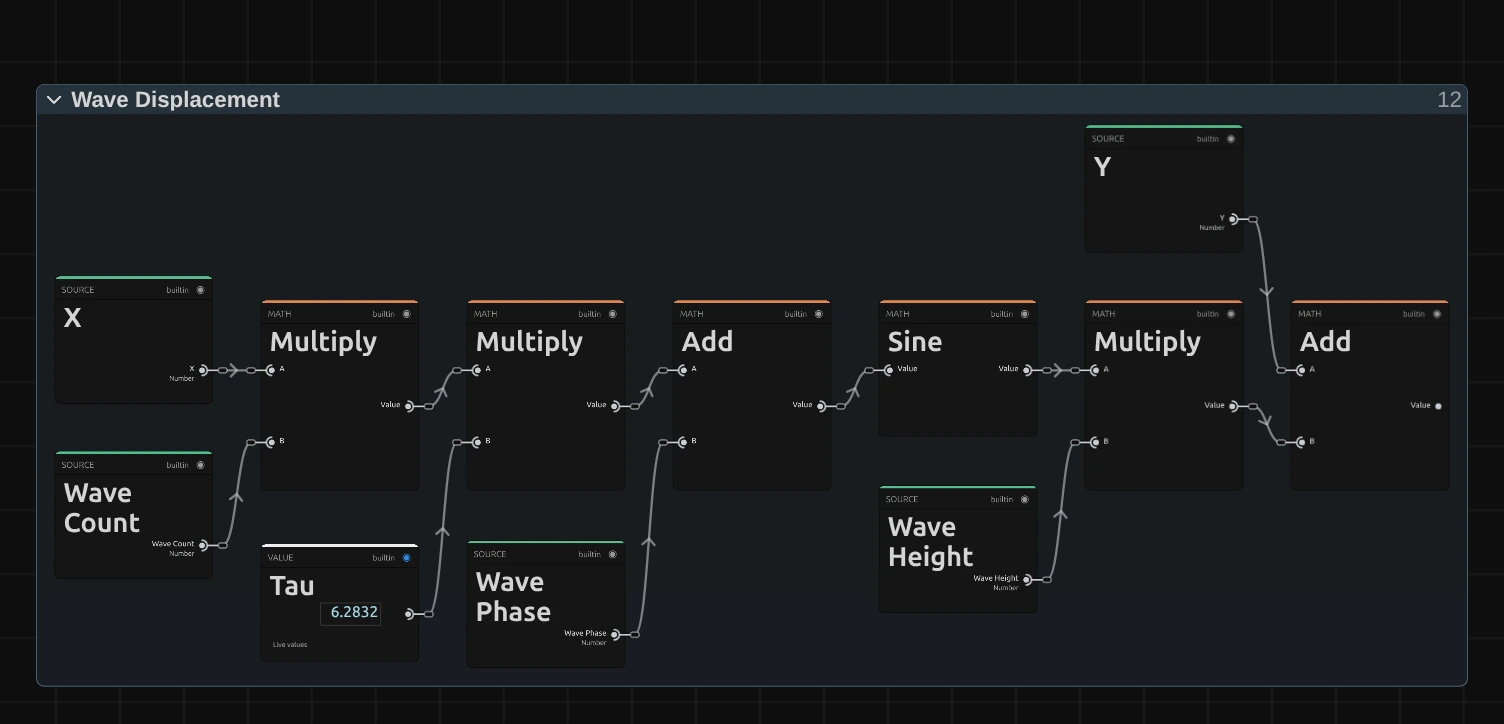
Y – the pixel’s height in the picture, from 0 at the top to 1 at the bottom. Split Vector at the start of the folder splits the pixel’s place (UV) into X and Y. X times Wave Count times Tau, plus the Wave Phase, says where along the waves this pixel lies.
Sine – turns that place into a smooth swing between −1 and 1: up, back, down, back, Wave Count times across the picture.
Multiply – the swing times Wave Height: how far this pixel is lifted or lowered.
Add – Y plus that shift: the shifted height. A second strand in the same folder does the same with the shifted height, Sway Count and Sway, and shifts X sideways; Combine Vector joins both into the Read Position.
Remix: for waves that grow towards the bottom, like a water surface seen from above, add a Multiply node between the Sine (2) and the Multiply (3), and connect the Y card (1) to its second input. The ripples are calm at the top of the picture and strongest at the bottom.
Premultiplied Source
Section titled “Premultiplied Source”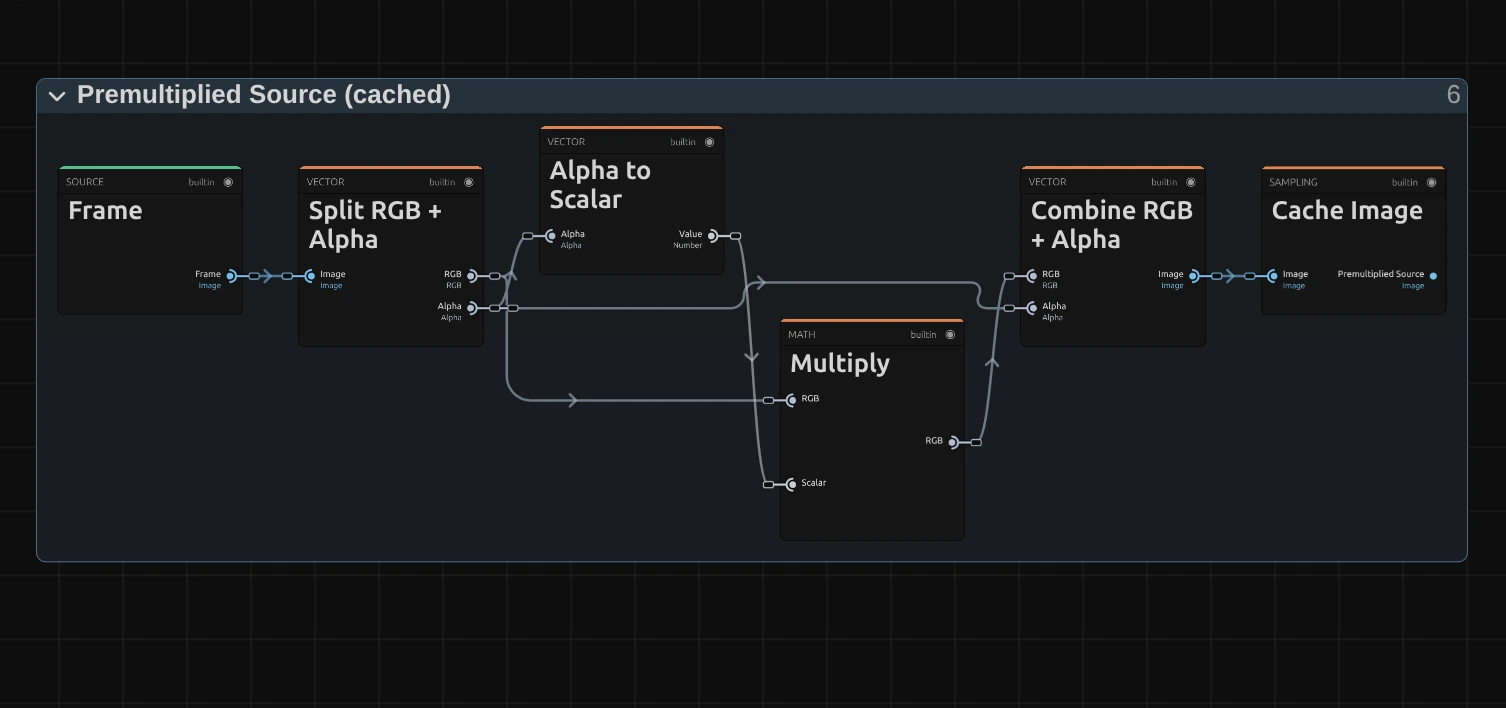
Multiply – multiplies every pixel’s colour by its transparency. When the read later blends two neighbouring pixels, a transparent one then adds no colour, so a cut-out figure keeps clean edges instead of a dark rim.
Cache Image – keeps the prepared picture, so it is made once per frame, not once per pixel.
Frame Edges & Sampling
Section titled “Frame Edges & Sampling”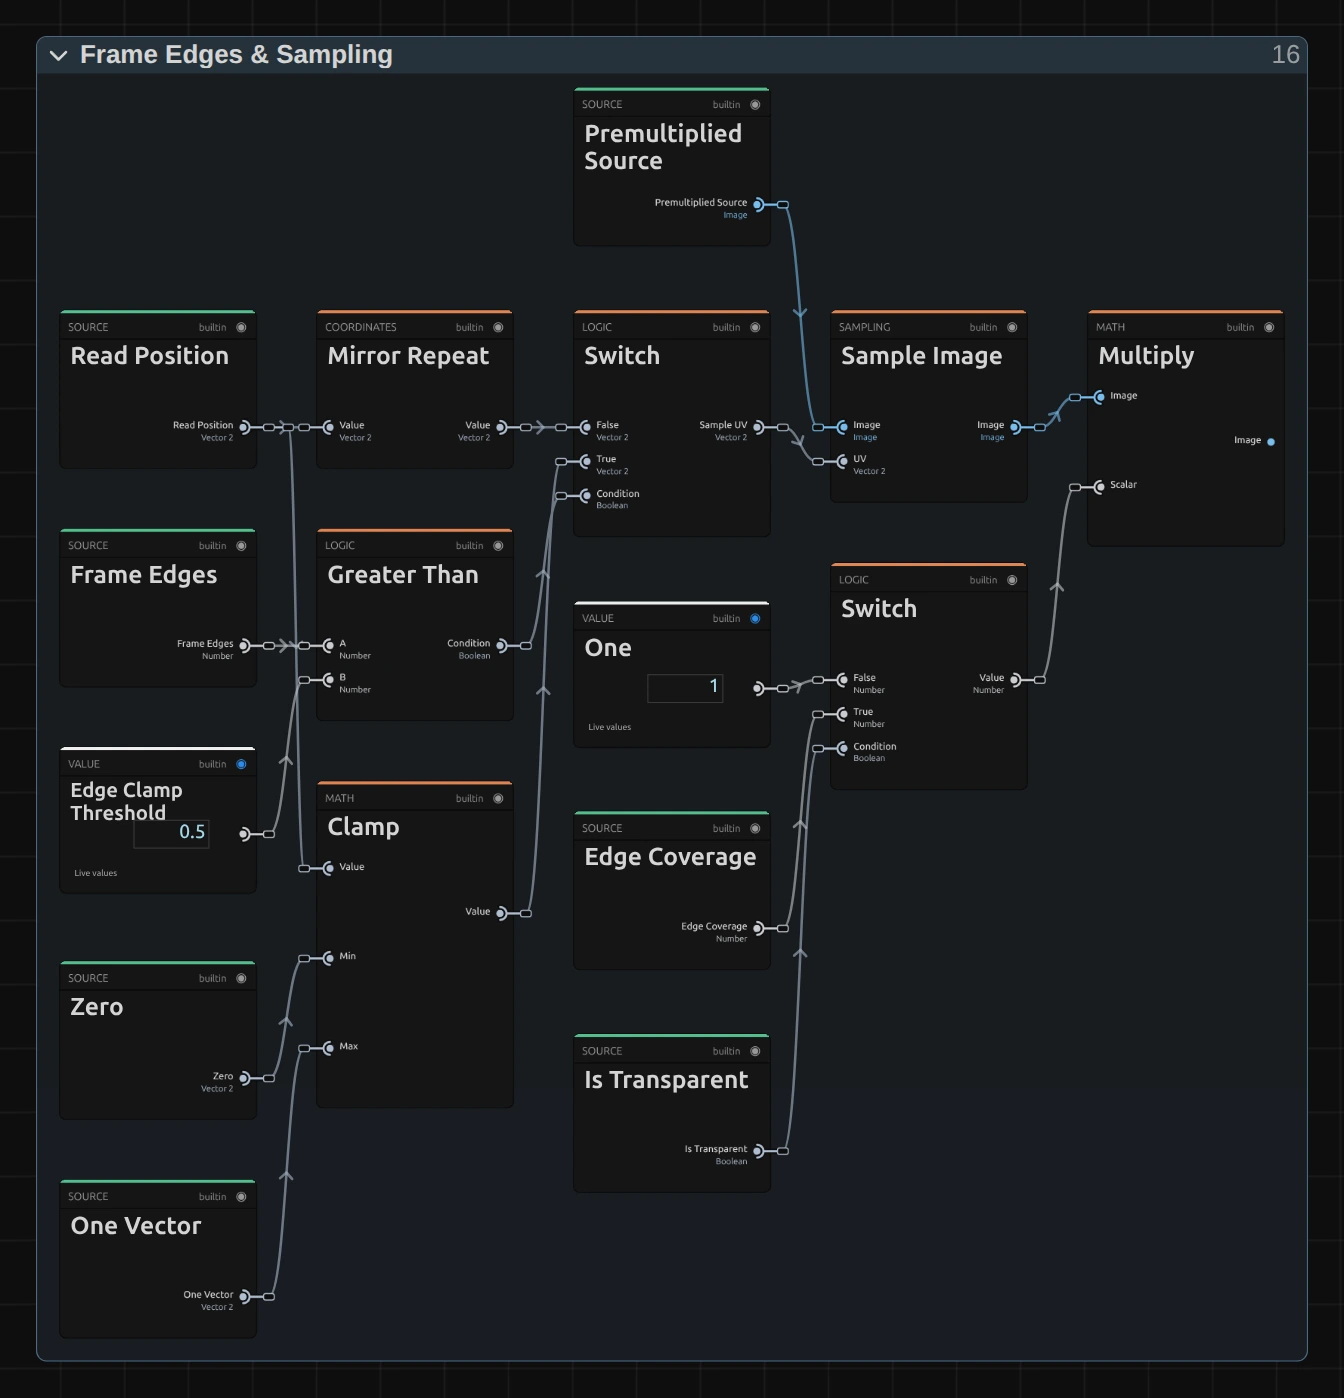
Mirror Repeat – folds a Read Position beyond the frame back in, as in a mirror: the Mirror choice.
Clamp – holds the Read Position between Zero and One, so it stops at the outermost pixel: the Clamp choice, and the base of Transparent.
Switch – picks the mirrored or the clamped position. Greater Than compares Frame Edges with 0.5: Mirror is the only choice below it.
Sample Image – reads the Premultiplied Source at that position, blending the four nearest pixels.
Multiply – scales the read by One, or for Transparent by Edge Coverage, which falls from 1 to 0 within one pixel of the frame edge. Places that read from beyond the frame turn empty with a soft edge.
Straight Alpha Output
Section titled “Straight Alpha Output”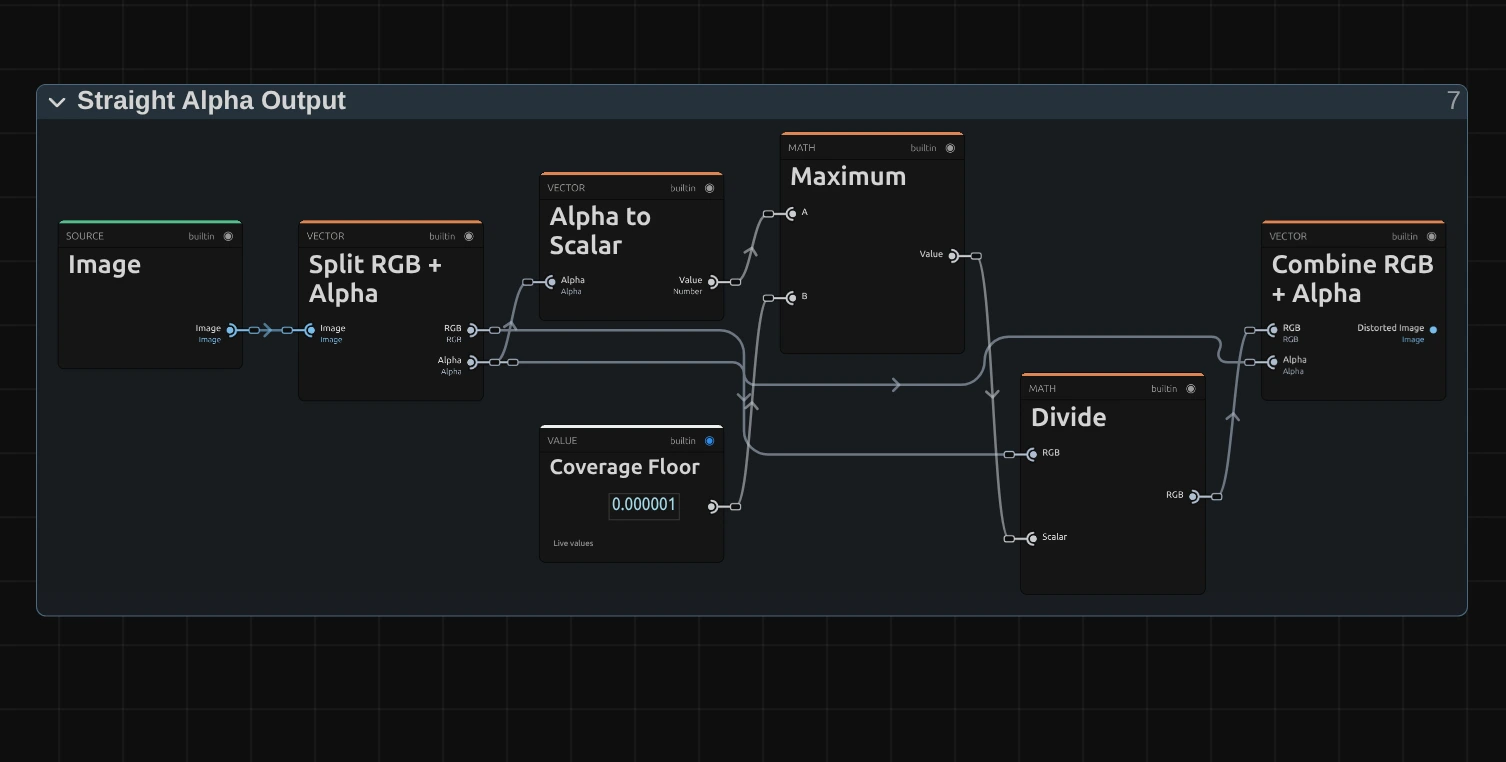
Maximum – keeps the transparency above a tiny Coverage Floor, so a fully transparent pixel never divides by zero.
Divide – divides the colour by the transparency again: the step back from the Premultiplied Source, so half-transparent edges keep their real colour.
Combine RGB + Alpha – joins colour and transparency into the finished picture that goes on to the next effect.
Technical details
Section titled “Technical details”- Formula. Wave adds sin(2π × Wave Count × x + φ) × Wave Height to y, then sin(2π × Sway Count × y′ + φ) × Sway to x, where y′ is the shifted y and φ = Phase (in radians) + 2π × Speed × time in seconds.
- Time. The waves follow the timeline time: scrubbing, playback and export give the same frame for the same moment, and a paused picture needs no extra rendering. Speed multiplies that time, so a keyframed Speed makes the waves jump, the further along the timeline the more. To start the motion on a cue, keyframe Wave Height and Sway, or Phase at Speed 0.
- Units. Wave Height is a share of the picture height, Sway a share of the width, so a 4K export, a portrait frame and the thumbnails show the same waves.
- Both heights 0 skip the effect, so the picture passes through exactly.
- Limits. Each pixel is read once, so many small waves (a high count at a small height) shimmer on fine detail.
- Transparency. The picture is read premultiplied, so cut-out figures keep clean edges; the preview and the export match.
- Saved projects. An untouched graph, an effect saved before effects owned a graph and an effect preset of the earlier recipe load as the current recipe with Clamp and Speed 0, so they look as before.
- More: Effect system: Lens & Distort · Editable UV distortions · Node Catalog · Styles and presets.