
Twirl
Winds the picture into a spiral around a centre point, strongest in the middle. For swirl transitions, dreams and whirlpools.
Group: Lens & Distort · How to add an effect
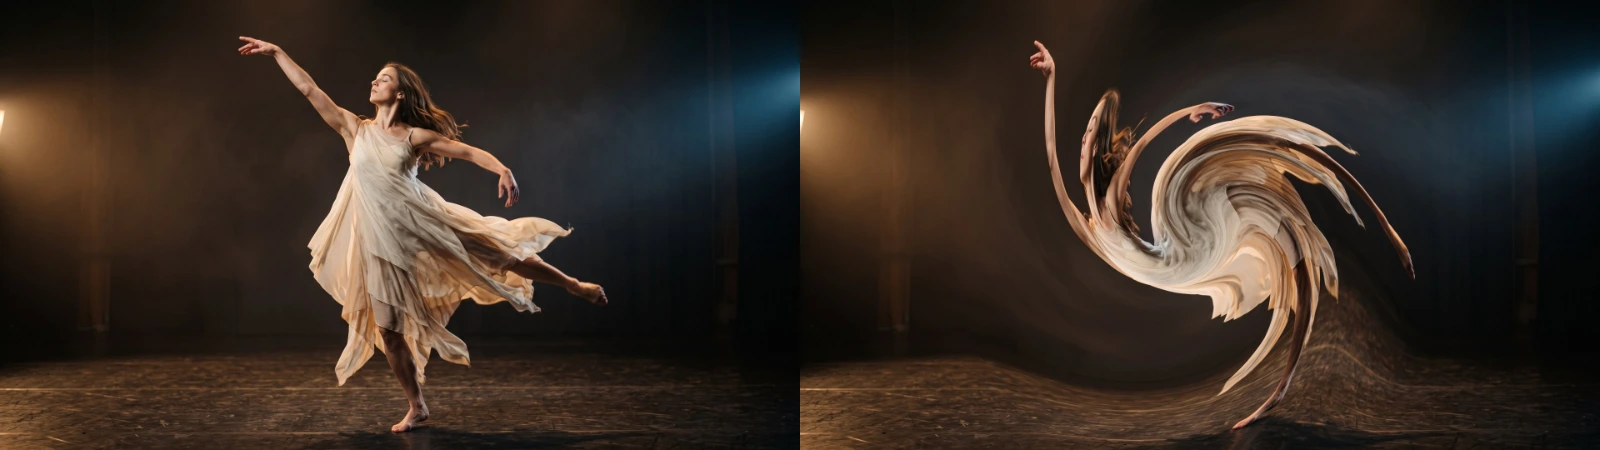
Use it for: a swirl transition · a dream or a dizzy spell · a whirlpool in water, smoke or light.
- Twist – how far the middle turns.
- Radius – how large the turning area is.
- Center X / Center Y – where the middle of the spiral sits.
Tip: keyframe Twist from 0 up to 360° over the last second of one shot and from 360° back to 0 over the first second of the next: the cut disappears inside a whirlpool.
Presets
Section titled “Presets”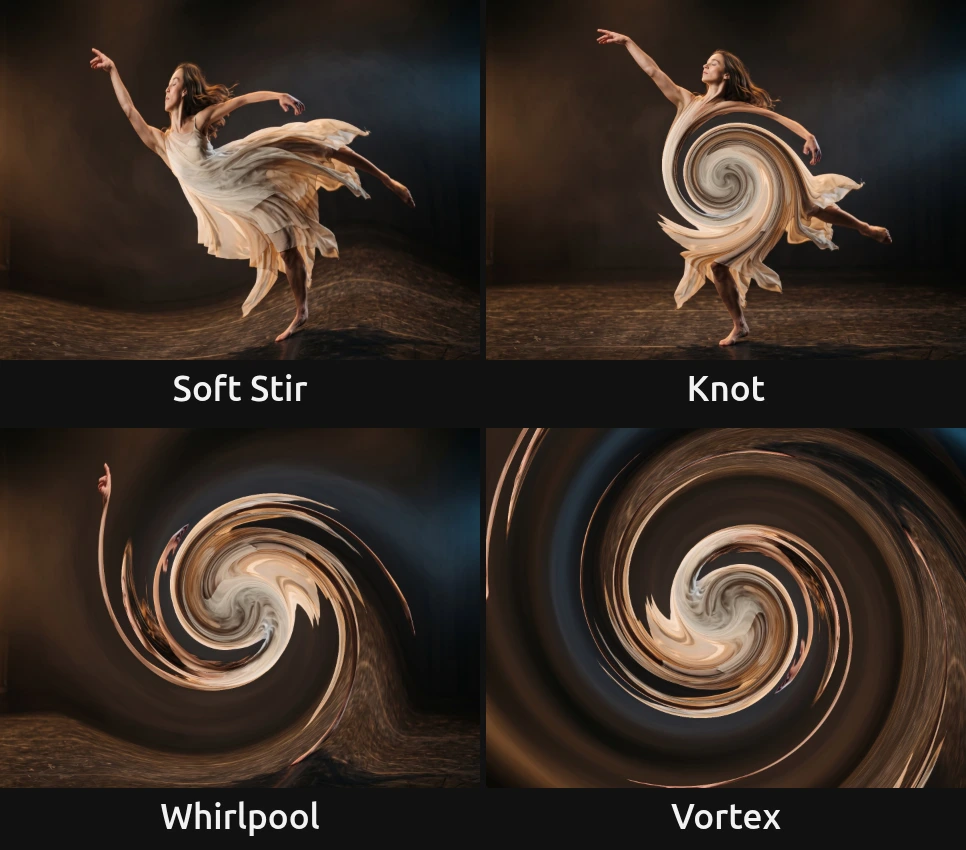
Pick one in the Preset row of the effect card. It sets all controls at once, in one undo step, and the row then shows its name until you change something. A control with keyframes keeps them, and the card says so. Center X / Center Y go back to the middle of the frame, so place the spiral after the preset.
Soft Stir – Twist 80°, Radius 0.8: the picture bends gently over a wide area and stays easy to read, as if seen through moving water. Good for unease or a memory.
Knot – Twist 540°, Radius 0.25: a small, tight spiral in the middle, the rest of the frame untouched. After picking it, put Center X / Center Y on a body or a face to twist just that.
Whirlpool – Twist 360°, Radius 0.6: one full turn that draws the middle of the picture into a clear spiral, while the edges still show the scene.
Vortex – Twist 540°, Radius 1: one and a half turns across the whole frame, still below the strength where fine detail shimmers. Nothing is left but rings of colour; strong at the peak of a swirl transition.
Controls
Section titled “Controls”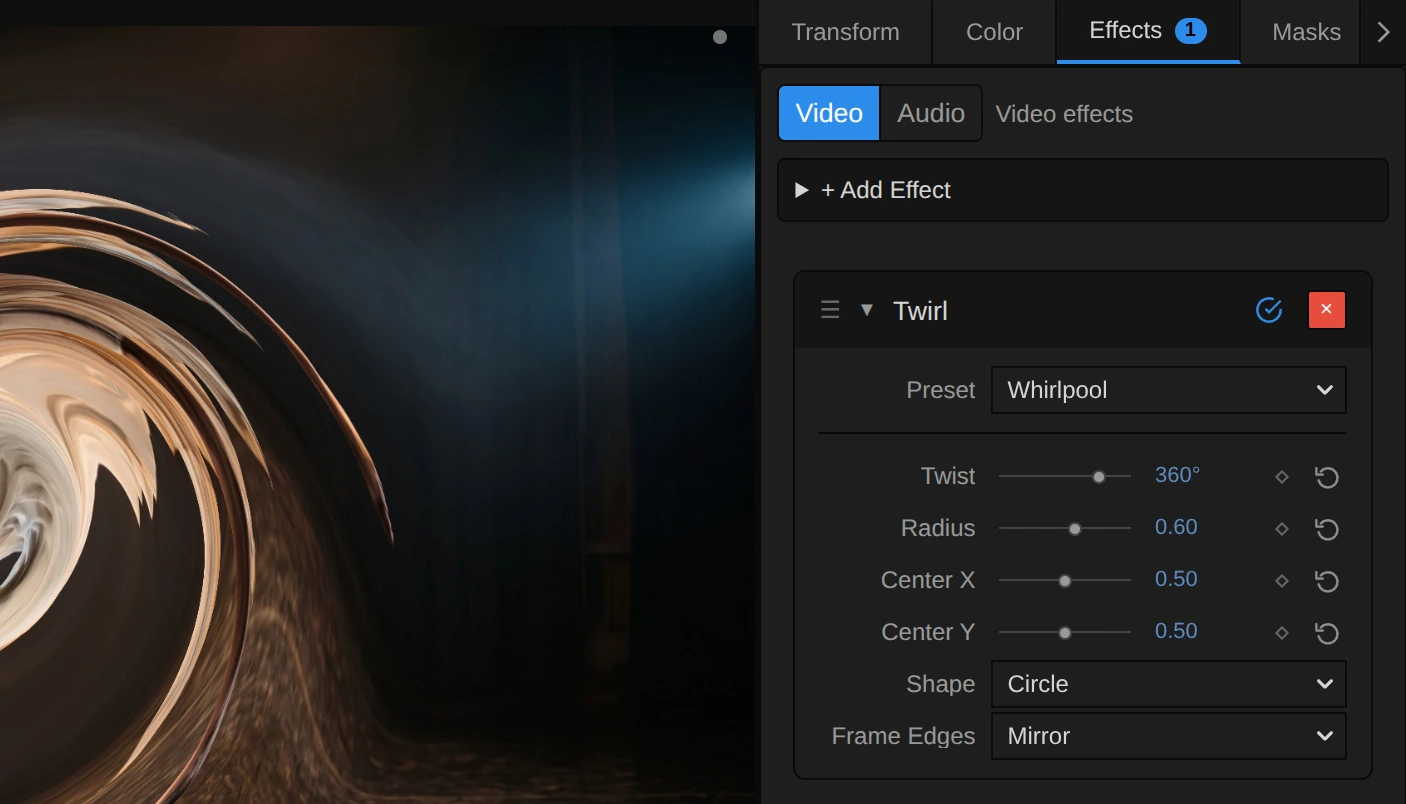
Preset – a starting point for Twist and Radius; see Presets.
Twist – how far the middle of the area turns, in degrees. The turn is strongest in the middle and fades in a soft curve to nothing at the edge of the area, so the picture bends instead of tearing. 45° is a soft swirl, 115° a clear one, 360° a full turn and 720° two; negative values turn the other way. Animate it from 0 for a swirl that winds up. −720 to 720°, default 120°. Effects saved before 120° became the default keep about 115°.
Radius – how large the turning area is, as a share of the picture height (the width in a portrait picture). 0.5 makes a circle as tall as the picture, 0.25 a small spot around the centre, and 1 reaches almost into the corners. Outside the area the picture stays as it is. 0.05 to 1, default 0.5.
Center X – where the middle of the spiral sits across the picture: 0 is the left edge, 1 the right edge. Keyframe it with Center Y to let the spiral follow something moving. 0 to 1, default 0.5.
Center Y – where the middle sits from top to bottom: 0 is the top edge, 1 the bottom edge. 0 to 1, default 0.5.
Shape – the outline of the area. Circle keeps it round on any frame. Stretch to Frame stretches it to the frame’s proportions: on a wide picture it becomes a flat oval, and at Radius 0.5 it touches all four edges. Circle, Stretch to Frame, default Circle.
Frame Edges – what fills in where the turn reads from beyond the frame, which happens at a large Radius near the corners. Mirror reflects the picture at the edge, so the spiral keeps flowing; Clamp repeats the outermost pixels into streaks; Transparent leaves those places empty, so the layer below shows through. Mirror, Clamp, Transparent, default Mirror.
Node setup
Section titled “Node setup”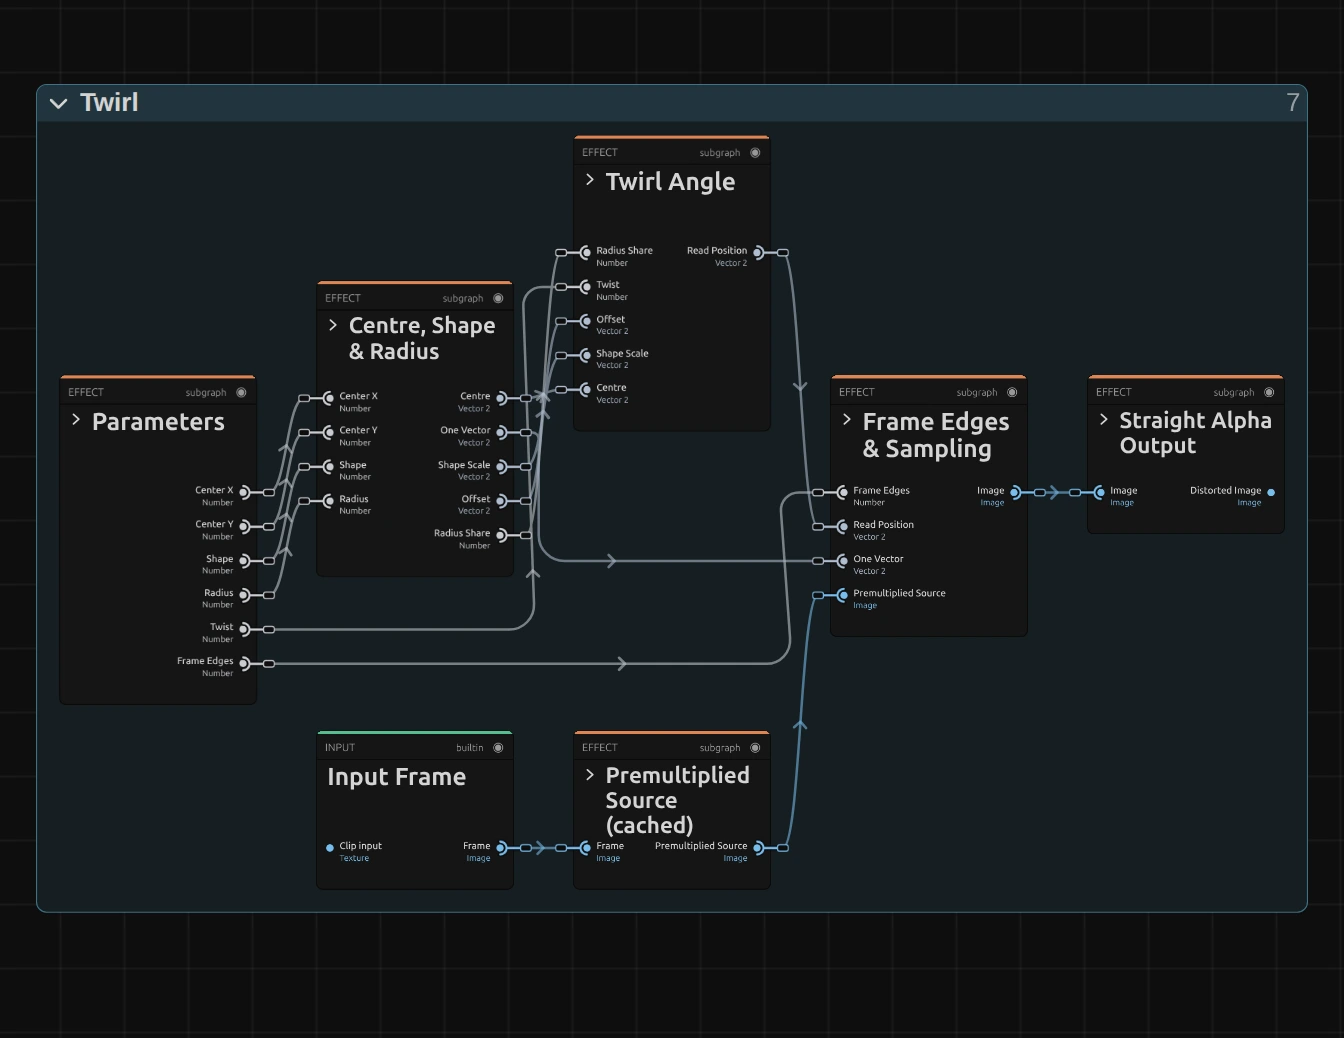
Twirl does not paint anything: it moves where each pixel reads, like every effect in its group (the shared idea). Centre, Shape & Radius works out where a pixel sits from the middle of the spiral, Twirl Angle turns that position, Frame Edges & Sampling reads the picture at the turned place, from the Premultiplied Source prepared once per frame, and Straight Alpha Output turns the result back into a normal picture. Click a folder’s header to open it; the sections below show what is inside.
Centre, Shape & Radius
Section titled “Centre, Shape & Radius”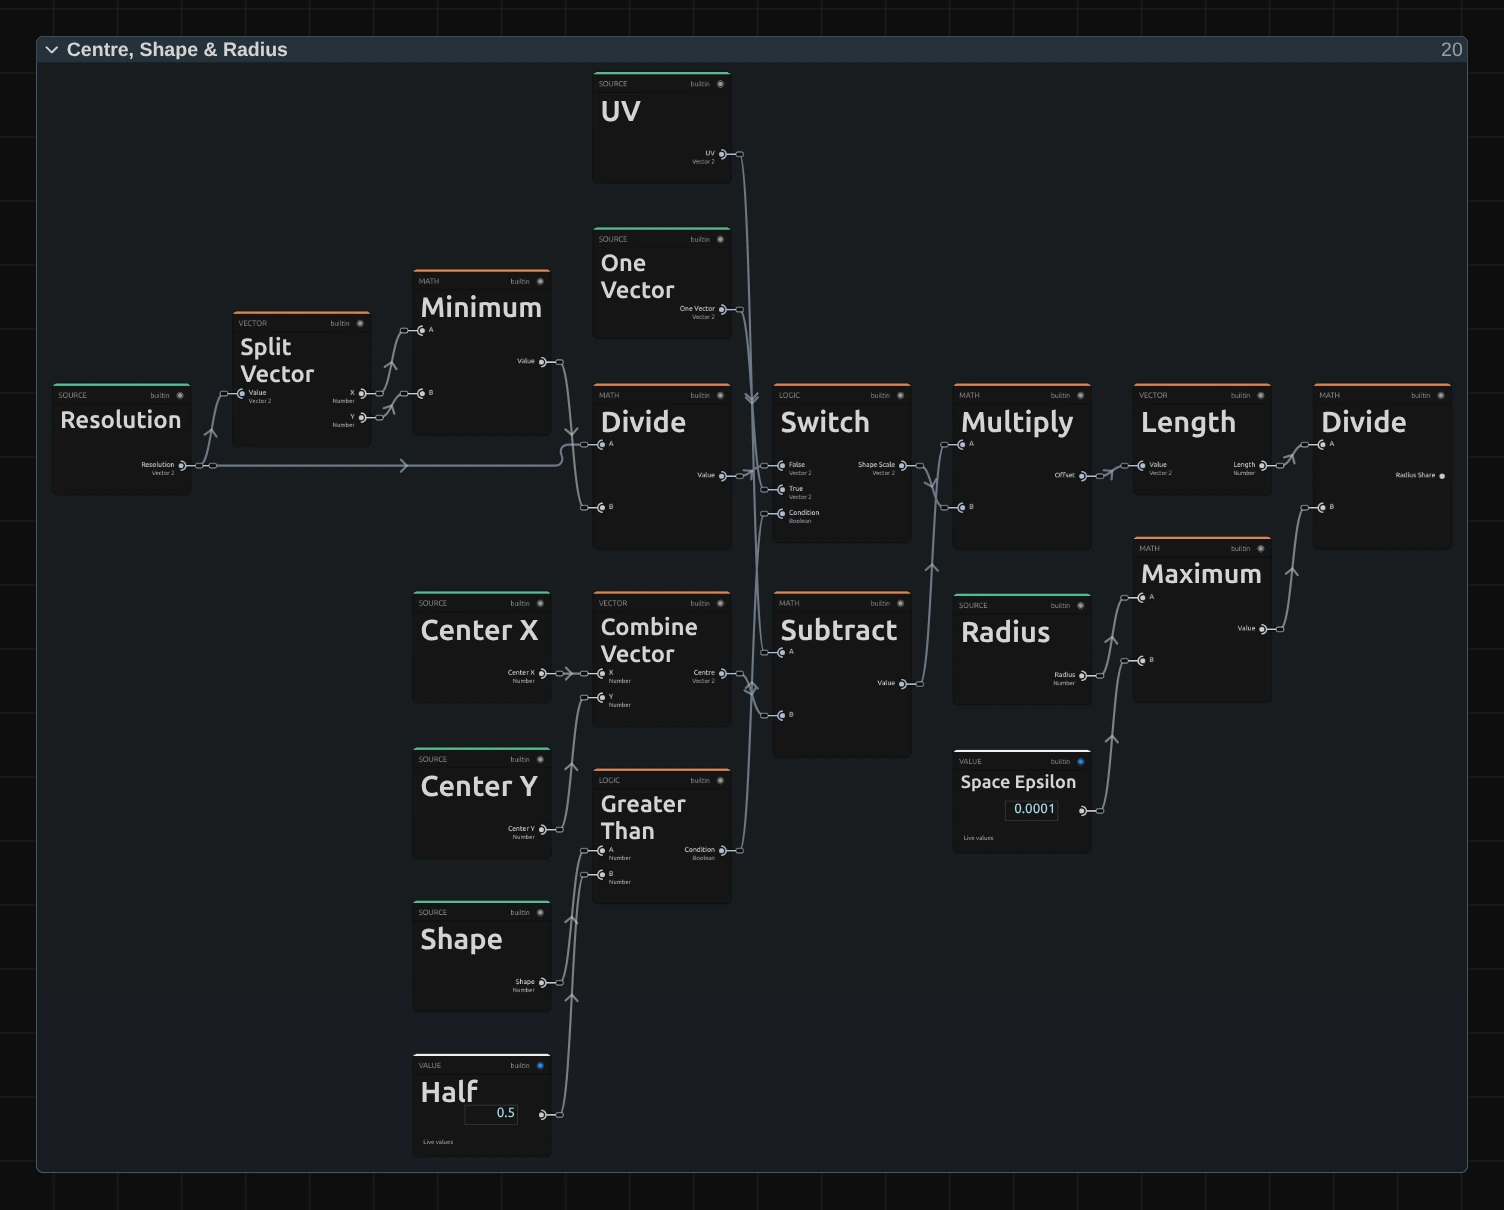
Minimum – the shorter side of the frame in pixels. Divided into the resolution, it gives the scale that keeps the area a circle on a wide or a tall frame.
Switch – picks that circle scale for Circle, or One for Stretch to Frame, so each side then counts in its own length. Greater Than compares the Shape choice with Half to decide.
Multiply – the Offset: the pixel’s place (UV) minus the Centre, times the scale. It says how far and in which direction the pixel lies from the middle of the spiral.
Divide – the Radius Share: the length of the Offset divided by Radius. It is 0 in the middle and 1 at the edge of the area. Maximum keeps Radius above a tiny Space Epsilon, so the division never fails.
Twirl Angle
Section titled “Twirl Angle”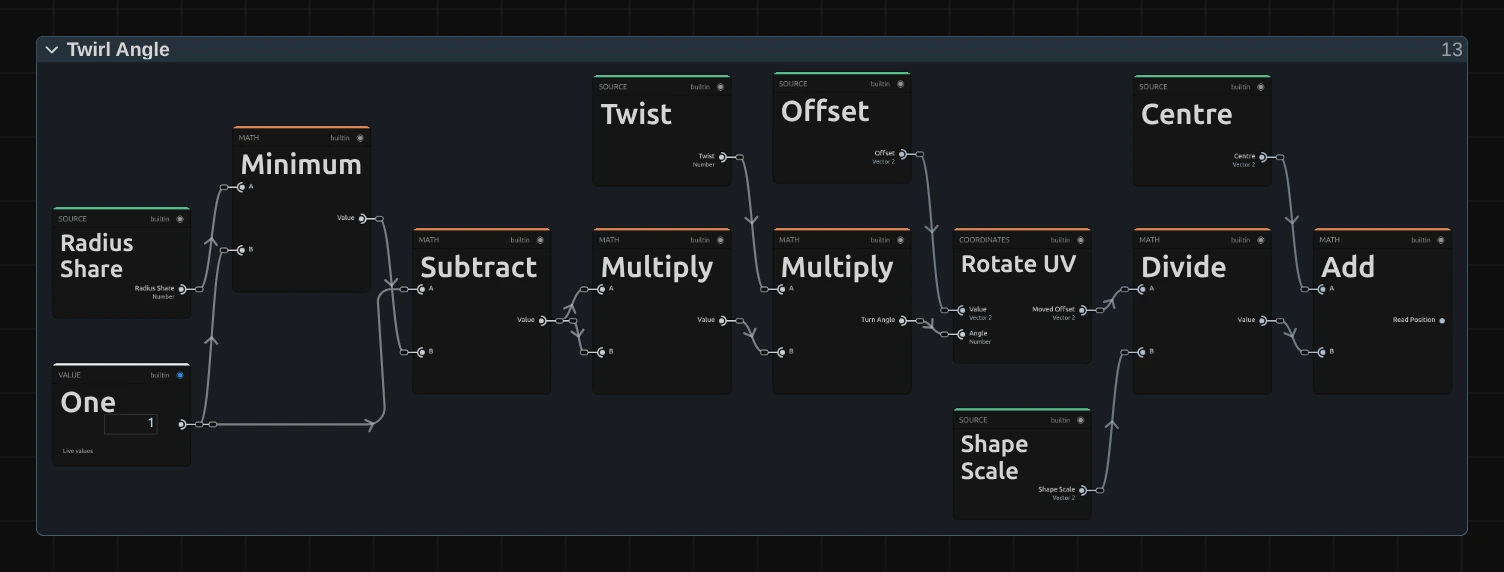
Subtract – One minus the Radius Share (held at 1 or less by Minimum): 1 in the middle, 0 at the edge of the area and beyond. The Multiply to its right multiplies it by itself, so the strength fades in a soft curve and the edge of the area shows no seam.
Multiply – that falloff times Twist: the Turn Angle, how far this pixel turns. The full Twist in the middle, nothing at the edge.
Rotate UV – turns the Offset around the middle by the Turn Angle. Pixels at the same distance turn by the same amount, which is what makes a spiral.
Add – Divide takes the shape scale back out, and Add puts the Centre back: the Read Position, the place in the picture this pixel reads.
Remix: connect the output of Subtract straight to input B of the Multiply that makes the Turn Angle, in place of the cable from the squaring Multiply. The turn then fades in a straight line, and the swirl stays strong further out.
Premultiplied Source
Section titled “Premultiplied Source”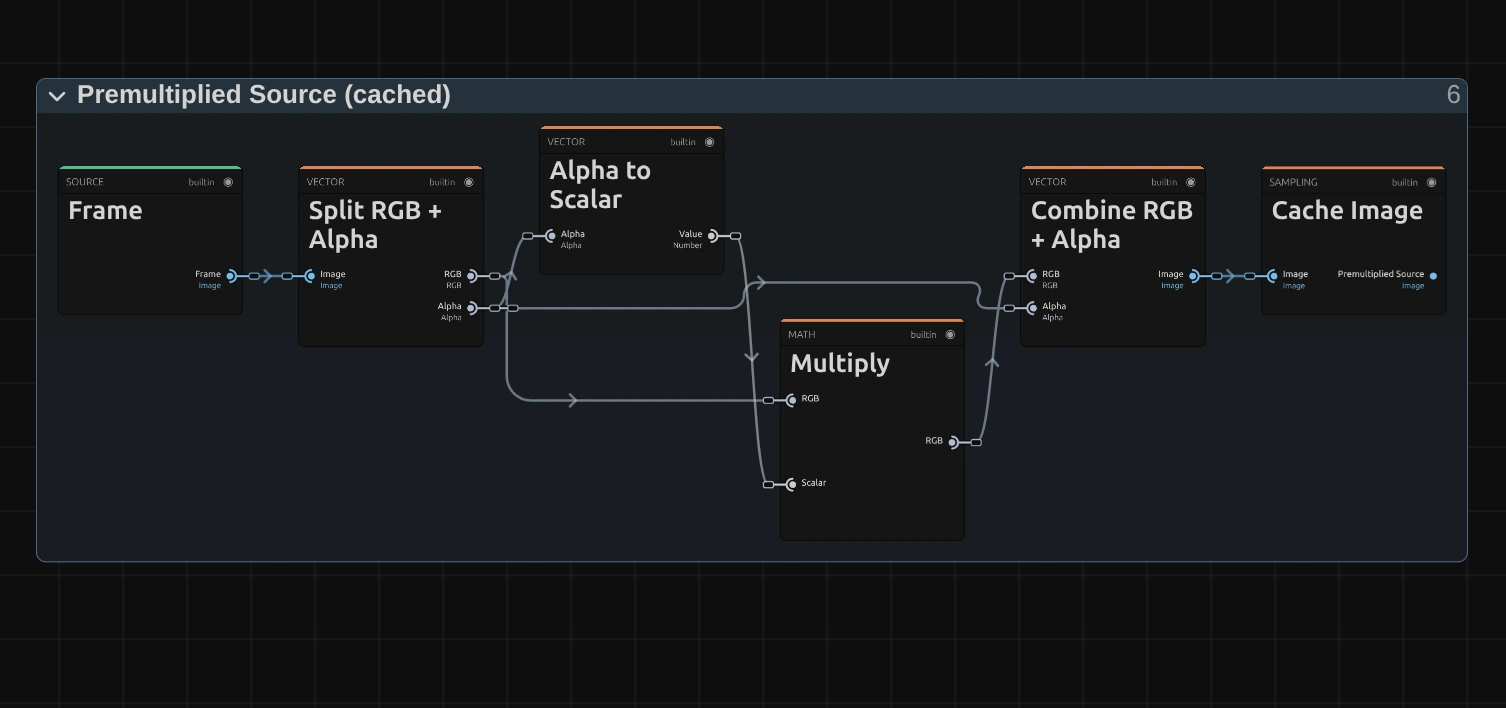
Multiply – multiplies every pixel’s colour by its transparency. When the read later blends two neighbouring pixels, a transparent one then adds no colour, so a cut-out figure keeps clean edges instead of a dark rim.
Cache Image – keeps the prepared picture, so it is made once per frame, not once per pixel.
Frame Edges & Sampling
Section titled “Frame Edges & Sampling”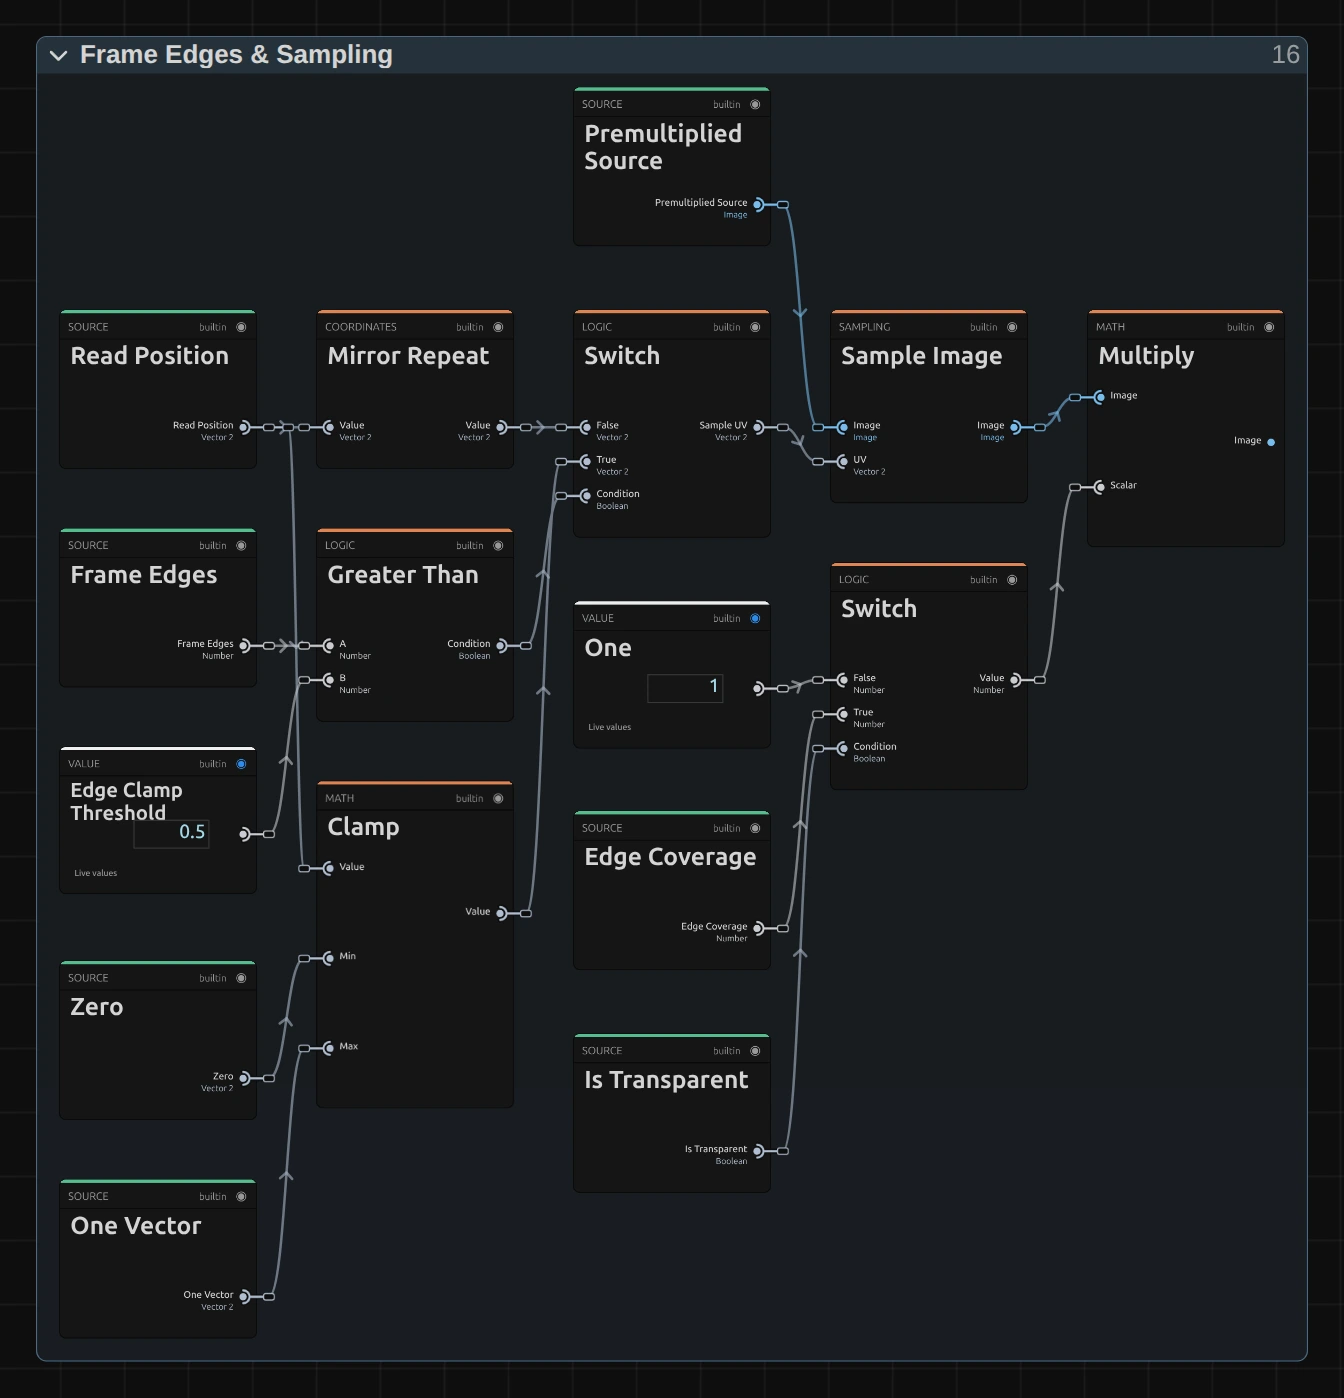
Mirror Repeat – folds a Read Position beyond the frame back in, as in a mirror: the Mirror choice.
Clamp – holds the Read Position between Zero and One, so it stops at the outermost pixel: the Clamp choice, and the base of Transparent.
Switch – picks the mirrored or the clamped position. Greater Than compares Frame Edges with 0.5: Mirror is the only choice below it.
Sample Image – reads the Premultiplied Source at that position, blending the four nearest pixels.
Multiply – scales the read by One, or for Transparent by Edge Coverage, which falls from 1 to 0 within one pixel of the frame edge. Places that read from beyond the frame turn empty with a soft edge.
Straight Alpha Output
Section titled “Straight Alpha Output”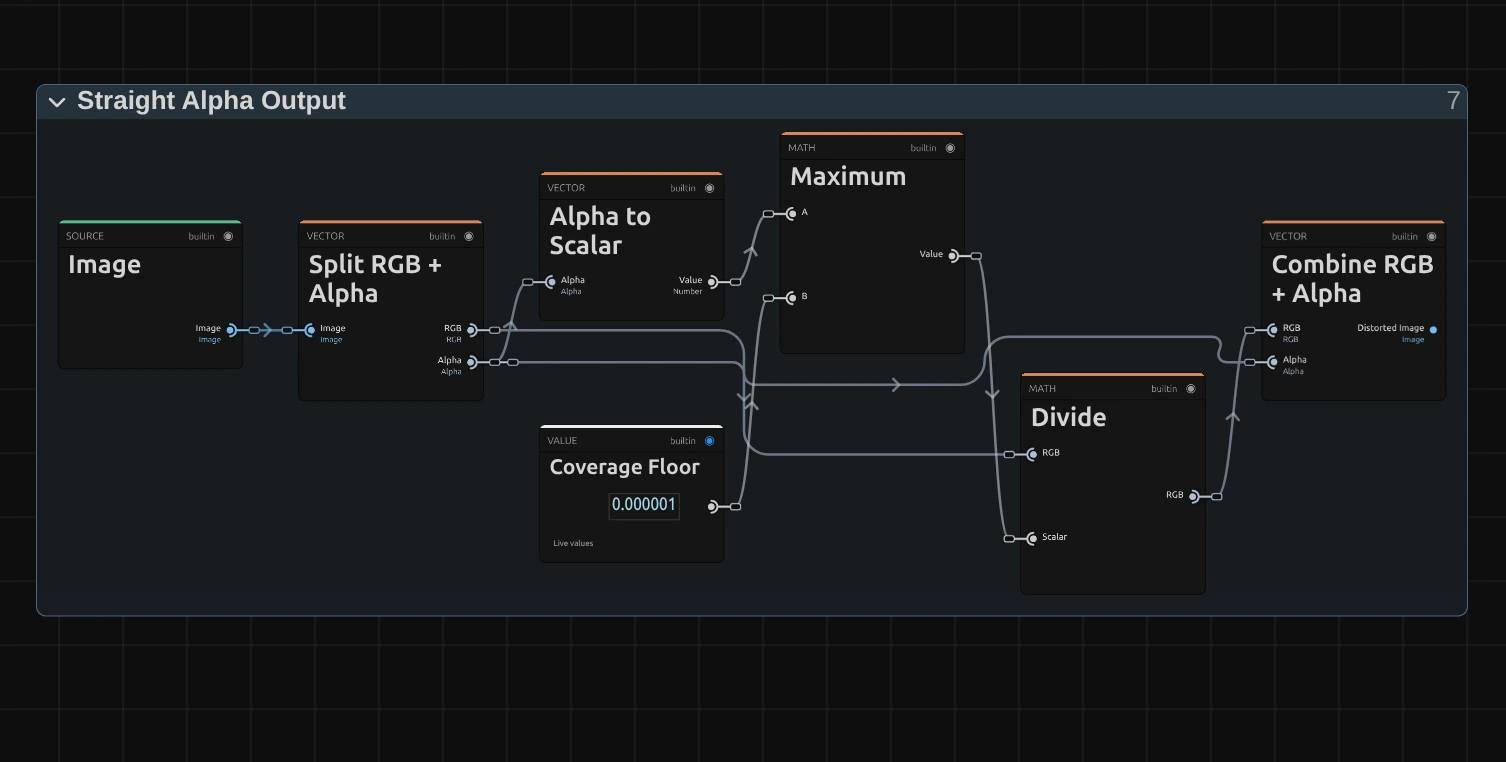
Maximum – keeps the transparency above a tiny Coverage Floor, so a fully transparent pixel never divides by zero.
Divide – divides the colour by the transparency again: the step back from the Premultiplied Source, so half-transparent edges keep their real colour.
Combine RGB + Alpha – joins colour and transparency into the finished picture that goes on to the next effect.
Technical details
Section titled “Technical details”- Formula. With p the offset from the centre and r = |p| / Radius, Twirl turns p by Twist × (1 − min(r, 1))² radians.
- Units. Twist is stored in radians (default 2, range ±4π). The card shows degrees, also when Twist takes a node source; keyframe lanes, MIDI and tools use radians. Radius and the centre are shares of the frame, so a 4K export, a portrait frame and the thumbnails show the same spiral.
- Twist 0 skips the effect, so the picture passes through exactly. A Radius of 0 or less, which only a tool or a node source can set, leaves the picture unchanged, and the card says so.
- Limits. Each pixel is read once, so a very strong Twist (above about 570°) shimmers on fine detail.
- Transparency. The picture is read premultiplied, so cut-out figures keep clean edges; the preview and the export match. Twirl does not move with time: a still frame stays still.
- Saved projects. An untouched graph, an effect saved before effects owned a graph and an effect preset of the earlier recipe load as the current recipe with Stretch to Frame and Clamp, which keeps their look.
- More: Effect system: Lens & Distort · Editable UV distortions · Node Catalog · Styles and presets.