
Drift Lines
Cuts the picture into thin bands that slide back and forth in a slow wave. For dreamlike, unstable images: water, heat, a breaking signal.
Group: Lines & Engraving · How to add an effect
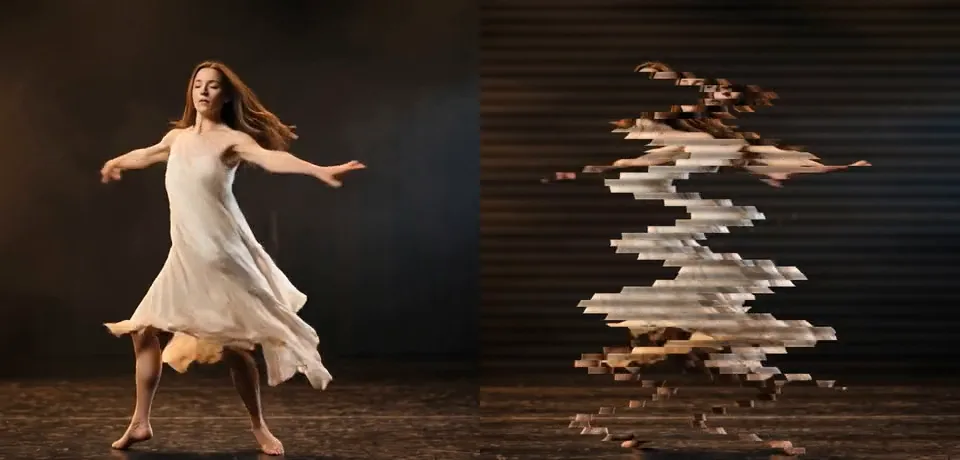
Use it for: a dream or a memory · shimmering water or heat on a projection · a picture that breaks apart on a cue.
- Band Size – how thick the bands are.
- Angle – which way they run: 0° across, 90° upright.
- Drift – how far they slide.
- Speed – how fast the wave moves.
Tip: keyframe Drift from 0 up to 0.75 to let a still picture come apart on a cue, and back to 0 to pull it together again.
Presets
Section titled “Presets”Pick one in the Preset row of the effect card. It sets all controls at once, in one undo step, and the row then shows its name until you change something. A control with keyframes keeps them, and the card says so.
Heat Haze – fine rows and a small drift: the picture shimmers like air over a hot stage floor and stays easy to read. Good under text or for a quiet unease.
Venetian Blinds – broad bands that slide slowly, shaded like half-open blinds. A calm, graphic look for large surfaces.
Rain Curtain – thin upright columns that run up and down. A figure turns into falling streaks; strong on tall gauzes and portrait screens.
Torn Signal – fine rows torn across the whole width, fast. For a breakdown, a lost transmission or the moment a scene cracks.
Controls
Section titled “Controls”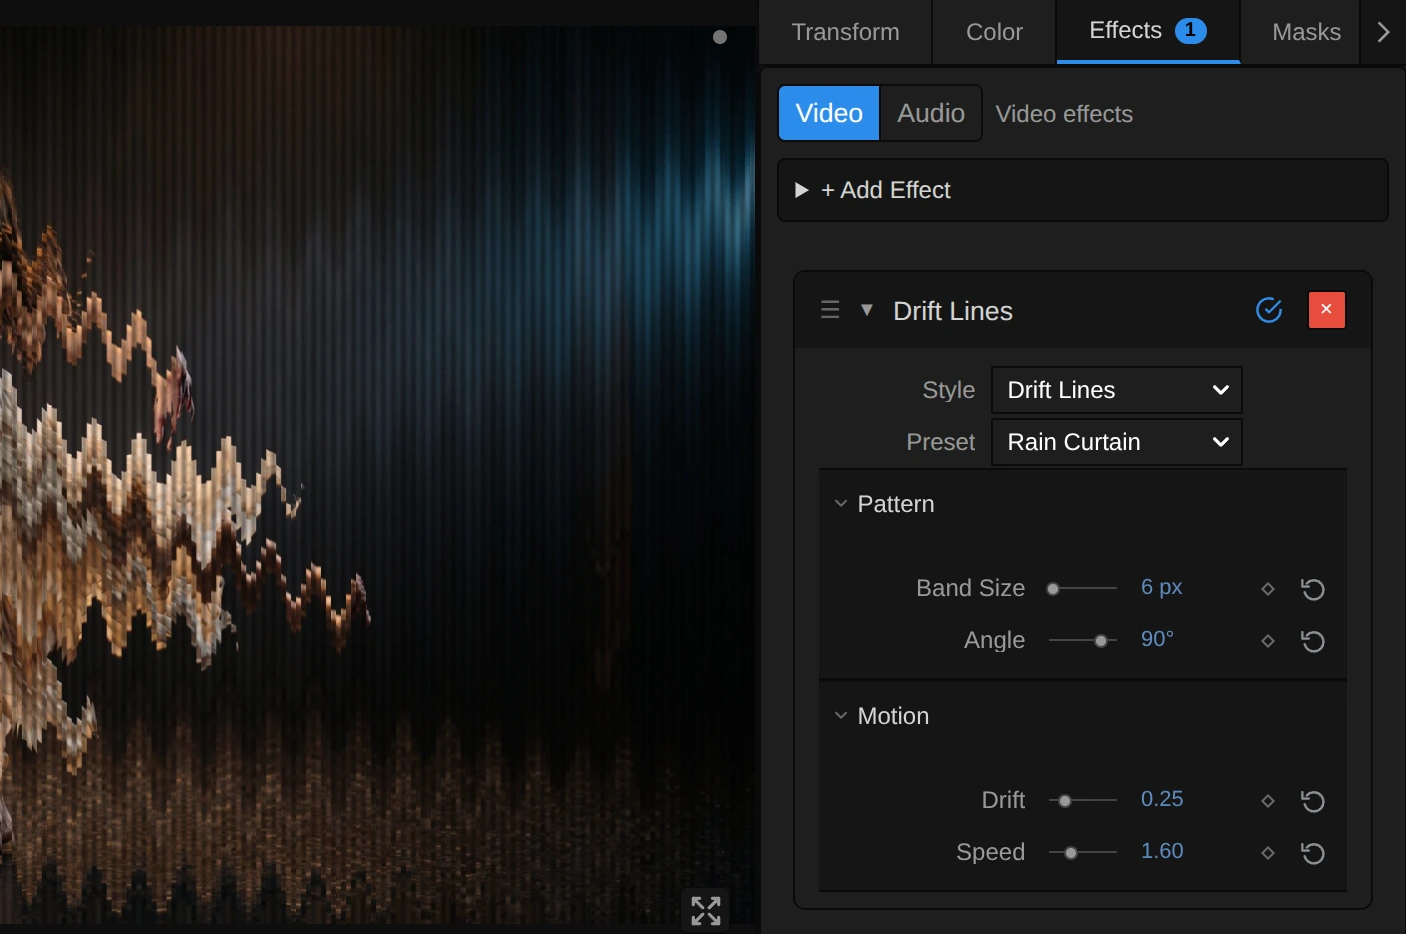
Style – switches to another look of the same engine. Band Size, Angle and Speed keep the values and keyframes you set in looks that have the same control, for example Halftone, Glitch Grid or Scatter Mosaic. A control that means something else in the new look starts at that look’s default, and the row under the menu says so: Drift everywhere, since no other look slides its bands (Halftone’s Amount is a mix), and Band Size in Wave Lines (Line Density), Crystal Glass (Facets) or Ribbon Scan (Ribbons). Undo brings the old value back.
Pattern
Section titled “Pattern”Band Size – how thick each band is. 2–4 gives a fine ripple like water, 10–20 clear strips, 40 and more broad blinds; thicker bands also make the dark lines between them wider. It counts pixels of a 1080p picture, so a 4K picture shows the same bands, only sharper. 2 to 80 px, default 14 px.
Angle – which way the bands run, turned counter-clockwise. At 0° they lie flat and slide sideways; at 90° they stand upright and slide up and down; 30° tilts them so they rise to the right. Animate it slowly for a picture that seems to turn in the wind. −180 to 180°, default 0°.
Motion
Section titled “Motion”Drift – how far the bands slide. At 0 the picture holds together and only the fine lines remain; 0.05 already makes edges ripple, 0.3 breaks a figure into steps, and at 1 a band travels about a sixteenth of the picture width each way. 0 to 1, default 0.75.
Speed – how fast the wave runs through the bands. 0 freezes the drift where it is; at 1 the wave comes round about every three seconds; 3 and more flickers. It follows the playhead, so a paused picture stands still and the export matches the preview. 0 to 5, default 1.
Node setup
Section titled “Node setup”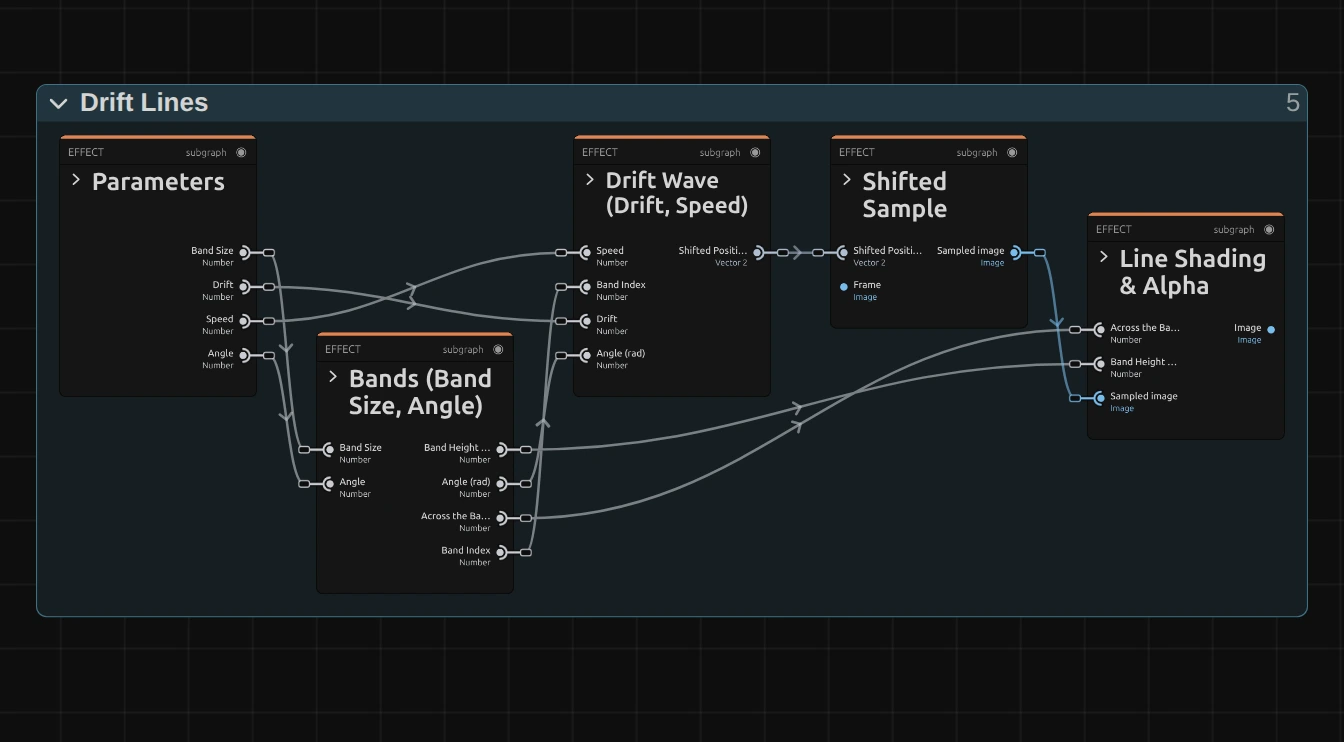
Drift Lines works in four stages, one folder each in the Nodes tab: Bands finds the band a pixel lies in, Drift Wave works out how far that band slides right now, Shifted Sample reads the picture there, and Line Shading darkens the bands into lines. Click a folder’s header to open it; the sections below show what is inside. Drift Lines is one look of the pattern engine that the Lines & Engraving looks share; its Style menu switches between them.
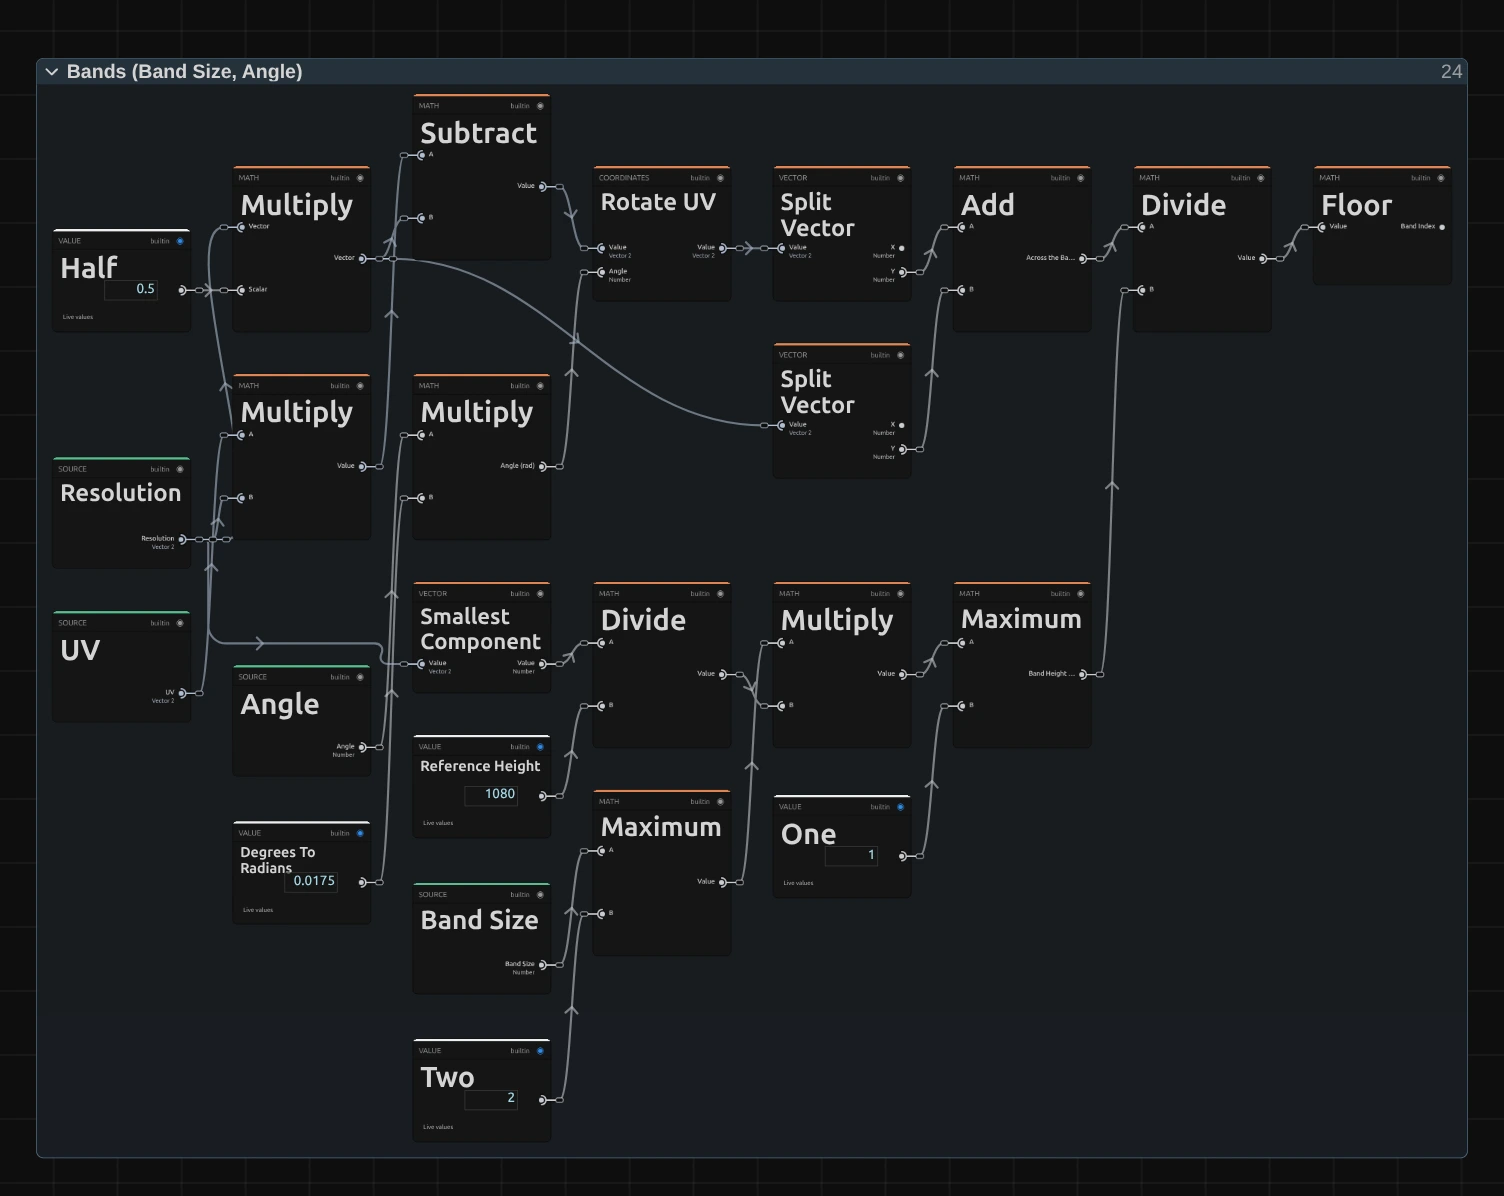
Smallest Component – the shorter side of the frame. Divided by 1080, it says how much larger or smaller this frame is than a 1080p one, so Band Size looks the same on a 4K export, a portrait frame and a thumbnail.
Maximum – the band height in pixels of this frame: Band Size times that scale, and never thinner than one pixel. The other Maximum, to its left, first keeps Band Size at 2 or more.
Rotate UV – turns the position of every pixel around the middle of the frame by Angle (Multiply turns degrees into radians). The bands are cut across this turned picture, which is why they can run at any angle.
Floor – which band the pixel lies in. Add gives its distance across the turned bands in pixels, Divide splits that into band heights, and Floor drops the fraction: every pixel of a band gets the same band number, so the whole band slides as one.
Drift Wave
Section titled “Drift Wave”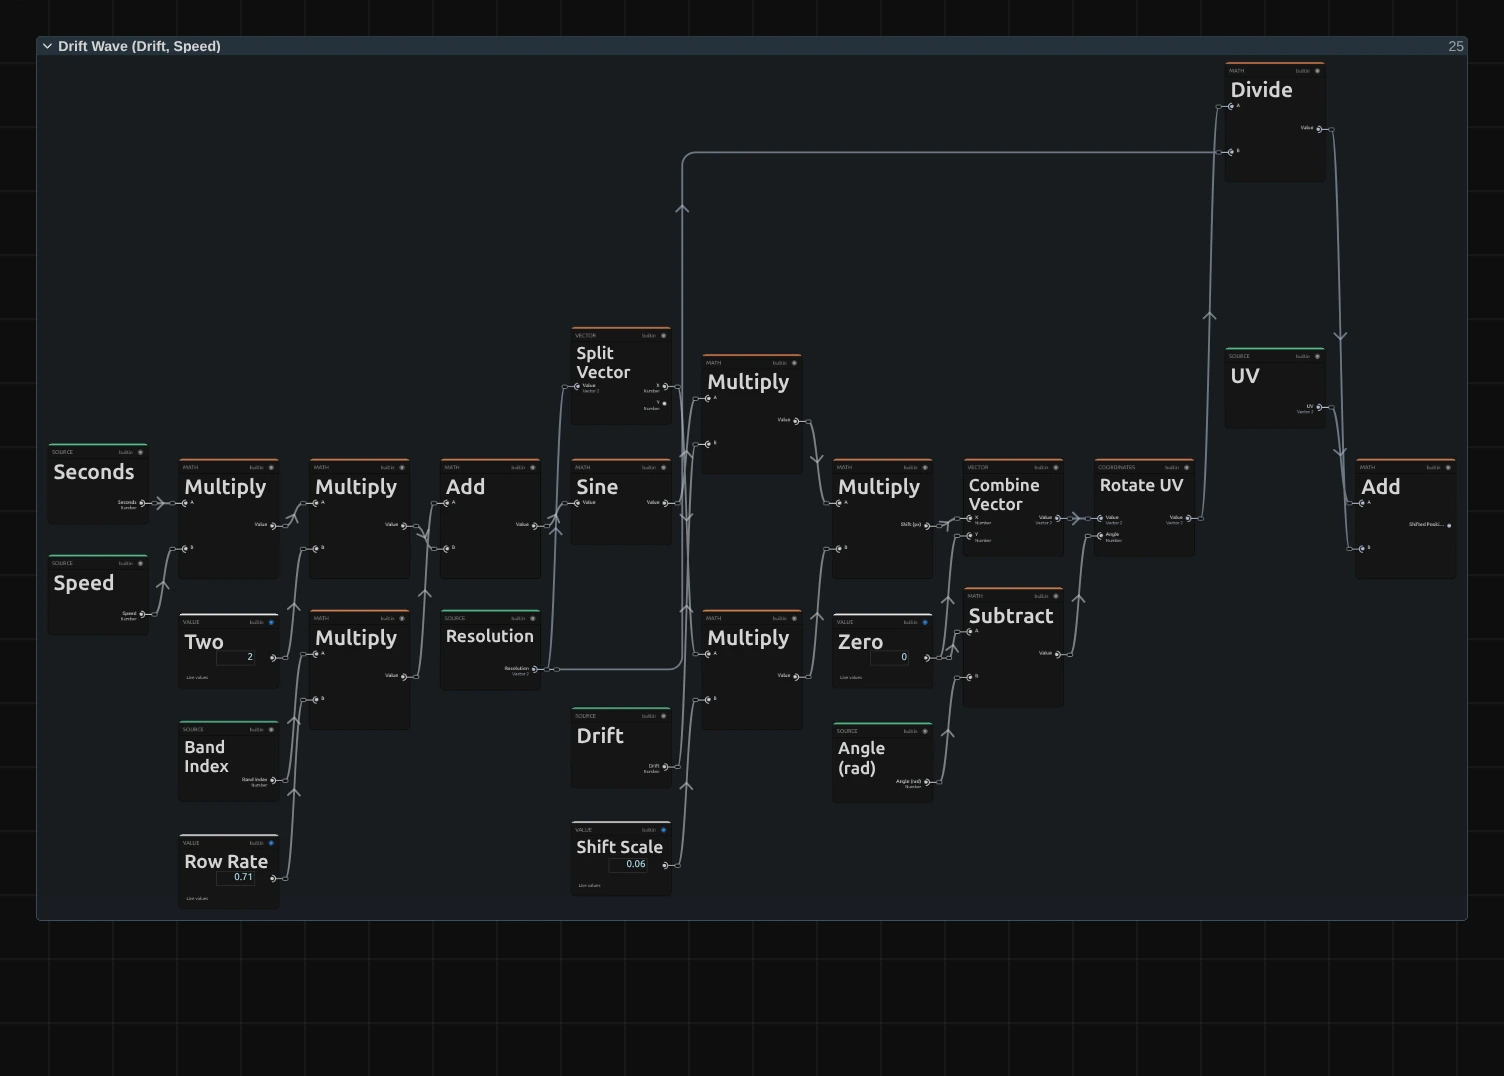
Row Rate – 0.71. Multiplied by the band number, it gives every band its own place on the wave, so neighbouring bands slide by different amounts. Seconds × Speed × 2 is added to it, so the wave runs on with the playhead.
Sine – turns that place into a smooth swing between −1 and 1: one way, back, the other way, back.
Shift Scale – 0.06, so a band slides at most 6 % of the frame width. Sine × Drift × this width is the slide in pixels.
Rotate UV – turns the slide by minus Angle, from across the bands to along them, so upright bands slide up and down. Divide by Resolution and Add the pixel’s own place (UV): that is the Shifted Position the next stage reads.
Remix: open the Constants folder and set the value 0.71 (the Row Rate card above) to 0.1: neighbouring bands now slide almost together, and the picture sways in long, slow waves.
Shifted Sample
Section titled “Shifted Sample”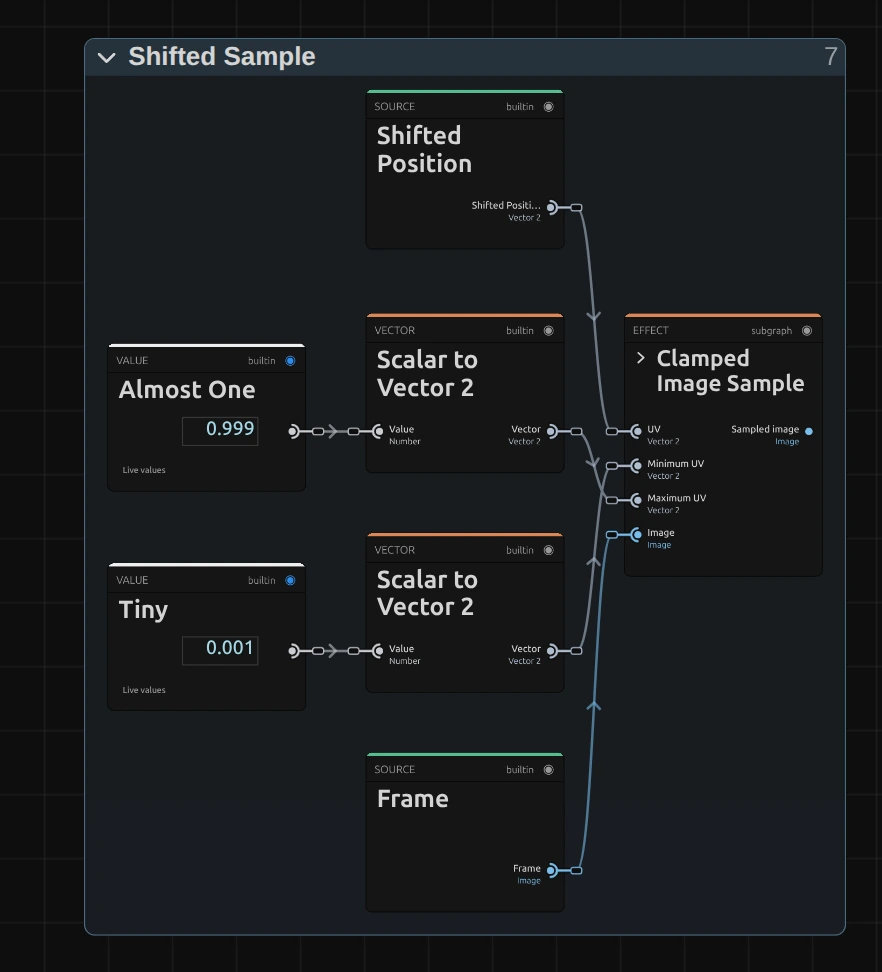
Clamped Image Sample – reads the input picture at the Shifted Position, but never outside the frame. It holds a small node setup of its own; its › opens it.
Almost One and Tiny – 0.999 and 0.001: the farthest and nearest place it may read, as a share of the frame (Scalar to Vector 2 uses each for both directions). Where a band slides in from beyond the edge, the edge pixels stretch into the gap instead of leaving it empty.
Line Shading & Alpha
Section titled “Line Shading & Alpha”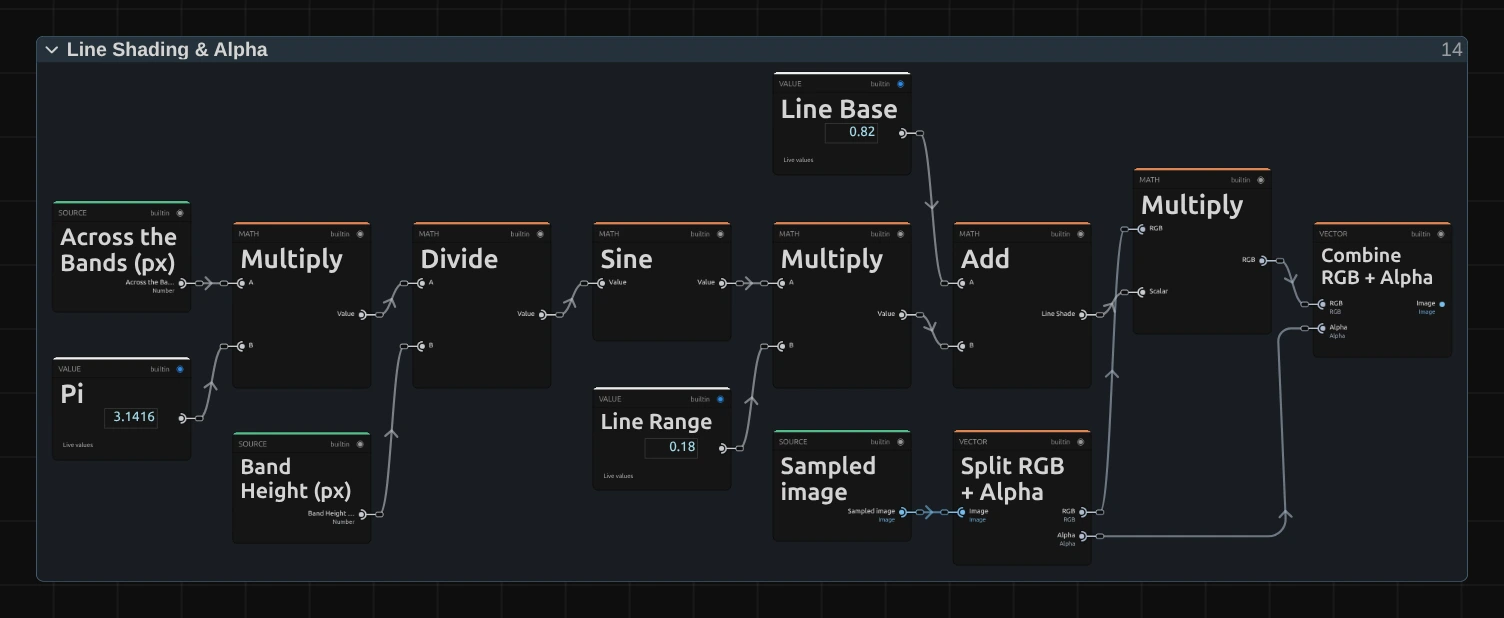
Sine – the distance across the bands times π, divided by the band height, rises and falls once per band: up in one band, down in the next.
Add – Line Base 0.82 plus Line Range 0.18 times that sine: the shade, from 0.64 in the middle of every second band to 1 in the middle of the others.
Multiply – multiplies the colour of the sampled picture by the shade, so every second band carries a dark line through its middle.
Combine RGB + Alpha – joins the shaded colour with the sampled transparency, so a cut-out figure keeps clean edges.
Technical details
Section titled “Technical details”- Size. Band Size counts pixels of a frame whose shorter side is 1080: a 4K export, a portrait 1080 × 1920 frame, a lower Preview Quality and the thumbnails show the same bands. A band is never thinner than one pixel of the frame; below 2 px Band Size renders as 2. The card says when either happens.
- Time. The wave follows the timeline time: scrubbing, playback and export give the same frame for the same moment, and a paused picture needs no extra rendering. Speed multiplies that time, so a keyframed Speed makes the wave jump, the further into the clip the more. To start the motion on a cue, keyframe Drift instead.
- Transparency. Bands carry their transparency with them, so a cut-out figure keeps clean edges. Where a band slides in from the frame edge, the edge pixels stretch.
- Saved projects. A Drift Lines whose node setup you edited keeps its own recipe: its bands count output pixels and its card hides Angle.
- More: Effect system · Node Catalog · Styles and presets.