
Edge Detect
Turns the picture into its outlines: bright lines where things meet, dark everywhere else. With Invert it looks like a pencil drawing.
Group: Light & Stylize · How to add an effect
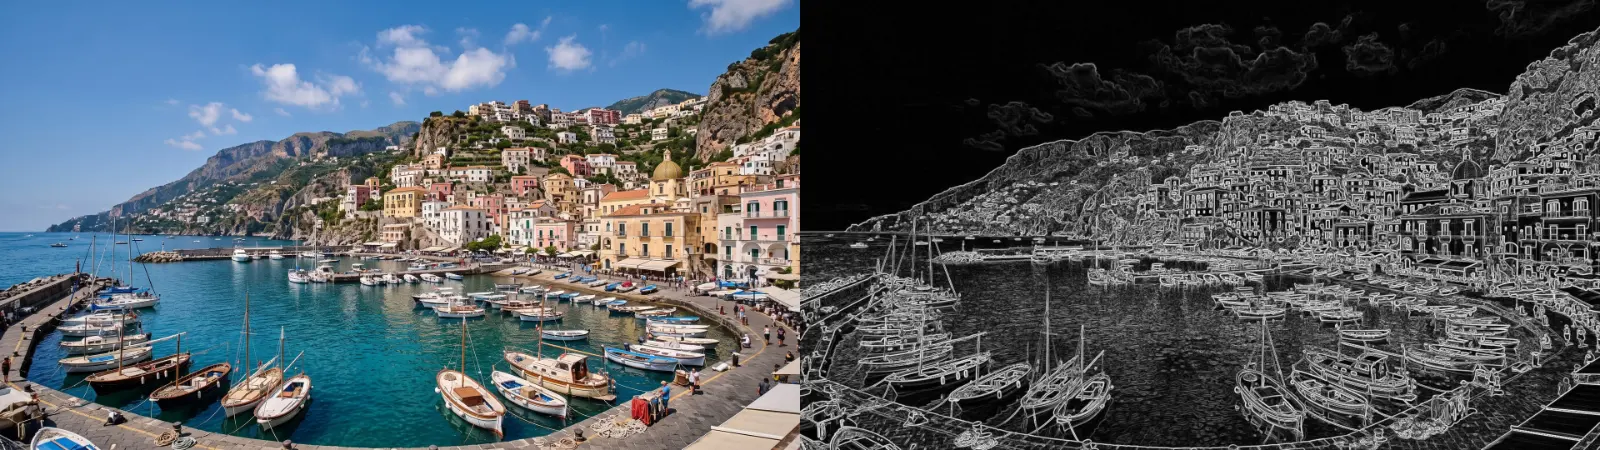
Use it for: a drawn or neon-outline look · glowing contours on black for projection · an outline around a title or a cut-out.
- Strength – how bright and how many lines.
- Width – how thick the lines are; it stays the same at any resolution.
- Color – white lines, or lines in the picture’s own colours.
- Invert – dark lines on white, like a pencil drawing.
Tip: on a title or a cut-out on a transparent layer, the outline is drawn just outside it too. Add Glow after Edge Detect for neon tubes.
Presets
Section titled “Presets”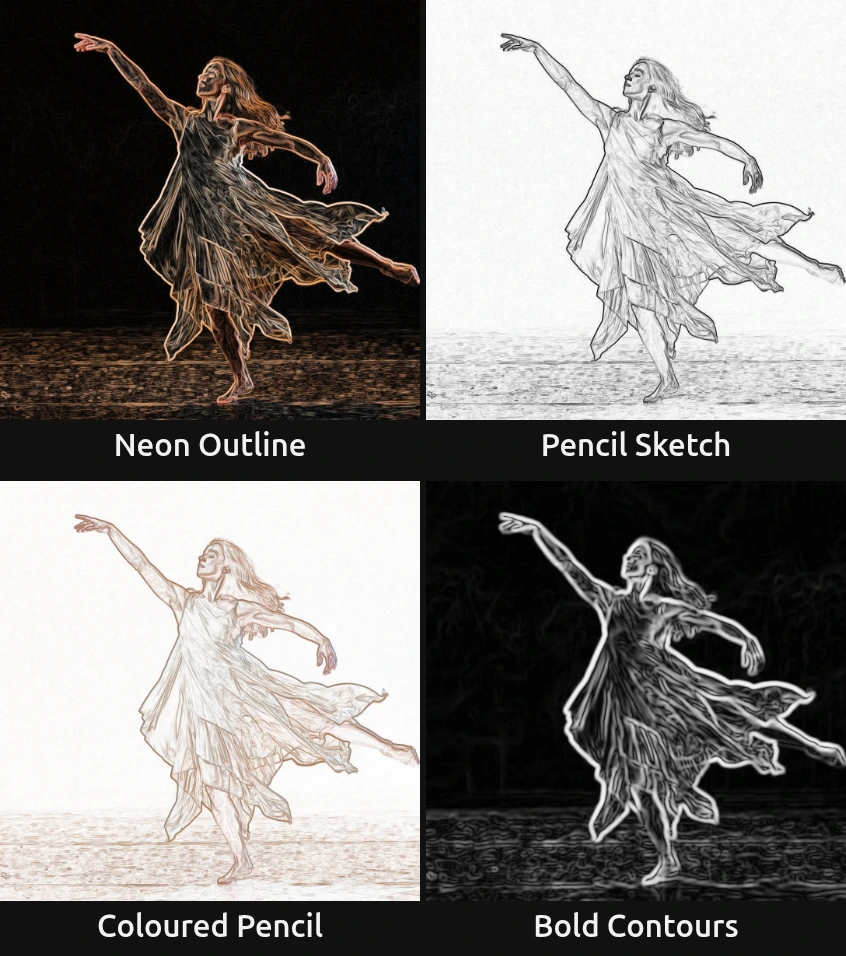
Pick one in the Preset row of the effect card. It sets all four controls in one undo step, and the row shows its name until you change something. A control with keyframes keeps them, and the card says so.
Neon Outline – glowing contours in the picture’s own colours on black. Strong on stage footage with a dark background, and a good start for projection; add Glow after it for neon tubes.
Pencil Sketch – fine dark grey lines on white paper, like a quick drawing. Works best on a sharp picture with clear shapes.
Coloured Pencil – lines in the picture’s colours on white, like a drawing with coloured pencils. It reads best on colourful pictures; on pale skin and white costumes the lines stay light.
Bold Contours – thick, soft white lines around the figure and the big folds, like chalk or a cartoon. Most fine texture fades; a busy floor keeps a faint pattern.
Controls
Section titled “Controls”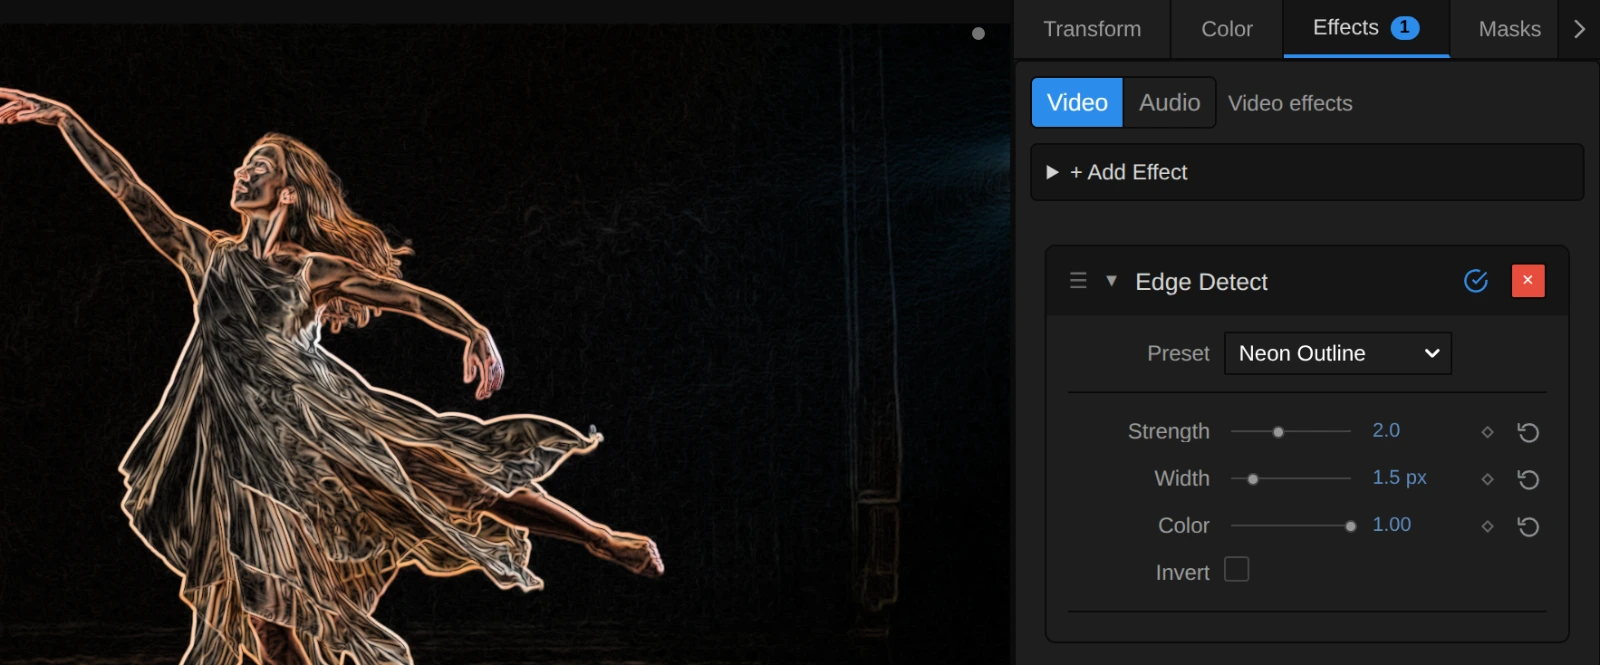
Preset – a starting point for all four controls; see Presets.
Strength – how bright the lines get, and with that how many show. Around 0.3 only the strongest outlines remain; the default 1 draws clear outlines and a soft web of fine detail; 2–3 brings out texture such as hair, fabric and a stage floor. Strong edges never clip to a flat white: they approach it softly, so busy detail keeps its structure even at 5. 0 draws no lines at all. 0 to 5, default 1.
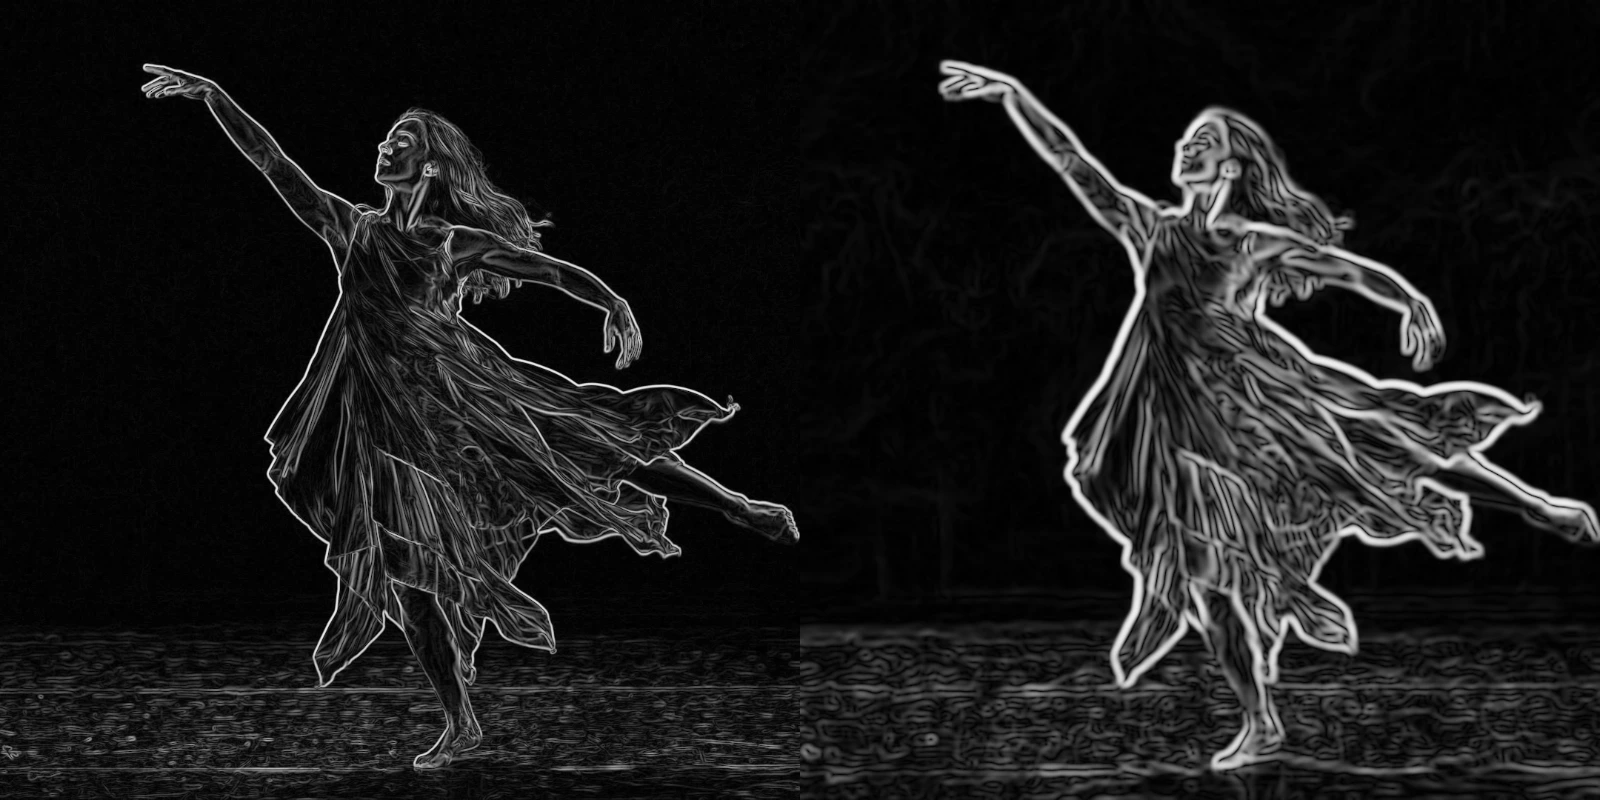
Width – how thick the lines are, and how big a detail has to be to get one. At 1 every hair and fold gets a line; at 3–4 fine texture fades and thick, soft lines follow only the big shapes. It is measured in pixels of a 1080p frame, so a half-size preview, the 1080p export and a 4K export draw the same line and let the same fine texture through. A 1080p frame cannot show lines thinner than about 0.7 px, so the lowest values look alike there (the card says so). Animating Width changes the lines smoothly. 0.5 to 6 px, default 1 px.
Color – the colour of the lines. At 0 they are white (with Invert: black); at 1 each line takes the colour of the picture next to it, at full brightness, so a dark red stays a clear red line. Values between mix the two. 0 to 1, default 0.
Invert – swaps line and background: dark lines on white, like a pencil drawing. With Color the lines take the picture’s colours on white. A switch: on or off, default off.
Node setup
Section titled “Node setup”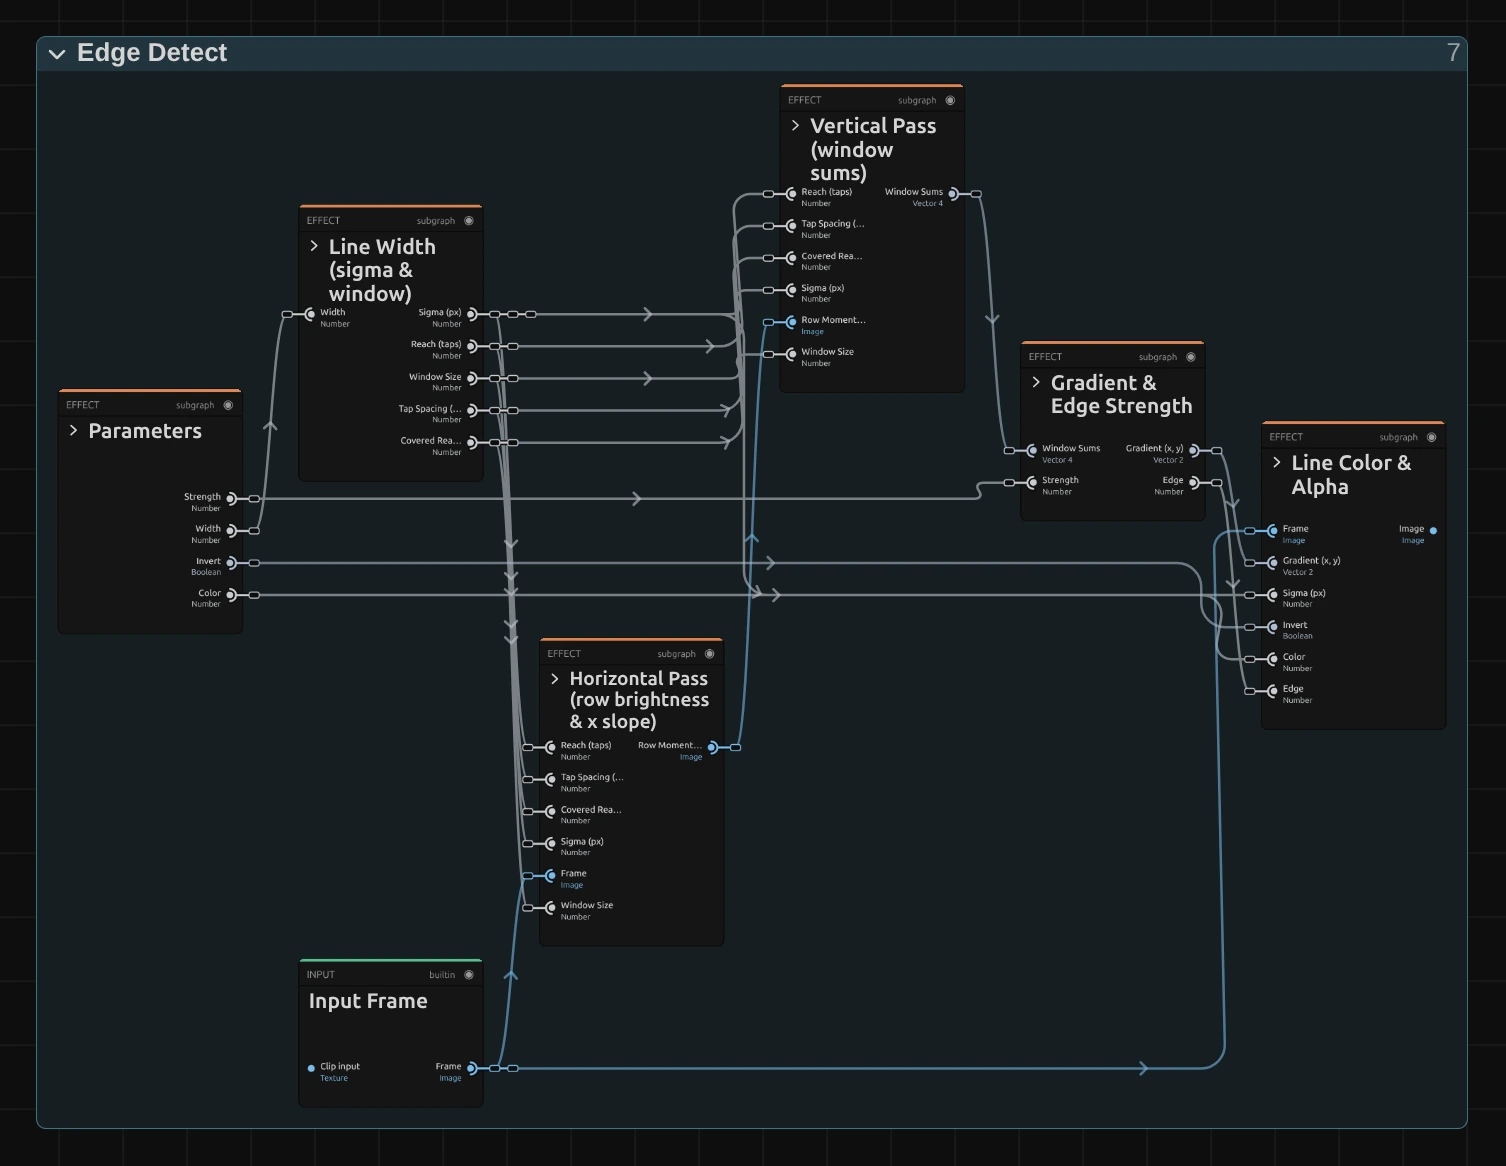
Edge Detect reads a window around each pixel in two passes over the picture. Line Width (sigma & window) turns Width into a blur size in pixels and the size of that window. Horizontal Pass (row brightness & x slope) reads the brightness along a row of the window, weighted by distance, and keeps two sums per pixel in a cache: the brightness, and how it rises from left to right. Vertical Pass (window sums) adds those rows up, weighted the same way, so together they cover the whole square window. Gradient & Edge Strength works out from those sums how strongly the brightness changes across the pixel, and turns that into a line strength from 0 to 1. Line Color & Alpha draws the line in white, black or the picture’s colour over the background. Click a folder’s header to open it.
Every tap reads one whole pixel, so the window takes in all the detail it covers. That is why Width lets the same fine texture through in a half-size preview and in a 4K export.
Line Width (sigma & window)
Section titled “Line Width (sigma & window)”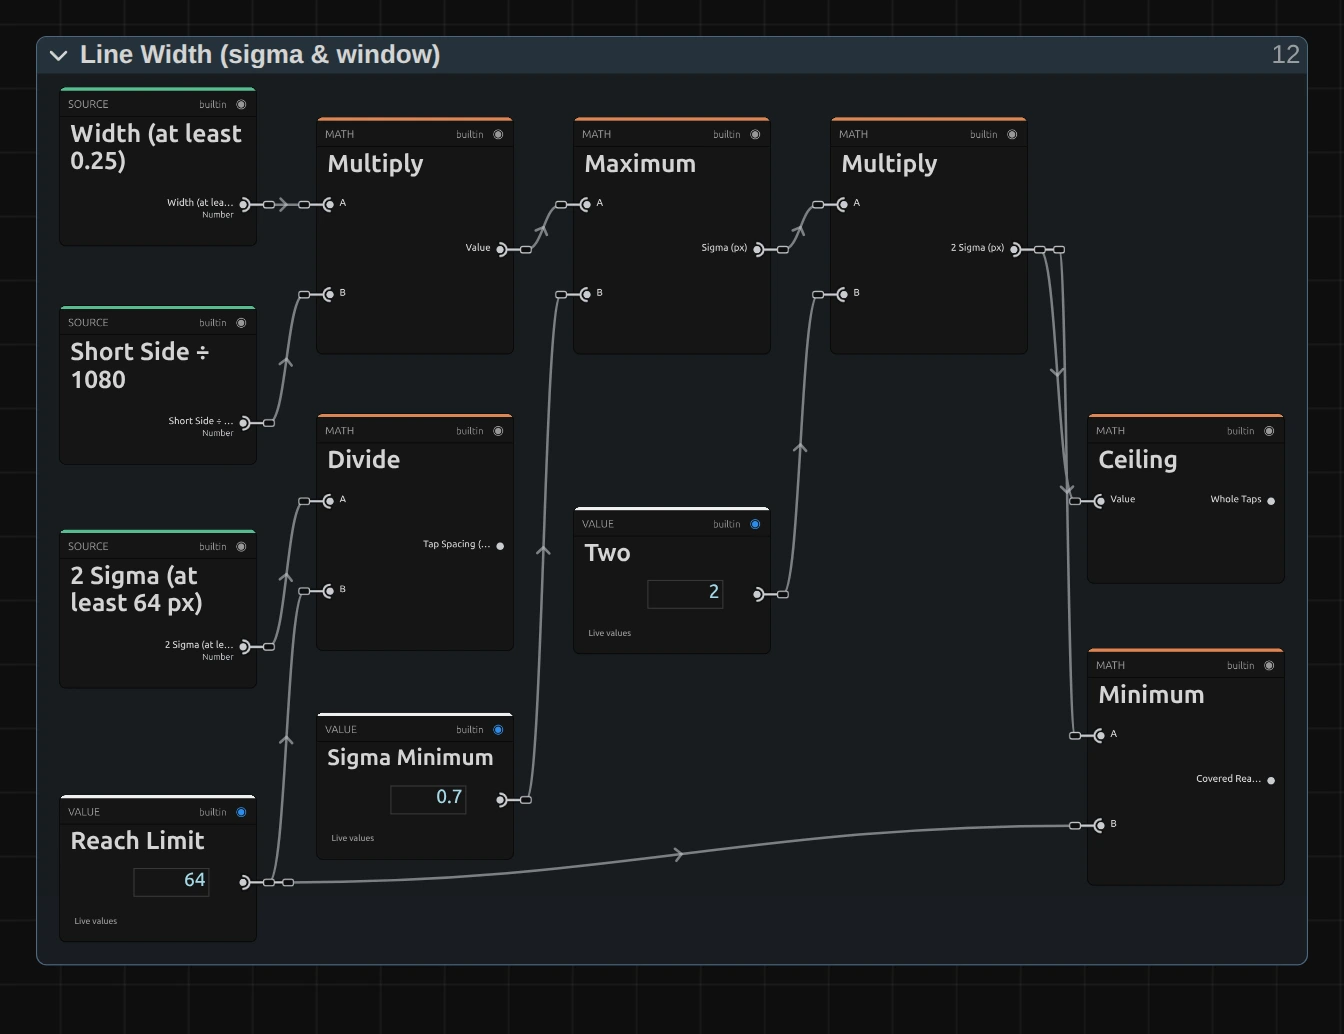
Multiply – Width times the frame’s short side divided by 1080: the line’s blur size (sigma) in pixels of this frame. That is why a line looks the same in a 1080p preview and a 4K export.
Maximum – keeps sigma at 0.7 px or more. A pixel grid cannot show a finer line; it would only fade.
Ceiling – two sigma rounded up to whole pixels: how many taps each pass reads to each side. A second Minimum, left out of the picture, limits that to 64.
Minimum – the Covered Reach: two sigma counted in taps, also limited to 64, but not rounded. Both passes use it to count the outermost tap only with the share of it the reach covers.
Divide – the Tap Spacing, how far apart the taps sit: two sigma, at least 64 px, divided by 64. It stays 1 px for every Width the slider reaches, even at 4K (Width 6 there needs 24 taps to each side). Only a keyframed Width above 8 at 4K spreads the taps apart; the card then says so.
Horizontal Pass (row brightness & x slope)
Section titled “Horizontal Pass (row brightness & x slope)”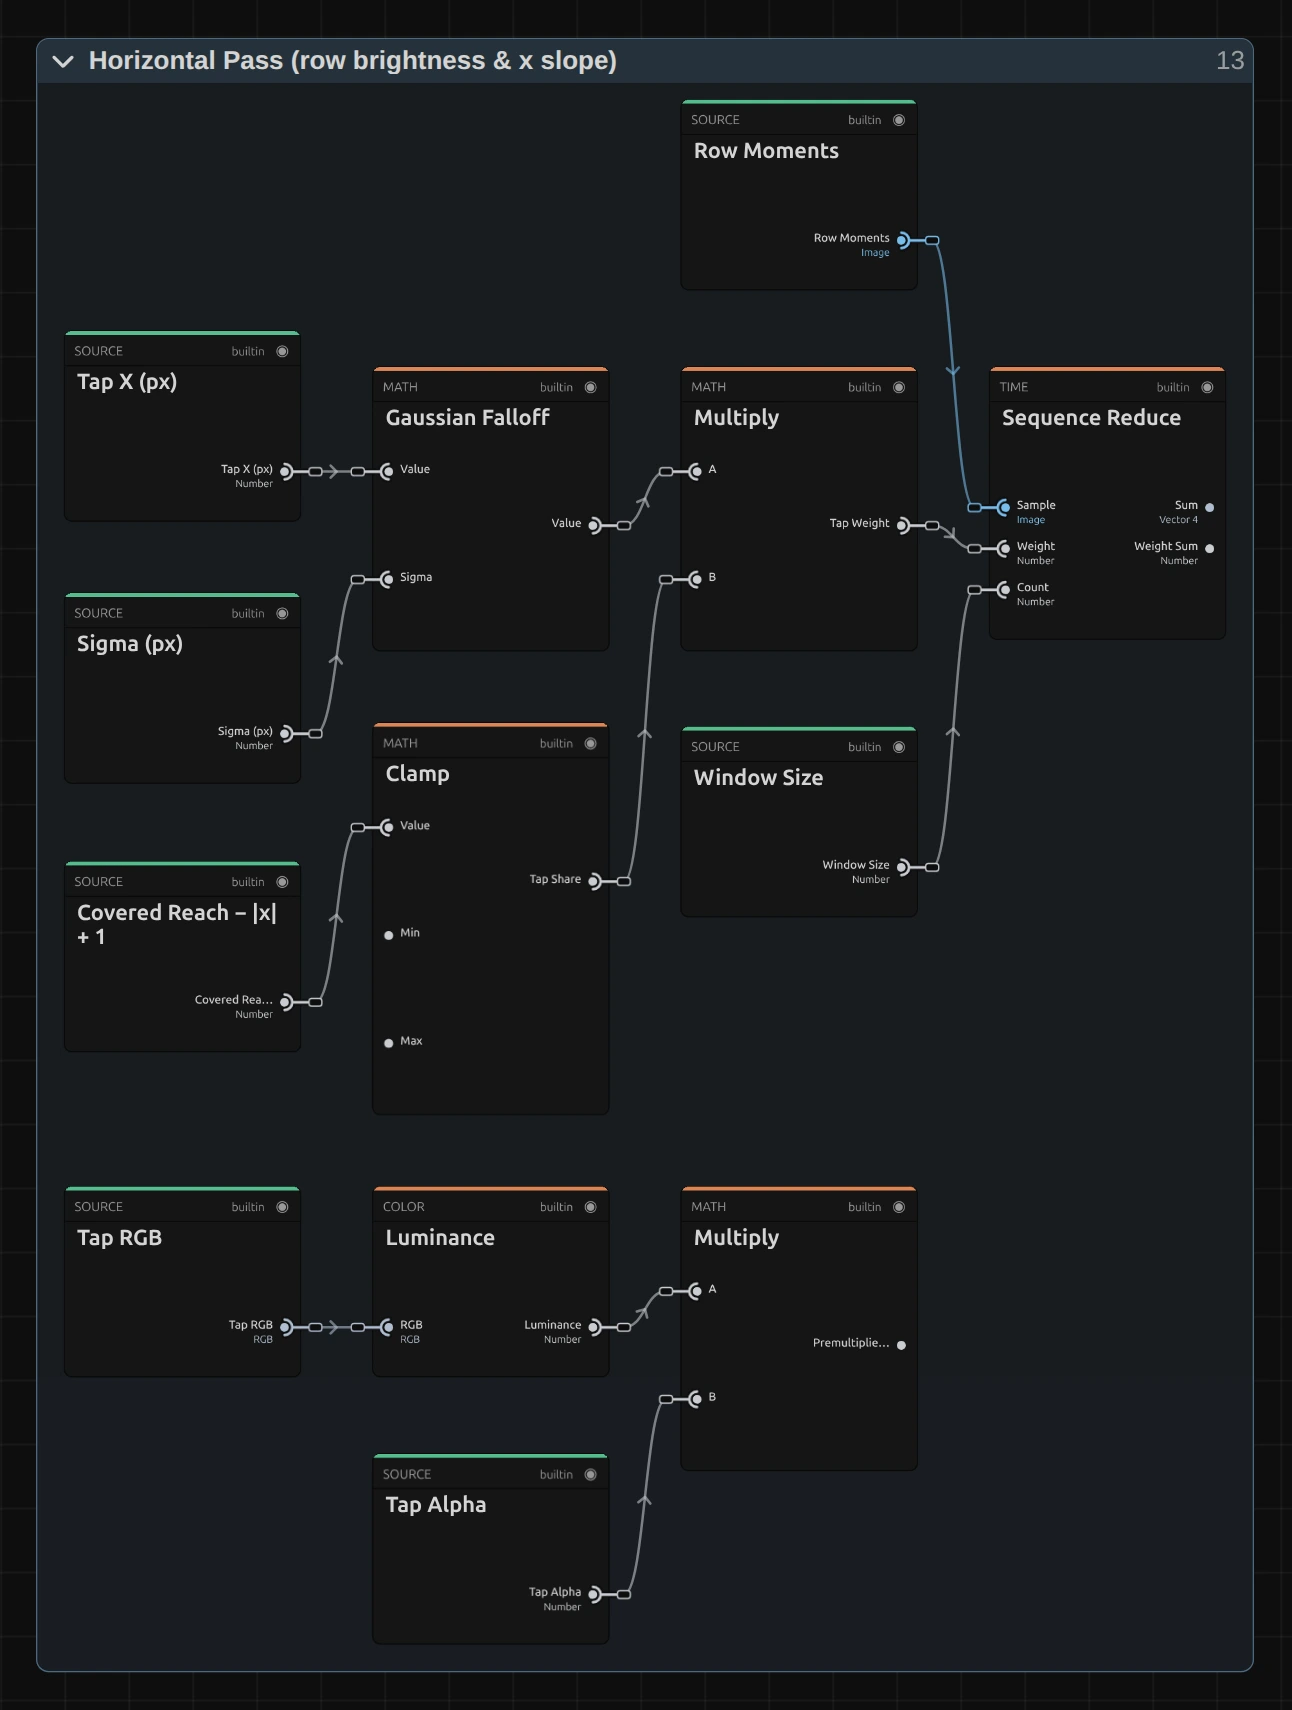
Gaussian Falloff – the weight of each tap: 1 at the pixel itself, falling off smoothly with the distance, at the speed sigma sets.
Clamp – the share of a tap that lies inside the Covered Reach: 1 for every tap inside it, a part for the outermost one. When an animated Width makes the window one tap wider, the new tap fades in instead of appearing at once, so the lines do not jump. The Multiply after it scales the Gaussian weight by it: the Tap Weight.
Multiply – the Luminance of the tap times its alpha (premultiplied brightness), so the outline of a title on a transparent layer is an edge too.
Sequence Reduce – reads every tap of the row, one pixel apart, and adds up the Row Moments: the brightness, the brightness times the offset across, the offset squared, and the weights themselves. A Cache Image after it keeps these sums for every pixel, divided by the weights, for the Vertical Pass.
Vertical Pass (window sums)
Section titled “Vertical Pass (window sums)”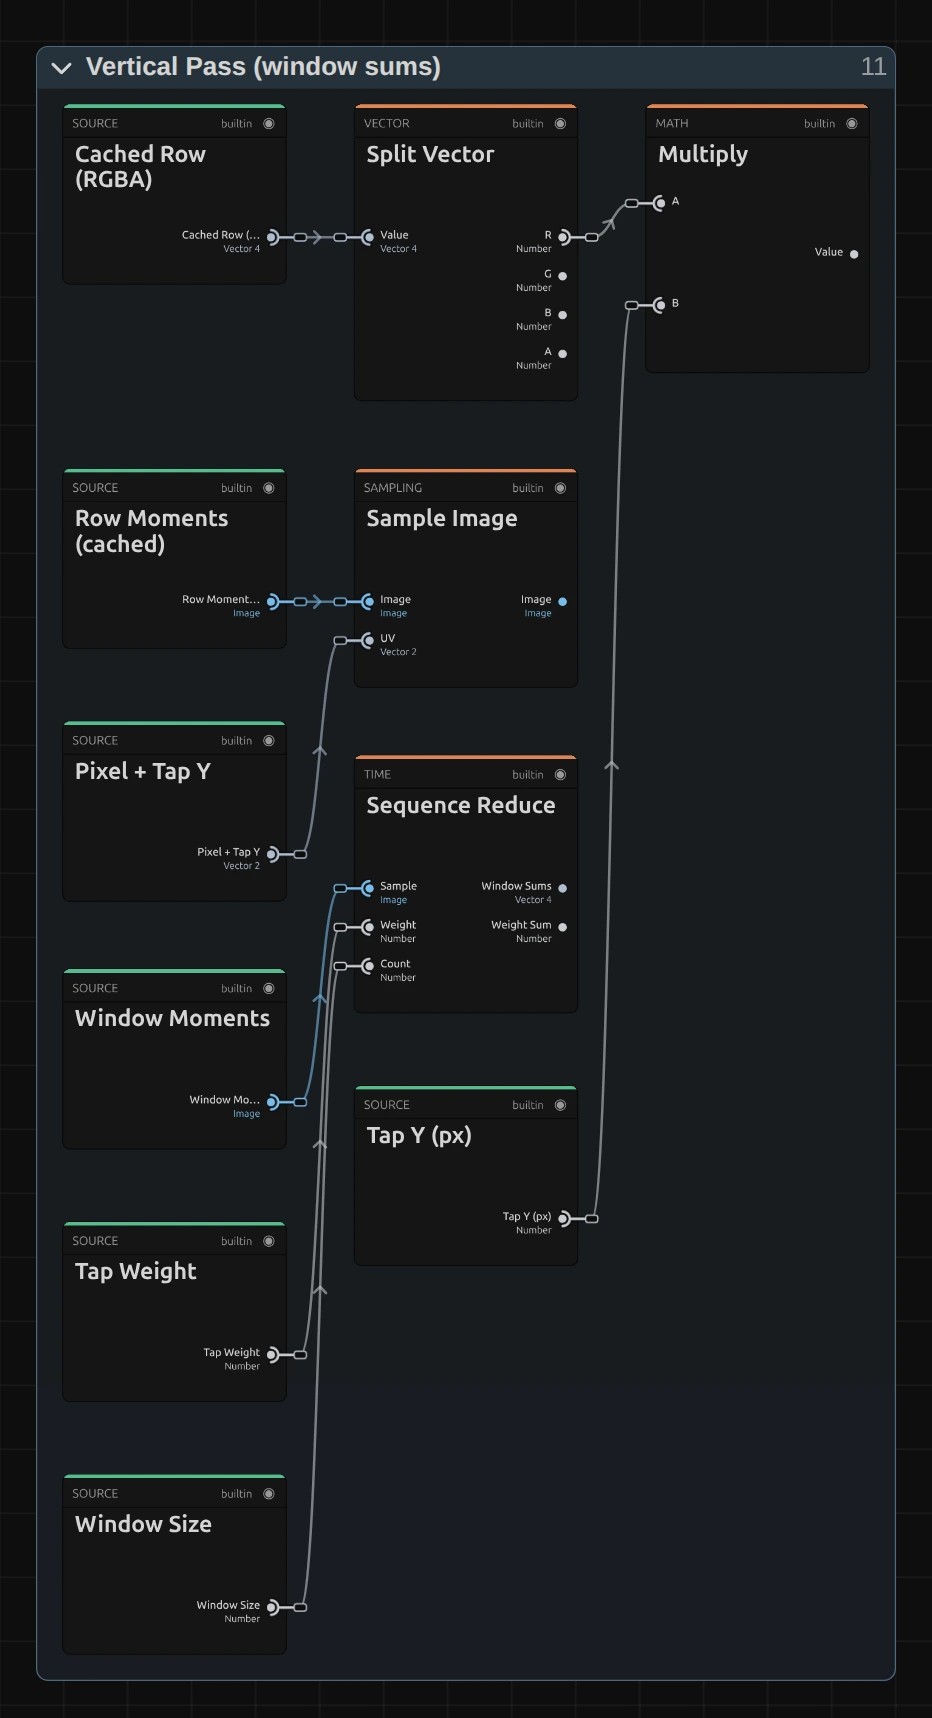
Sample Image – reads the cached row sums one whole pixel above or below this pixel, out to two sigma.
Split Vector – takes the row apart: the row’s brightness (R), its slope across (G) and its spread (B).
Multiply – the row’s brightness times its offset down: from these, the Sequence Reduce gets the slope from top to bottom.
Sequence Reduce – adds up all rows with the same Tap Weight as the Horizontal Pass: the slope across, the slope down, the spread and the weights of the whole square window, the Window Sums. Adding up rows of a Gaussian gives exactly the square Gaussian window, so two passes of up to 2 × 64 + 1 taps replace one window of up to 129 × 129.
Gradient & Edge Strength
Section titled “Gradient & Edge Strength”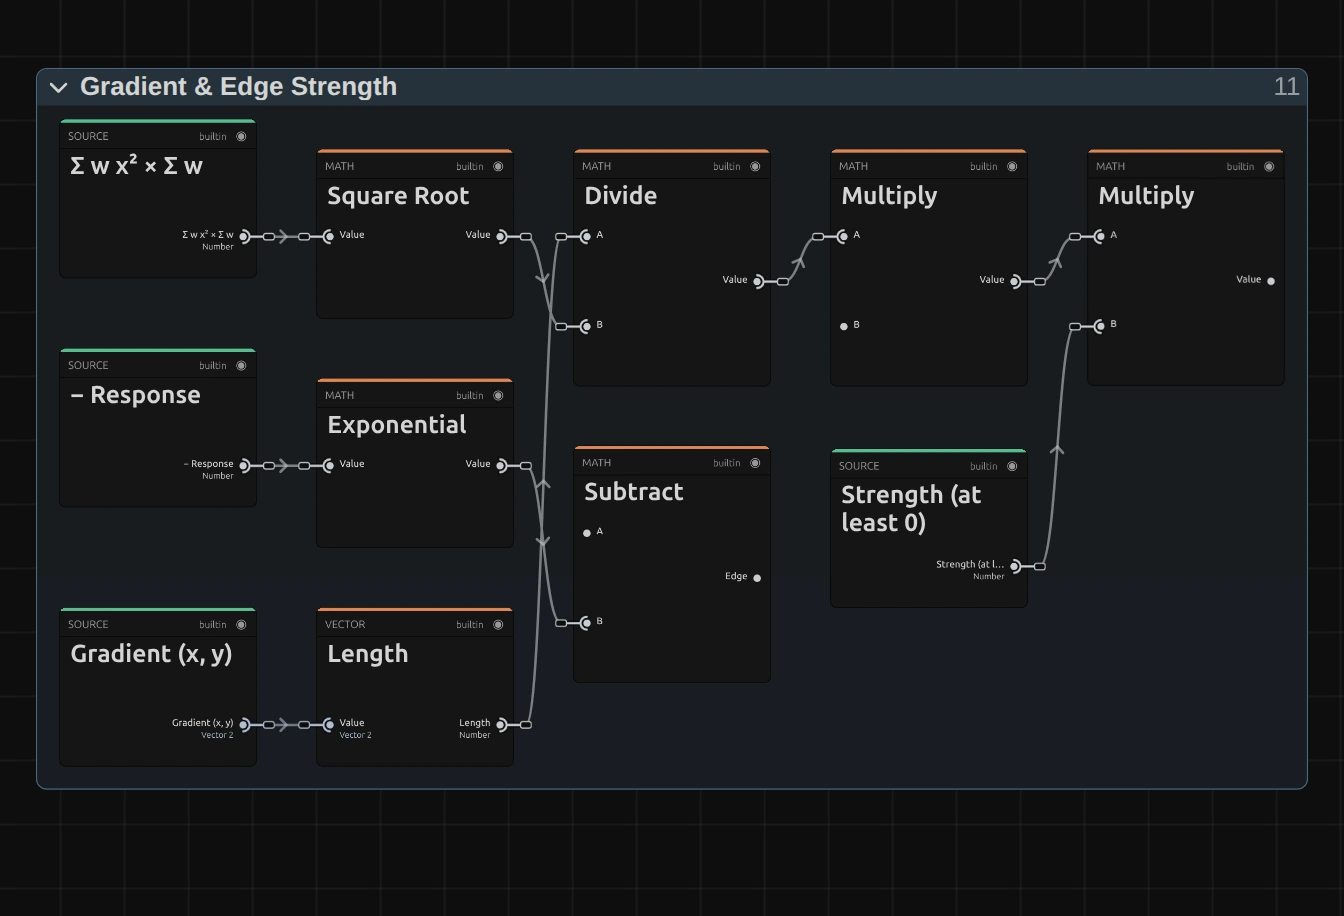
Square Root – the spread of the window: the root of its squared offsets times its weights. It is the yardstick the gradient is measured with.
Length – how steep the brightness rises across the pixel, in any direction: the length of the summed brightness times offset, across and down.
Divide – the steepness divided by the spread. A step of the same contrast therefore gives the same line strength at every Width and every resolution. The two Multiply cards after it scale it (Step Scale 10.03, so a step of contrast 0.25 gives a response of about 1) and by Strength.
Subtract – 1 minus the Exponential of minus the response. Faint edges grow almost in proportion; strong ones approach 1 softly instead of clipping, which keeps dense detail readable.
Line Color & Alpha
Section titled “Line Color & Alpha”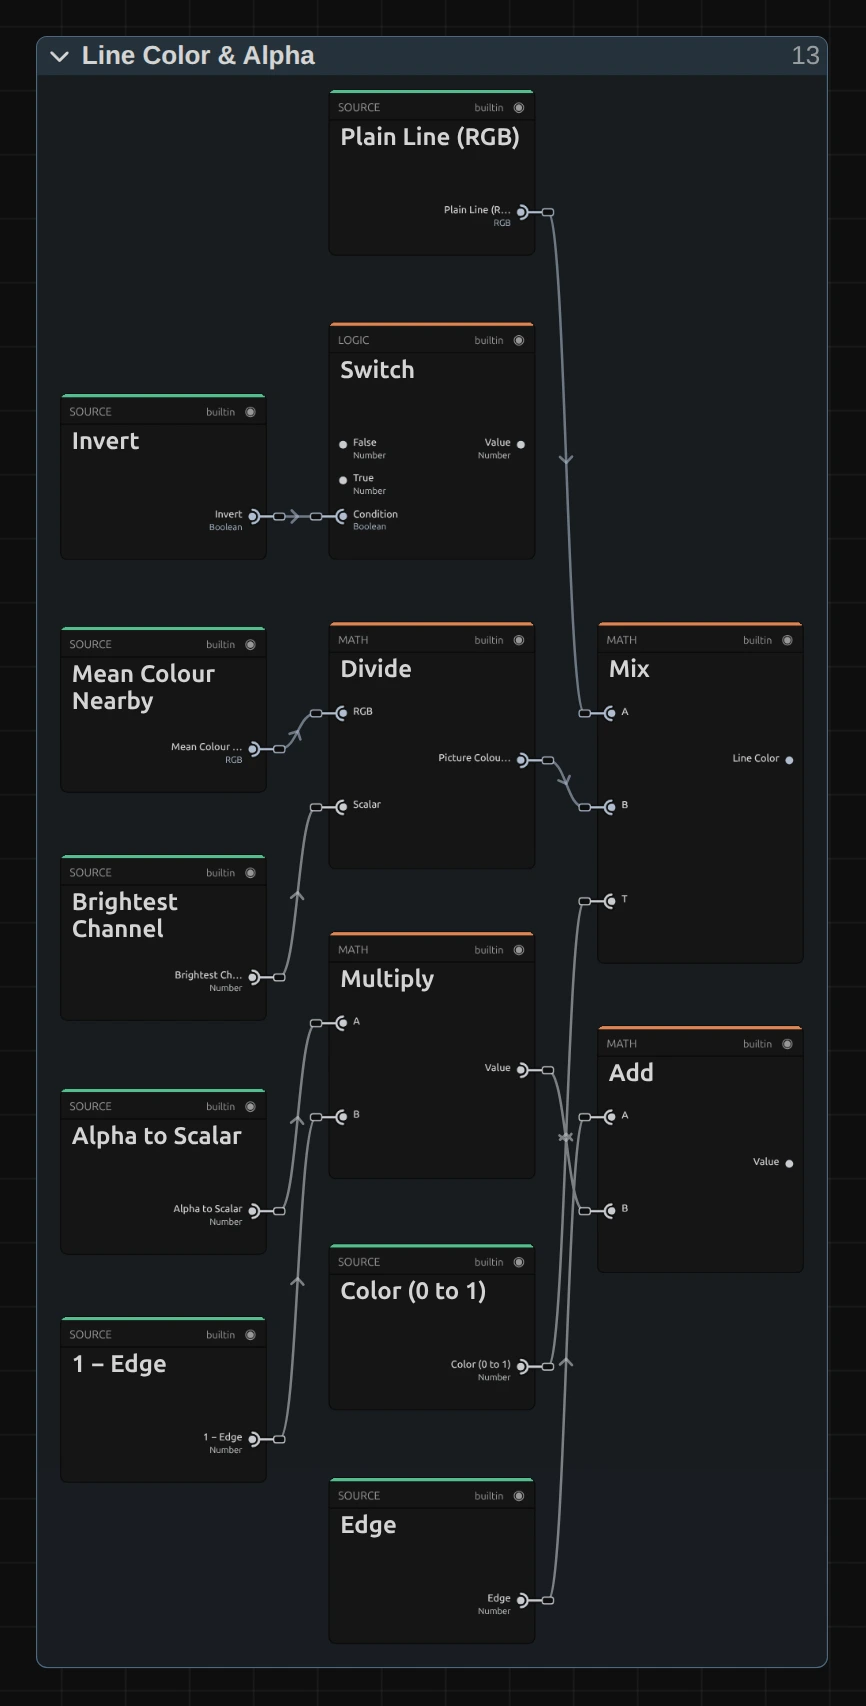
Divide – the colour of the picture beside the line, divided by its brightest channel, so it comes out at full brightness. Edge Detect takes that colour from this pixel and two taps towards the brighter side of the edge, so an outline just outside a layer takes the layer’s colour.
Mix – blends the plain line colour (white, with Invert black) towards that picture colour by Color: the Line Color.
Switch – the background: Zero (black) while Invert is off, One (white) while it is on.
Multiply – how much background shows: the source alpha times 1 minus the Edge. Where the layer is transparent no background is drawn, so surroundings stay transparent.
Add – the alpha of the result: the Edge plus that background share. The line therefore shows in its full colour even outside a transparent layer, where it is drawn over nothing.
Remix: for chalk on a slate, open Line Color & Alpha and find the Switch. Plug a Value of 0.15 into its False input, in place of Zero: with Invert off, the background turns dark grey.
Technical details
Section titled “Technical details”- Lines. A derivative of a Gaussian on premultiplied brightness (Rec. 709) over a window of ±2 sigma, normalized by the window’s own second moment; line strength
1 − exp(−4 · contrast · Strength). The Gaussian is separable, so the window runs as a horizontal pass (Sequence Reduce, then a Cache Image of the row sums) and a vertical pass. - Width is sigma in pixels of a 1080p frame (at least 0.7 px). Each pass reads whole pixels out to 2 sigma, up to 64 taps to each side: 2 × (2 · ceil(2 sigma) + 1) reads per pixel plus two for Color, about 100 at 4K and Width 6. Every pixel of the window counts, so fine texture leaves the same speckle in a preview, at 1080p and at 4K. The outermost taps count with the share 2 sigma covers, so an animated Width changes smoothly. Above 64 taps per side (a keyframed Width above 8 at 4K) the taps spread apart; the card and the tool result say so, as they do for a Width finer than a pixel, a negative Strength and a Color outside 0–1. Wide lines cost more render time.
- Transparency. Lines are composited premultiplied (alpha = edge + source alpha × (1 − edge)), so transparent surroundings stay transparent and a layer’s outline shows in its full line colour.
- Saved projects. An Edge Detect saved before 2026-10-21 keeps its earlier one-pixel Sobel (Width and Color have no effect on it); one saved with version 3.2.7 keeps whole taps out to 2 sigma, whose lines can jump a step while Width is animated, and a window that ends at 8 px, so its wide lines come out thinner in large frames (at 4K above Width 2; the card says so). The card of both offers Use the new Edge Detect.
- Shared notes: Light & Stylize. Formulas: Effect system; blocks: Node Catalog.