
Temperature
Makes the light warmer or cooler, like the white balance of a camera. Blacks stay black and the overall brightness stays the same.
Group: Color & Tone · How to add an effect

Use it for: footage shot under the wrong white balance · matching two cameras · a warm or cold mood of light, from late sun to moonlight.
- Temperature – warmer (orange) or cooler (blue) light.
- Tint – towards magenta or towards green.
Tip: a stage light that slowly goes cold: keyframe Temperature from 0 down to −0.8 over a scene. Since the brightness stays, the picture does not seem to fade, only the light changes its colour.
Presets
Section titled “Presets”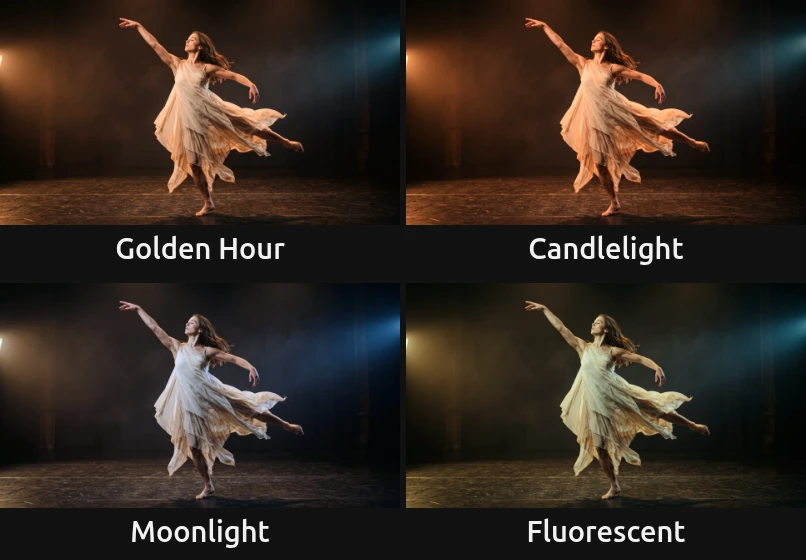
Pick one in the Preset row of the effect card. It sets Temperature and Tint in one undo step, and the row then shows its name until you change a value. A keyframed control keeps its keyframes, and the card says so.
Golden Hour – the low sun of a late afternoon (Temperature 0.5, Tint 0.08). Warm, but still natural; the touch of magenta keeps skin from turning yellow.
Candlelight – a deep orange (Temperature 1, Tint 0.12), like a room lit by flames or an old tungsten bulb. For an intimate interior or a memory.
Moonlight – a cold, blue night (Temperature −0.8, Tint 0.1). The slight magenta keeps the blue from drifting into cyan. Lower Exposure a little as well for a darker night.
Fluorescent – the green cast of old fluorescent tubes (Temperature −0.15, Tint −0.45): an office at night, a hospital corridor, a feeling of unease.
Controls
Section titled “Controls”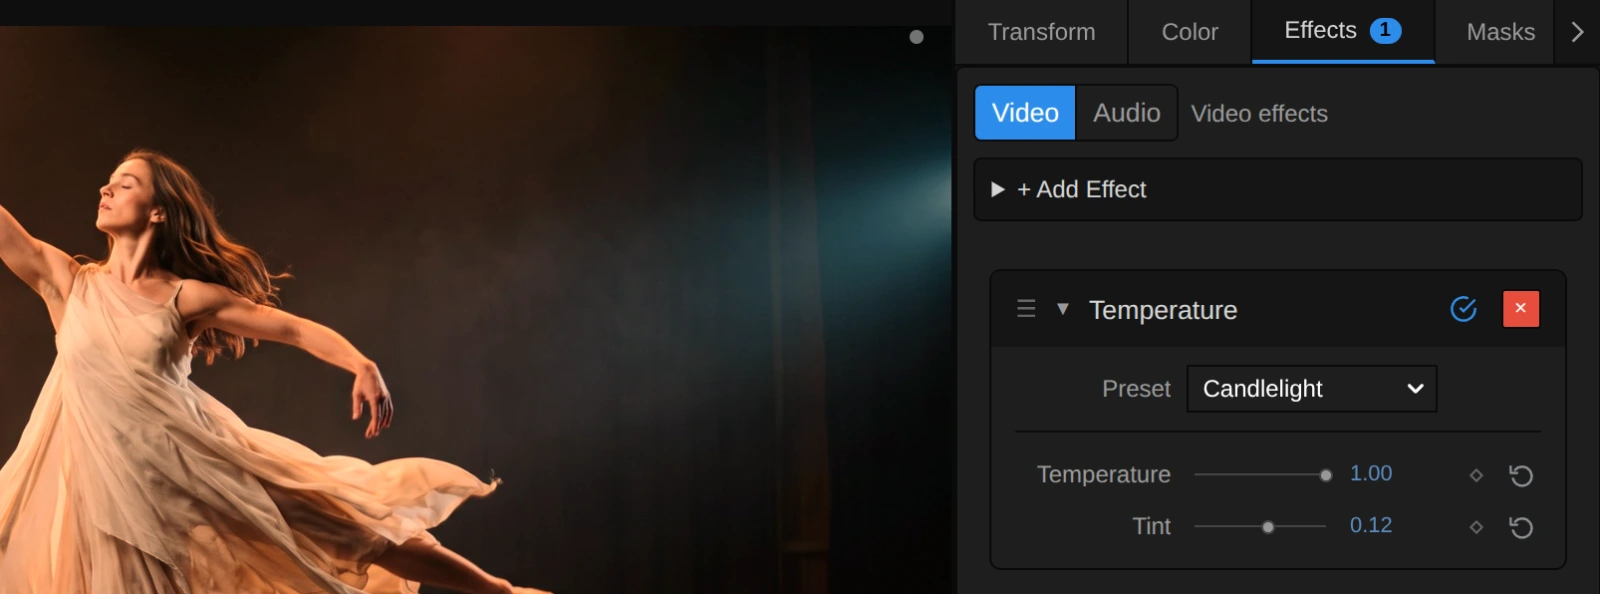
Preset – one of the four starting points above; it sets both controls.
Temperature – warmer or cooler light, the way a camera’s white balance shifts it. Above 0 red grows and blue shrinks, below 0 the other way round, while green stays and the brightness of every grey stays the same. 0.1–0.3 corrects footage that is a little too blue or too orange; 0.5–1 is a clear colour mood, from late sun to candlelight or from dusk to moonlight. Very bright colours can reach full red or full blue and stop there. −1 to 1, default 0. In the number field you can type up to ±4, a fiery orange or a deep blue; beyond that the picture uses the limit and the inspector says so.

Tint – the second axis of white balance, between green and magenta. Above 0 green shrinks and the picture turns pinker; below 0 it turns greener. Use it to remove the green cast of fluorescent or cheap LED light (a little above 0), or to give a scene a sickly green. Small values do a lot: 0.1–0.2 is a correction, 0.5 a strong colour. It works together with Temperature: warm light usually wants a touch of magenta, so skin does not turn yellow. −1 to 1, default 0. In the number field you can type up to ±4.
Node setup
Section titled “Node setup”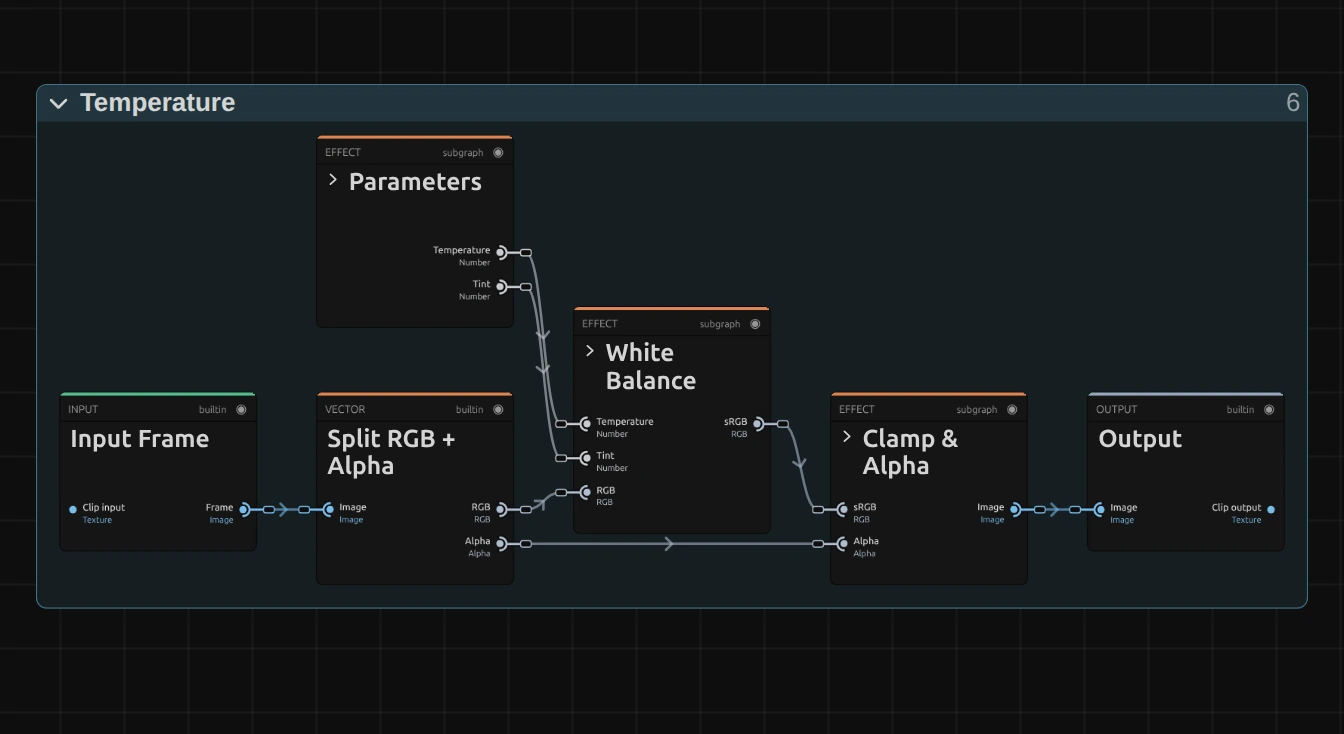
Temperature works in three stages (Color & Tone shows the shape all colour effects share): Parameters holds the two controls, the block White Balance does the work, and Clamp & Alpha finishes. Split RGB + Alpha takes the transparency aside first. Click a folder’s header to open it; the sections below show what is inside. The same block is in right-click → Reusable Nodes.
Parameters
Section titled “Parameters”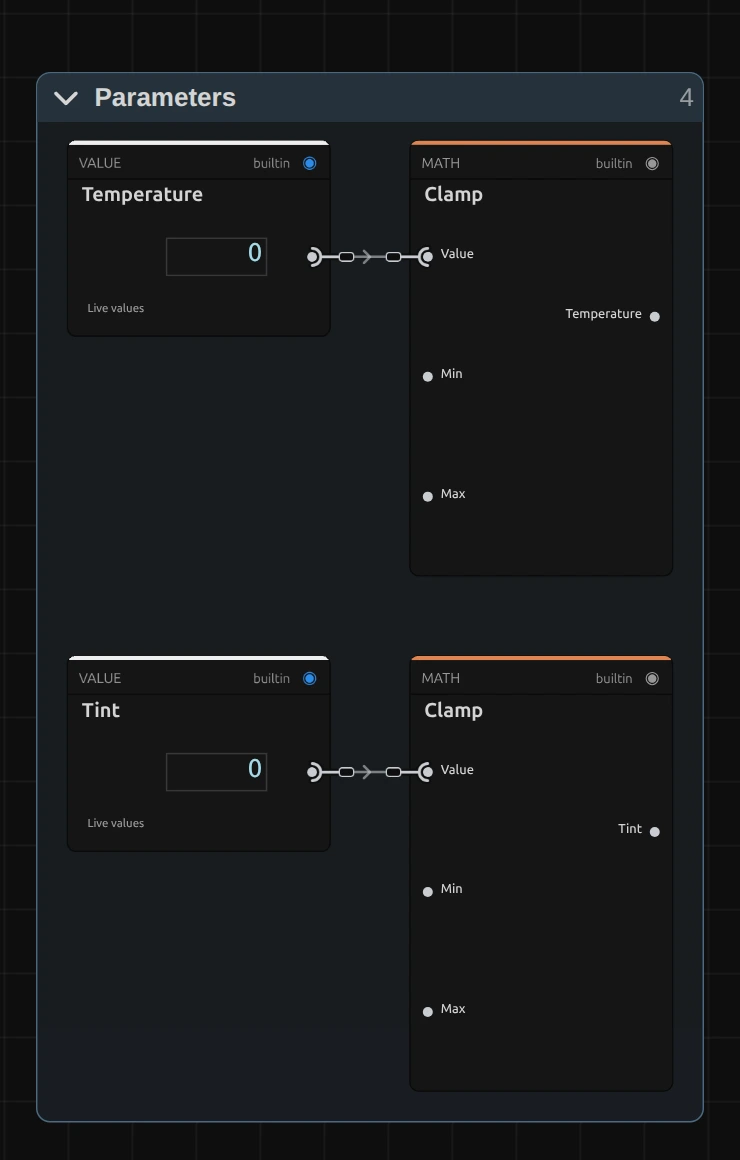
Clamp – there are two, one per control. Each keeps its value between −4 and 4, the values in Temperature Render Min and Temperature Render Max (and the same pair for Tint). At ±4 red and blue are almost five stops apart, and every light colour has reached full orange or full blue. A driving node (LFO, Math) or the AI agent’s effect update may send more; the picture then uses the limit, and the card and the tool result say so.
White Balance: the gains
Section titled “White Balance: the gains”The block has two parts: it turns the two controls into one gain per colour channel, and then applies those gains to the light (next section).
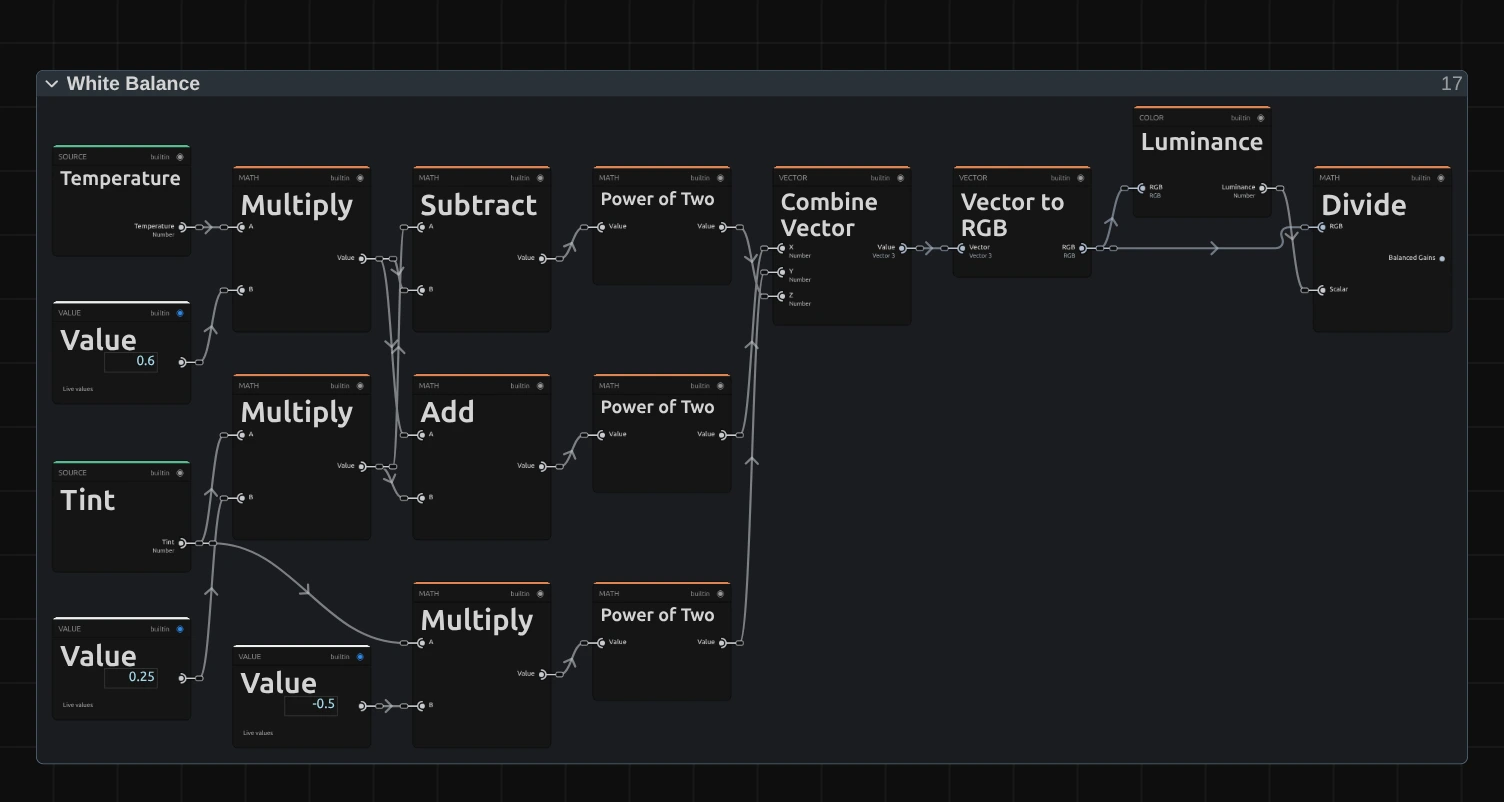
Multiply – there are three. The top one turns Temperature into stops: one unit is 0.6 stops (the Value 0.6). The one below gives the Tint’s share for red and blue (Value 0.25), the lowest one the Tint’s stops for green (Value −0.5). Add then collects the stops of red, Subtract those of blue: warmth adds to red and is taken from blue.
Power of Two – there are three, one per channel. Each turns stops into a gain: 0 stops is 1 (no change), +0.6 stops is 1.52, −0.6 stops 0.66. Combine Vector and Vector to RGB join the three gains into one colour.
Luminance – how bright those gains would make a white, measured as the eye sees it (Rec.709: 21 % red, 72 % green, 7 % blue).
Divide – divides the gains by that brightness. The result, the Balanced Gains, changes the colour of the light but not its strength, so a grey stays exactly as bright as before at every setting.
Remix: select the Value 0.6 and set it to 0.3 in the node inspector: the Temperature slider becomes half as strong, for fine corrections over its whole travel.
White Balance: in linear light
Section titled “White Balance: in linear light”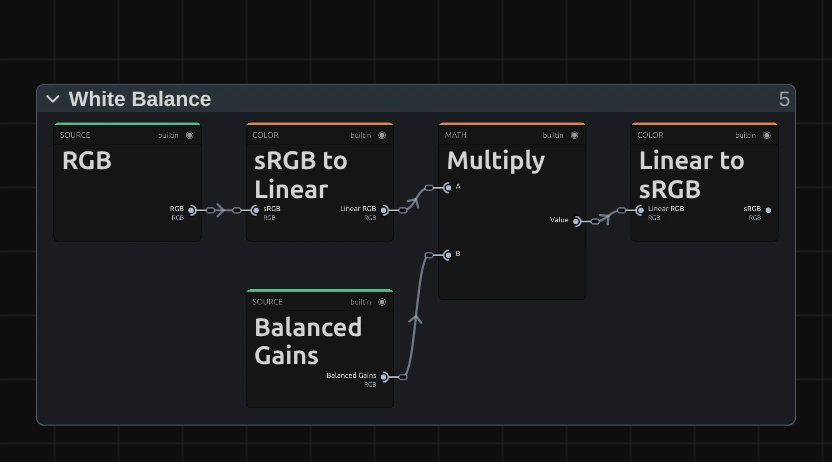
sRGB to Linear – screen colours are stored brighter than the light they stand for. This turns them back into amounts of light, as Exposure does too.
Multiply – multiplies each channel’s light by its balanced gain. Black has no light to multiply, so it stays black.
Linear to sRGB – turns the light back into screen colours. Because the gains act on light and not on the stored values, the shift looks like a different lamp, not like a coloured layer laid over the picture.
Clamp & Alpha
Section titled “Clamp & Alpha”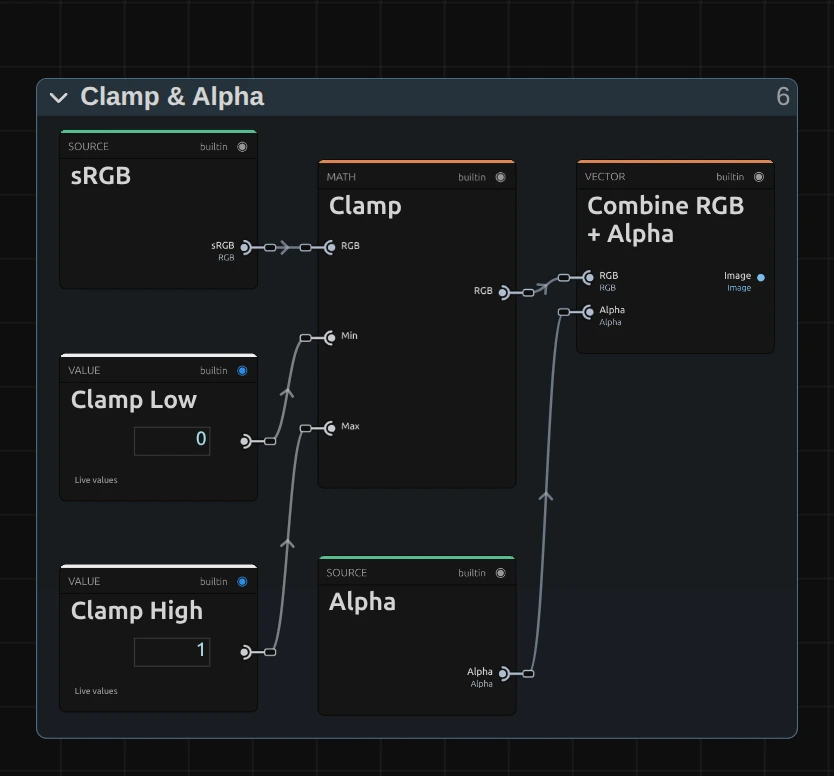
Clamp – keeps each colour channel between 0 and 1 (its Clamp Low and Clamp High cards). A channel that a gain pushed past full stays at full: this is where very bright colours stop at full red or full blue.
Combine RGB + Alpha then puts the original transparency back, untouched.
Technical details
Section titled “Technical details”- Formula. In linear light each channel is multiplied by
g / L(g), with the gainsg = (2^(0.6·T + 0.25·Tint), 2^(−0.5·Tint), 2^(0.25·Tint − 0.6·T))andLthe Rec.709 luminance. Temperature 1 puts red and blue 1.2 stops apart; Tint 1 puts green 0.75 stops below red and blue. Grey keeps its luminance, black stays black; the result is limited to 0–1. There is no Kelvin scale. - Range. The sliders cover −1 to 1; typed values (also keyed in the inspector) and driving nodes render up to ±4. Beyond that the picture uses the limit, and the inspector and the tool result say so.
- Transparency. Only the colour is changed; the transparency passes through untouched.
- What all colour effects share (8-bit range, saved projects, adjustment layers): Color & Tone. Formulas: Effect system; blocks: Node Catalog · Styles and presets.