
Posterize
Reduces the picture to a few flat tones, like a screen print or a poster. Bold at 2–4 tones, subtle from 8 on.
Group: Color & Tone · How to add an effect
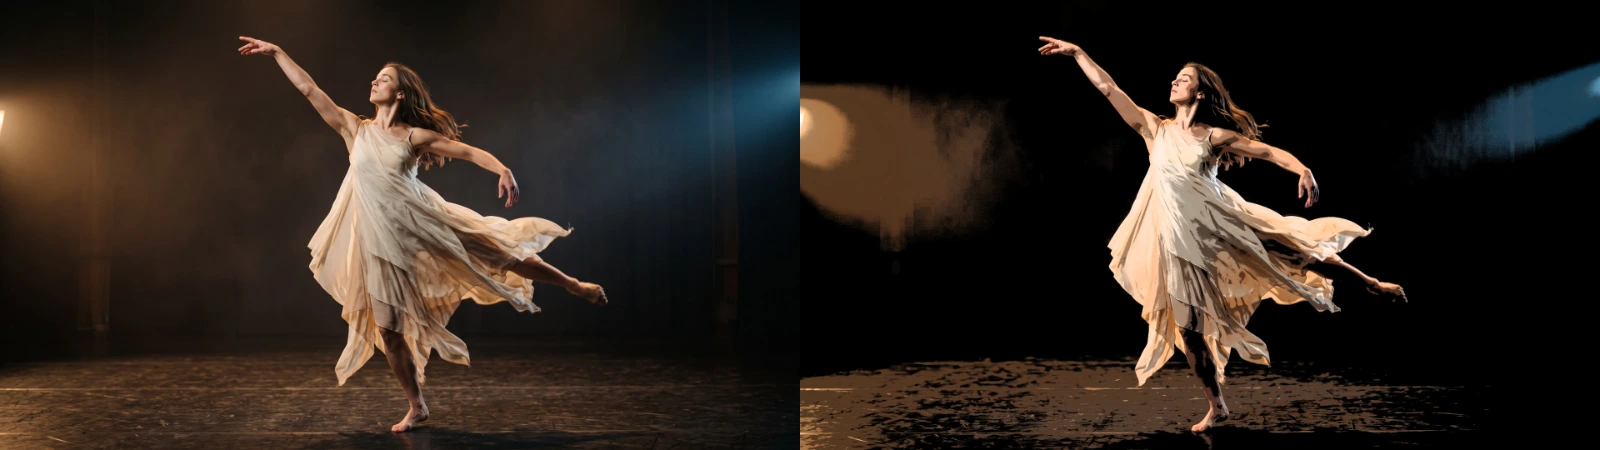
Use it for: a graphic, screen-printed look · pop-art colours · a base for a comic or stencil style.
- Levels – how many tones: 2–4 is bold and graphic, 8 and more subtle.
- Softness – rounds the edges between the tones.
- Brightness Only – keeps every colour and steps only its brightness.
Tip: on moving footage keep a little Softness (0.2–0.4). Noise in the picture then no longer flips pixels from one tone to the next, so the edges between the tones stop flickering.
Presets
Section titled “Presets”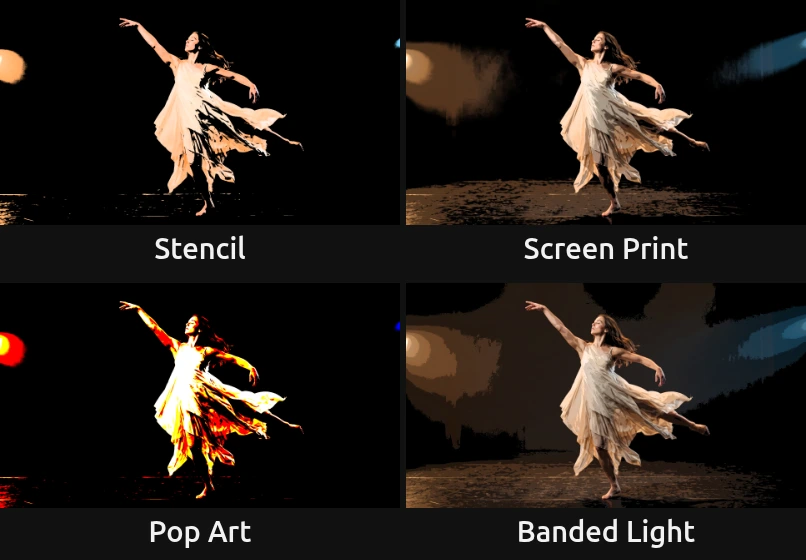
Pick one in the Preset row of the effect card. It sets all three controls in one undo step, and the row then shows its name until you change a value. A keyframed control keeps its keyframes, and the card says so.
Stencil – two tones (Levels 2, Softness 0.1): everything darker than half drops to black, the light parts keep their colour at full strength. A figure in a spotlight becomes a cut-out, like a spray stencil on a wall.
Screen Print – four flat inks with rounded edges (Levels 4, Softness 0.35). The classic poster look: faces and costumes stay readable, the background calms down into a few patches.
Pop Art – each colour channel on its own in two steps (Levels 2, Softness 0.1, Brightness Only off): only eight loud colours are left, from yellow and red to cyan and magenta. Skin turns orange and red, a blue sky turns cyan. Strong for a few seconds, on a beat or a cue.
Banded Light – eight hard steps of brightness (Levels 8, Softness 0). Soft light, haze and gradients turn into rings, like the lines of a relief map, while the figure stays almost natural. Beautiful with smoke on stage.
Controls
Section titled “Controls”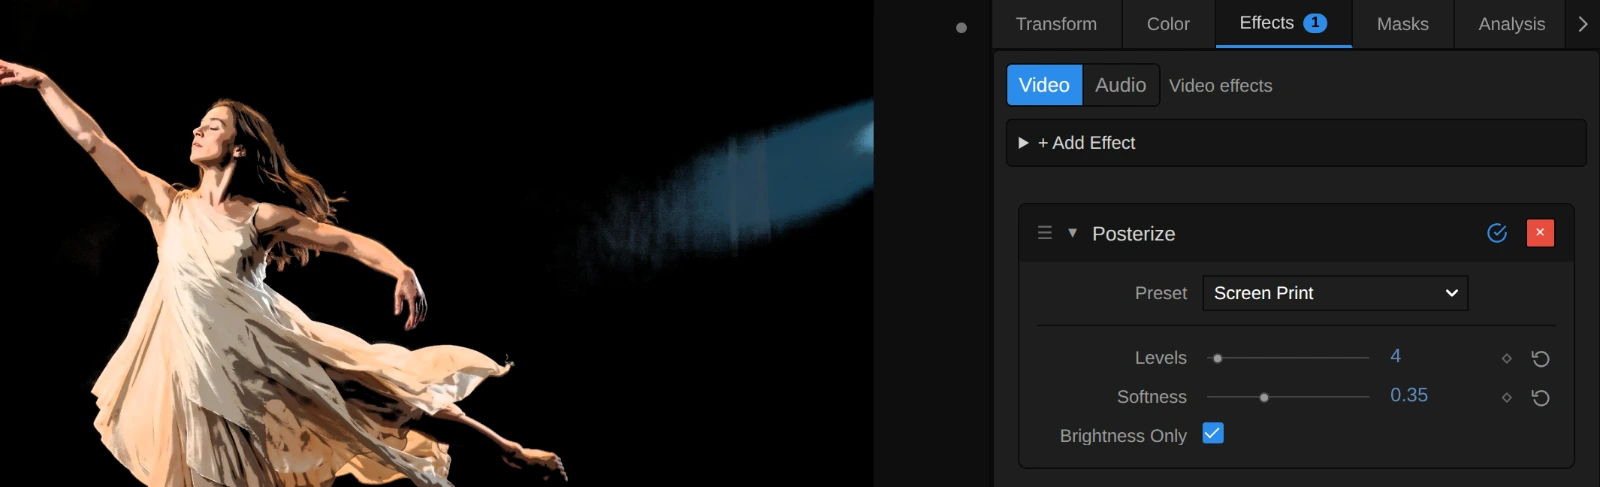
Preset – one of the four starting points above; it sets all three controls.
Levels – how many tones are left, from black to full. 2 is a hard two-tone stencil, 3–4 a bold poster, 6 (the default) still clearly graphic, 8–12 turns soft light and haze into visible bands, and from about 16 only gradients still show steps. Darker parts fall to black first, because the lowest step is always black. Use whole numbers: a fraction makes the top step narrower than the others, and the card says so. 2 to 32, default 6. A driving node (LFO, Math) or the AI agent’s effect update may send less than 2; the picture then uses 2 and the card says so.
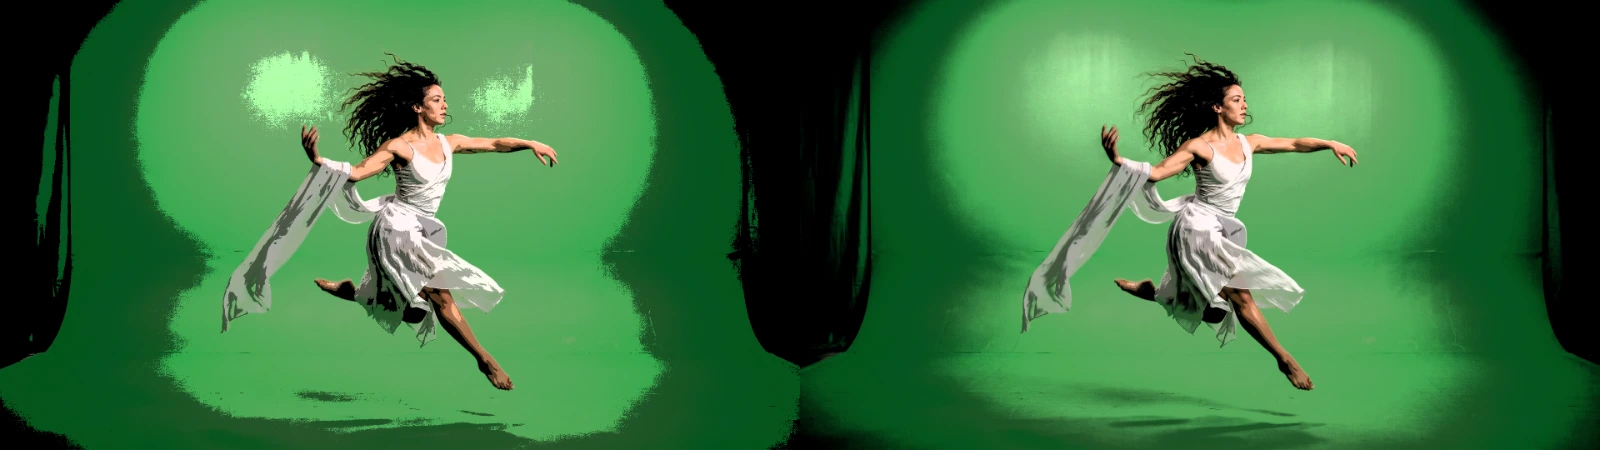
Softness – rounds the jump from one tone to the next into a short, smooth ramp. At 0 the edges are hard, and where the picture is noisy they break up into ragged, flickering borders. 0.2–0.4 keeps the flat tones but smooths their edges; around 0.5 the tones start to flow into each other, and at 1 the steps are fully rounded, a gentle banding over a smooth picture. It counts in steps, so it looks the same at every Levels. 0 to 1, default 0. A value below 0 is used as 0; a driving node (LFO, Math) or the AI agent’s effect update may send more than 1, which is used as 1 (a wider ramp would overlap the next one and draw new hard edges in the middle of a tone). The card says so in both cases.
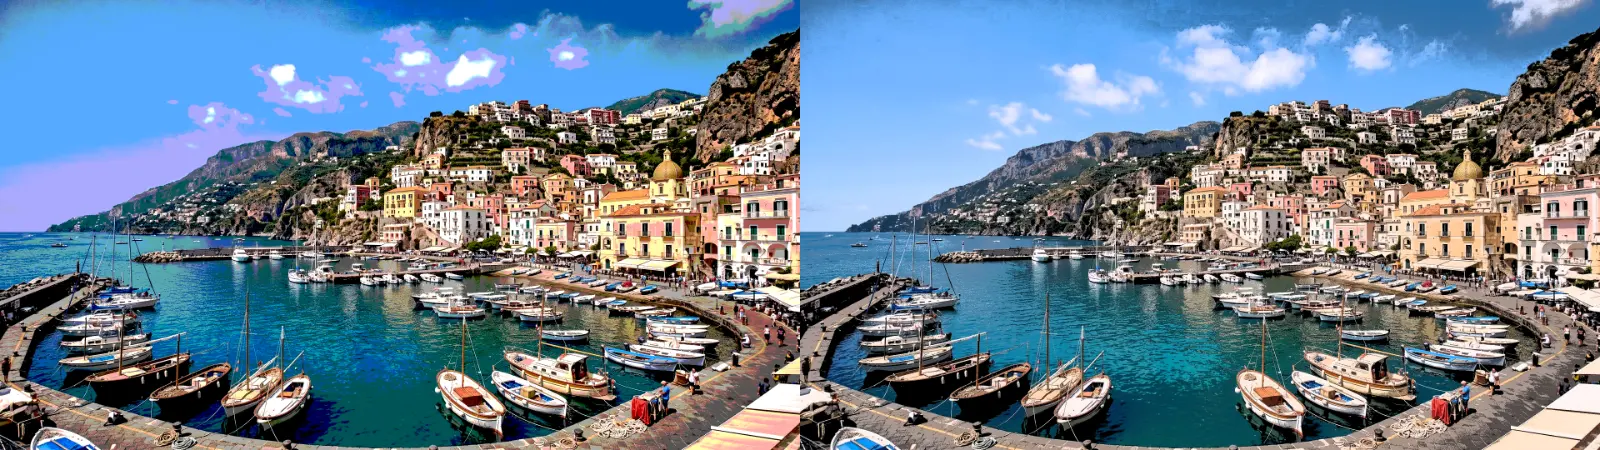
Brightness Only – on, it steps only the brightness and keeps every colour as it is: a blue sky stays blue, skin keeps its tone, and only how light it is falls into steps. Turn it off for pop-art colours: then red, green and blue are each stepped on their own, so light greys can tint lavender or green and coloured fringes appear where the channels cross a step at different places. A switch: on or off, default on. A Posterize saved before the switch existed keeps its per-channel look (off).
Node setup
Section titled “Node setup”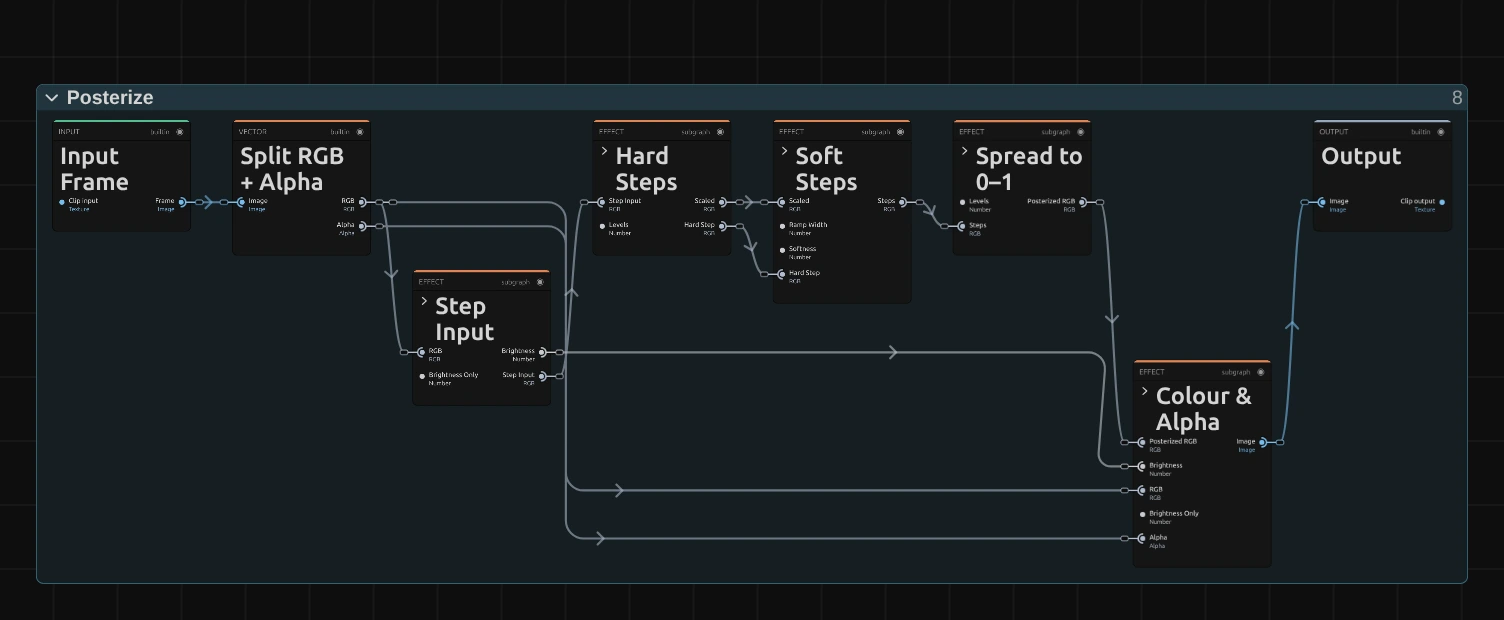
Posterize works as a path of stages, one folder each: Step Input picks what gets stepped, Hard Steps cuts it into a staircase, Soft Steps rounds the stairs when Softness is on, Spread to 0–1 turns the steps back into tones, and Colour & Alpha puts the colour and the transparency back. A sixth folder, Parameters, makes the three controls safe and plugs into the ports that show a plain dot in the picture: Levels, Softness and Ramp Width, and Brightness Only. In the Nodes tab it sits at the top left, beside the Constants folder, with a cable to every stage; the picture leaves it out so the path reads as one line. Click a folder’s header to open it; the sections below show what is inside.
Parameters
Section titled “Parameters”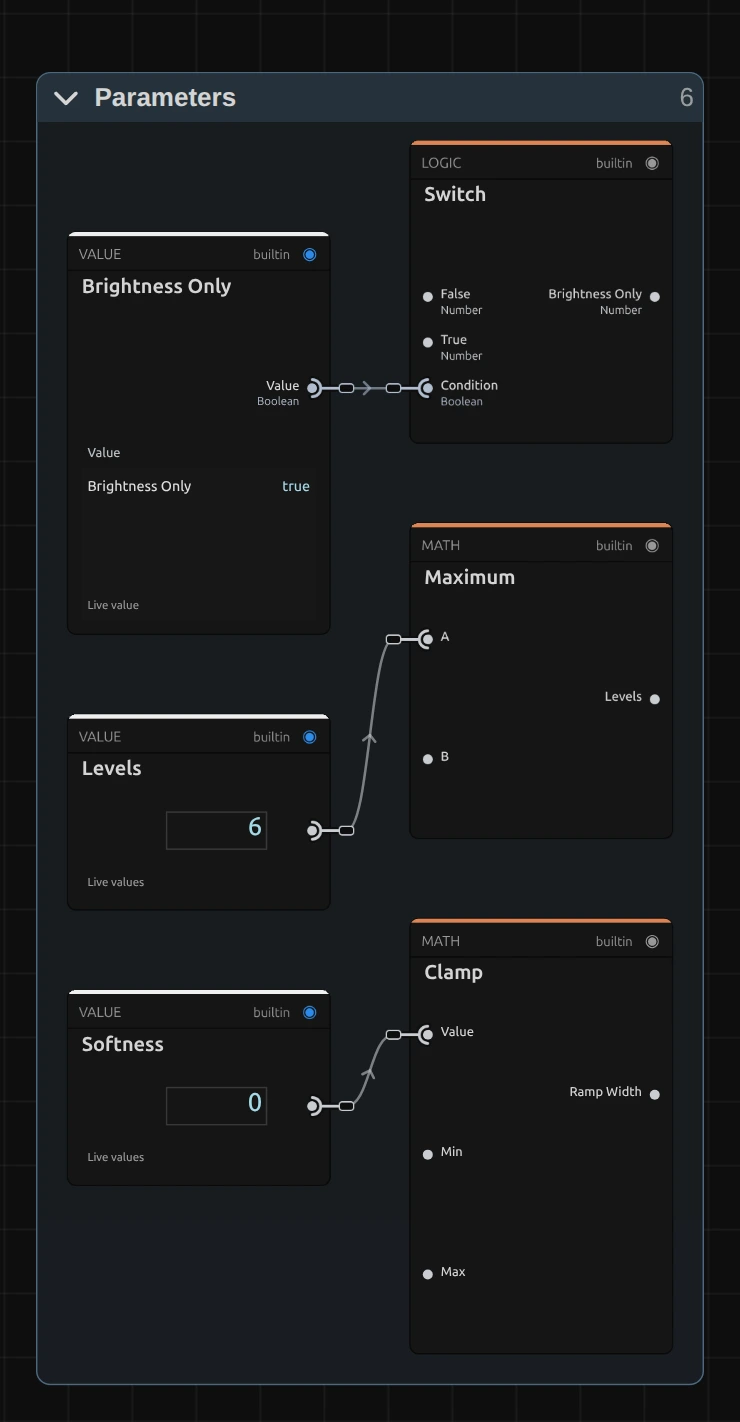
Switch – turns the Brightness Only switch into a number: 1 when it is on, 0 when it is off. Two Mix cards further on use it to choose between the two ways of stepping.
Maximum – keeps Levels at 2 or more (its Minimum Levels card in Constants). With fewer than two tones there would be nothing to step between; the card reports a lower value.
Ramp Width – a Clamp: Softness, kept between 0.0001 (the Ramp Floor) and 1 (the Ramp Ceiling). The ramp divides by this width, so it must not be 0; at Softness 0 the ramp is switched off anyway (see Soft Steps). Above one step the ramps of two neighbouring edges would overlap, so the ceiling keeps each ramp one step wide at most.
Step Input
Section titled “Step Input”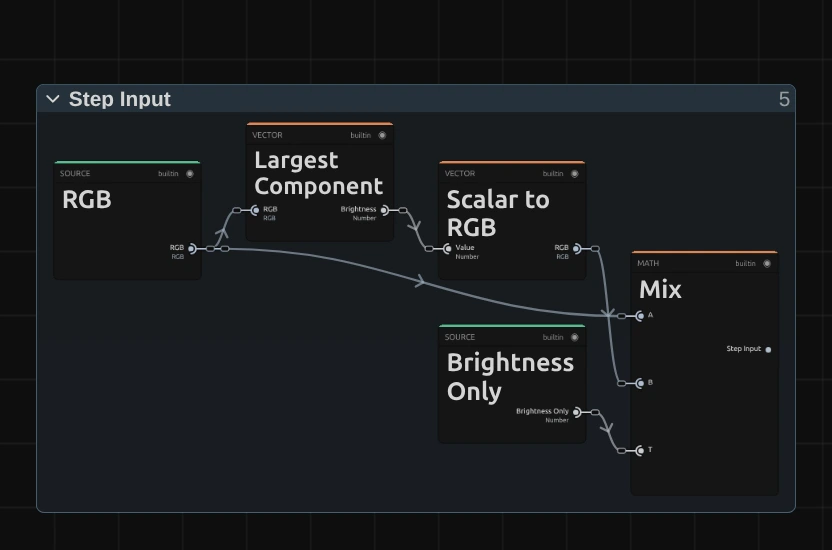
Largest Component – the brightest of the three channels: how far the colour is from black. A pure red and a white both count as 1, so stepping it never washes out a strong colour.
Mix – passes on either the colour itself (Brightness Only off) or that brightness as a grey (on). Everything after this folder steps what comes out here.
Hard Steps
Section titled “Hard Steps”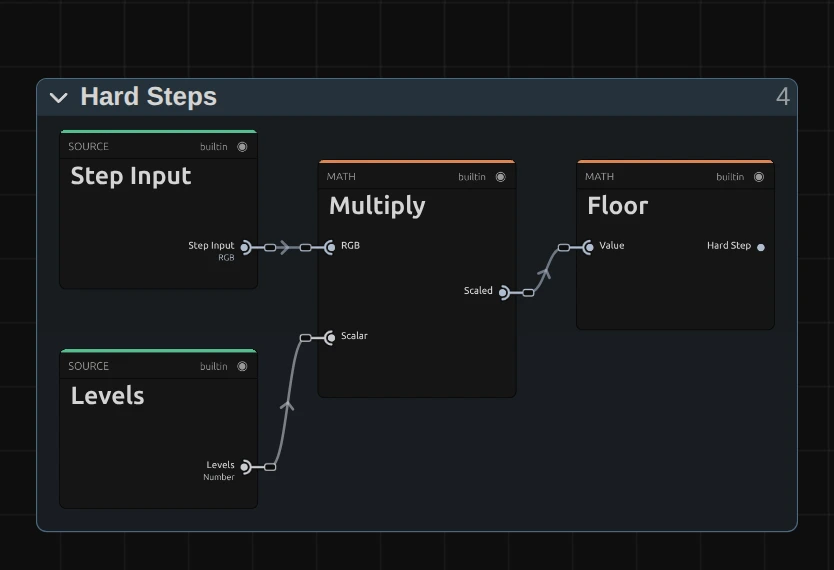
Multiply – multiplies each value by Levels, so 0 to 1 becomes 0 to 4 at Levels 4.
Floor – drops everything after the decimal point: 2.7 becomes 2. All values within one step get the same whole number, the Hard Step. This is the staircase itself.
Soft Steps: where the edge is
Section titled “Soft Steps: where the edge is”Soft Steps rounds every stair edge into a short ramp. Its first part works out how far each value is from the nearest edge, the second turns that into a smooth curve.
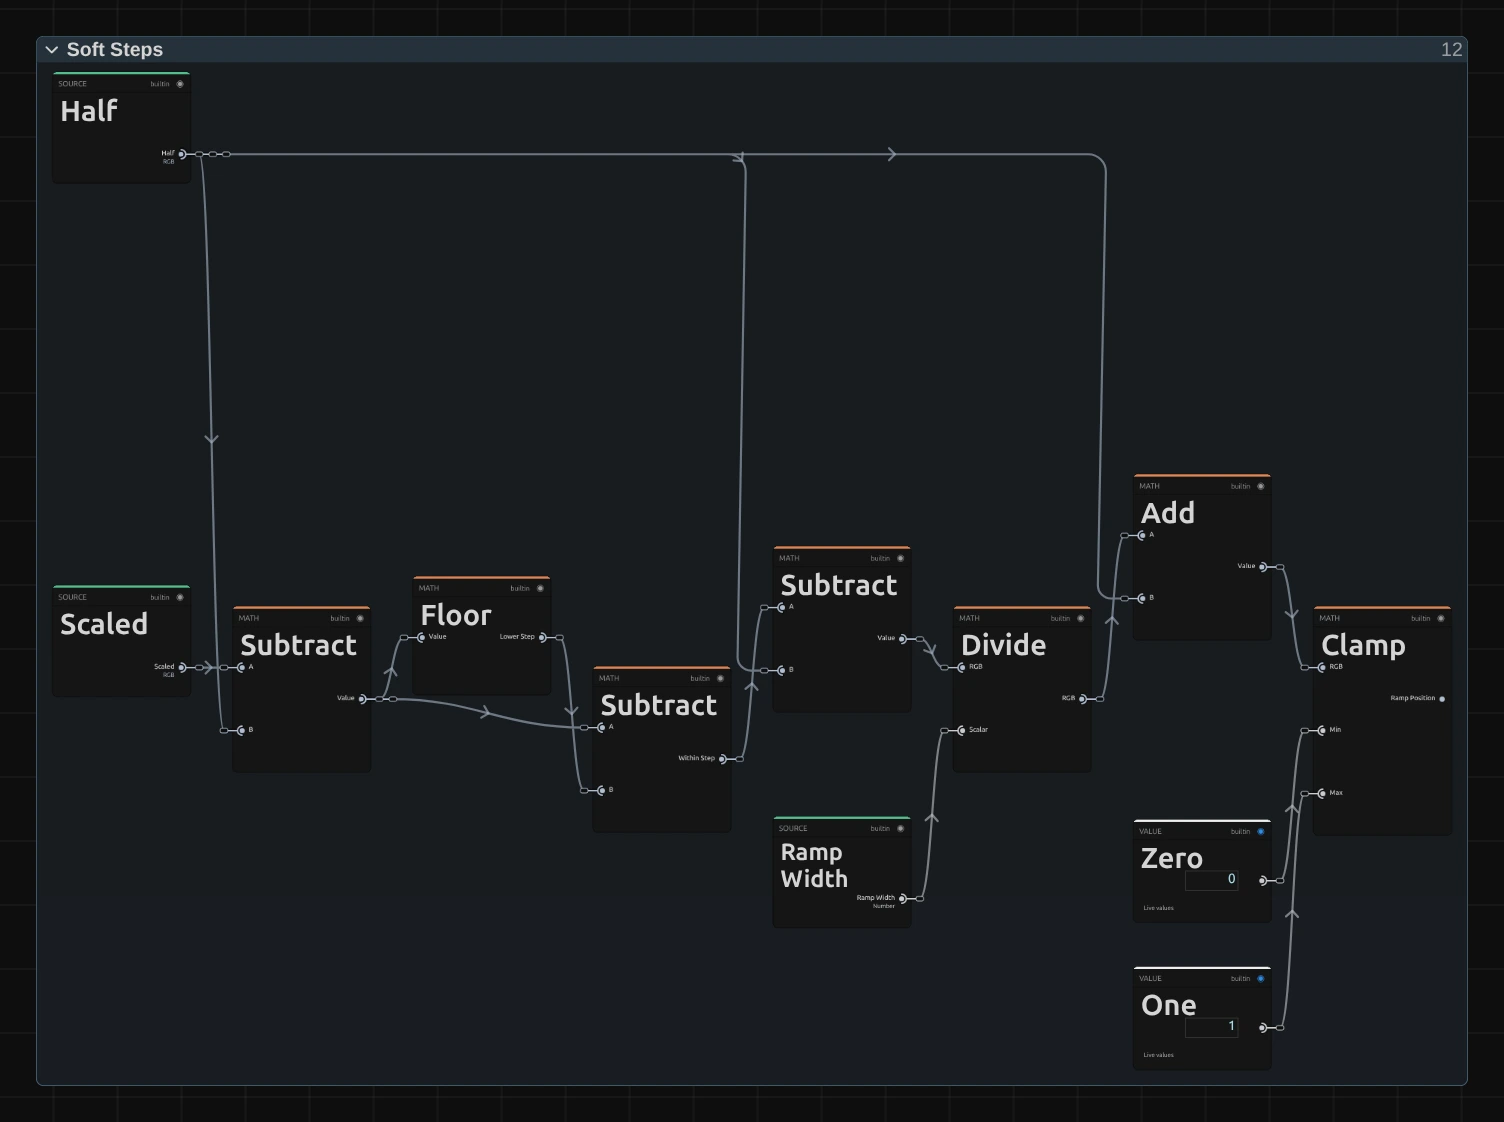
Floor – the stretched value moved back by half a step, without its fraction: the Lower Step, the step just below the nearest edge. The Subtract cards around it only shift by half a step and back, so that the result counts from the edge: 0 right on the edge, −0.5 and 0.5 in the middles of the two steps beside it.
Divide – divides that distance by the Ramp Width: at Softness 0.35 the ramp is 0.35 of a step wide, and the distance now counts in ramp widths.
Clamp – after adding Half back, keeps the result between 0 and 1: the Ramp Position, 0 just before the ramp, 1 just after it, and in between on the ramp itself.
Soft Steps: the ramp
Section titled “Soft Steps: the ramp”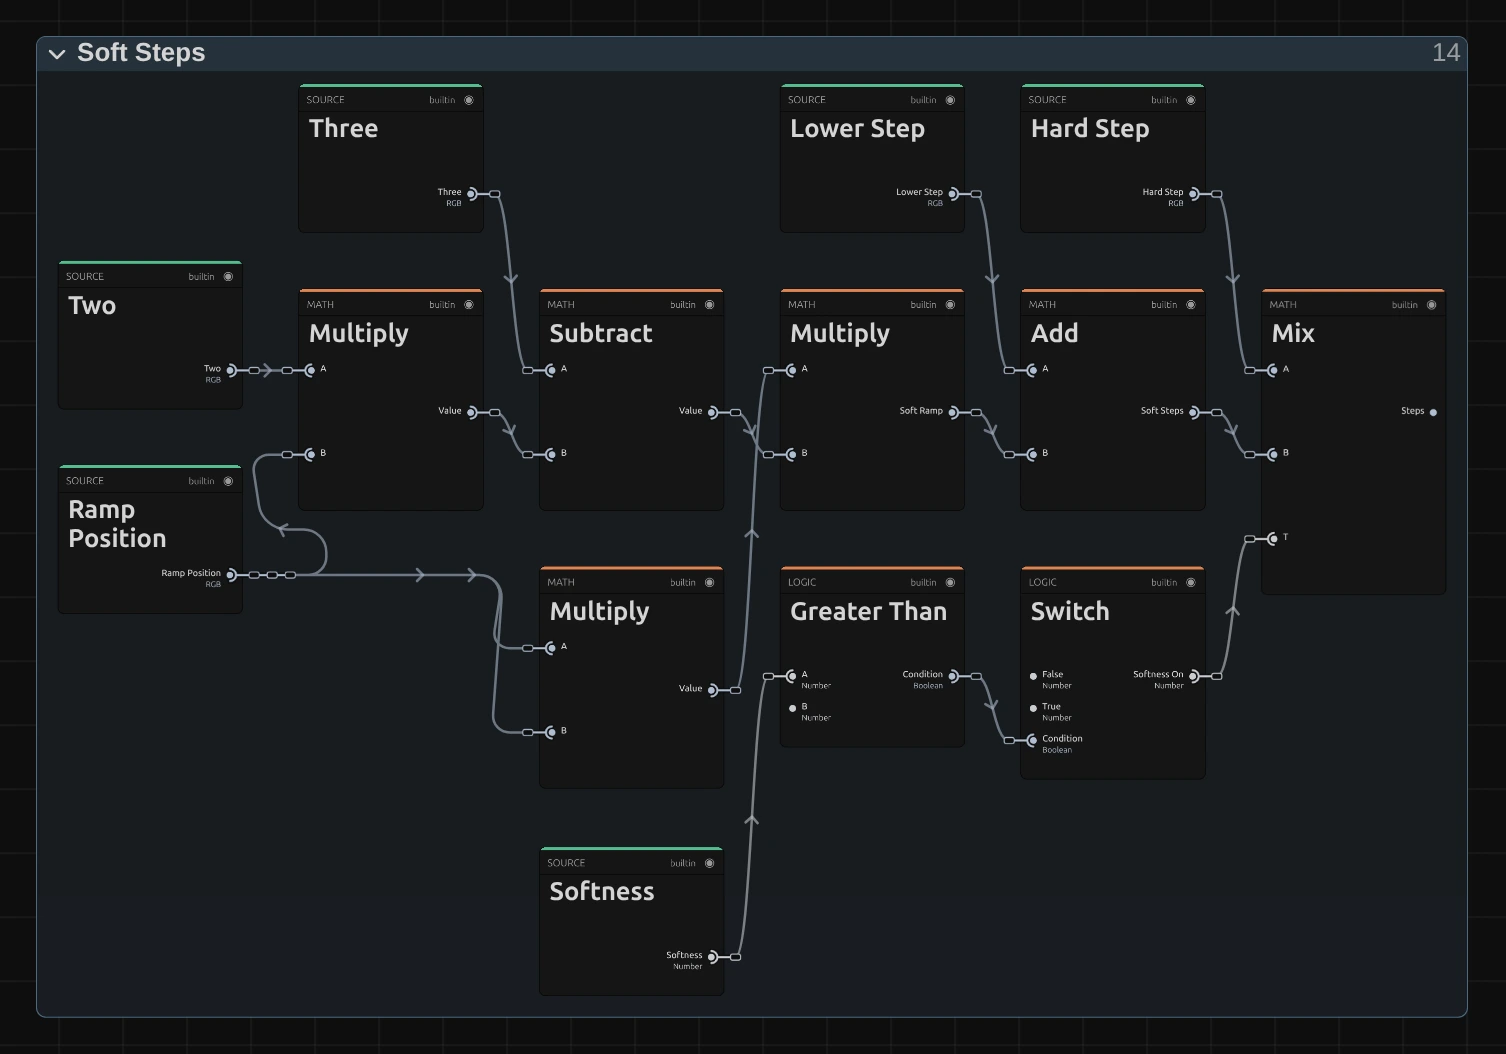
Multiply – the last of three Multiply cards that bend the Ramp Position into a smooth S-curve, t × t × (3 − 2 t), the Soft Ramp: it starts and ends flat, so the step has no visible corner.
Add – puts the curve on top of the Lower Step: the staircase with rounded edges, the Soft Steps.
Switch – 1 when Softness is above 0, else 0 (Greater Than asks the question).
Mix – takes the Hard Step at Softness 0 and the Soft Steps above it. So Softness 0 is exactly the plain staircase, without any rounding.
Spread to 0–1
Section titled “Spread to 0–1”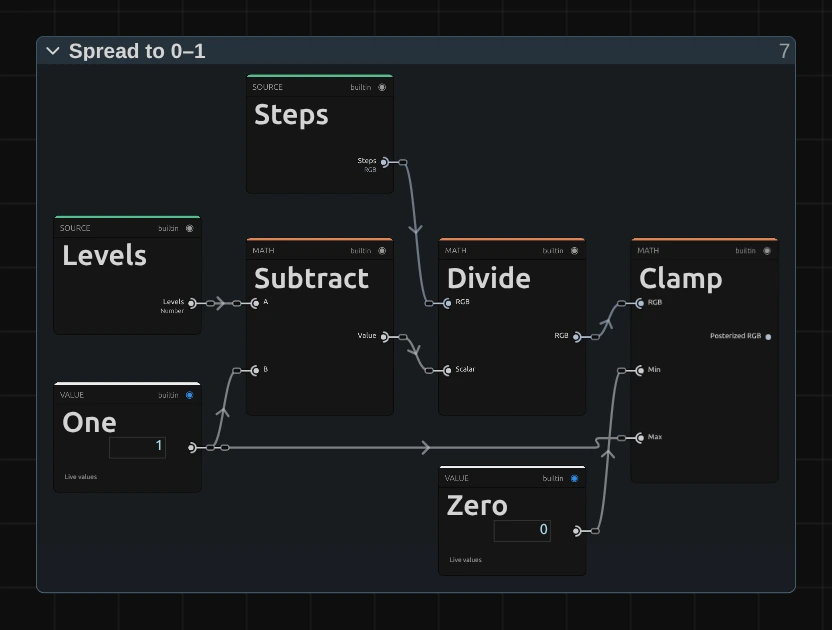
Subtract – Levels minus 1: at Levels 4 there are four tones but only three gaps between them. Divide then divides the steps by it, so the tones are 0, ⅓, ⅔ and 1: the darkest is black, the lightest full.
Clamp – keeps the result between 0 and 1. A pure white would otherwise land one step above full; this gives the Posterized RGB.
Remix: drag a cable from the folder’s Levels input into the Scalar input of Divide, in place of Subtract’s. The steps are then divided by 4 instead of 3, so the brightest tone sits a little below white (at Levels 4 at 75 %), for a softer, printed look.
Colour & Alpha
Section titled “Colour & Alpha”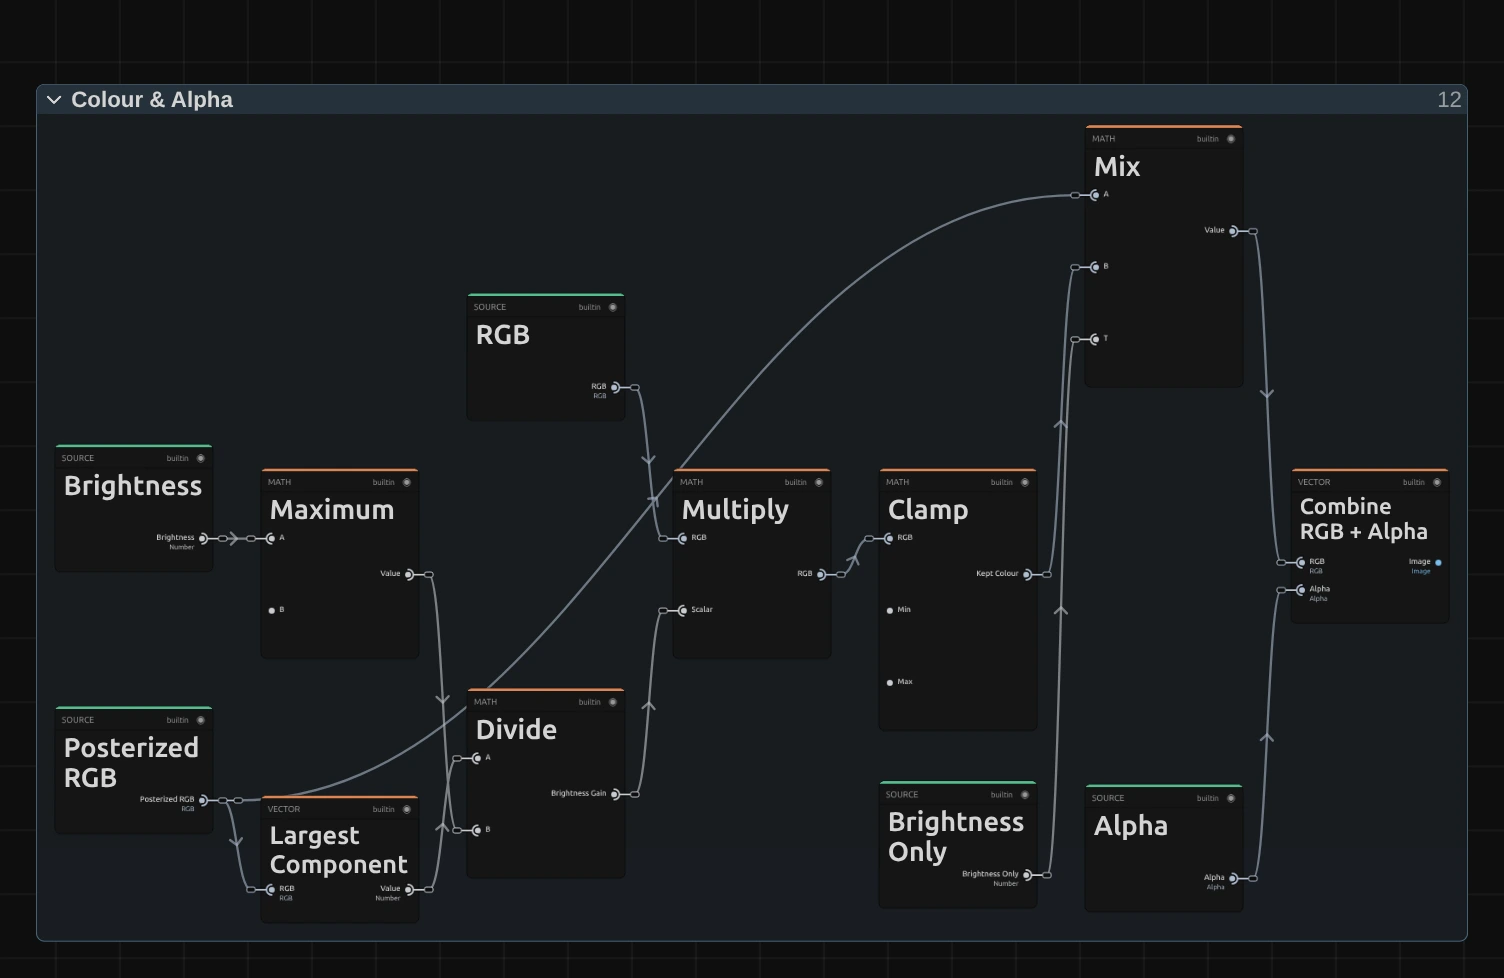
Divide – the stepped brightness divided by the original brightness: the Brightness Gain. 0.5 means this pixel should be half as bright. Maximum keeps the original brightness above a tiny floor, so a black pixel never divides by zero.
Multiply – multiplies the original colour by that gain. All three channels change by the same factor, so the hue and the strength of the colour stay; Clamp keeps the result within 0 to 1.
Mix – with Brightness Only off it passes the stepped channels (Posterized RGB), with it on this kept colour.
Combine RGB + Alpha – joins the result with the original transparency, untouched.
Technical details
Section titled “Technical details”- Formula. Each value
vbecomesfloor(v · L) / (L − 1), limited to 0–1, withL= Levels (at least 2). With Brightness Only the value is the largest channelm, and the colour is multiplied byposterize(m) / m. Softnesssreplaces each jump with a smoothstep rampmin(s, 1)steps wide, centred on the edge; Softness 0 without Brightness Only is exactly the earlier staircase. - Limits. Levels below 2 renders as 2, negative Softness as 0 and Softness above 1 as 1 (wider ramps would overlap and jump in the middle of a tone; graphs saved before 2026-10-22 get the same limit when they load, which changes only Softness above 1); a fractional Levels makes the top step narrower. The card and the tool result say so.
- Transparency. Only the colour is stepped; the transparency passes through untouched.
- Saved projects. Brightness Only defaults to on. Saved effects and Look entries without the value render it off (its legacy default), so a saved Posterize keeps stepping each channel. Softness above 1 renders as 1 and is reported; graphs saved on 2026-10-21 and 22 with the unlimited ramp are capped to one step on load. Untouched earlier Posterize graphs become the current recipe; edited ones stay as saved. A saved graph that already has its folders keeps them (an older one: one Color Processing folder); a newly added Posterize opens with the stage folders above.
- What all colour effects share (8-bit range, adjustment layers): Color & Tone. Formulas and history: Effect system; blocks: Node Catalog · Styles and presets.