
Number Field
Rebuilds the picture from figures in a few flat colours, like a picture to paint by numbers. The brighter a part, the higher its figure and the lighter its colour; Steps sets how many colours there are.
Group: Text & Glyph · How to add an effect
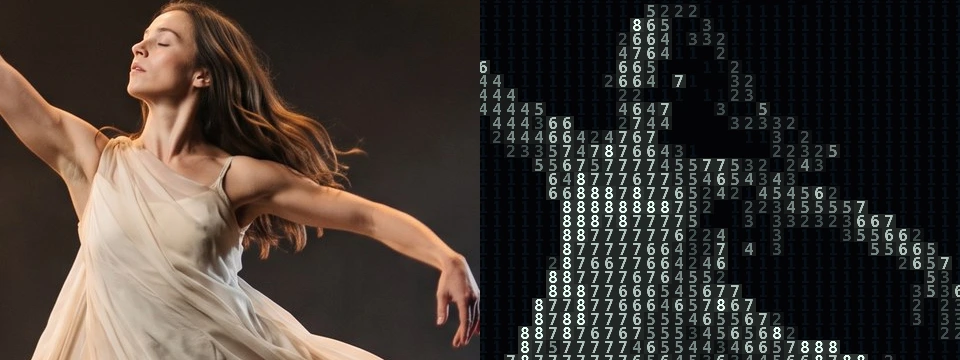
Use it for: data and statistics on stage · a person reduced to numbers · countdowns, scoreboards and departure boards.
- Cell Size – how big the figures are.
- Steps – how many colours.
- Dark and Light – the colours of the darkest and the brightest parts.
- Background – how much colour fills each cell behind its figure.
Tip: type as many figures into Custom Ramp as there are Steps (12345 with Steps 5): every cell then carries the number of its colour. Or keyframe Steps from 2 up to 10 to let a stark two-tone figure open into fine shades on a cue.
Presets
Section titled “Presets”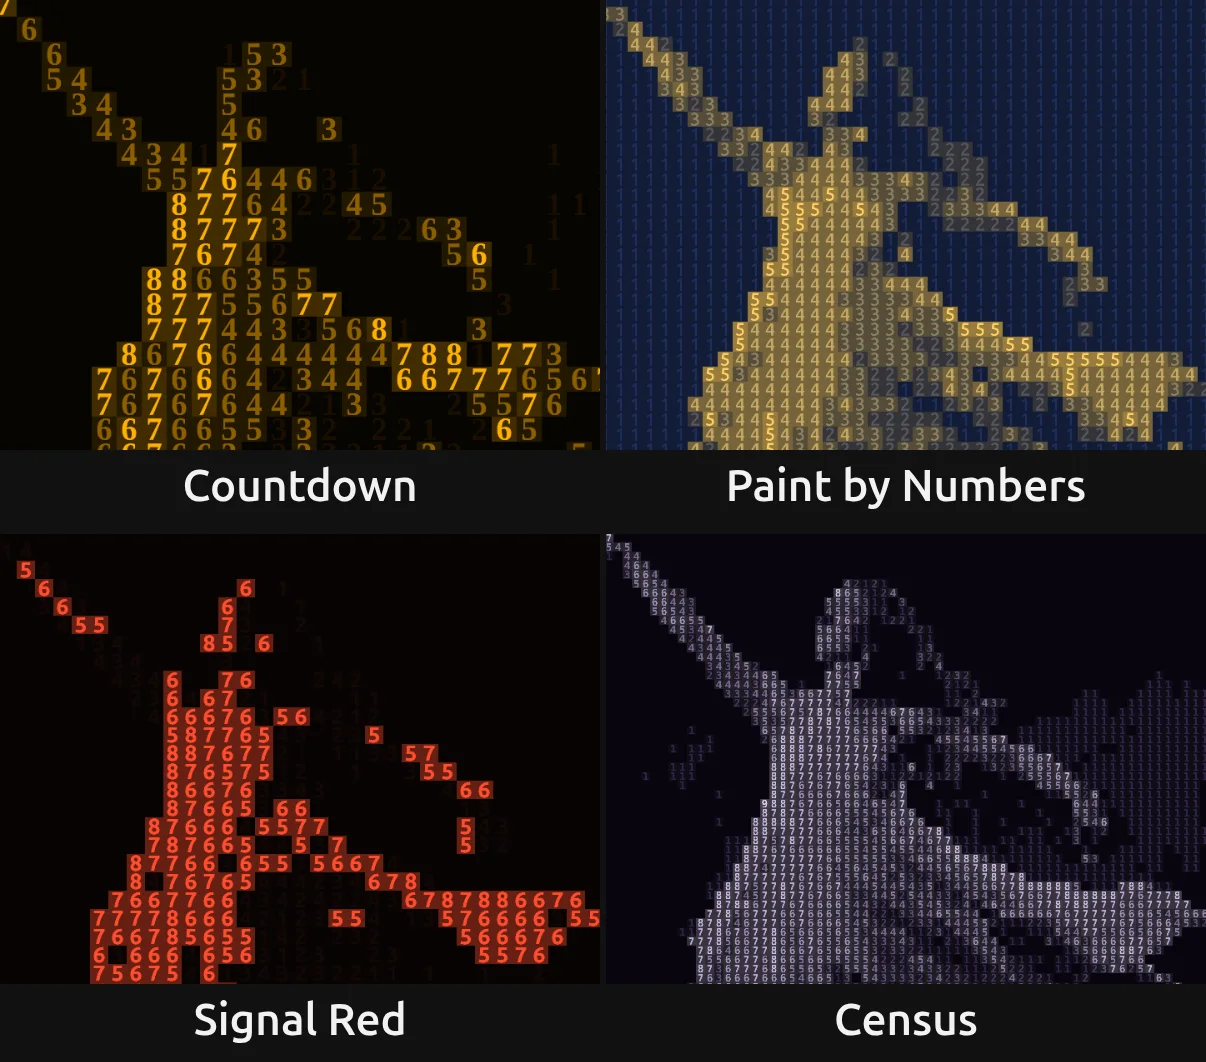
Pick one in the Preset row of the effect card. It sets all controls at once, in one undo step, and the row then shows its name until you change something. A control with keyframes keeps them, and the card says so.
Countdown – amber serif figures in three steps on brown-black, like a countdown, a scoreboard or an old departure board. Every lit cell glows as an amber block behind its figure. For time running out, waiting, a station at night.
Paint by Numbers – every cell carries the number of its colour, 1 to 5, from navy to gold: the Custom Ramp 12345 has as many figures as there are Steps. Background 0.6 fills the cells, so the picture reads as numbered flat areas. For childhood, craft, a picture still waiting for its colours.
Signal Red – two steps only: bold vermilion figures where the picture is lit, near-black everywhere else. Graphic and loud; for alarms, propaganda, a figure singled out.
Census – fine pale violet figures in ten shades. With the Numeric ramp and Steps 10 the darkest shade stays blank, and 1 to 9 name the others. For statistics, crowds, a person counted.
Controls
Section titled “Controls”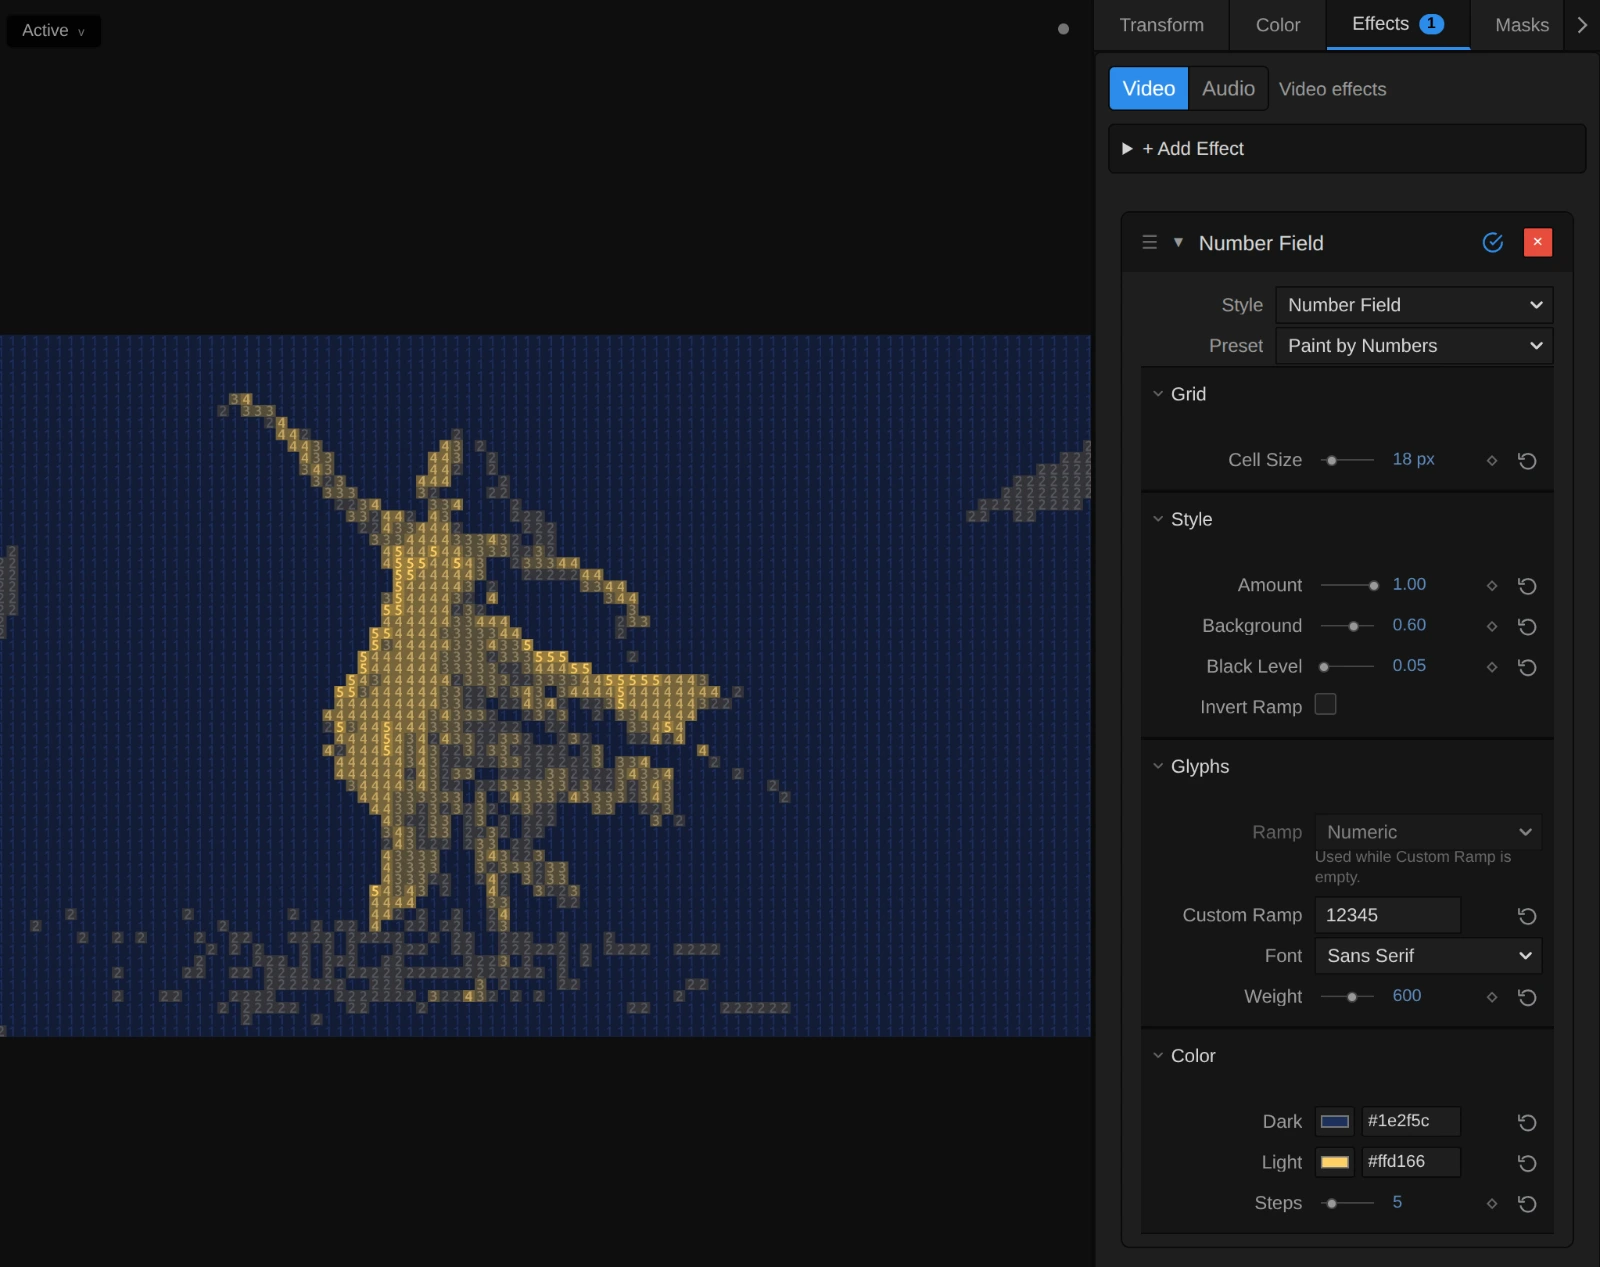
Style – switches to another look of the same engine and keeps your values and keyframes, for example ASCII, Grid Glyph or Pixel Code. Steps belongs to Number Field alone: other looks leave it unread, and switching back brings it back. Undo brings the old look back.
Cell Size – how big one cell, and the figure in it, is. 8–11 gives a fine sheet of figures that reads as a picture from afar (Census), 14–22 clearly readable figures, 40 and more a few large figures, like a countdown; at 72 the frame holds only 15 rows. It counts pixels of a 1080p picture, so the preview, the thumbnails and a 4K export show the same figures. 4 to 72 px, default 14 px.
Amount – how much of the effect you see. At 0 the original picture, unchanged; in between, the figures fade in over it. Keyframe it to let the picture dissolve into numbers. 0 to 1, default 1.
Background – how much of its colour fills each cell behind the figure. At 0 the figures stand on black; 0.2 lets the colour steps show faintly as flat areas; 0.5–0.7 fills the cells, so the picture reads as numbered patches of colour (Paint by Numbers); at 1 the figures vanish into a plain mosaic of the Steps colours. 0 to 1, default 0.2.
Black Level – the brightness up to which the picture counts as black. Everything darker gets the first character of the ramp, the space in Numeric (with Invert Ramp the last one), and the darkest colour, so a grey stage drops out and only the lit figure is written; the rest spreads over all figures and all colours. Try 0.1–0.2 on stage footage. 0 to 0.9, default 0.
Invert Ramp – swaps the ends of the ramp: dark parts get the high figures, bright parts the low ones, and the brightest parts none at all. The colours stay, so the brightest parts are still the lightest. Either on or off, default off.
Glyphs
Section titled “Glyphs”Ramp – the characters the picture is built from, from the darkest to the brightest part. Numeric (the digits 1 to 9 after a space) makes the field of numbers; Binary writes only 0 and 1; Standard, Detailed, Blocks, Bars and Symbols turn it into ASCII art, shading blocks, level bars or signs, all in flat colours. While a Custom Ramp is typed, the row rests and the card dims it. In the menu: Standard, Detailed, Blocks, Bars, Binary and 2 more, default Numeric.
Custom Ramp – your own characters, from dark to bright, instead of the Ramp. With as many characters as Steps (12345 with Steps 5) every cell carries the number of its colour (Paint by Numbers). Spaces at the end are ignored, and a ramp longer than 256 characters is thinned to 256 (the card says so). Clear it to use the Ramp again. Any text, default empty.
Font – the lettering. Monospace draws the even figures of a terminal or a ledger; Serif the figures of a clock face or a timetable (Countdown); Sans Serif plain ones for signs (Signal Red). Each is narrowed to fit its cell. Monospace, Serif, Sans Serif, default Monospace.
Weight – how heavy the strokes are. Heavier figures carry more colour, so the picture gets brighter. How many steps you see depends on the font: the built-in monospace font of many systems only has regular (up to 500) and bold (600 and more). Keyframes step from one weight to the next. 200 to 900, default 600.
Dark – the colour of the darkest step, and of the ground in the dark parts. A Dark that is not black, such as a deep navy, lets the steps show across the whole frame, the empty stage too. Pick a colour, default #081018.
Light – the colour of the brightest step: pure white takes it exactly. The steps in between are spaced evenly from Dark to Light, so two colours of one family (brown-black to amber) keep every step warm, while colours far apart on the colour wheel meet in a grey in the middle. Pick a colour, default #e8fff5.
Steps – how many flat colours the figures take, spaced evenly from Dark to Light by brightness. 2 is a hard two-tone, figure against ground (Signal Red); 3–5 reads like a poster; 10 and more gives soft shading. With the Numeric ramp at 10, every figure names its own shade (Census). Keyframes step from one count to the next; a value outside the range renders as 2 or 16, and the card says so. 2 to 16, default 5.
Node setup
Section titled “Node setup”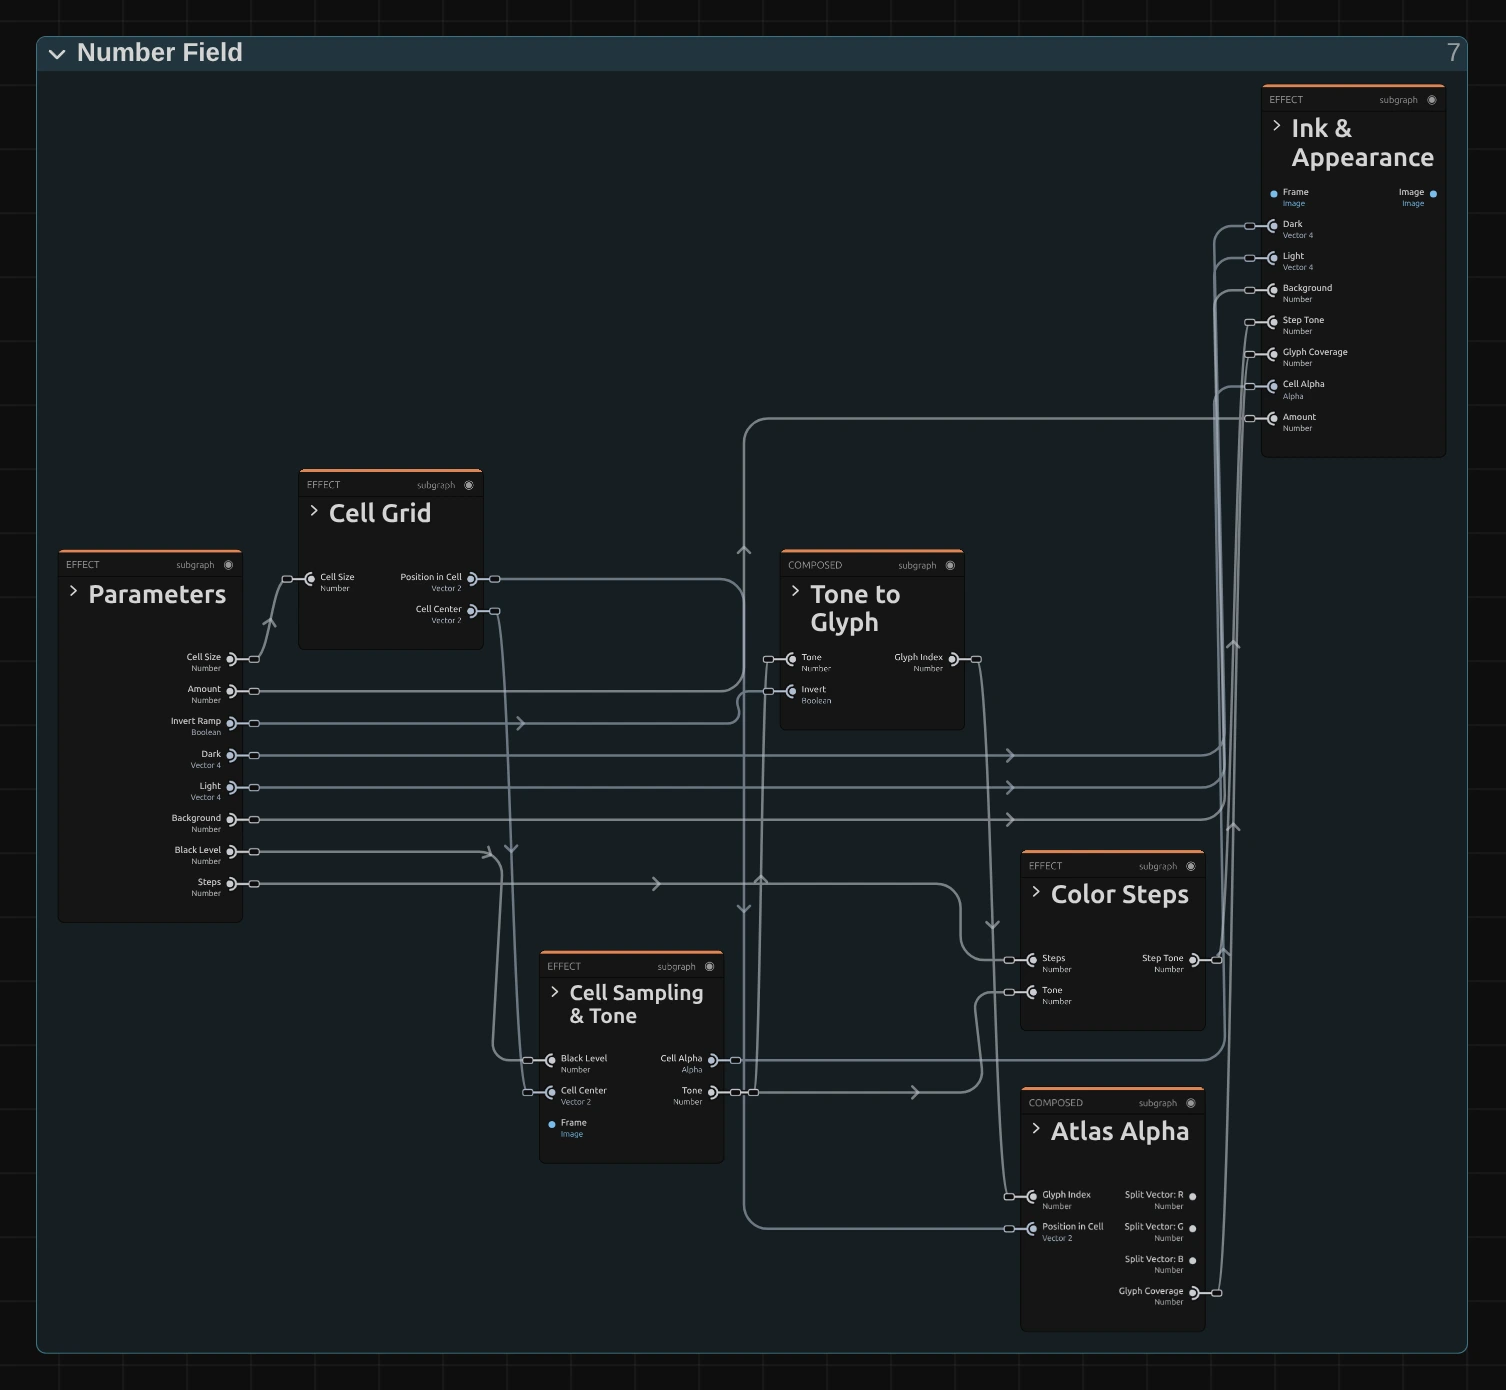
Number Field works in six stages, one folder each in the Nodes tab: Cell Grid cuts the frame into square cells, Cell Sampling & Tone reads the brightness in the middle of each cell, Tone to Glyph picks a figure of the ramp for that brightness, Atlas Alpha looks up where the figure covers the cell, Color Steps cuts the same brightness into Steps bands, and Ink & Appearance colours the figure and its ground with the colour of its band. Click a folder’s header to open it. Color Steps makes the flat colours; the other folders work as in ASCII. Number Field is one look of the glyph engine that the Text & Glyph looks share; its Style menu switches between them.
Cell Grid
Section titled “Cell Grid”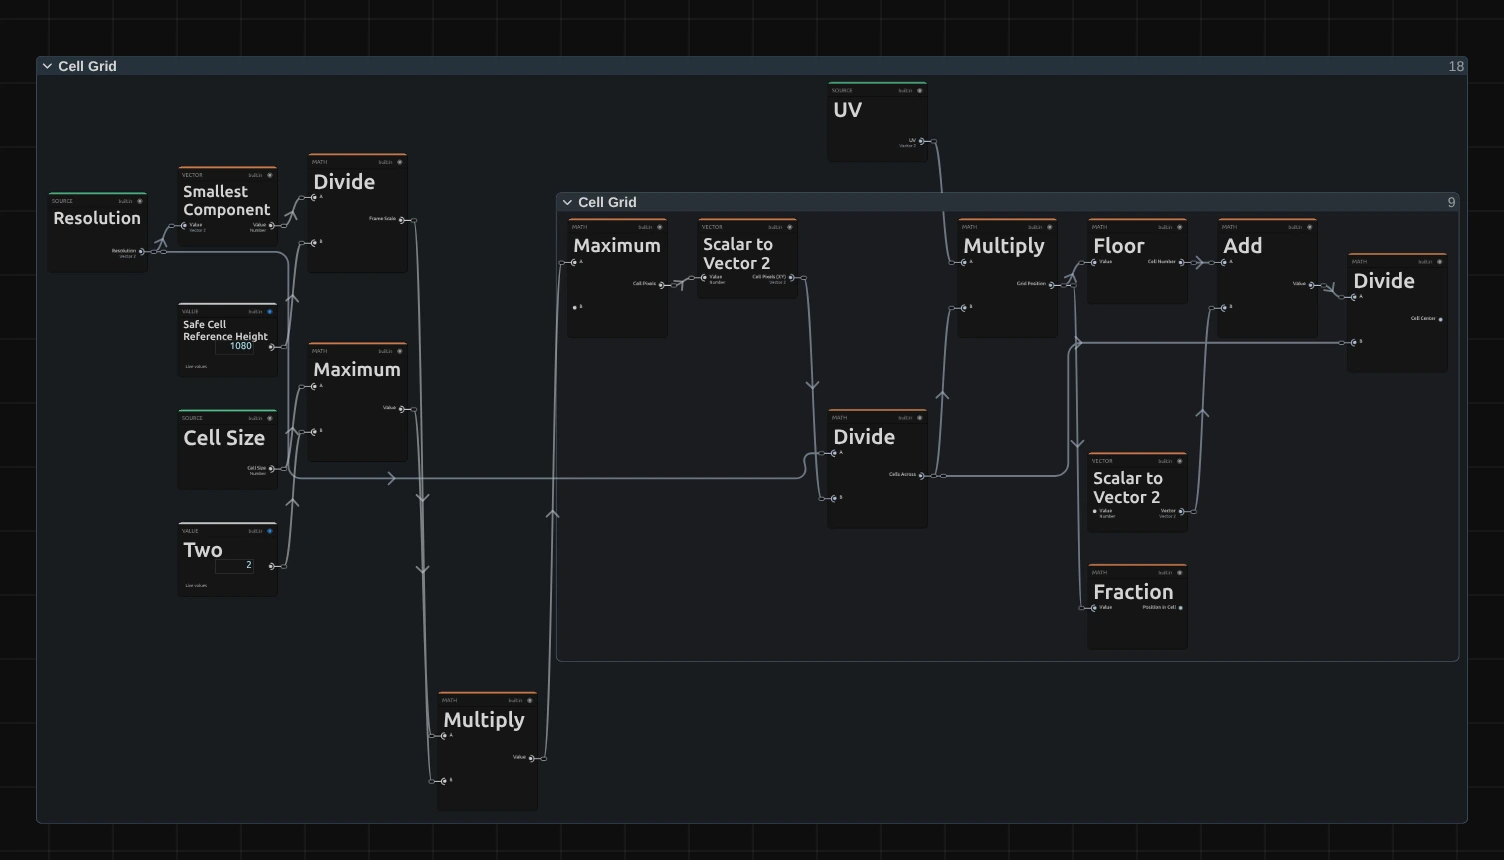
Smallest Component – the shorter side of the frame; divided by 1080 it scales Cell Size, so a 4K export, a portrait frame and a thumbnail show the same figures.
Maximum – the cell size in pixels of this frame, never smaller than 2.
Floor – which cell the pixel lies in, counted in columns and rows.
Fraction – where the pixel lies inside its cell, from 0 to 1; Atlas Alpha draws the figure with it.
Divide – the middle of the cell, where the whole cell reads the picture.
Cell Sampling & Tone
Section titled “Cell Sampling & Tone”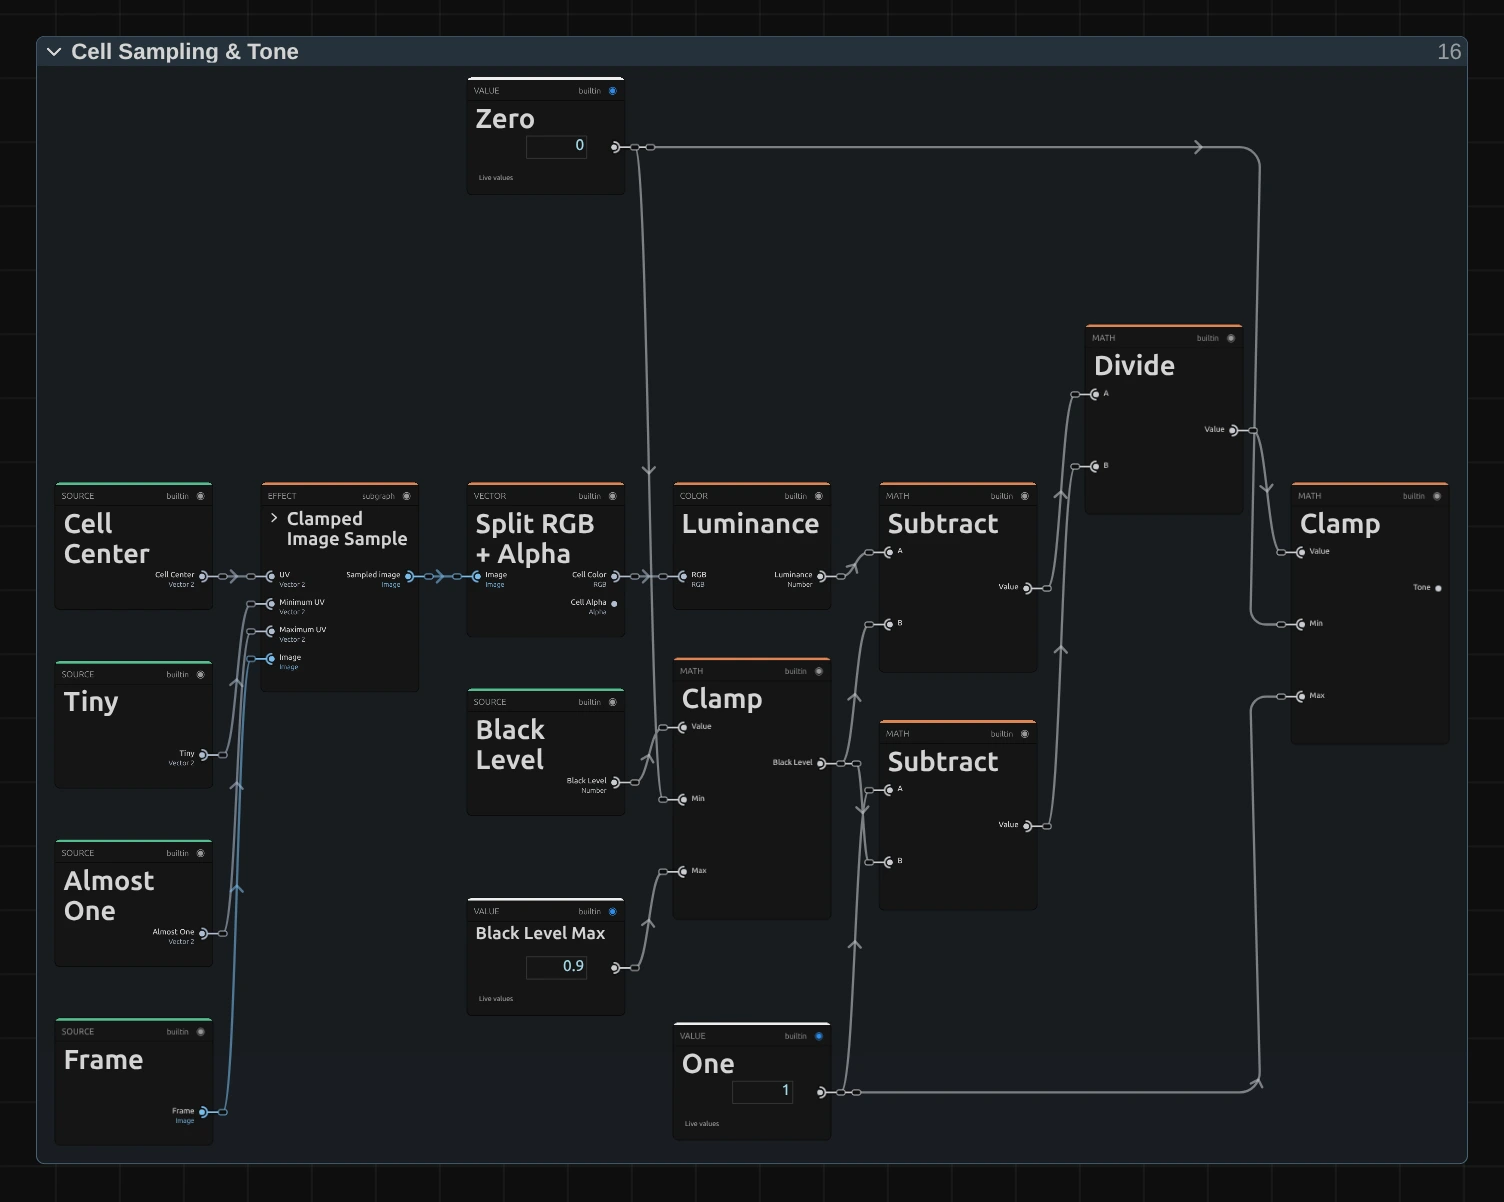
Clamped Image Sample – reads the input picture at the cell centre, never outside the frame.
Split RGB + Alpha – the cell’s colour and its transparency. Number Field takes only the brightness of the colour; the transparency becomes that of the whole cell.
Luminance – the brightness of the cell colour, weighted the way the eye sees it (green counts most).
Divide – applies Black Level: the luminance minus Black Level (Subtract), divided by what is left above it (the other Subtract: One minus Black Level). The Clamp next to Black Level keeps it between 0 and Black Level Max 0.9.
Clamp – keeps the result between 0 and 1, so everything darker than Black Level becomes 0: the Tone. It picks the figure and, in Color Steps, the colour.
Tone to Glyph
Section titled “Tone to Glyph”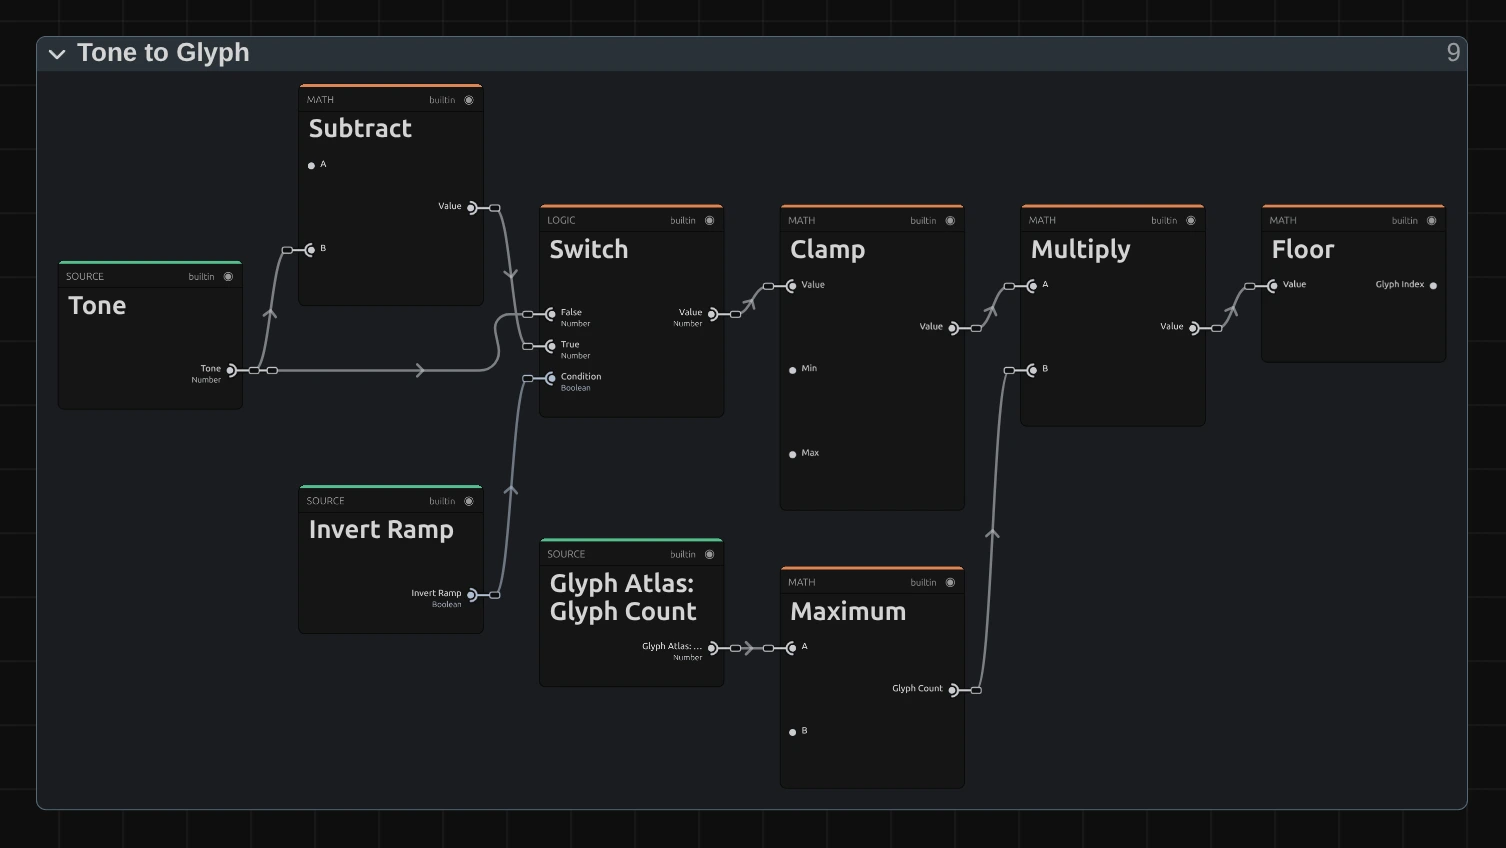
Subtract – one minus the tone, for Invert Ramp.
Switch – the tone as it is, or inverted when Invert Ramp is on.
Clamp – keeps the tone just under 1, so the brightest cells get the last character and never one past it.
Multiply – spreads the tone over the number of characters in the ramp.
Floor – drops the fraction: the number of the character, 0 for the first (the space of the Numeric ramp) up to the last.
Atlas Alpha
Section titled “Atlas Alpha”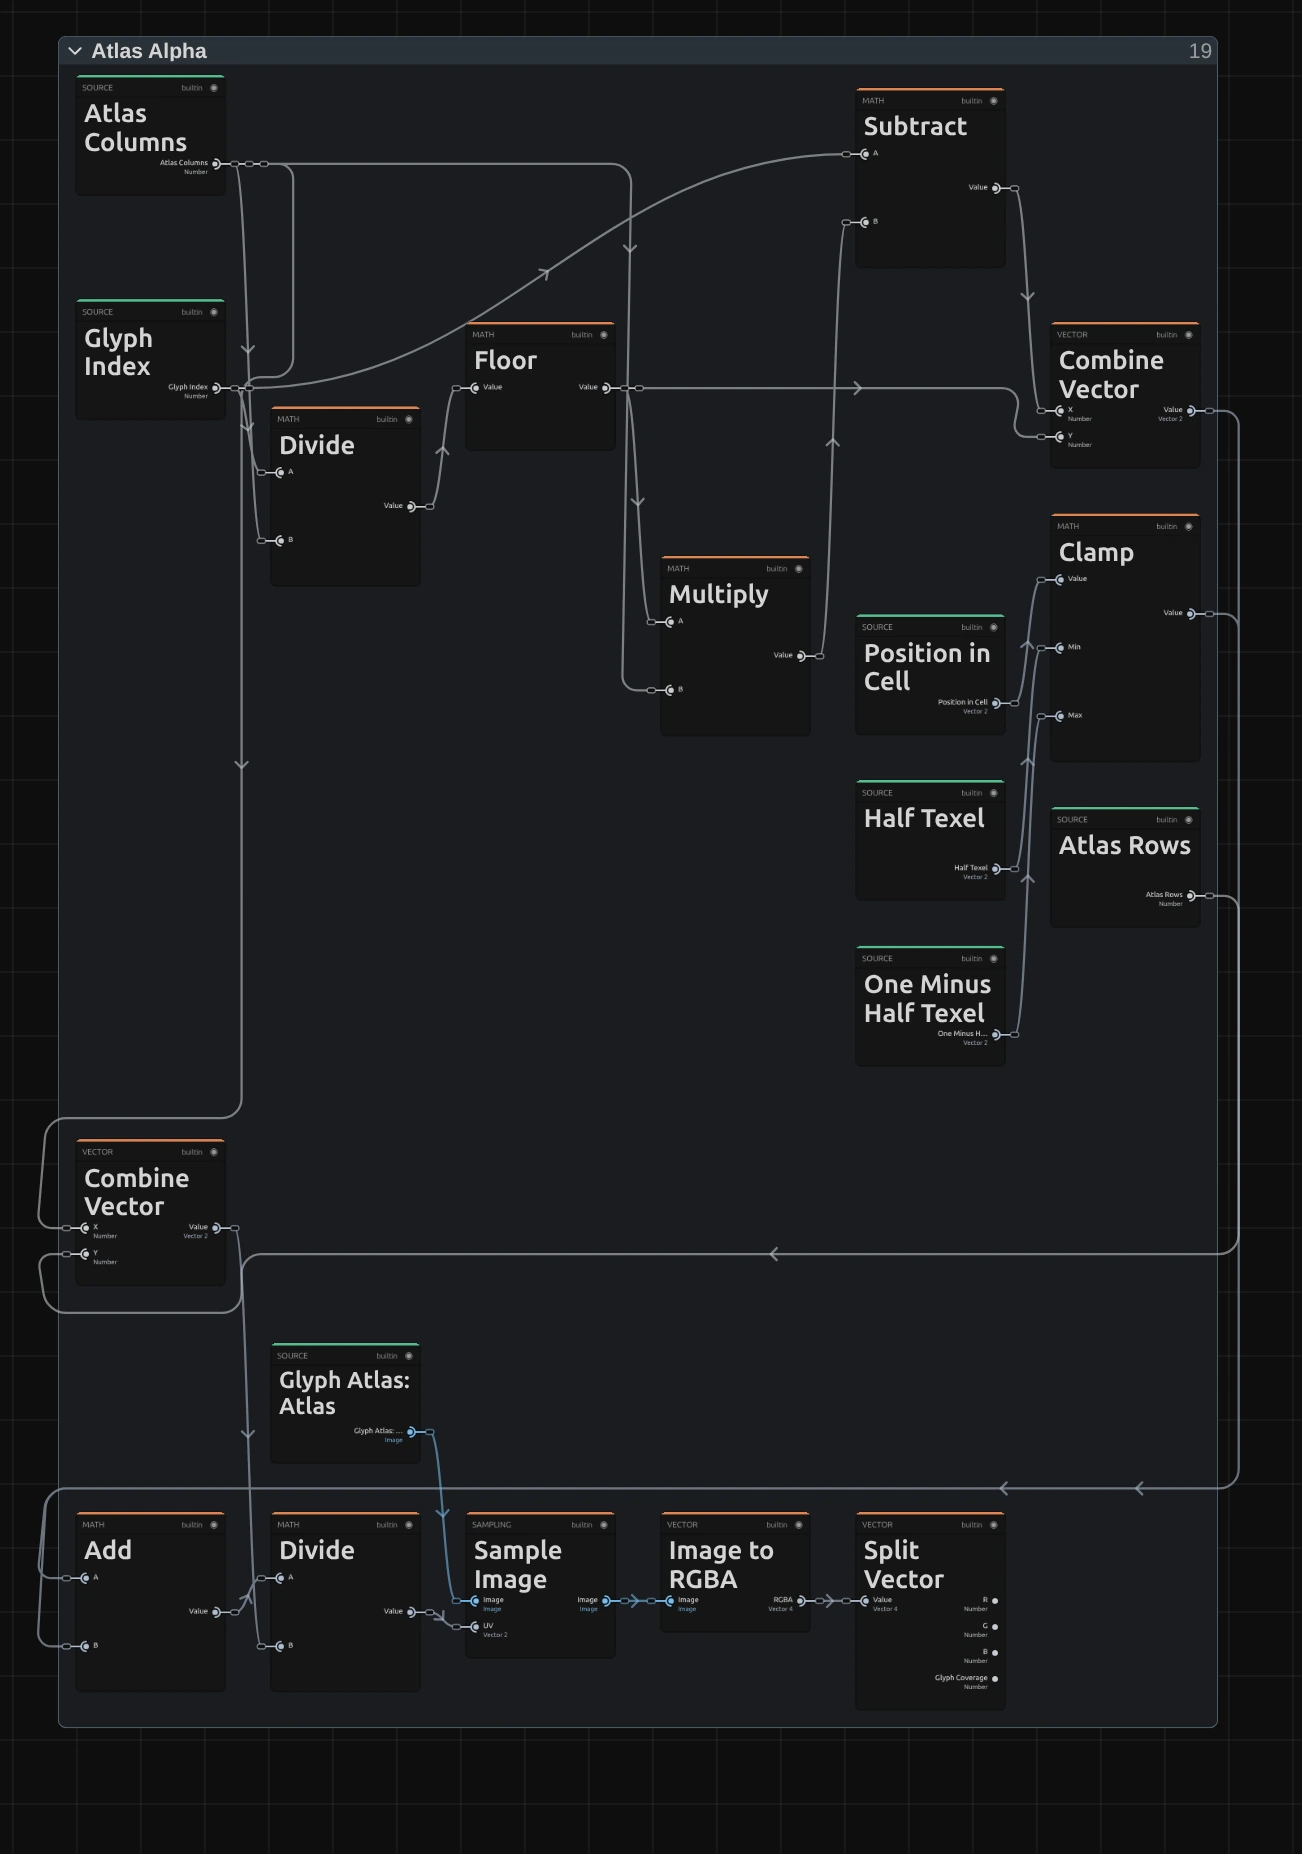
Floor – the row of the character on the atlas, a sheet of all characters of the ramp drawn in the chosen Font and Weight.
Subtract – its column on the sheet.
Clamp – keeps the place inside the cell half a pixel of the sheet away from the edges of the character’s square (Half Texel, 0.5 of the 64 pixels of a square, and One Minus Half Texel), so the smoothed read never mixes in the neighbouring character.
Sample Image – reads the sheet at the character’s square plus the place inside the cell.
Split Vector – the Glyph Coverage: 1 inside the strokes of the figure, 0 around them. Ink & Appearance colours it.
Color Steps
Section titled “Color Steps”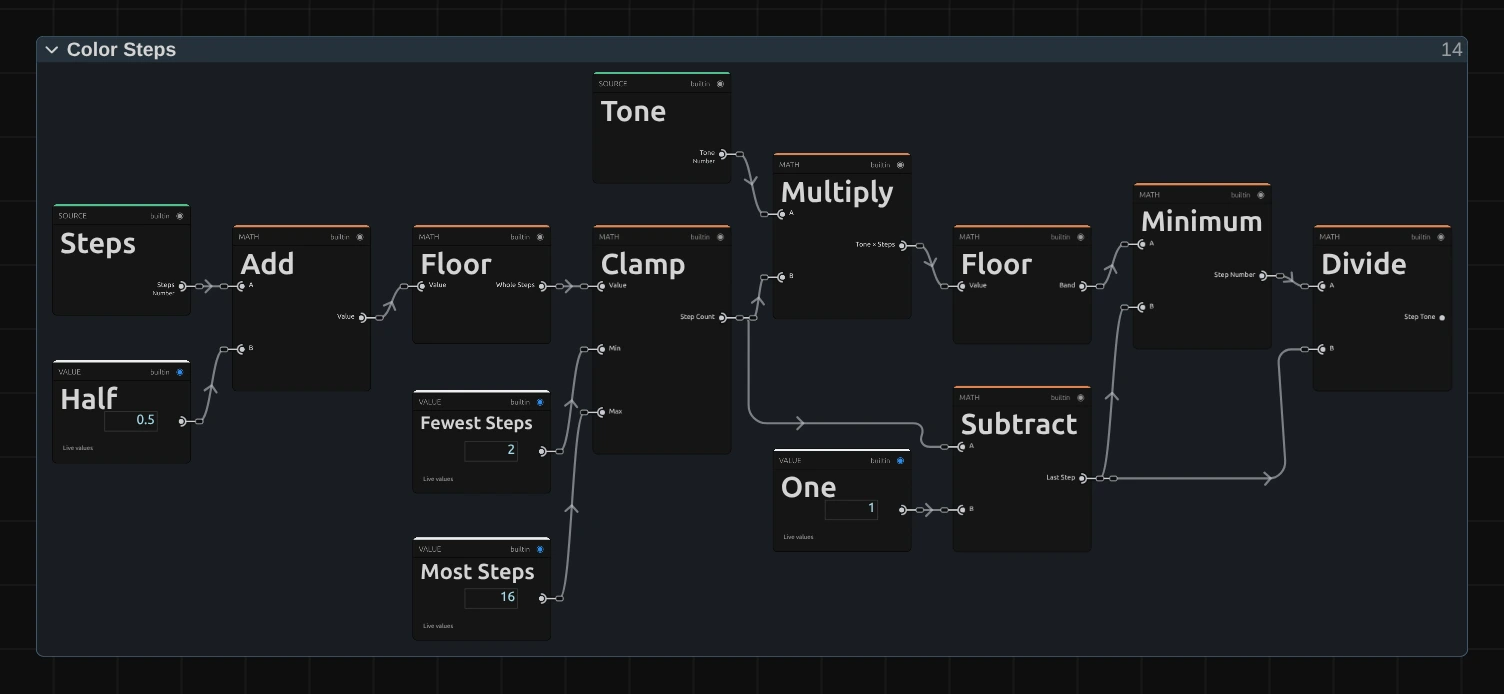
Whole Steps – Steps plus Half (Add), without its fraction (Floor): Steps rounded to a whole count, so a keyframed Steps jumps from one count to the next instead of giving uneven bands.
Step Count – the Clamp keeps the count between Fewest Steps 2 and Most Steps 16; a value outside renders as 2 or 16, and the card says so. Subtract takes One from it: the Last Step.
Band – the Tone times the count (Multiply, Tone × Steps) without its fraction (Floor): the band the brightness falls in, 0 for the darkest.
Step Number – the smaller of Band and Last Step (Minimum). Pure white would fall one band past the last, so it stays in the last one and takes Light exactly.
Step Tone – Step Number divided by Last Step: 0 for the darkest band, 1 for the brightest, evenly spaced in between. Ink & Appearance mixes Dark and Light by it.
Remix: open Color Steps and drag a cable from the output of Multiply (Tone × Steps) onto A of Minimum, past the Floor that makes the Band: the colours flow smoothly from Dark to Light instead of in steps, and Steps only sets how early the brightest parts reach Light.
Ink & Appearance
Section titled “Ink & Appearance”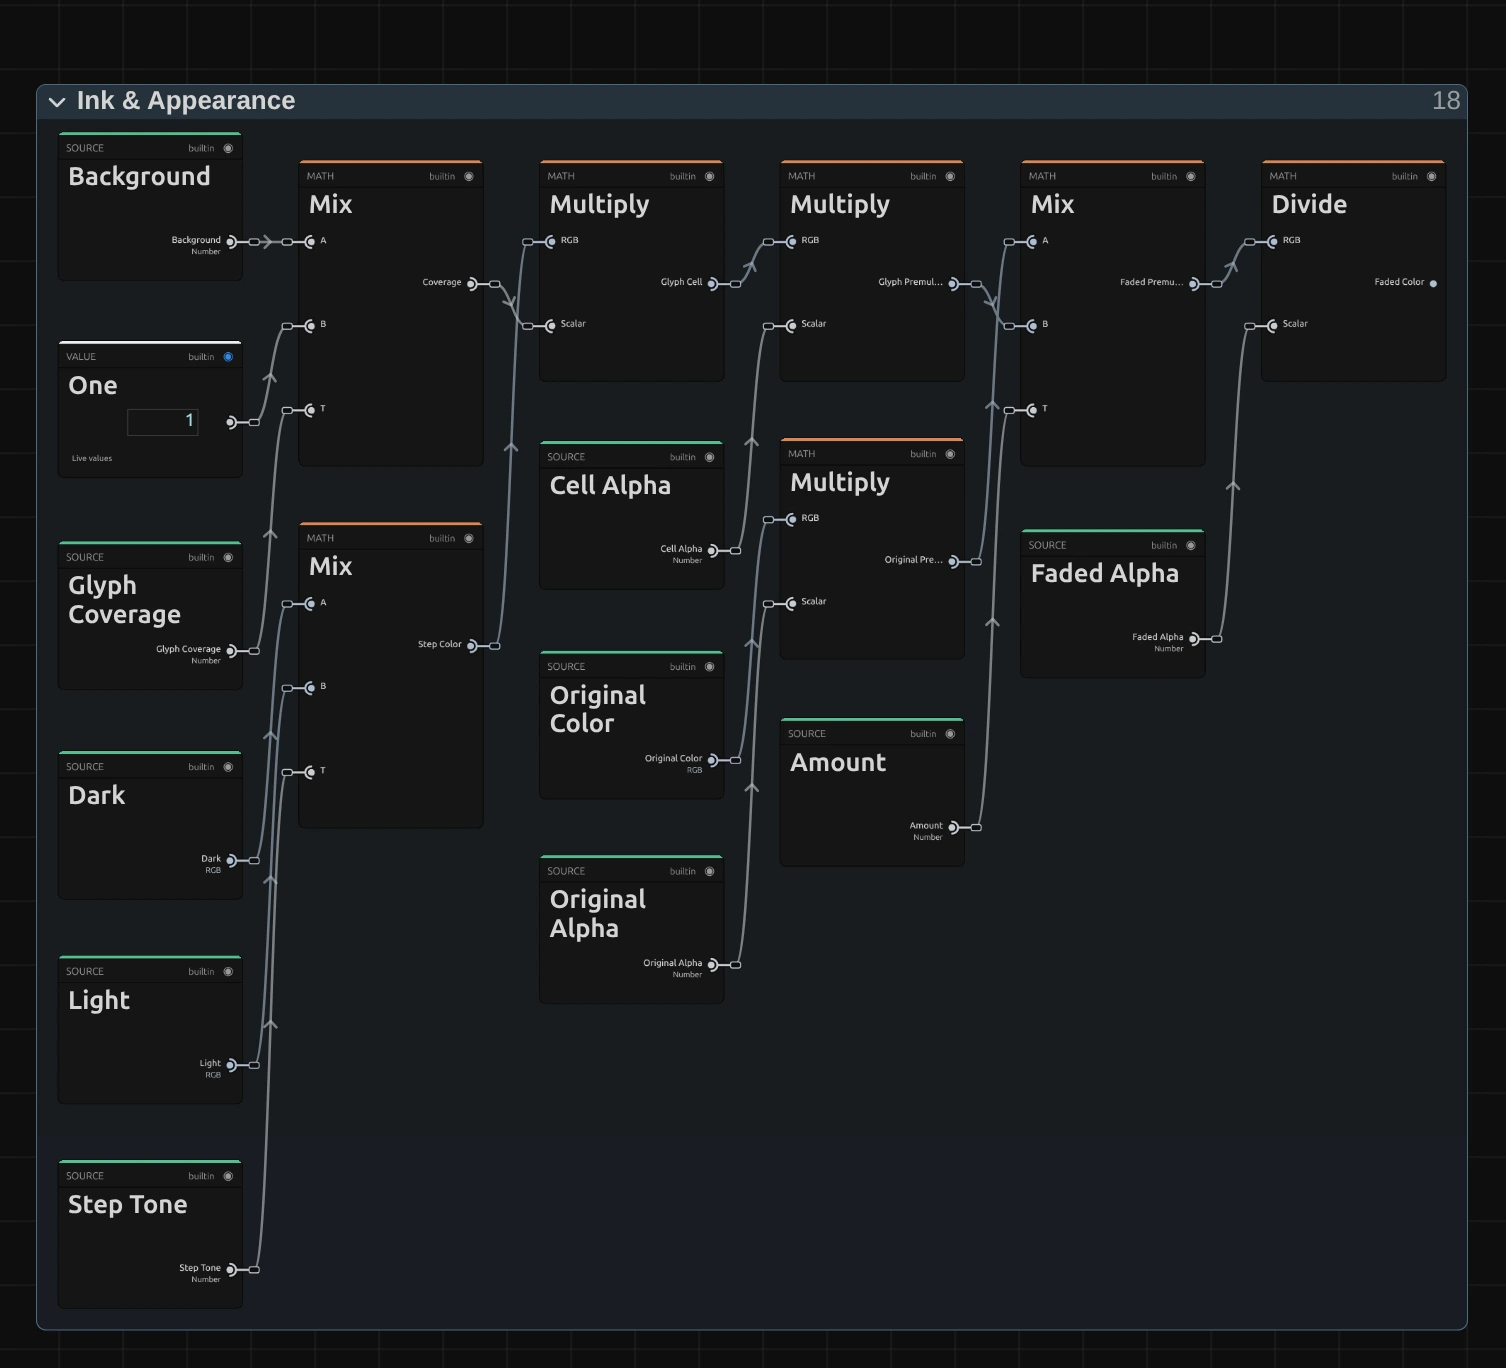
Step Color – mixes Dark and Light by the Step Tone from Color Steps: the one flat colour of the cell, for its figure and its ground.
Coverage – moves Background towards One by the Glyph Coverage (Mix): 1 inside the strokes of the figure, Background around them.
Glyph Cell – Step Color times Coverage (Multiply): the figure in the full colour of its step, the ground in a share of it, black at Background 0.
Faded Color – fades the untouched picture, pixel by pixel, towards the glyph cell by Amount and divides by the faded alpha. Both are first multiplied by their transparency, so the colour a transparent pixel hides never shows as a fringe around a cut-out figure.
Technical details
Section titled “Technical details”- Size. Cell Size counts pixels of a frame whose shorter side is 1080: a 4K export, a portrait 1080 × 1920 frame, a lower Preview Quality and the thumbnails show the same figures. A cell is never smaller than 2 pixels; below that Cell Size renders as 2, and the card says so.
- Steps. Each cell takes one of Steps colours, spaced evenly from Dark to Light by its brightness after Black Level; pure white takes Light exactly. Steps renders as a whole count between 2 and 16; outside that range the card says so.
- Characters. The figures come from an atlas, a sheet the engine draws for the Ramp, Font and Weight and keeps. Its tallest character spans 88 % of the cell height. Weight is drawn in steps of 100.
- Time. Number Field does not move by itself: on footage it changes with every frame of the clip, and a paused picture needs no extra rendering.
- Transparency. Each cell, its figure and its ground take the transparency of the cell’s centre, so a cut-out figure keeps its outline in whole cells. Amount fades the transparency back to the original’s, pixel by pixel, without a fringe.
- Saved projects. A Number Field that stores its node setup keeps its look, including the earlier fixed five steps, in which pure white went a quarter step past Light: a sixth colour, brighter than Light and outside the normal range. Effects saved without a stored setup get Steps 5 with pure white on Light; this is a fix. The card of a new Number Field no longer shows Color Source, which the look never read. Presets fully apply only to effects added in this version: a stored setup from before has no Background, Black Level or Steps row, so a preset leaves those values out.
- More: Effect system · Node Catalog · Styles and presets.