
Rom1
Watery smoke: bright parts of the picture leave trails that drift along slow, invisible currents and fade. For dreamlike movement, ghosts of a dancer and smoky light on stage.
Group: Light & Stylize · How to add an effect
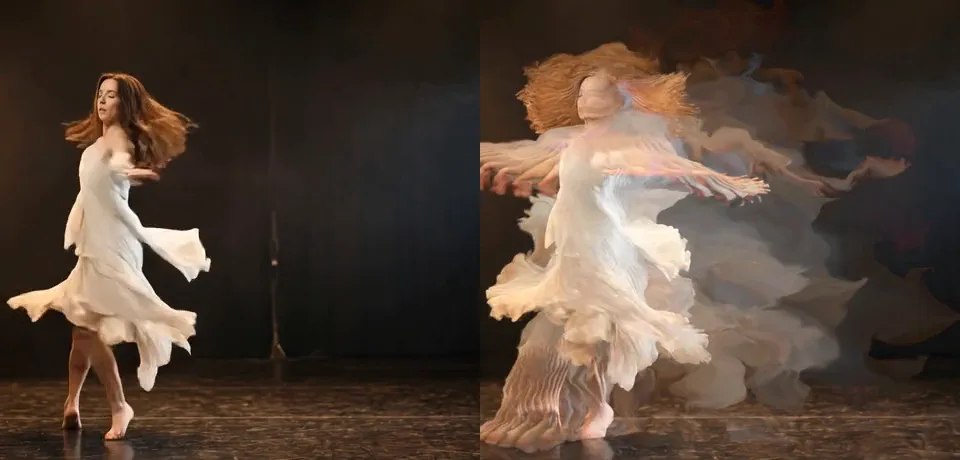
Use it for: ghostly trails behind dancers and moving lights · dreamy, liquid stage pictures · an abstract smoke backdrop from any footage.
- Trail – how long the smoke stays.
- Strength – how far it flows each frame.
- Density – how large the currents are.
- Gain X and Gain Y – sideways or up and down.
Tip: Rom1 builds on its own last frames, so it needs time and movement: the trails grow while the clip plays, and a single paused frame shows little. Keyframe Trail from 0.5 up to 0.98 to let the smoke rise on a cue.
Presets
Section titled “Presets”Pick one in the Preset row of the effect card. It sets all controls at once, in one undo step, and the row then shows its name until you change something. A control with keyframes keeps them, and the card says so.
Soft Echo – short, faint trails beside the figure at Opacity 0.6. Face and costume stay clear; a gentle afterglow for dance and slow movement.
Light Trails – the flow runs sideways only, so arms, lights and a dress streak across the frame; at Opacity 0.8 the face stays readable. Strong on turns and on lights passing by.
Dripping Light – the flow runs up and down only, fast and far (Speed 10, Strength 0.5), and the picture is lifted a little: every movement leaves long vertical streaks that hang and run like rain down a window.
Smoke Storm – long trails in fast, wide currents: the figure dissolves into swirling smoke. For a breakdown, a dream or a transition between scenes.
Controls
Section titled “Controls”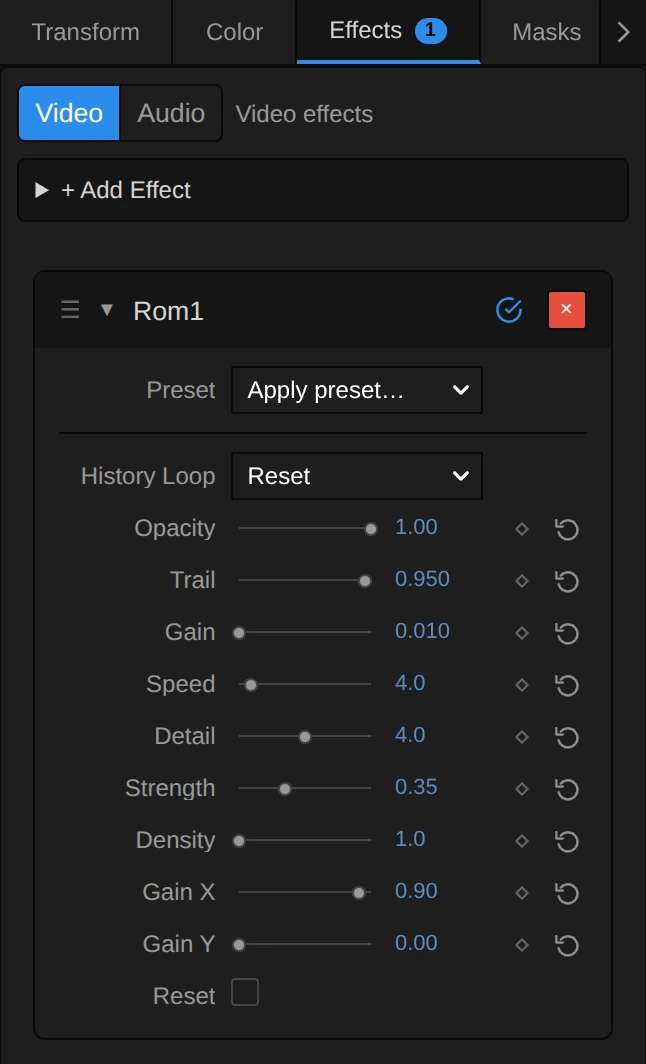
Rom1 makes every frame from its own last one: it pushes that frame a little along the currents, keeps whichever is brighter, the picture or the smoke, and lets the smoke fade by Trail. Some controls overlap: Strength and Speed multiply each other, and so do Density and Detail. The Preset row sets them all at once.
History Loop – what happens to the smoke when playback loops back to the start. Reset clears it, so every pass starts clean, as on the first play; Continuous keeps the trails across the loop point, for an installation loop without a visible restart. Scrubbing or jumping always starts fresh. Two settings: Reset, Continuous, default Reset.
Opacity – how much of the smoke covers the original. 1 is the full effect, 0.5 keeps the footage clear under a soft haze of trails, 0 leaves the picture untouched. 0 to 1, default 1.
Trail – how much of the smoke stays from one frame to the next, so how long it lingers. 0.5 leaves only a faint smear at the edges, 0.9 short echoes, 0.98 long trails of about two seconds, 0.995 smoke that hardly fades. A higher value renders as 0.995, and the card says so. Each frame also fades the smoke by at least three quarters of an 8-bit step, so even 0.995 fades out completely, after about ten seconds, instead of leaving a grey ghost. It counts frames, so at a higher frame rate the smoke fades sooner. 0 to 0.995, default 0.98.
Gain – lifts the whole picture before it turns into smoke, so the trails get brighter and the picture paler. 0.01 is a hint, 0.05 a clear haze, 0.25 washes the picture out to grey. Above 0.25 the lift eases off towards 0.5, so even 1 never turns the frame white. 0 to 1, default 0.01.
Speed – the same as Strength, on a larger scale: the two multiply, so doubling one does the same as doubling the other, and the Strength loop below shows both. Set Speed for the overall pace (4 drifts slowly, 10 and more smears the figure into large swirls) and keyframe Strength. At 0 the smoke still trails behind moving things but no longer flows (the card says so). The currents themselves change slowly over time, whatever Speed is. 0 to 40, default 4.
Detail – the same as Density: the two multiply, so the Density loop below shows both. Low values give broad, slow sweeps, high values finer, more broken streaks. At 0 the currents merge into one wide stream (the card says so). 0 to 8, default 4.
Strength – how far the picture flows along the currents each frame. 0 stops the flow, so only the trail of moving things remains; 0.3 drifts gently; 1 smears the picture into large swirls. Use Strength for fine changes and keyframes, Speed for the overall pace. 0 to 1, default 0.32.
Density – how many currents cross the frame, together with Detail (the two multiply): at the defaults, 4 × 4, about 16 across the width. 1 makes a few broad, smooth sweeps, 4 wavy currents, 16 many small, ragged ones; very high values break the smoke into grain. 0 to 100, default 4.
Gain X – how much of the flow runs sideways. With Gain Y at 0 the smoke streaks only left and right, as in Light Trails. It counts shares of the frame, so on a wide frame the same value travels further than Gain Y. 0 to 1, default 0.3.
Gain Y – how much of the flow runs up and down. With Gain X at 0 the smoke runs only vertically, as in Dripping Light. The currents point both ways, so the smoke drips and climbs; it does not rise as a whole. 0 to 1, default 0.3.
Reset – clears the smoke at once when you switch it on; it then builds again from the current picture. Switch it off again before the next reset. A switch: on or off, default off.
Node setup
Section titled “Node setup”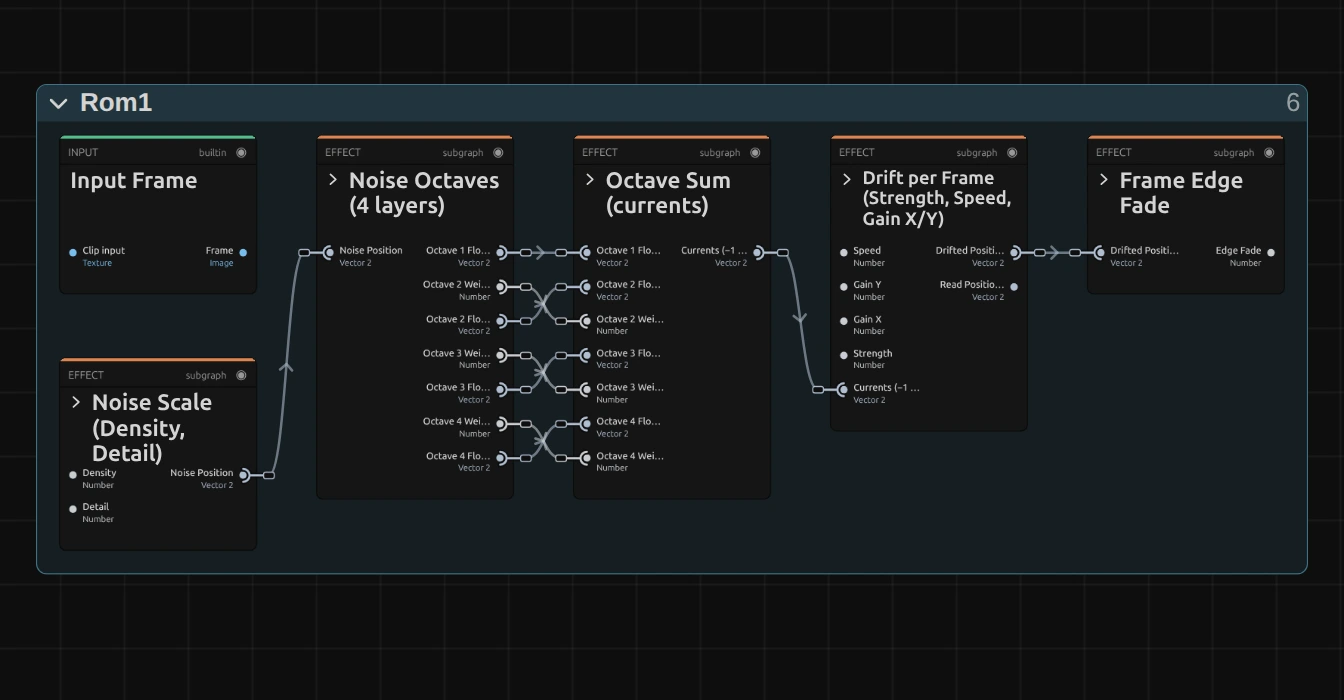
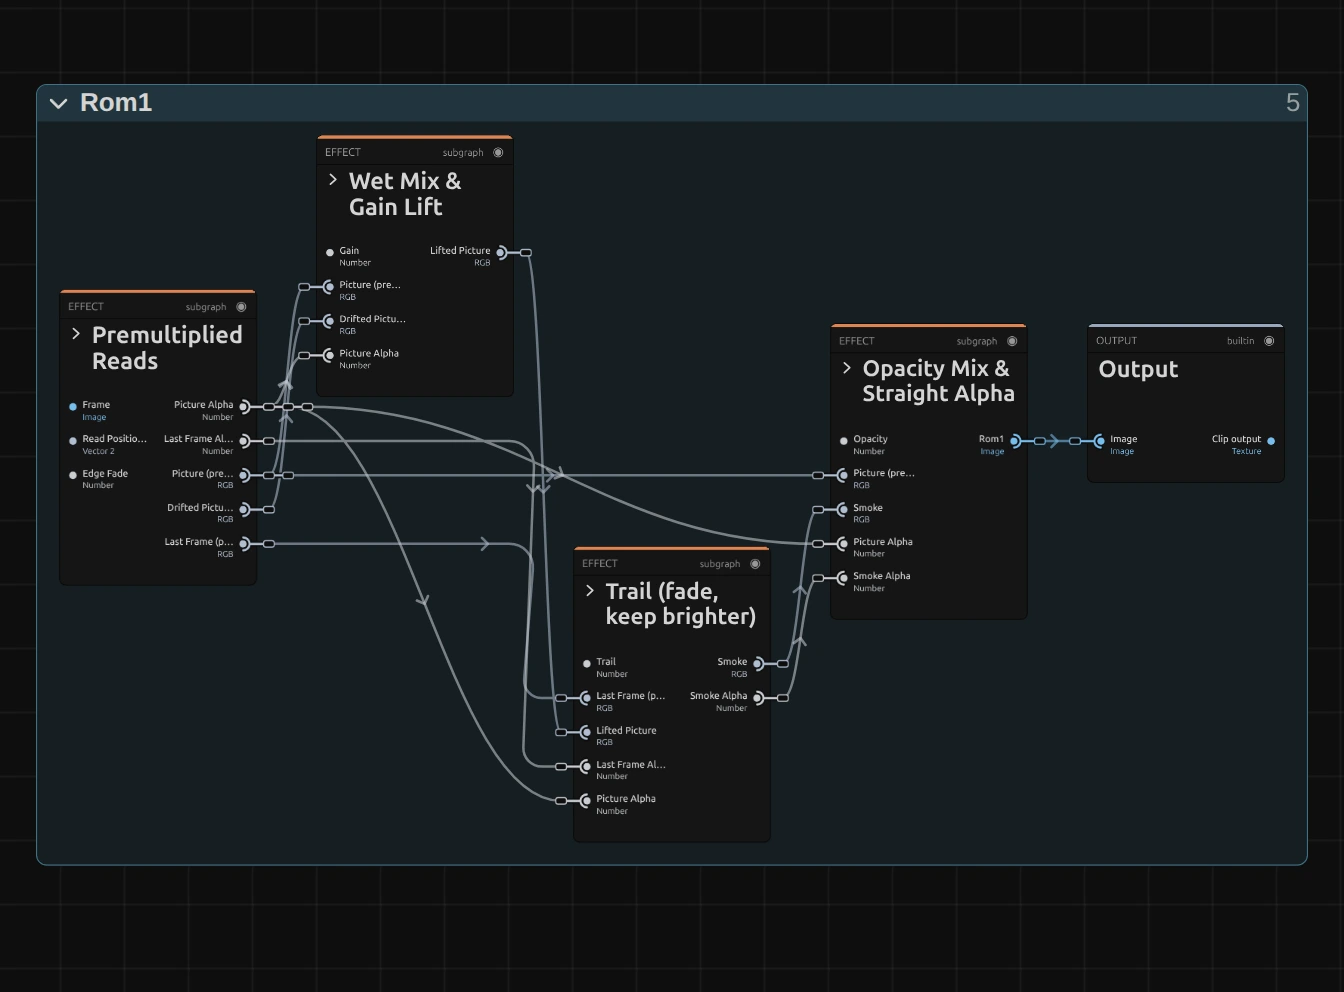
Rom1 works in nine stages, one folder each in the Nodes tab. Noise Scale, Noise Octaves and Octave Sum make the currents: four layers of noise that change slowly with the playhead. Drift per Frame turns them into the place each pixel reads from, and Frame Edge Fade keeps smoke from flowing in from outside the frame. Premultiplied Reads reads the picture and the last frame there, Wet Mix & Gain Lift blends a little of the drifted picture in and lifts it, Trail fades the last frame and keeps the brighter of the two, and Opacity Mix blends the result with the original. Click a folder’s header to open it; the sections below show what is inside.
Noise Scale (Density, Detail)
Section titled “Noise Scale (Density, Detail)”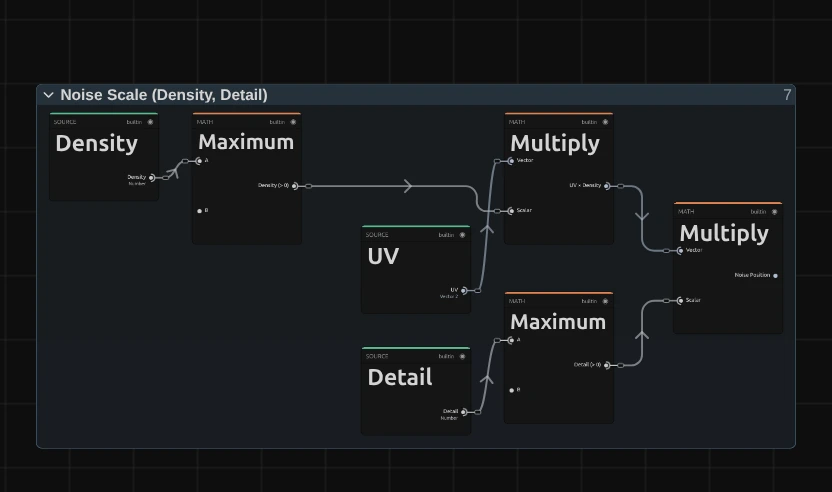
Maximum – keeps Density above 0 (at least 0.001); the other Maximum does the same for Detail, so a 0 never turns the currents into nothing.
UV × Density – the position of the pixel in the frame (0 to 1 each way), times Density.
Noise Position – times Detail as well: the place in the noise this pixel looks at. Both controls stretch the same number, which is why they act alike.
Noise Octaves (4 layers)
Section titled “Noise Octaves (4 layers)”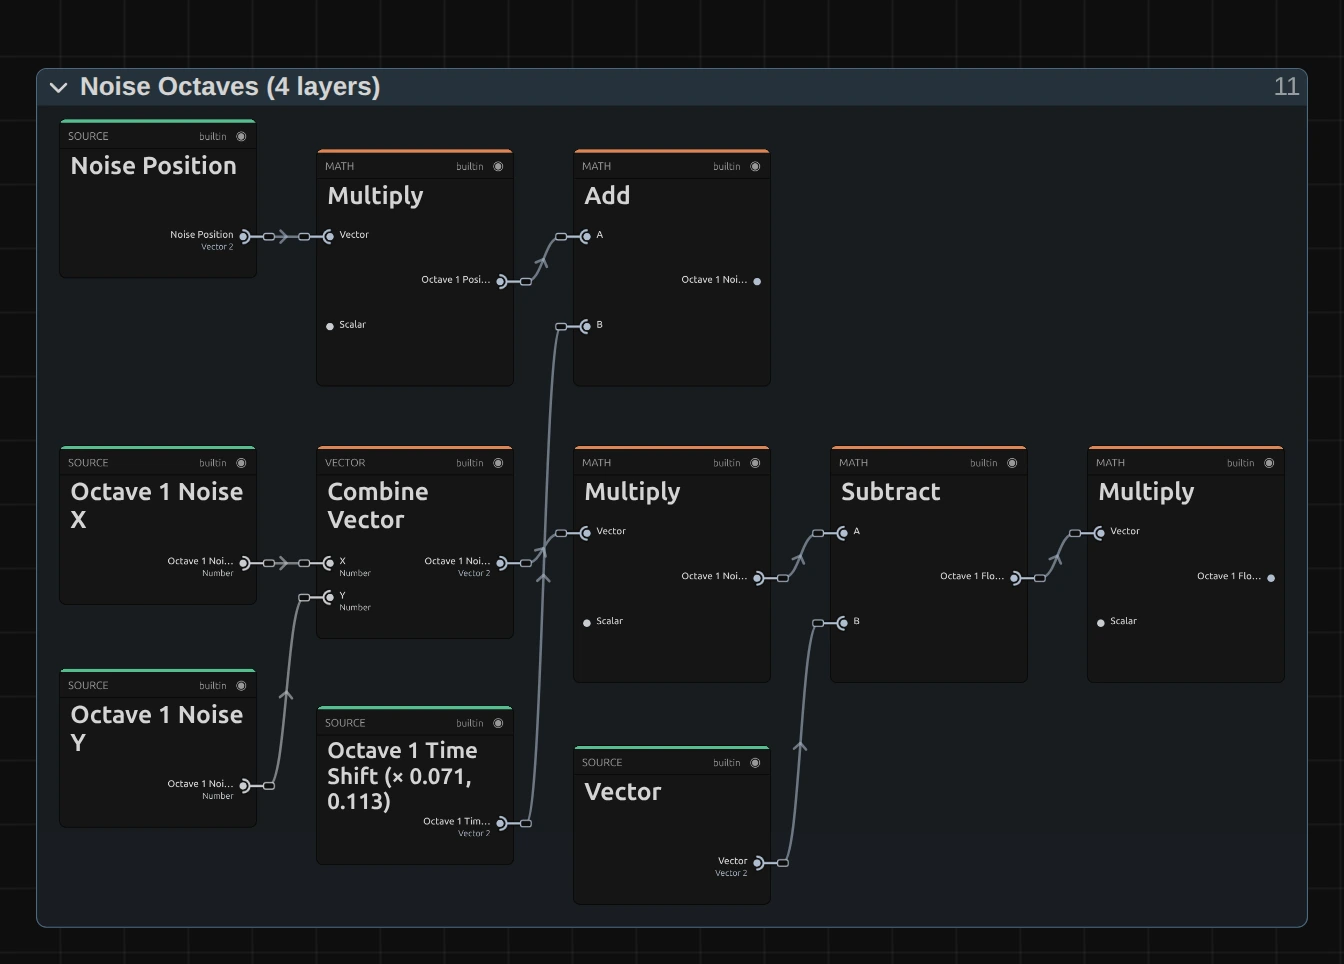
Octave 1 Position – the Noise Position times the octave’s scale: 1 for the first layer, then 2, 4 and 8, so every layer is twice as fine as the one before.
Octave 1 Noise X Read – shifts that place by the playhead (seconds × 0.071 and × 0.113, plus 13.37 per layer), so the currents change slowly while the clip plays. A second read at another place gives Noise Y. Each read is a smooth value noise of its own, about 25 cards inside the folder.
Octave 1 Flow (−1 to 1) – the two noises, between 0 and 1, doubled minus 1: a direction that can point any way.
Octave 1 Flow × Weight – the layer’s share: 0.5 for the first layer, and 0.53 times that for each finer one.
Octave Sum (currents)
Section titled “Octave Sum (currents)”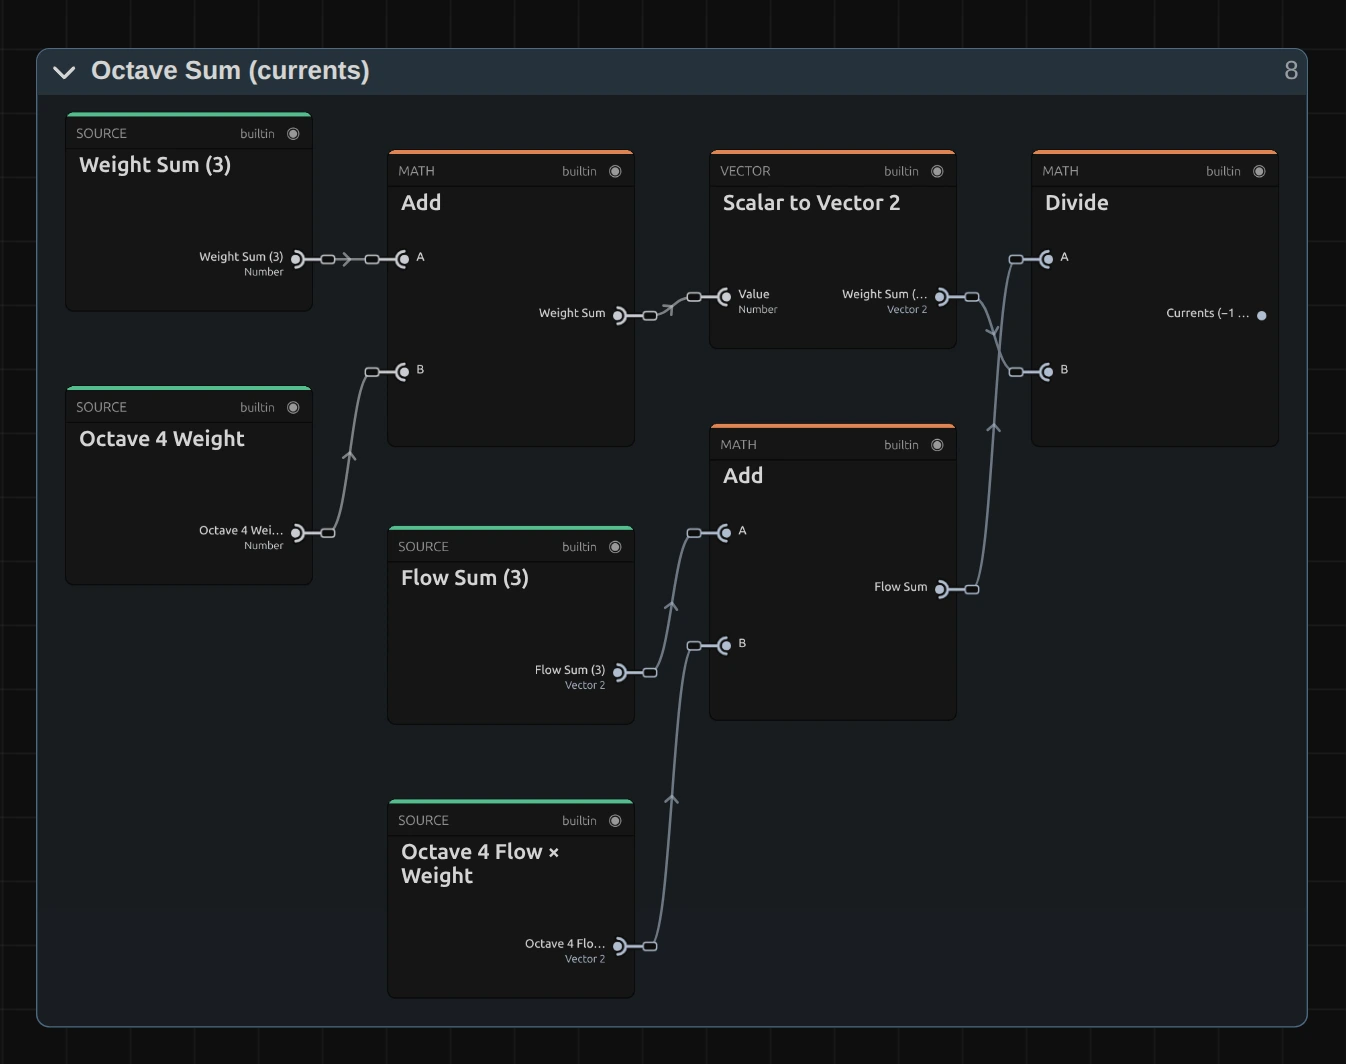
Weight Sum – the four weights added up.
Flow Sum – the four weighted flows added up.
Divide – Flow Sum divided by Weight Sum: the currents, a direction between −1 and 1 for every pixel.
Remix: open the Constants folder and set Amplitude Ratio from 0.53 to 0.9: the fine layers count almost as much as the coarse one, and the smoke turns more ragged and finely broken.
Drift per Frame (Strength, Speed, Gain X/Y)
Section titled “Drift per Frame (Strength, Speed, Gain X/Y)”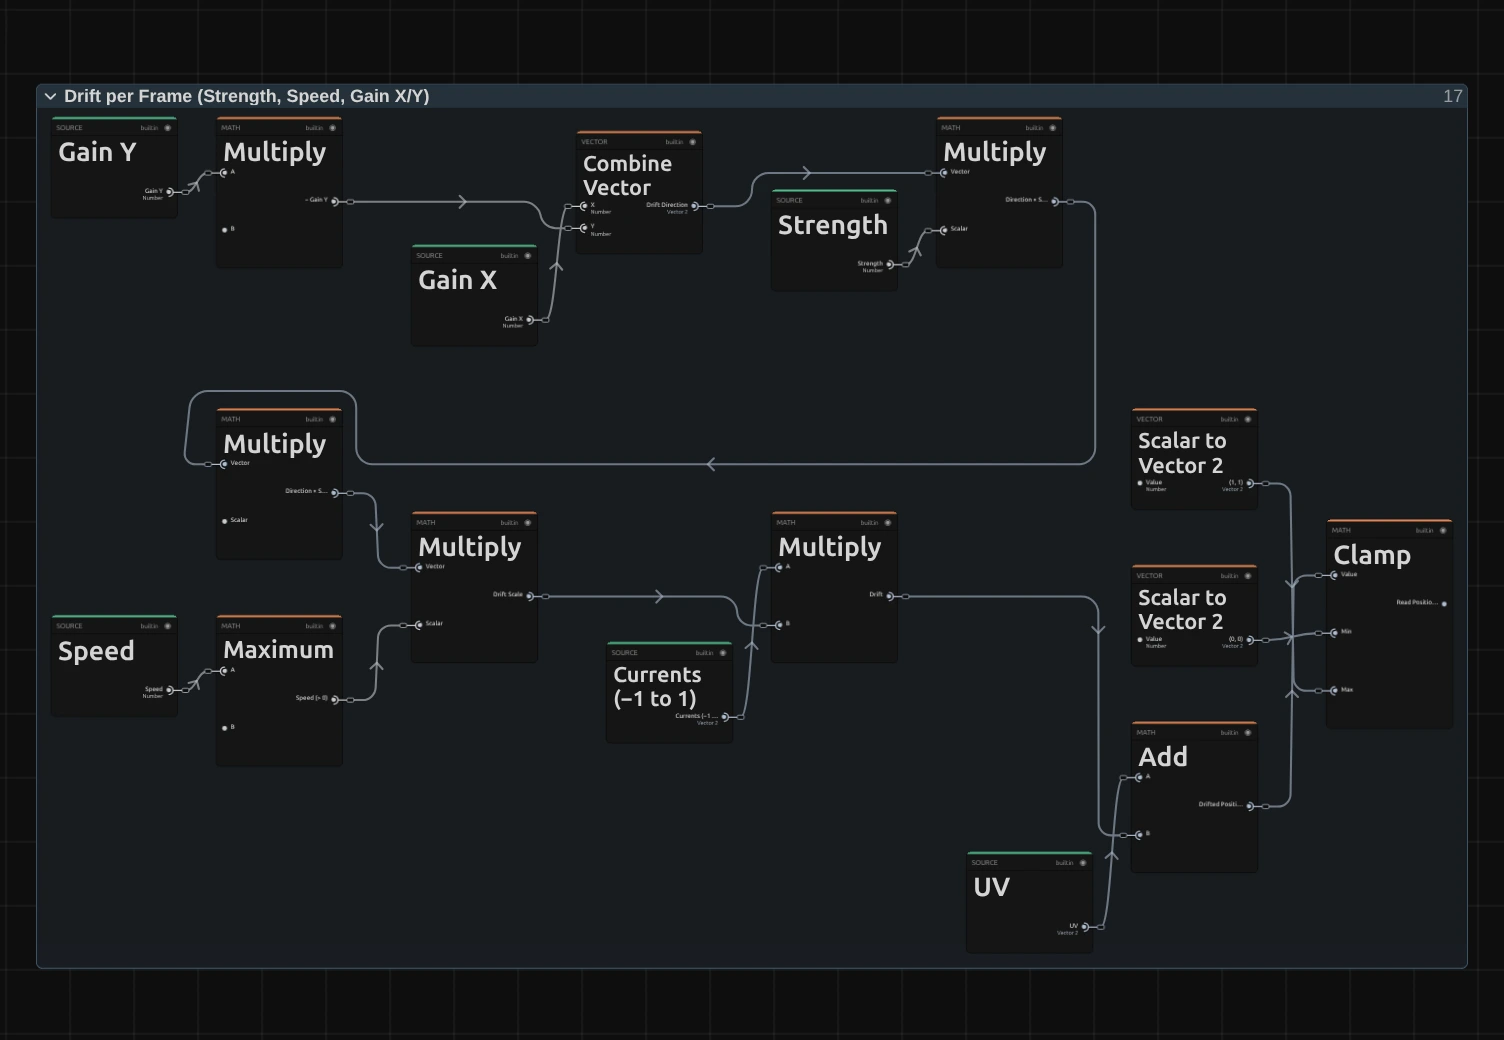
Drift Direction – Gain X and minus Gain Y as one direction.
Drift Scale – times Strength, times 0.005, times Speed (at least 0.001): how far a pixel may read away in one frame, as a share of the frame.
Drift – the currents times the scale: how far and which way this pixel reads.
Drifted Position – the pixel’s own place plus the drift.
Clamp – keeps the read inside the frame (0 to 1); Frame Edge Fade takes care of what lies beyond.
Frame Edge Fade
Section titled “Frame Edge Fade”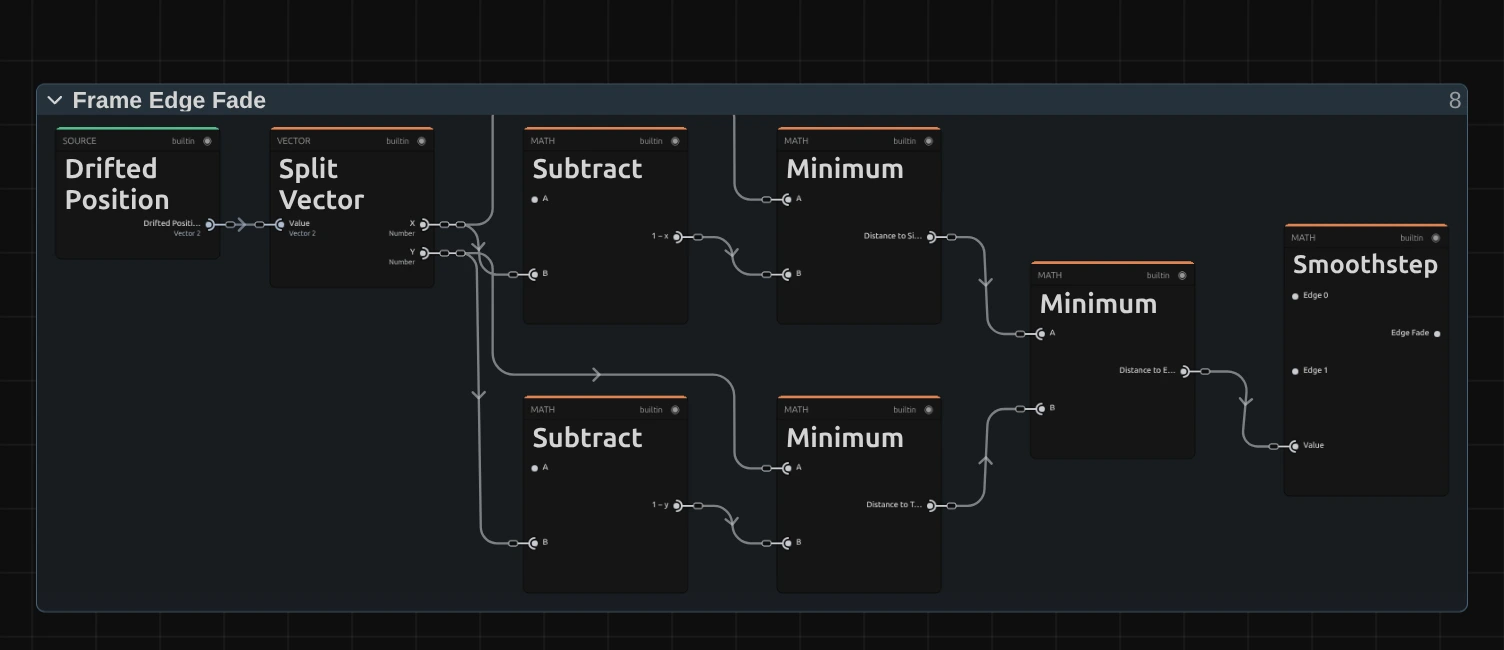
Distance to Side – the smaller of x and 1 − x: how close the drifted place is to the left or right edge. Its twin does the same for top and bottom.
Distance to Edge – the smaller of both.
Smoothstep – 0 just outside the frame, 1 from 2.5 % inside: the last frame fades in over that strip, so no smoke streams in from the edge.
Premultiplied Reads
Section titled “Premultiplied Reads”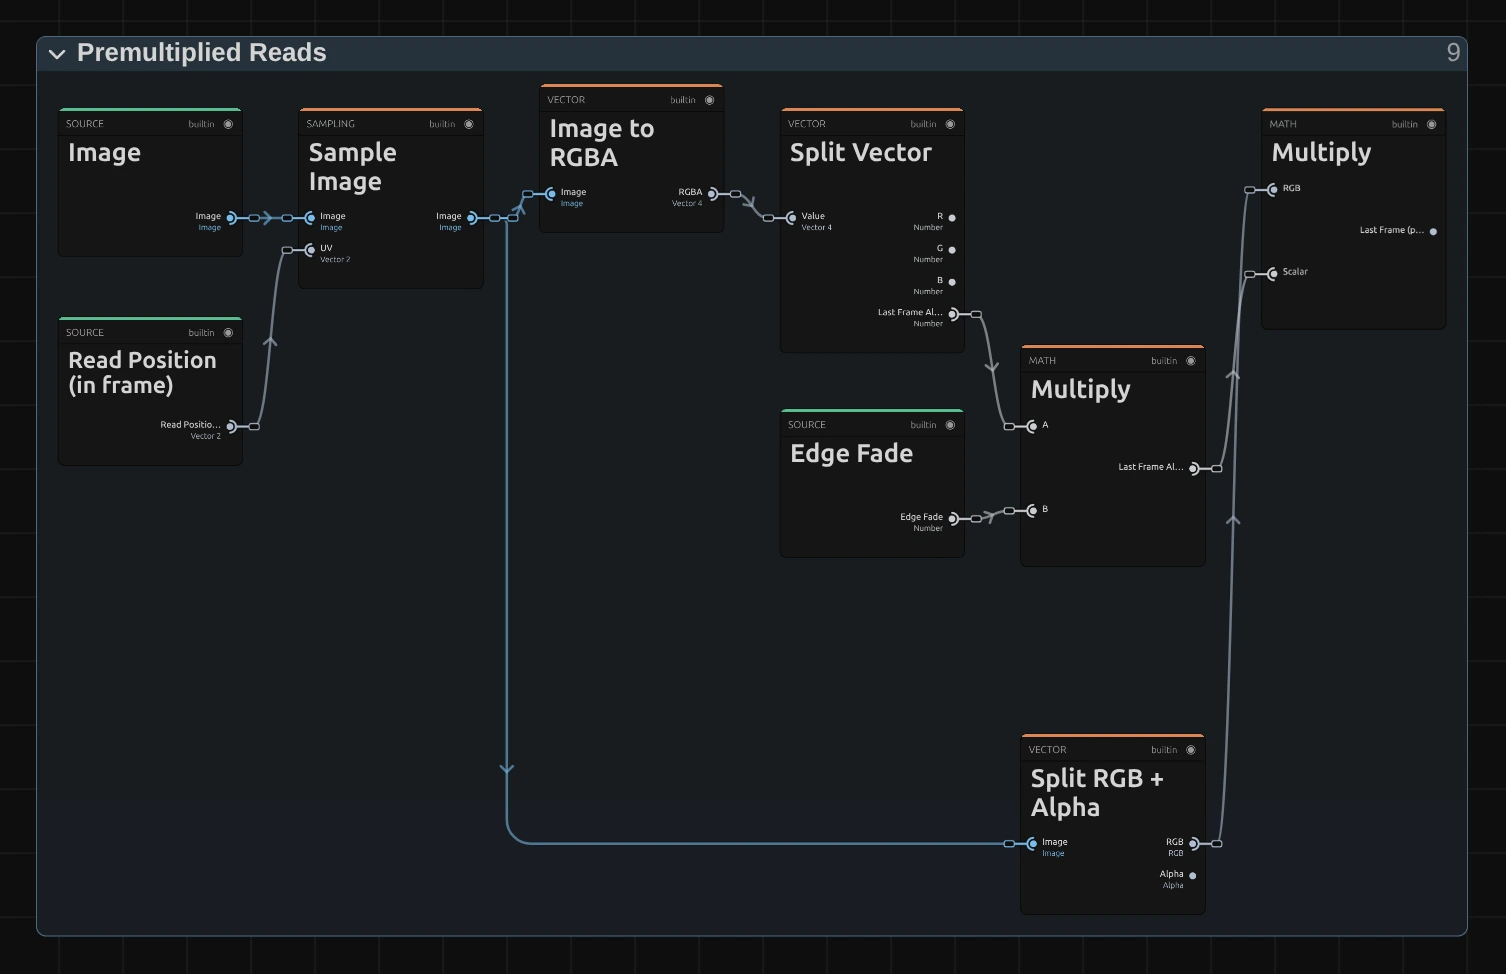
Sample Image – reads the last frame (the frame history) at the drifted place. Two more reads, left out here, take the picture at the pixel itself and at the drifted place.
Last Frame Alpha (faded at edges) – the last frame’s transparency times the edge fade.
Last Frame (premultiplied) – its colour times that transparency. Working with colour × transparency is what keeps the smoke beside a cut-out figure in its own colour as it fades.
Wet Mix & Gain Lift
Section titled “Wet Mix & Gain Lift”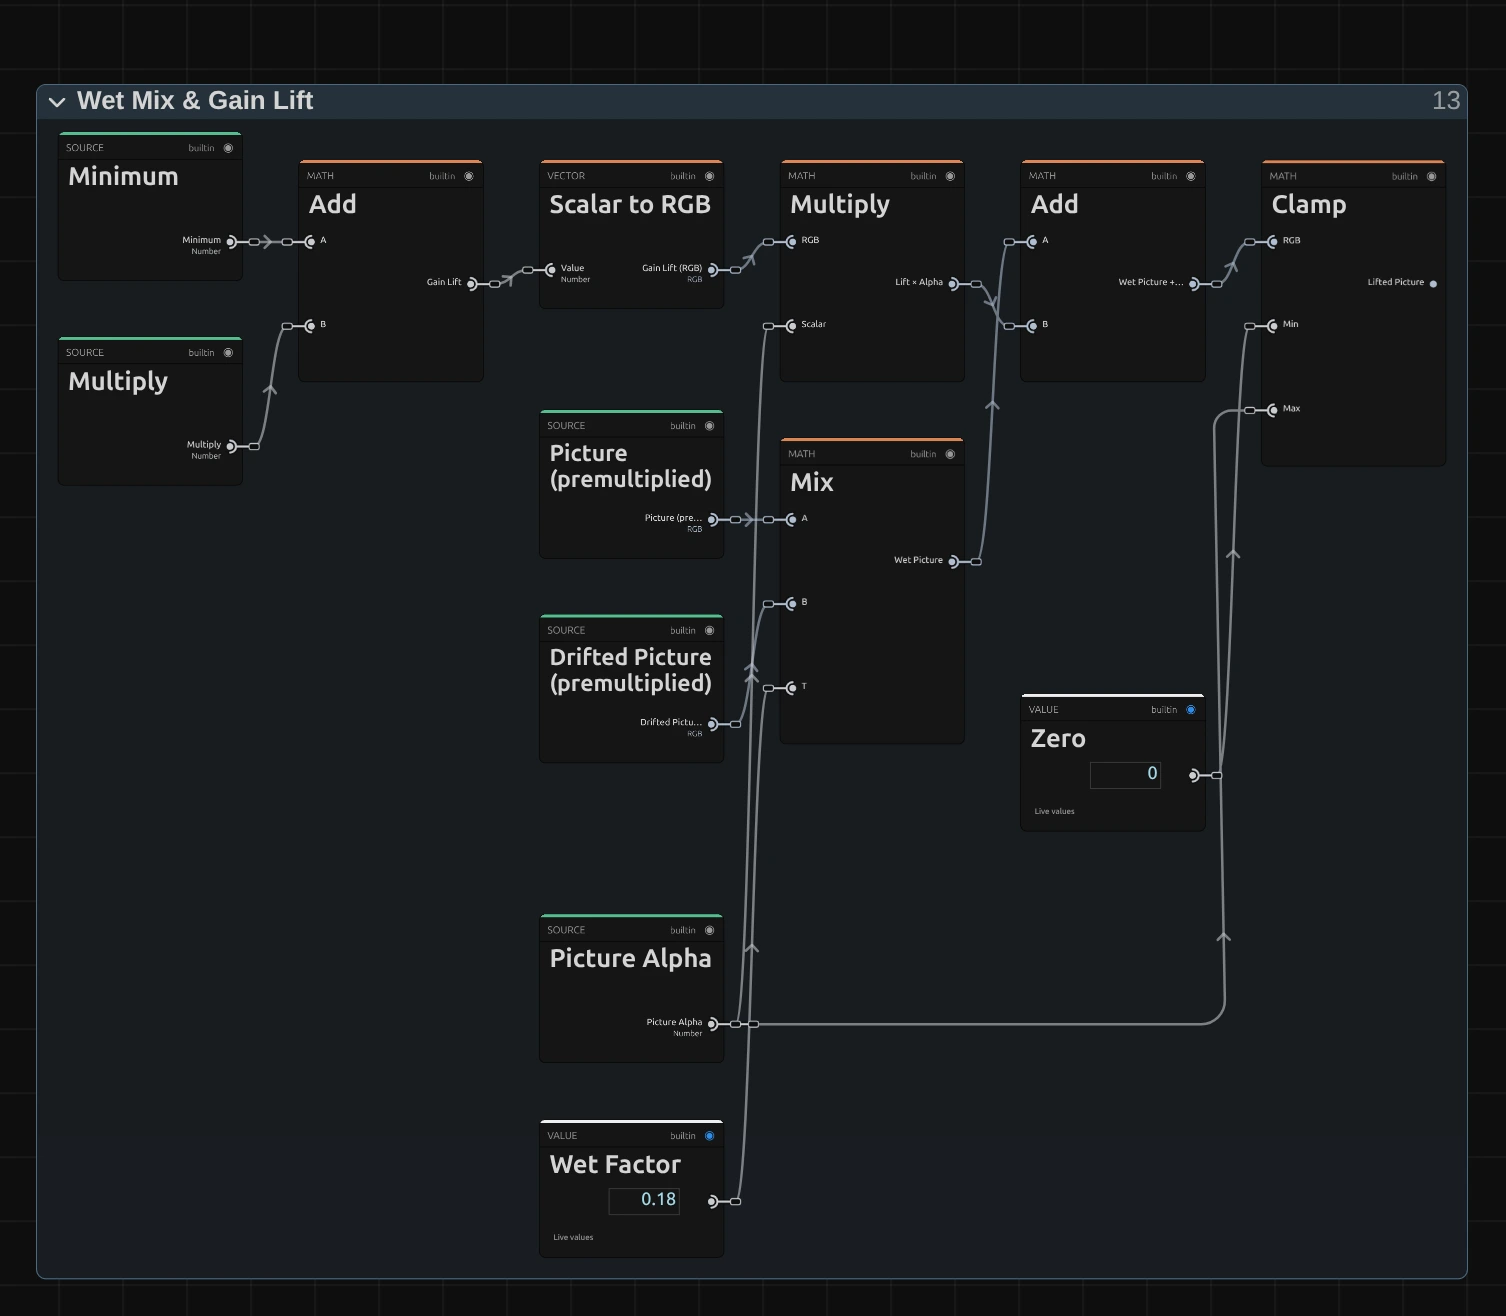
Wet Picture – mixes 18 % of the drifted picture into the picture itself (Wet Factor 0.18), so the footage looks a little liquid even without trails.
Gain Lift – Gain after its knee: unchanged up to 0.25, then easing towards 0.5. It is added to every colour, times the picture’s transparency.
Clamp – keeps the lifted picture between 0 and the picture’s own transparency, so the lift never reaches beyond a cut-out.
Remix: select Wet Factor and set it from 0.18 to 0.6: the picture itself flows along the currents, as if seen through running water.
Trail (fade, keep brighter)
Section titled “Trail (fade, keep brighter)”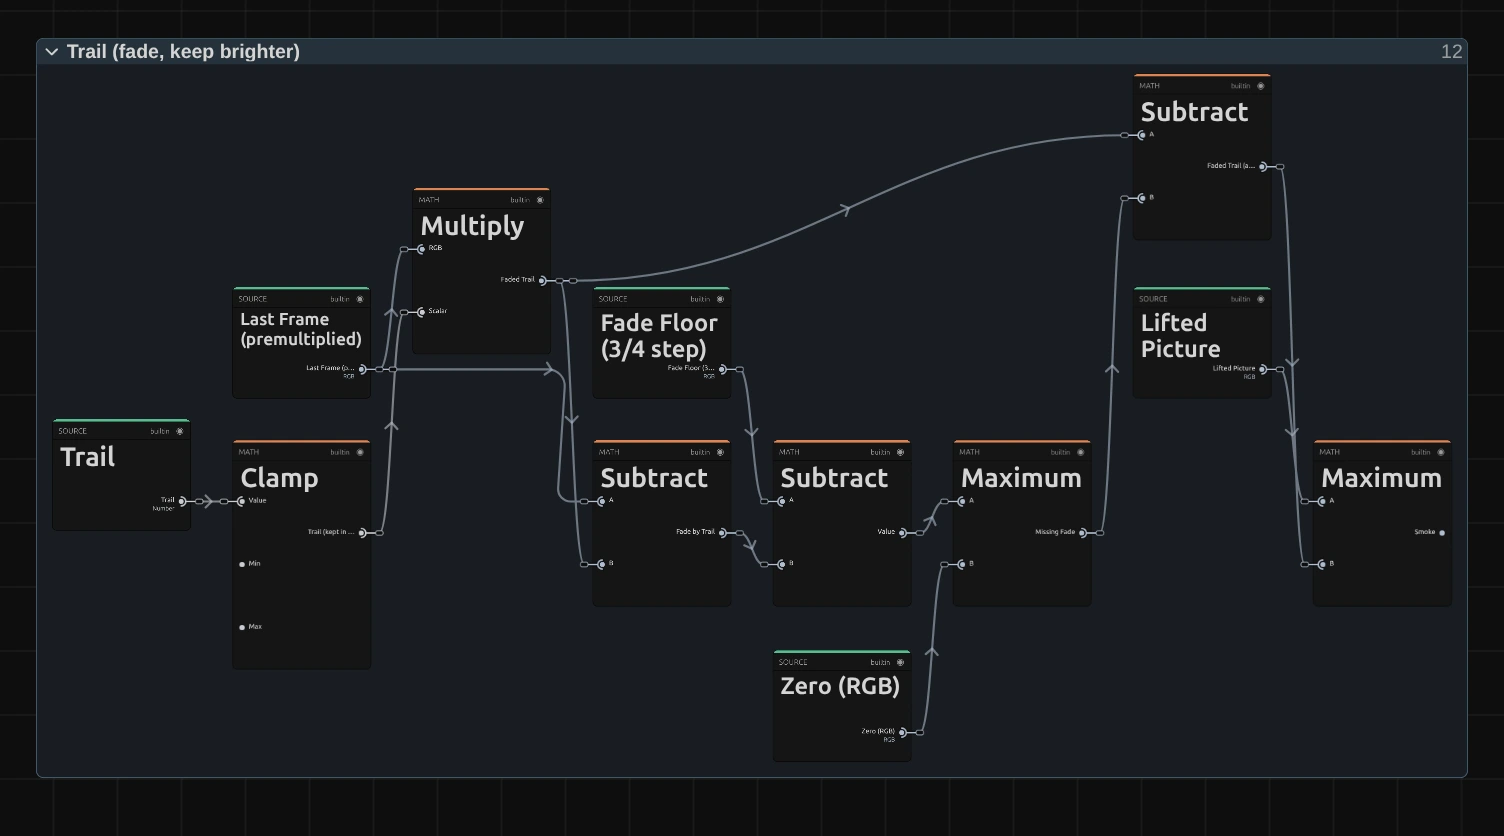
Trail (kept in range) – the Trail control, kept between 0 and 0.995.
Faded Trail – the last frame times Trail: the smoke, a little fainter than a frame ago.
Missing Fade – the frame history keeps 8 bits per channel, so a fade smaller than half a step would round back to the same value and the smoke would never quite go. The two Subtract cards before it measure how much the fade by Trail falls short of the Fade Floor (three quarters of a step); Maximum with Zero keeps only a shortfall.
Faded Trail (at least a step) – the Faded Trail minus that shortfall: every frame the smoke fades by at least three quarters of a step, so even Trail 0.995 fades out completely. Bright smoke fades by Trail alone; only the last faint tail is affected.
Smoke – the brighter of this faded trail and the lifted picture, colour by colour. Bright things leave smoke behind; dark things cannot cover it. The transparency goes through the same steps (Smoke Alpha), so smoke can lie over transparent parts of a layer.
Opacity Mix & Straight Alpha
Section titled “Opacity Mix & Straight Alpha”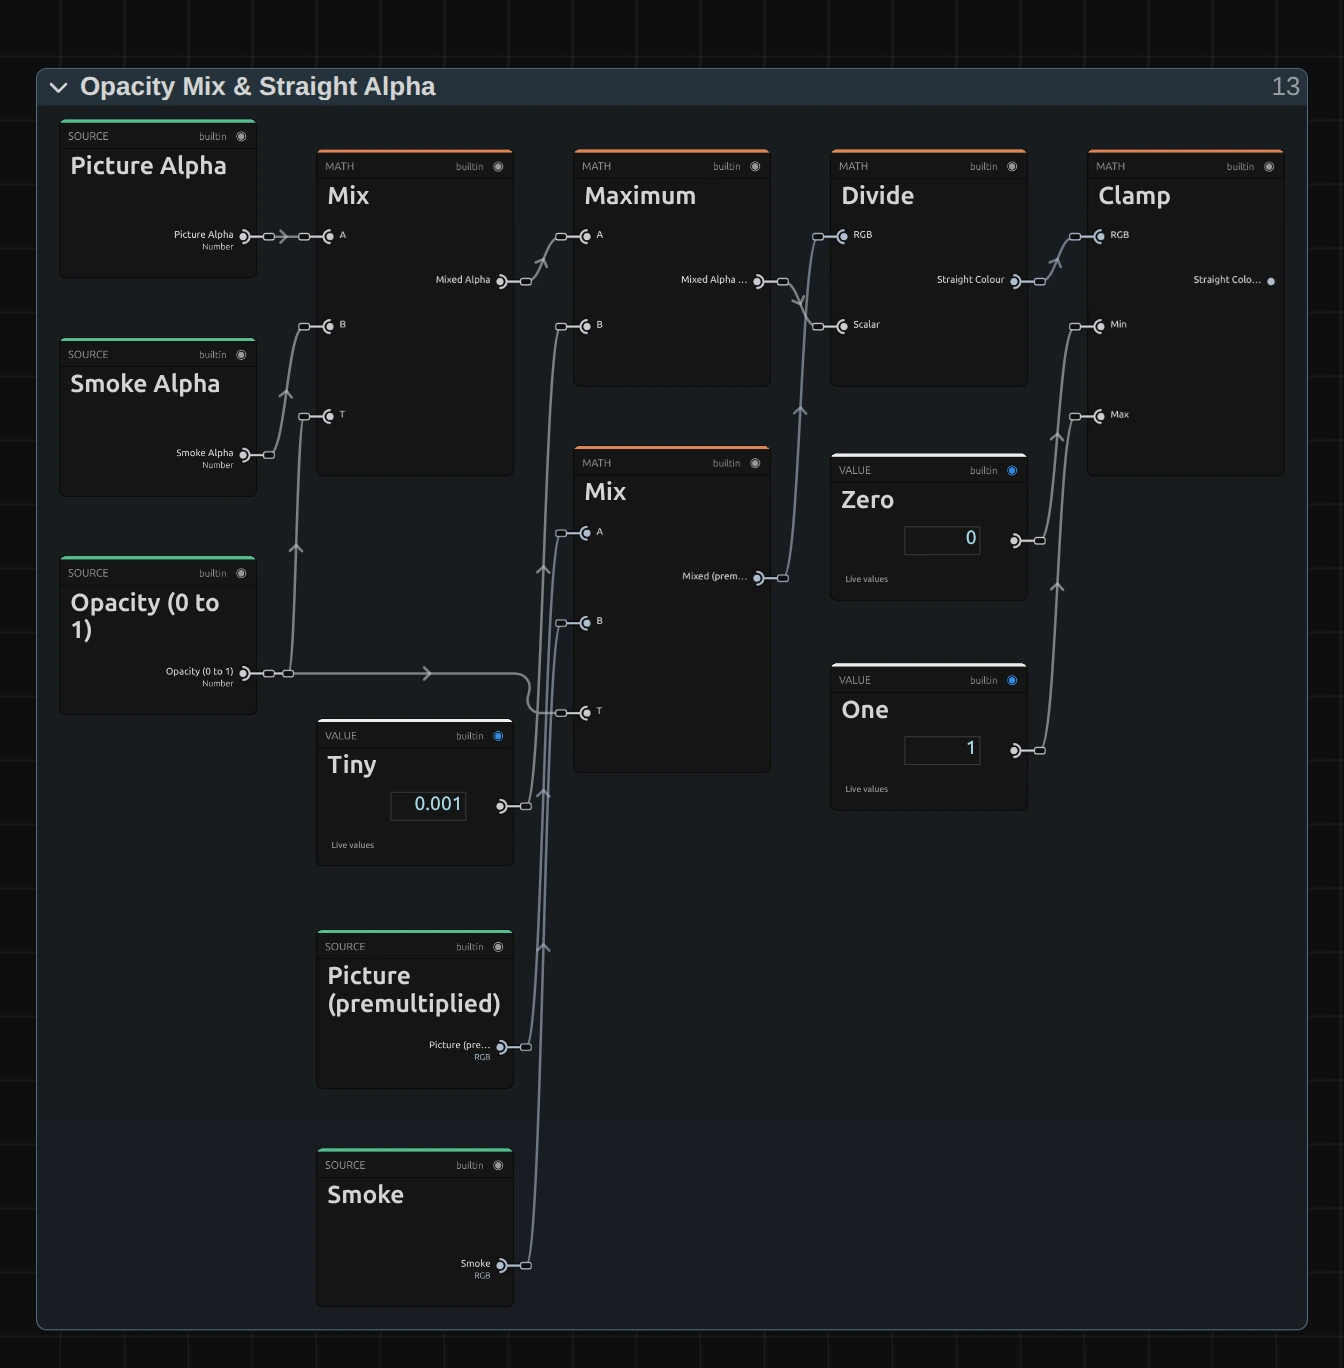
Mixed (premultiplied) – blends the picture and the smoke by Opacity.
Mixed Alpha – blends their transparency the same way.
Divide – colour divided by transparency (at least 0.001): back from colour × transparency to the plain colour the next effect expects.
Clamp – keeps the colour between 0 and 1.
Technical details
Section titled “Technical details”- Feedback. Every frame builds on the effect’s own last result. Seeking, jumping back, editing its node setup and the start of an export clear it; History Loop and Reset decide what a playback loop and a manual reset do: Effect system.
- Per frame. Trail and the flow count frames, not seconds: the export renders every frame of its frame rate, and a higher frame rate gives shorter, slower-moving smoke.
- Size. The currents and the flow count shares of the frame, so a 4K export shows the same smoke as 1080p. On a wide frame a Gain X value travels further in pixels than the same Gain Y.
- Transparency. The smoke is kept as colour × transparency: beside a cut-out layer it fades in transparency and keeps its colour.
- Limits. Gain above 1 or below 0, Opacity outside 0–1, Trail above 0.995 or below 0, and Speed, Detail or Density at or below 0 are reported in the card and the tool result.
- Saved projects. A Rom1 saved before 2026-10-22 opens with Trail 0.98, the value it always used. Its untouched node setup is upgraded to the colour × transparency smoke: a bug fix, since smoke beside a cut-out layer used to turn dark; on an opaque layer it paints the same pixels. An edited node setup keeps its own recipe.
- Software preview. The worker software preview runs Rom1 on the CPU with the same math, including the fade floor on its 8-bit history, so trails fade out there as in the GPU preview and the export.
- More: Effect system · Light & Stylize notes · Node Catalog · Styles and presets.