
Chroma Key
Makes a green or blue screen transparent, so a performer can stand in front of any background. It finds the screen colour by itself, and hair, fine fabric and edges take on the new background instead of a green rim.
Group: Keying & Time · How to add an effect

Use it for: a performer filmed in front of a green screen · a blue-screen insert · a coloured cloth or wall that should disappear (pick its colour).
- Screen – Green, Blue, or a colour you pick from the screen.
- View – switch to Matte to see what stays (white) and what goes (black).
- Clip Black and Clip White – raise Clip Black until the background is gone, lower Clip White until the body is solid.
- Shrink / Grow – pull the edge in when a thin rim of screen remains.
Tip: curtains, stands and lights beside the screen are no screen colour, so they stay in the picture. Cut them away with a mask around the performer.
Presets
Section titled “Presets”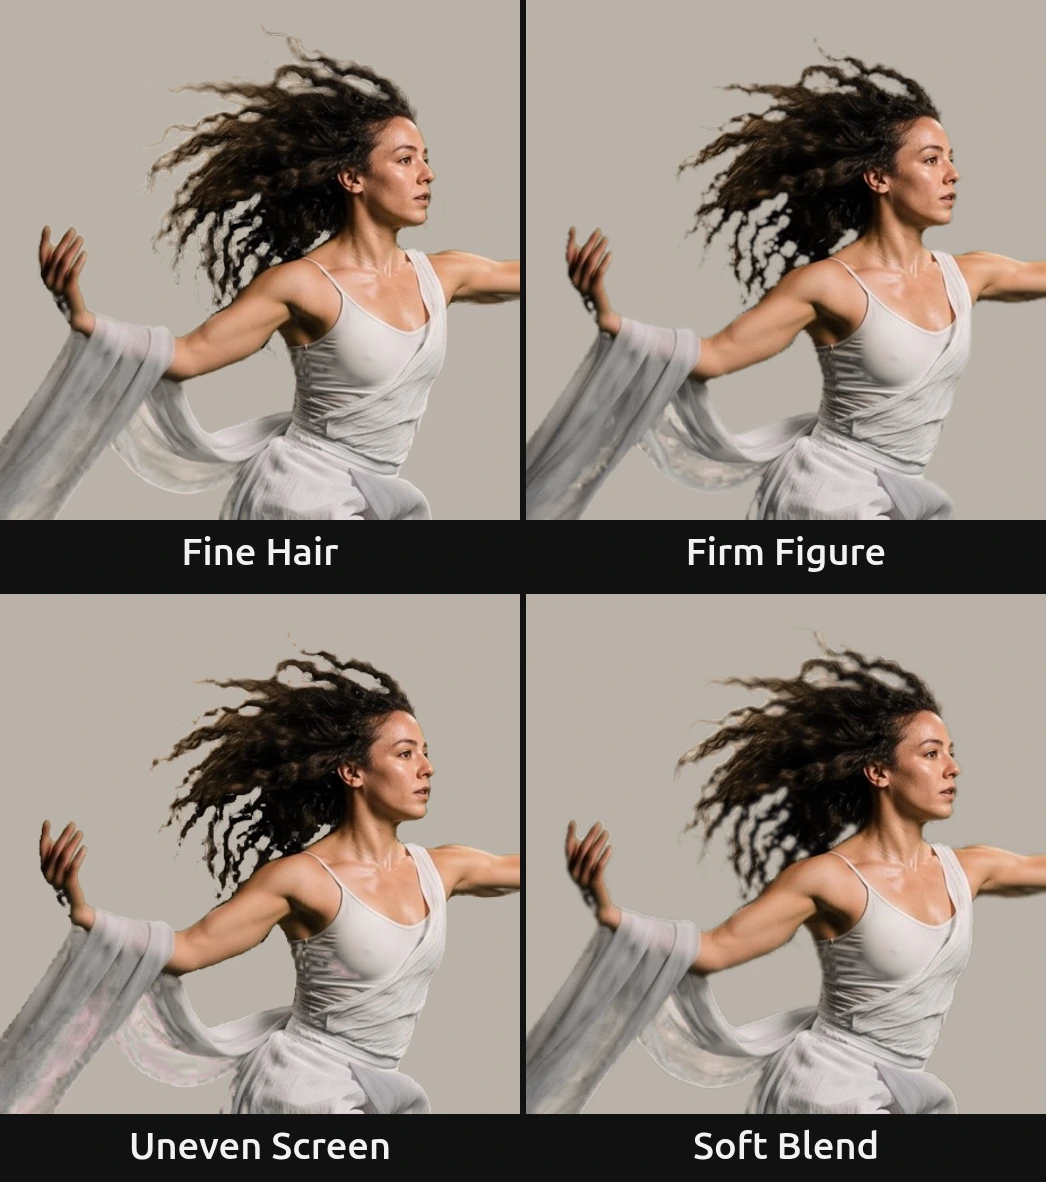
Pick one in the Preset row of the effect card. It sets all controls at once, in one undo step, and the row then shows its name until you change something. A control with keyframes keeps them, and the card says so. A preset sets the Screen to Green and the View to Final result. Each preset works for a blue screen too: choose Blue after it, and the card reminds you under Screen while Screen is not Green.
Fine Hair – keeps faint detail: wisps of hair, chiffon and smoke stay, soft and see-through (Clip Black 0.15, Clip White 0.95). For a well-lit screen and a performer with loose hair. On an uneven screen, specks of the background may stay too.
Firm Figure – a solid body with a clean, slightly tightened edge (Clip Black 0.4, Clip White 0.7, Shrink / Grow 1.5 px, Softness 1 px). For a figure that must not let the background through, such as a dancer over a busy projection. The finest wisps go.
Uneven Screen – takes out dark corners, creases and shadows on the screen (Clip Black 0.5, Clip White 0.9, Shrink / Grow 0.5 px). For a screen that is lit unevenly or too small for the shot. See-through fabric gets thinner.
Soft Blend – a soft outline that melts into the new background instead of a cut-out line (Shrink / Grow 1 px, Softness 3 px). For a performer placed into a painted or projected scene.
Controls
Section titled “Controls”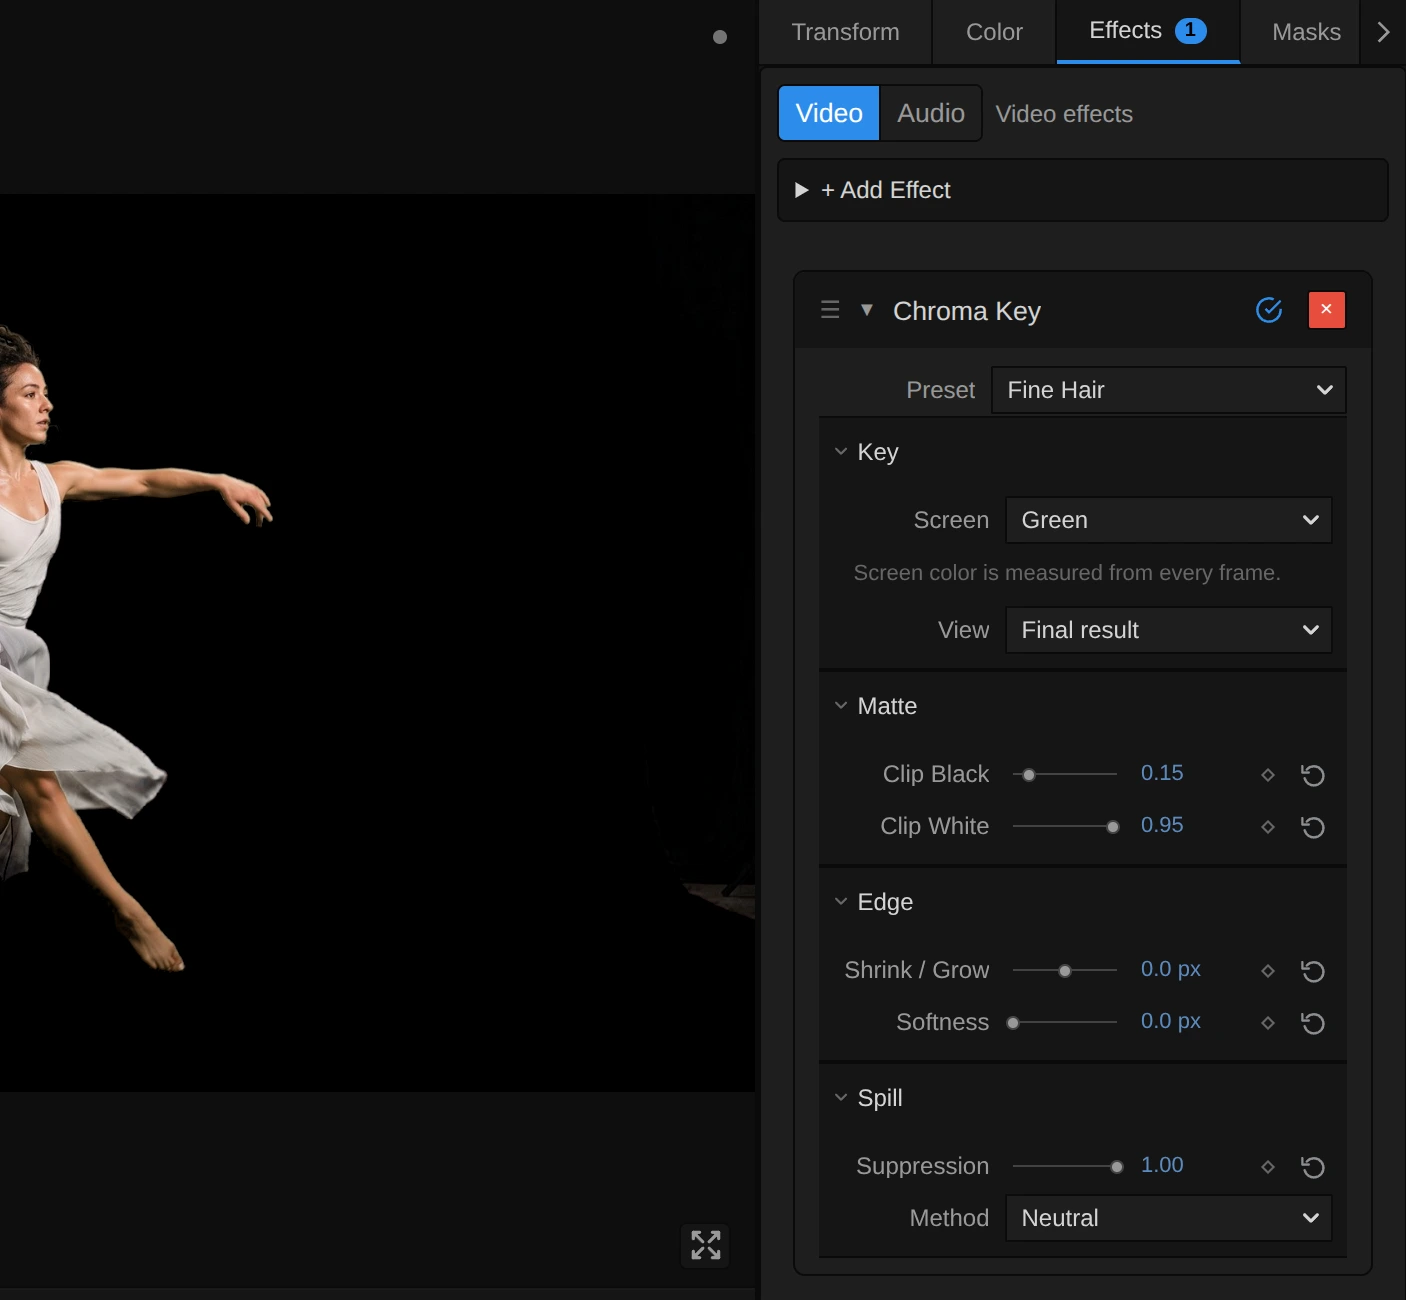
Preset – picks one of the four starting points above. Change any control afterwards; the row then shows no name.
A key in four steps: choose the Screen, switch View to Matte, raise Clip Black until the background is black and lower Clip White until the body is white, then switch back to Final result.
Screen – which colour becomes transparent. Green and Blue measure the screen from every frame, so a screen that is darker in the corners, or a light change during the shot, still keys. Picked color keys the colour in the row below, for a cloth, a wall or a screen of another shade. The card says so when the clip shows no such screen. Green, Blue, Picked color, default Green.
Screen color – the colour to key with Picked color; the row appears only then. Pick it from the screen where it is brightest and purest. A greyish colour keys nothing, and the card says so. It holds a colour, default #4c9a55.
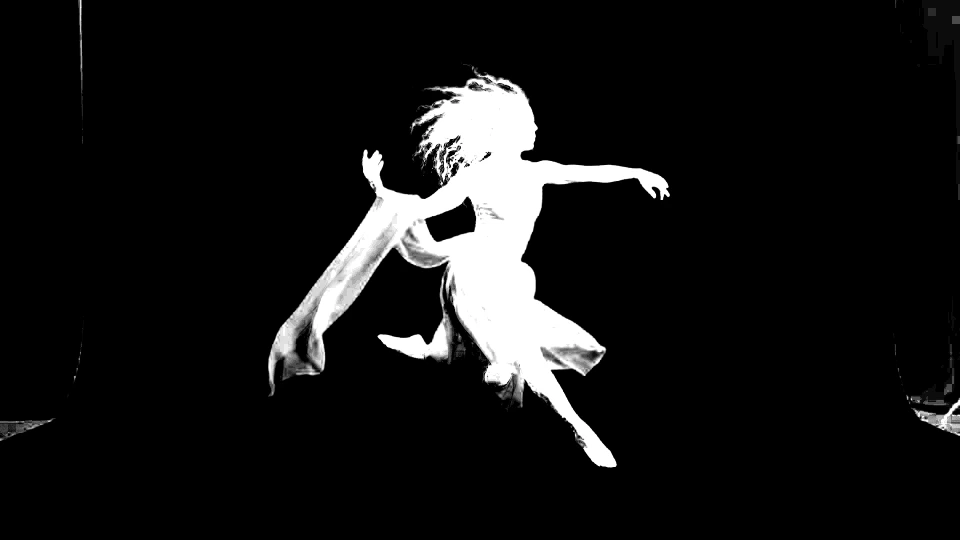
View – Final result shows the keyed picture; Matte shows the key in black and white: black is gone, white stays, grey is see-through. Set Clip Black and Clip White in Matte, then switch back. Final result, Matte, default Final result.
Clip Black – everything the key finds this much like the screen or more becomes fully transparent. Raise it until grey specks and shadows in the background turn black in the matte; 0.3 cleans a good screen, 0.5 an uneven one. Too high, and wisps of hair and see-through fabric vanish too. 0 to 1, default 0.3.
Clip White – everything above it becomes fully solid. Lower it until the body is pure white in the matte, with no see-through patches in the costume. Keep it above Clip Black: at or below it, the matte becomes a hard cut at Clip Black, and the card says so. 0 to 1, default 0.85.
Shrink / Grow – pulls the edge of the key in (positive values) or pushes it out (negative values), in pixels of a 1080p picture, so a 4K export shows the same edge. 1–2 px removes a thin rim of screen around a figure; −1 to −3 px brings back an edge that was cut too tight. Large negative values reveal a light rim of former screen around the figure. At 0 it costs nothing. −20 to 20, default 0.
Softness – blurs the edge of the key, in pixels of a 1080p picture. 1–3 px takes the hard cut-out look away; 10 and more gives a glowing, dreamlike outline. Works well together with a small Shrink / Grow, so the soft edge does not reach into the screen. At 0 it costs nothing. 0 to 20, default 0.
Suppression – removes the green (or blue) glow the screen throws onto skin, hair and costume. At 0 the edges keep a green tint, at 1 it is gone. Lower it when a costume’s own green or turquoise turns grey. 0 to 1, default 1.
Method – how much green may stay. Neutral holds the screen colour to the mean of the other two colours: hair and fabric lose the tint without turning olive. Gentle holds it to the stronger of the two and so keeps yellows on a green screen and cyans on a blue one, but leaves a slight olive cast on hair. Neutral, Gentle (keeps yellows), default Neutral.
Node setup
Section titled “Node setup”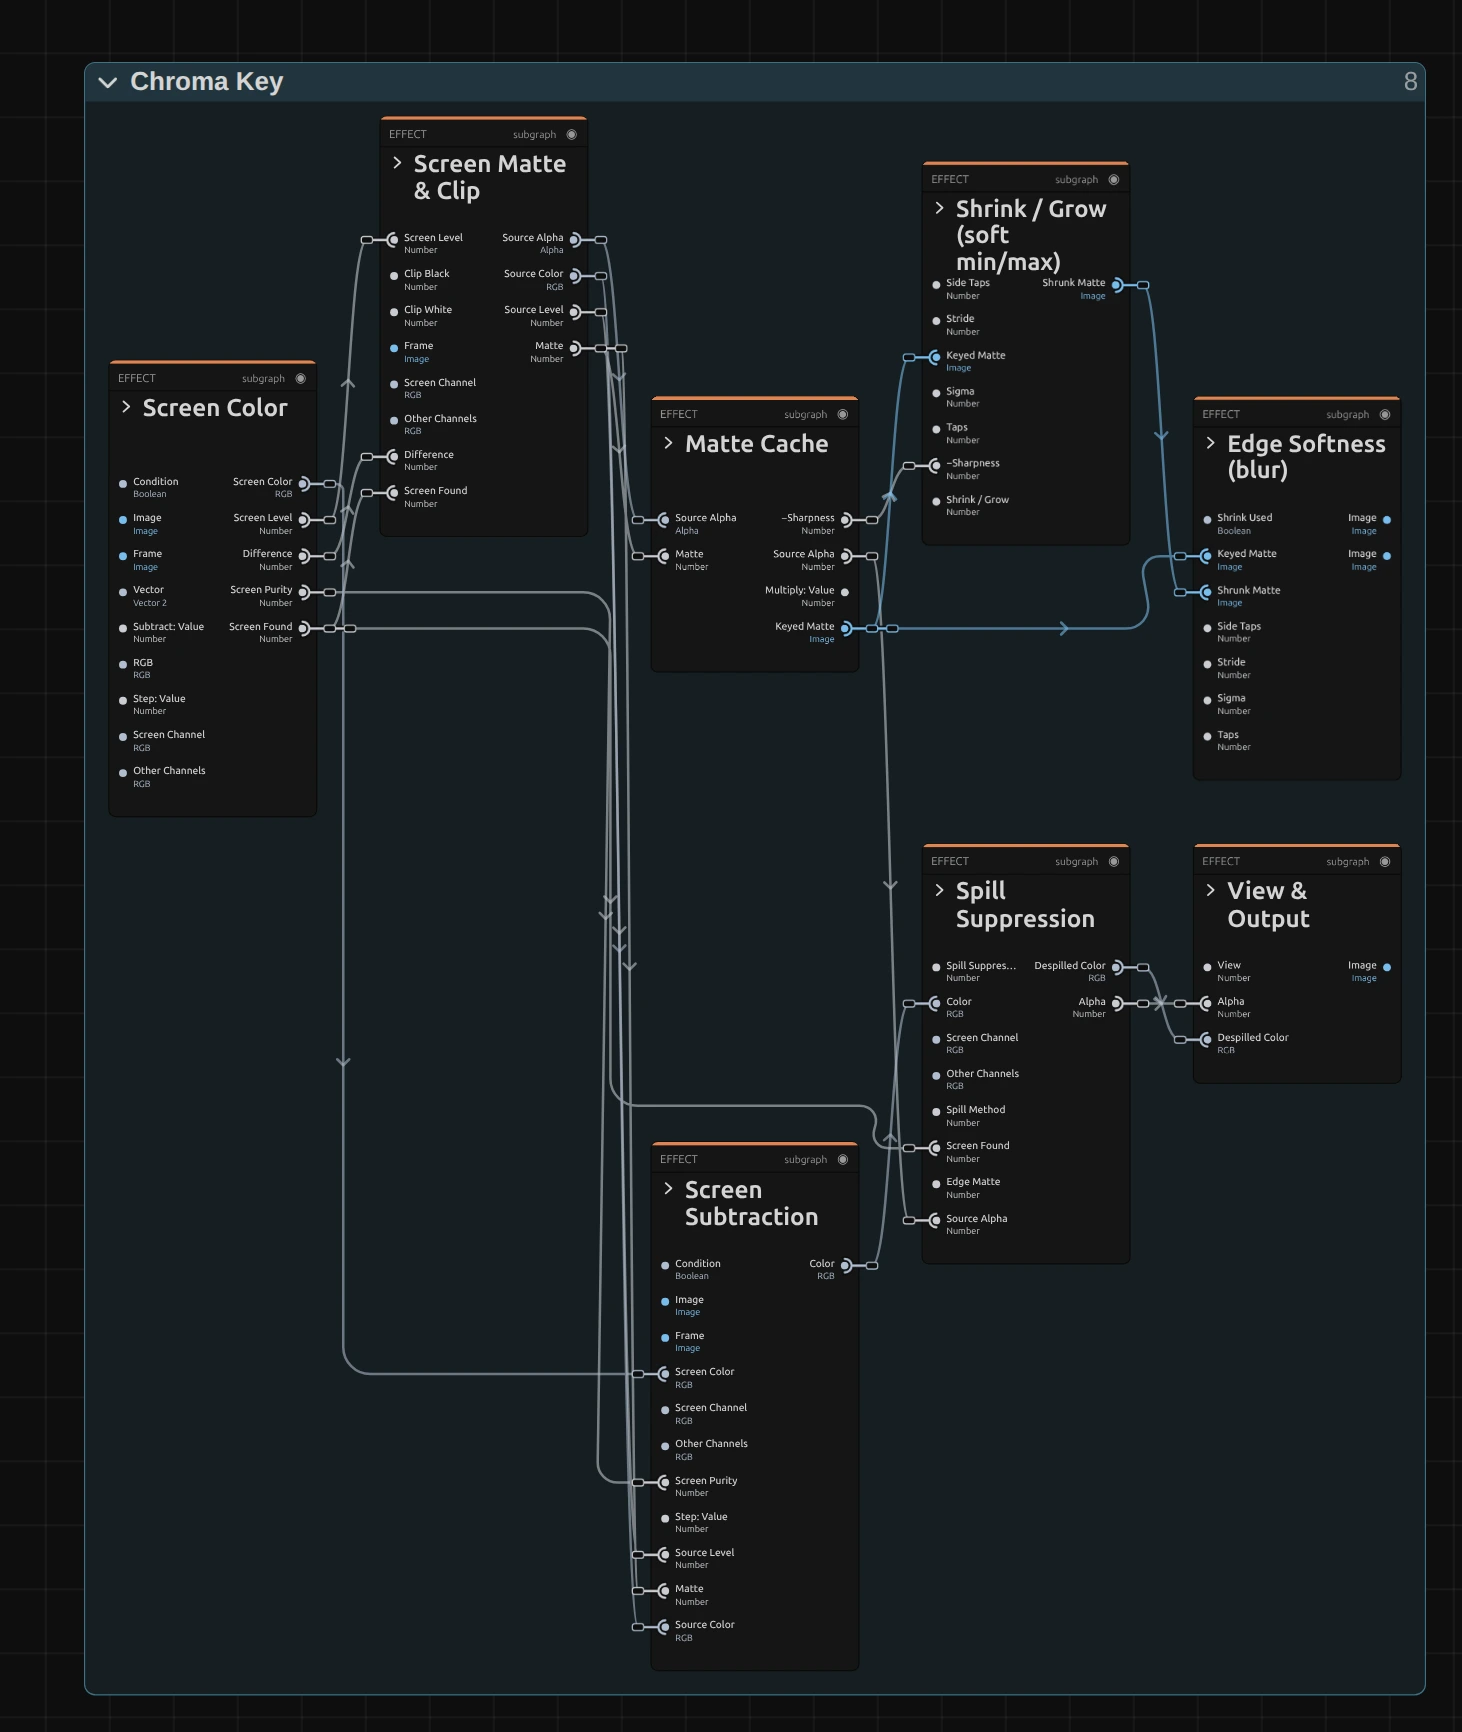
Chroma Key works in stages, one folder each in the Nodes tab. Screen Color finds the screen colour from a small cached grid of the frame (the Screen Grid folder, left out of the picture). Screen Matte & Clip compares every pixel with it and applies Clip Black and Clip White. Shrink / Grow and Edge Softness shape the edge of that matte. Screen Subtraction takes the screen’s share out of see-through pixels, so hair and chiffon show the new background, and Spill Suppression removes the glow. View & Output puts out the result or the matte. Click a folder’s header to open it; the sections below show what is inside. How to open the graph: The node setup.
Screen Color
Section titled “Screen Color”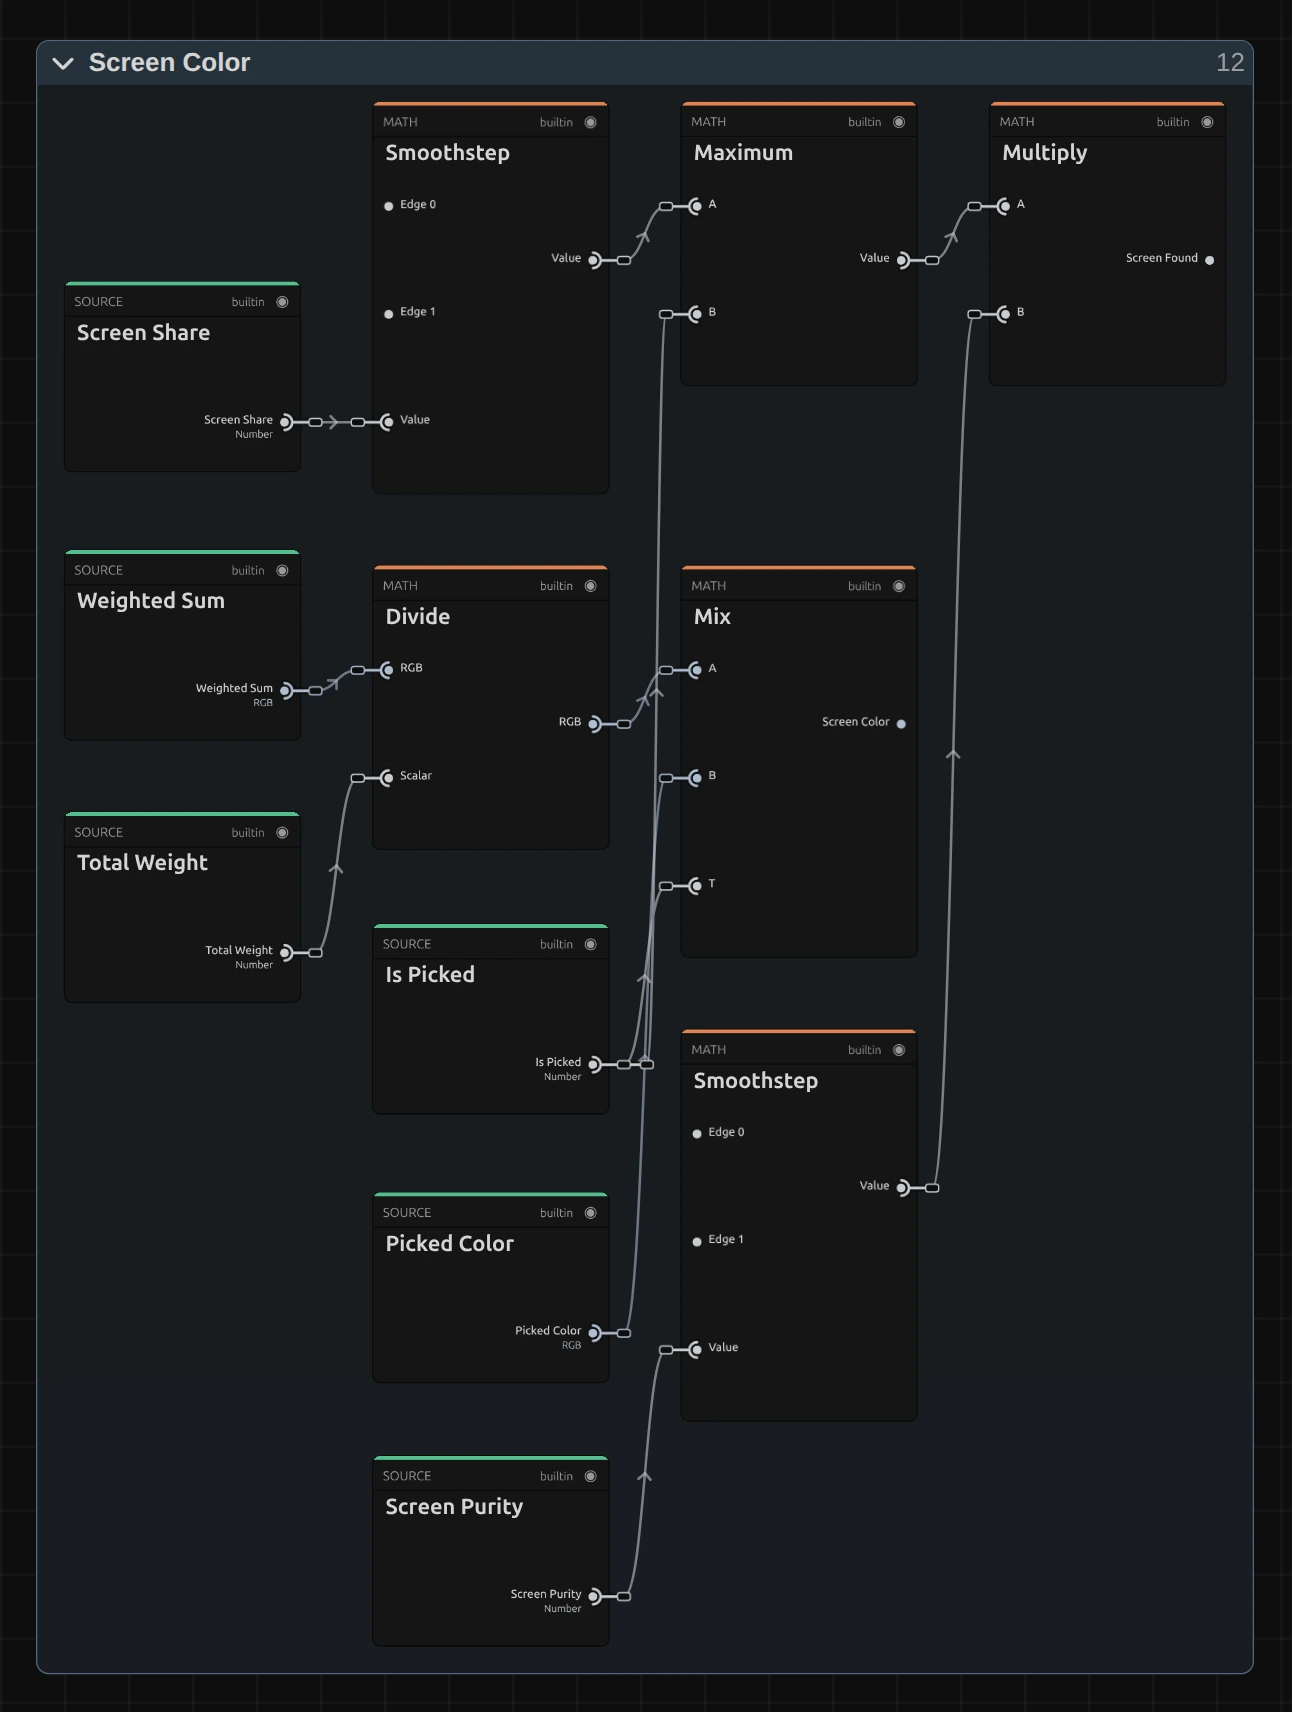
Divide – the mean colour of everything in the frame that looks like screen. The Screen Grid folder (a 64 px cache) and Screen Average (1 px) add up the frame, each pixel weighted by how screen-like it is; Divide turns that Weighted Sum into a colour. While no screen is seen, a faint built-in green or blue keeps the result sensible.
Mix – uses that measured colour, or the Picked Color when Screen is Picked color. This is the Screen Color every later stage compares with.
Smoothstep – how pure the screen colour is: a greyish colour counts as no screen at all. The other Smoothstep checks that enough of the frame is screen.
Multiply – both checks together: Screen Found, from 0 (no screen, the key leaves the picture alone) to 1. That is why a clip without a screen stays untouched instead of losing its greens.
Screen Matte & Clip
Section titled “Screen Matte & Clip”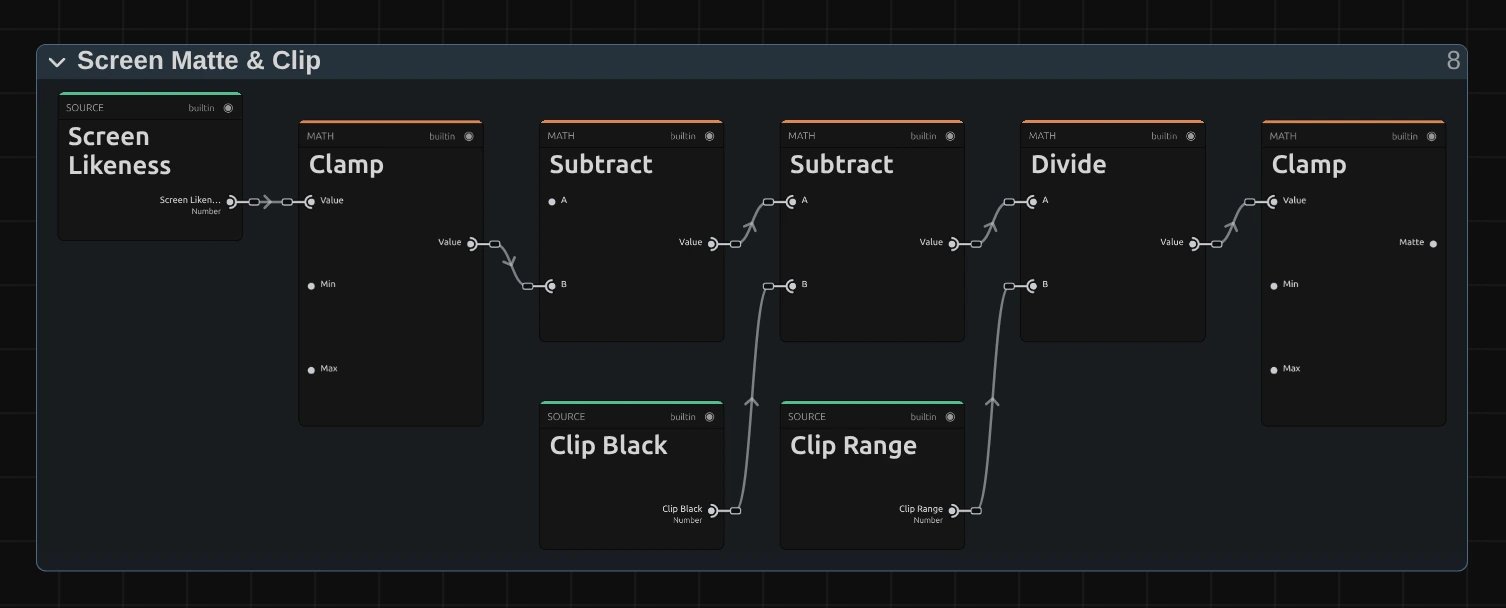
Subtract – one minus the Screen Likeness: how much this pixel differs from the screen, compared with how much the screen itself stands out (its green above red and blue). A pixel as green as the screen gets 0, a skin tone 1. Pixels darker than the screen are compared by purity, so the shadowed corners of a screen key as cleanly as its lit middle.
Divide – Clip Black is subtracted and the rest divided by the Clip Range (Clip White minus Clip Black, never below 0.001): levels on the matte, like Input Black and White in Levels.
Clamp – keeps the result between 0 and 1. That is the matte the edge stages and View → Matte show.
Shrink / Grow
Section titled “Shrink / Grow”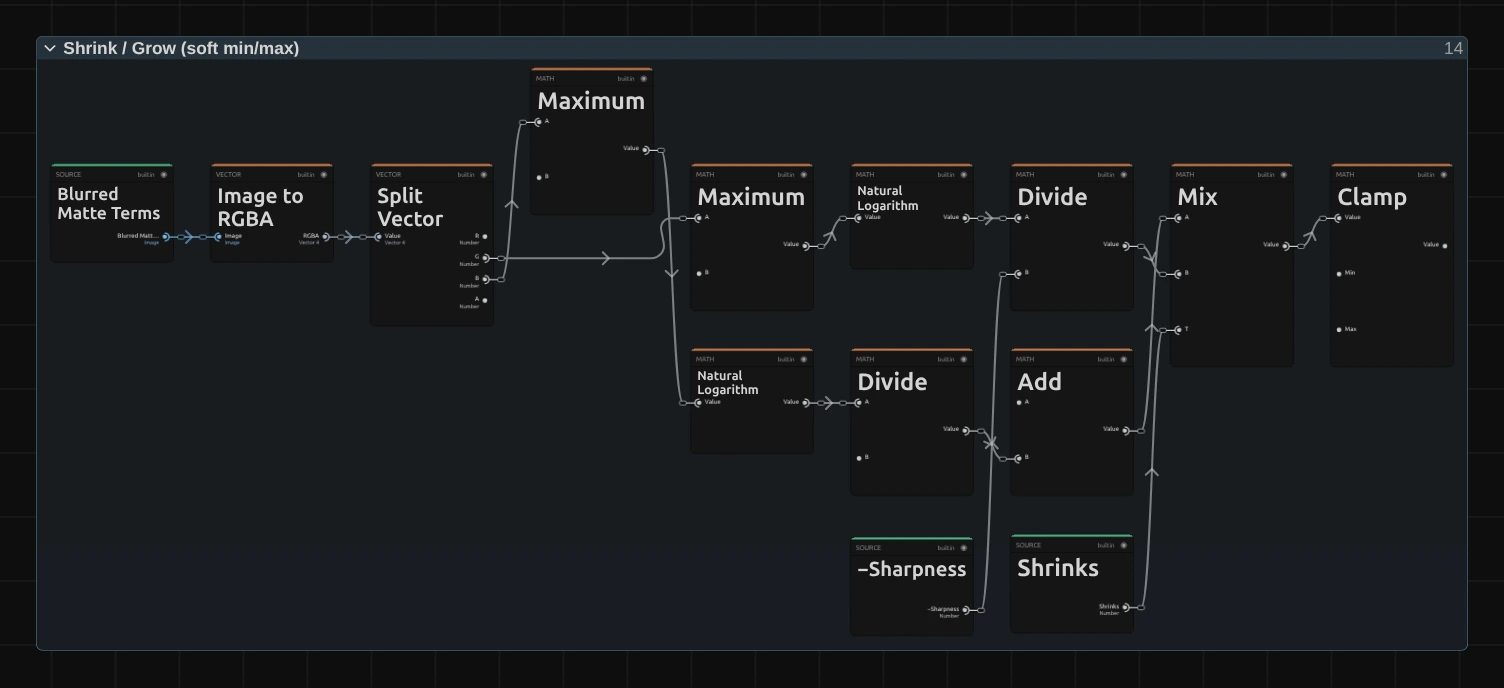
Image to RGBA – reads the Blurred Matte Terms: the Matte Cache folder stores the matte together with two exponential forms of it, and two Gaussian passes (rows, then columns) as wide as Shrink / Grow blur all three at once. Split Vector hands each term to its own path.
Divide – a soft minimum: the logarithm of the blurred term, divided by the Erode Sharpness. A pixel near the background takes on the background’s low matte, so the edge moves inwards smoothly, without the stair steps of a hard minimum.
Add – the same as a soft maximum for negative values: the edge moves outwards.
Mix – takes the shrunk edge when Shrinks (Shrink / Grow above 0), else the grown one. At 0 the whole folder is skipped.
Edge Softness
Section titled “Edge Softness”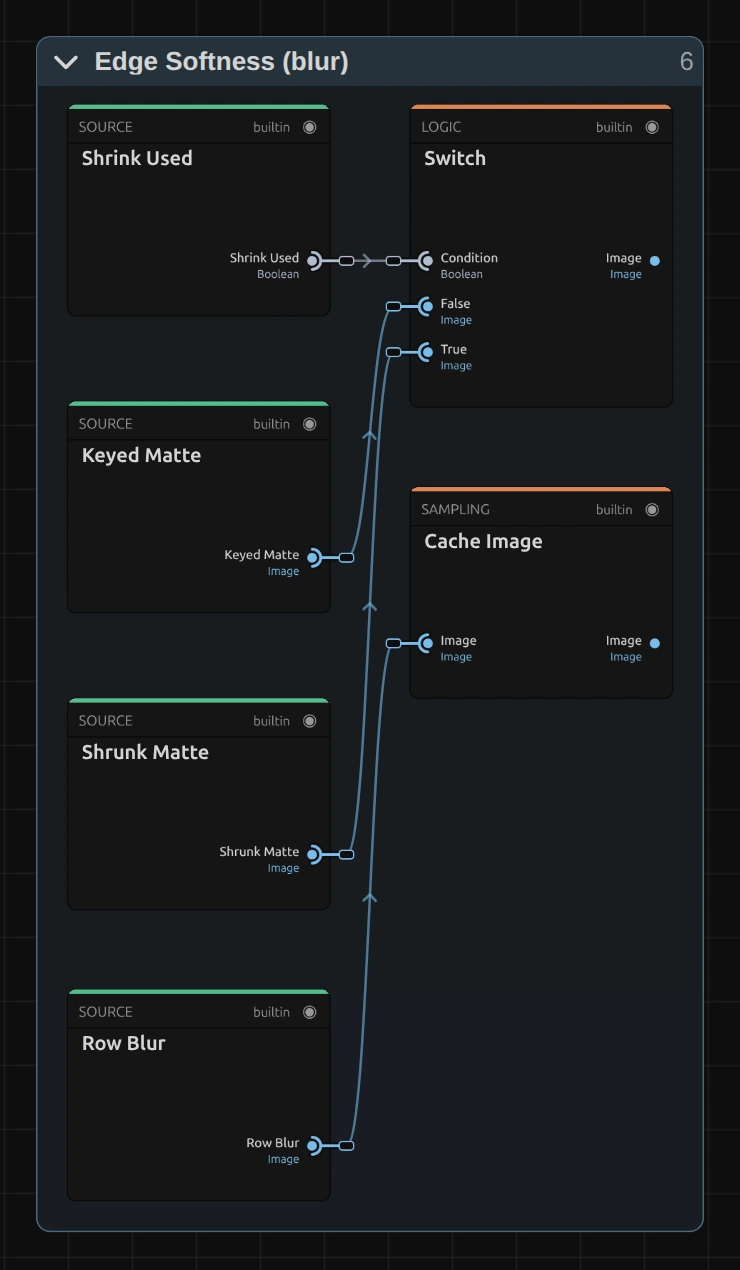
Switch – softens the Shrunk Matte when Shrink / Grow is in use, otherwise the Keyed Matte straight from the Matte Cache.
Cache Image – keeps the matte after a Gaussian blur along the rows; a second pass blurs its columns. Two passes of one direction each read far fewer pixels than one round blur of the same size. At Softness 0 both are skipped.
Screen Subtraction
Section titled “Screen Subtraction”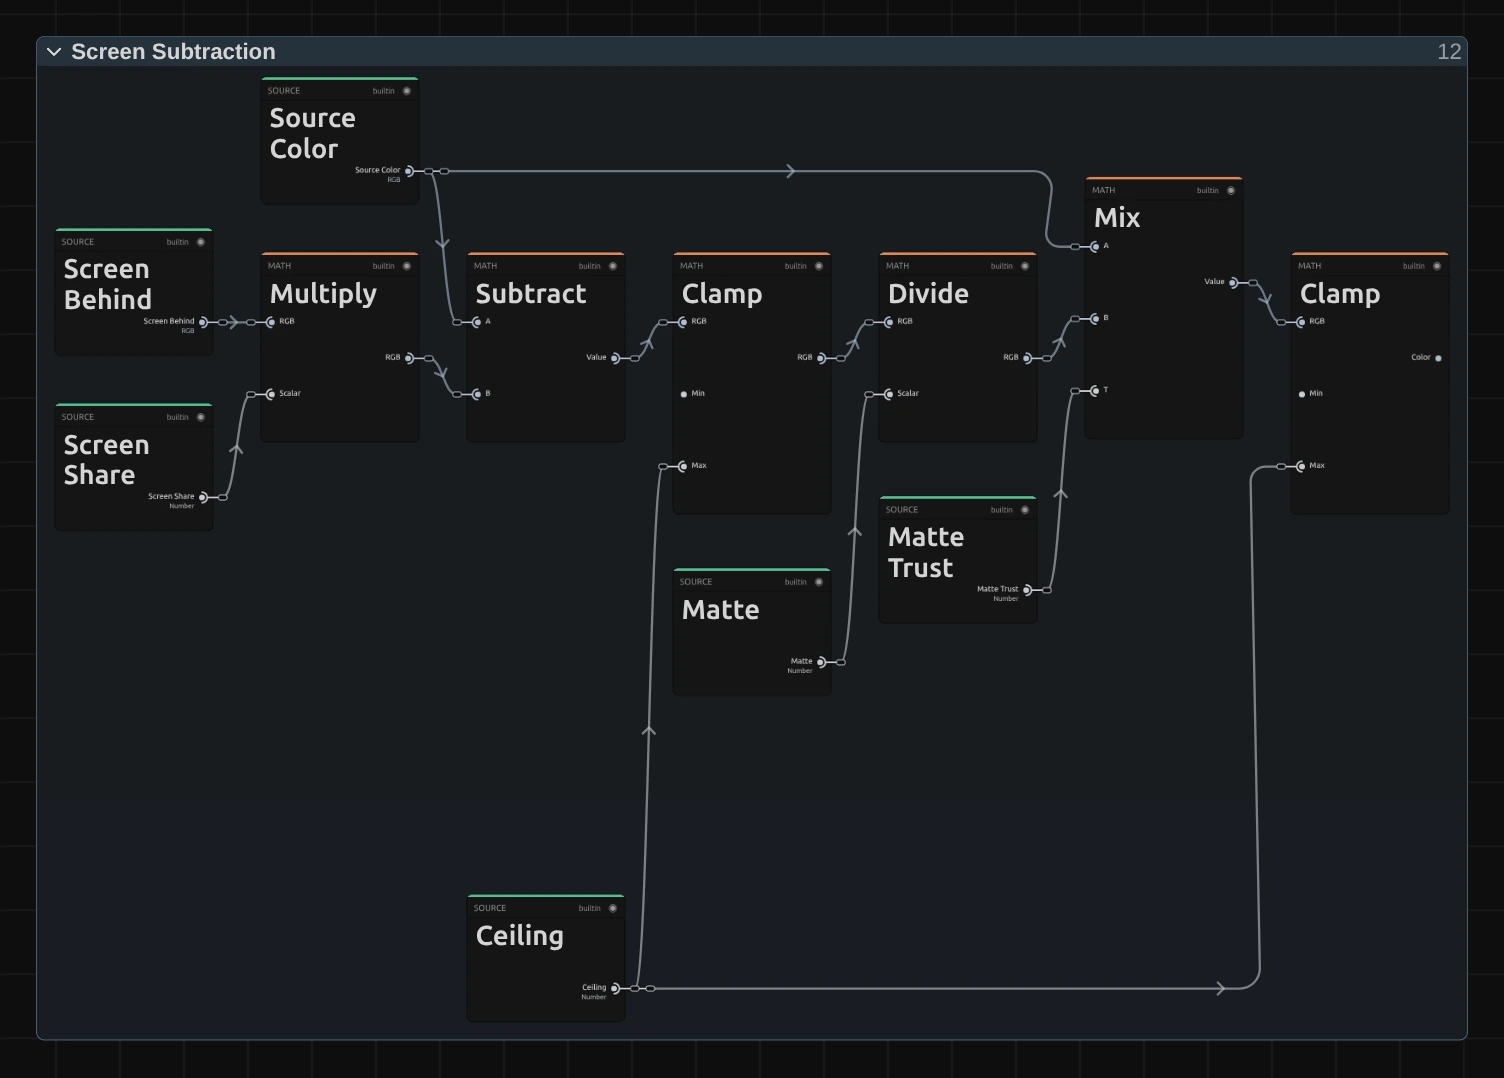
Multiply – the Screen Behind this pixel times its Screen Share (one minus the matte): how much of the pixel’s colour is screen. The Screen Behind is the local colour of the Screen Grid around the pixel, dimmed like the pixel, so a darker corner of the screen is taken out as cleanly as the lit middle.
Subtract – takes that share out of the Source Color. What remains is the performer’s own colour, weakened by the see-through part.
Divide – divides it by the Matte, which brings a strand of hair or chiffon back to its full colour; the new background then shows through it instead of grey or green.
Mix – uses this clean colour only where the matte is above 0.05 (Matte Trust); in almost transparent pixels the division would only enlarge noise, so their own colour fades back in.
Spill Suppression
Section titled “Spill Suppression”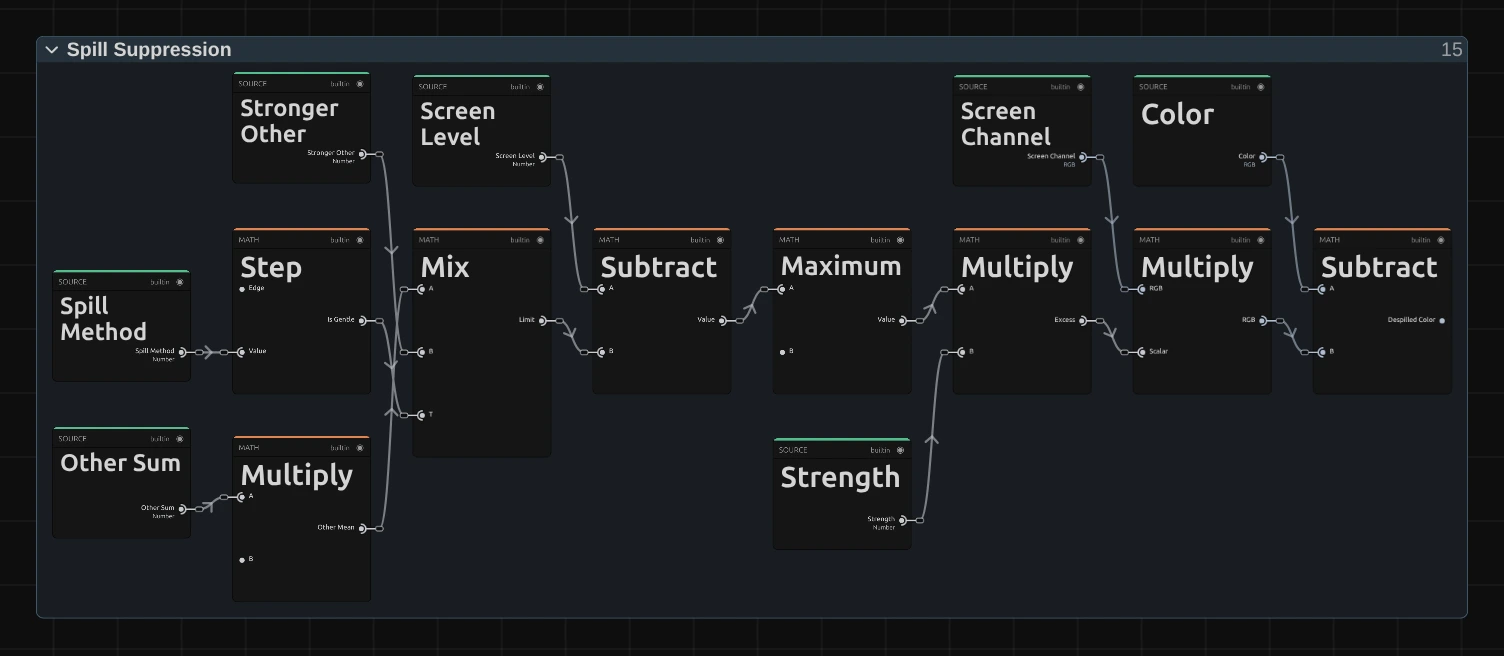
Mix – picks the Limit for the screen channel: the Other Mean of red and blue (Neutral), or the Stronger Other of the two (Gentle). The Step before it turns Spill Method into that choice, 0 or 1.
Multiply – whatever green lies above the Limit, times the Strength (Suppression, and Screen Found): the Excess, the glow of the screen.
Subtract – takes the Excess out of the screen channel only, so the other colours stay as they are.
Remix: for a limit halfway between Neutral and Gentle, unplug Step from input T of Mix and plug a Value of 0.5 into T.
Technical details
Section titled “Technical details”- Passes. A 64 px Screen Grid (each cell averages 5 × 5 reads, weighted by how screen-like they are), a 1 px Screen Average (the mean of 33 × 33 grid reads) and the key pass. Both are Cache Image nodes with Max size 64 and 1. A picked colour folds both away (one pass). Shrink / Grow and Softness each add two blur passes, only while they are not 0.
- Units. Clip Black and Clip White are matte levels. Shrink / Grow and Softness are pixels of a 1080p frame (its shorter side) and scale with the render size: a 4K export, a portrait frame and a lower Preview Quality show the same edge.
- Values. Out-of-range values are used at their limit, values that are not a number at their default, and Clip Black at or above Clip White makes a hard cut; the card names each case and tool results report unusable numbers. A clip without screen colour keys nothing, and the card and
addEffect/updateEffectsay so (checked on the clip’s thumbnails). - Limits. Chroma Key measures one screen colour per frame plus a coarse local grid, so see-through fabric that fills a whole grid cell can come out greyish. Curtains, stands and floor edges that are not screen colour stay; cut them with a mask.
- Software preview and export readback. The worker CPU keys a 1080p frame in under 0.1 s (the whole worker pixel pass, with frame copy and write-back, about 0.25 s), but only on a layer whose sole effect is one Chroma Key without Shrink / Grow or Softness. A stored key graph among other effects runs on the slower graph interpreter in stack order; a graph-less key among other effects is reported as unsupported.
- Presets. They set Clip Black, Clip White, Shrink / Grow, Softness, Suppression and Method, and reset Screen to Green and View to Final result, because the shared preset row resets every control a preset does not name; the card says so under Screen. There is no Blue Screen preset yet: until presets can leave Screen alone, it would only set Screen to Blue, and the preset strip shows one green-screen test image. A Chroma Key whose node setup was edited before the screen-matte keyer has no Clip Black, Shrink / Grow or Method: a preset then changes only what that setup reads. Re-add Chroma Key to use the presets fully.
- Saved projects. Untouched older key graphs switch to the current keyer: stored Spill Suppression stays, Clip Black/White and the edge use their defaults, and the card lists the retired Tolerance and Edge Softness values and keyframes that no longer act. The old Custom choice keyed pure green and now keys the picked colour (#4C9A55 unless one is stored). Edited graphs keep the old key with its Tolerance and Edge Softness rows.
- More: Effect system: editable keying and feedback graphs · Node Catalog · Styles and presets.