
Fisheye Lens
The rounded look of an ultra-wide fisheye lens: the middle comes closer and straight lines bend towards the edges.
Group: Lens & Distort · How to add an effect

Use it for: a skate-video or peephole look · a porthole, crystal ball or spy-hole frame · flattening footage from a real fisheye lens.
- Strength – how far the picture bends; below 0 it flattens instead.
- Field of View – how wide the imagined lens sees: wider looks rounder.
- Lens Radius – the size of the lens circle: 1 or less shows a round image circle.
- Outside Lens – keeps the picture around the circle or makes it transparent.
Tip: Fisheye Lens bends the whole frame like a lens and keeps the corners in place; Bulge & Pinch changes one round area and leaves the rest of the picture untouched (which one?). Give the subject room in the middle of the frame. For a round frame on another track, pick Peephole.
Presets
Section titled “Presets”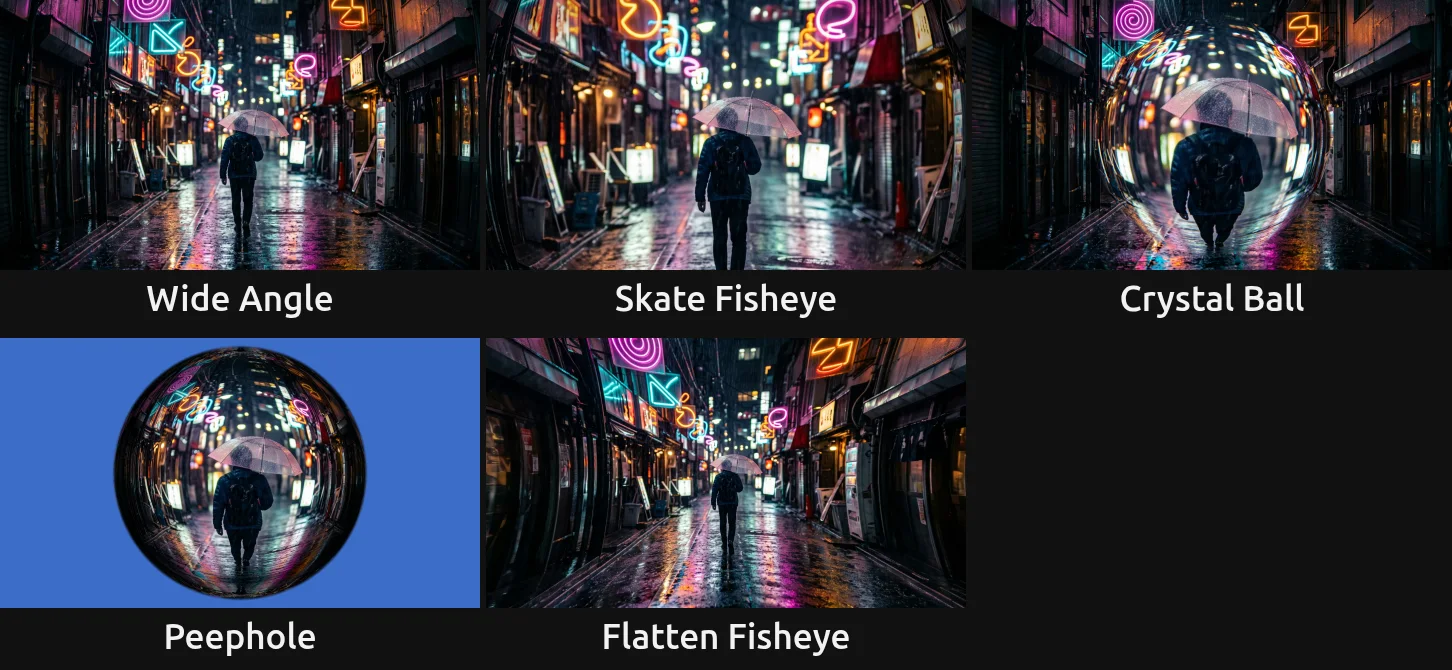
Pick one in the Preset row of the effect card. It sets all controls at once, in one undo step, and the row then shows its name until you change something. A control with keyframes keeps them, and the card says so. A preset also puts Edge Sampling back to 4: set it again for a final render at 8.
Wide Angle – Strength 0.5, Field of View 120°: a gentle bow, like a 14 mm lens or a phone’s ultra-wide camera. The frame stays full.
Skate Fisheye – Field of View 165°, Curve Bias −1, Lens Vignette 0.4: the hard bend of a skate or music video. The middle comes close, the sides curve round and the corners darken. Keep the subject near the camera and in the middle.
Crystal Ball – Stereographic, Field of View 160°, Lens Radius 0.9, Lens Feather 0.04, Color Fringe 0.012: a round glass ball in the middle of the unchanged picture, with a soft rim and a touch of colour fringe.
Peephole – Field of View 170°, Lens Radius 0.95, Zoom 0.25, Frame Edges Mirror, Outside Lens Transparent, Lens Feather 0.03, Lens Vignette 0.6 and Softness 0.35: the view through a door’s spy-hole. The whole scene sits small and bent inside a circle with a dark rim, alone on a transparent frame; Mirror fills the far edge of the circle without streaks. Put a background or a black solid on the track below.
Flatten Fisheye – Strength −1, Field of View 120°, Zoom 1.5: the other direction, for footage from a real fisheye or action camera. It pulls the bowed lines straight and zooms in until the frame is full again. On normal footage it stretches the corners outward.
Controls
Section titled “Controls”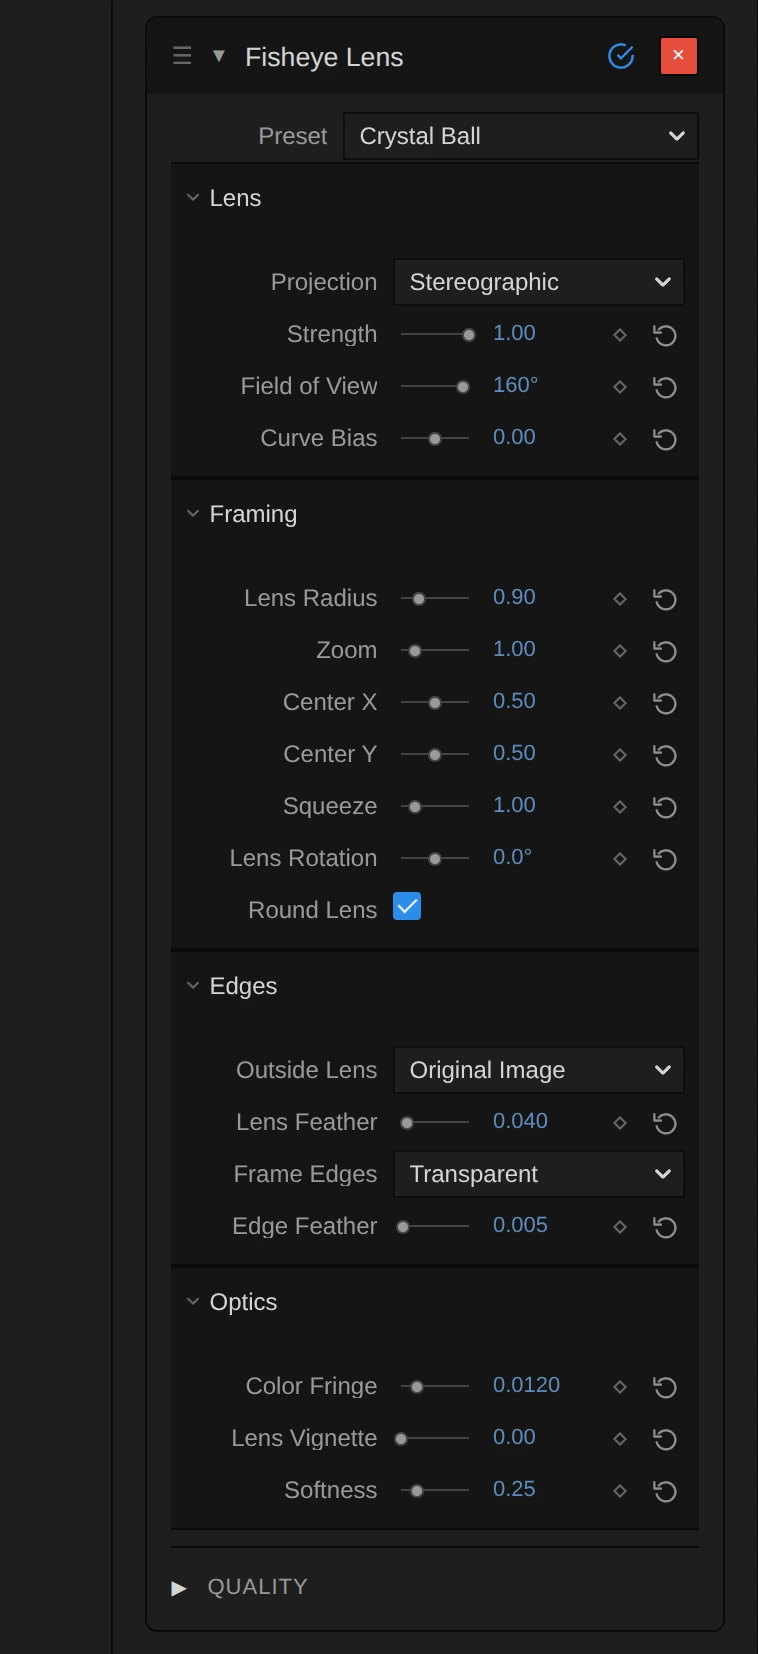
Preset – a starting point for every control; see Presets.
Projection – the lens model: how distance from the middle turns into a viewing angle. Equidistant is the classic, even fisheye. Equisolid Angle is the model of most real fisheye lenses and bends a little less. Stereographic keeps shapes near the rim rounder and fuller. Orthographic squeezes the rim hardest, like a reflection in a mirror ball. Equidistant, Equisolid Angle, Stereographic, Orthographic, default Equidistant.
Strength – how far the picture bends. 1 is the full lens, 0.5 halfway, 0 leaves the picture untouched. Below 0 it bends the other way: it flattens the bowed lines of a real fisheye shot and pulls the corners inward, so the edges beyond the picture show (see Frame Edges). Animate it from 0 for a picture that swells into a fisheye. −1 to 1, default 1.
Field of View – how wide the imagined lens sees. 90° is a soft bow, the default 140° brings the middle about twice as close, and towards 175° the middle grows very large and gets soft, because it enlarges a small part of the picture. 20° is almost flat. 20 to 175°, default 140°.
Curve Bias – shifts the bend between the middle and the edges. Below 0 the middle stays smaller and sharper and the curve moves to the sides; above 0 the middle swells further and the edges squeeze together. −1 to 1, default 0.
Framing
Section titled “Framing”Lens Radius – the size of the lens circle: 1 makes a circle as tall as the picture, 2.1 just reaches the corners of a 16:9 frame, so the whole frame is lens. Up to 1 you see a round image circle and the picture around it (see Outside Lens). 0.1 to 3, default 2.1.
Zoom – enlarges or shrinks the picture inside the lens. Below 1 you see more around the middle and, at the edges, what lies beyond the picture; above 1 the middle fills the lens. 0.25 to 4, default 1.
Center X – where the middle of the lens sits across the frame: 0 is the left edge, 1 the right. Move it to put the bulge on a face that is not in the middle. 0 to 1, default 0.5.
Center Y – where the middle of the lens sits from top (0) to bottom (1). 0 to 1, default 0.5.
Squeeze – stretches the lens into an oval. Above 1 it gets narrower and taller, below 1 wider and flatter; 2 is like an anamorphic lens. 0.25 to 4, default 1.
Lens Rotation – turns the oval of Squeeze or of an oval lens (Round Lens off). A round lens looks the same at every angle. −180 to 180°, default 0°.
Round Lens – on, the lens is a circle in the picture. Off, it stretches with the frame into an oval as wide as the picture, so a 16:9 frame bends more across than up and down. A switch, on or off, default on.
Outside Lens – what shows around the lens circle when Lens Radius is small enough to see its rim. Original Image keeps the unbent picture around it; Transparent cuts the circle out, for a porthole over another track. Original Image, Transparent, default Original Image.
Lens Feather – softens the rim of the lens circle, as a share of its radius: 0 is a hard edge, 0.05 a clean but smooth one, 0.5 a wide, dreamy fade. 0 to 0.5, default 0.05.
Frame Edges – what appears where the lens reads beyond the picture: with negative Strength, Zoom below 1 or an off-centre lens. Transparent leaves those places empty, Clamp repeats the border pixels as streaks, Mirror reflects the picture and Repeat tiles it. Transparent, Clamp, Mirror, Repeat, default Transparent.
Edge Feather – with Frame Edges on Transparent, softens the border of the picture, as a share of the frame: 0.005 takes the stair-steps off, 0.1 is a wide fade. 0 to 0.1, default 0.005.
Optics
Section titled “Optics”Color Fringe – the coloured edges of a cheap or very wide lens: red is pushed outward, blue inward, more the farther from the middle. 0.005 is a hint, 0.012 clearly visible on lights near the edge, 0.05 a strong glitchy split. 0 to 0.05, default 0.
Lens Vignette – darkens the picture towards the lens rim. With the default Lens Radius the rim sits at the corners, so only the corners darken; with a smaller lens it rings the circle. 0 to 1, default 0.
Softness – how far in from the rim the darkening of Lens Vignette starts: 0.01 is a thin dark ring at the rim, 1 a fade from the very middle. 0.01 to 1, default 0.25.
Quality
Section titled “Quality”Edge Sampling – in the Quality section, which starts closed. How many reads each pixel averages, a little apart, so the lens rim and fine bent lines stay smooth. 1 is the fastest and shows stair-steps at the rim, 4 is smooth, 8 helps on fine detail at strong settings. Every step from 1 to 8 counts. A preset puts it back to 4. 1 to 8, default 4.
Node setup
Section titled “Node setup”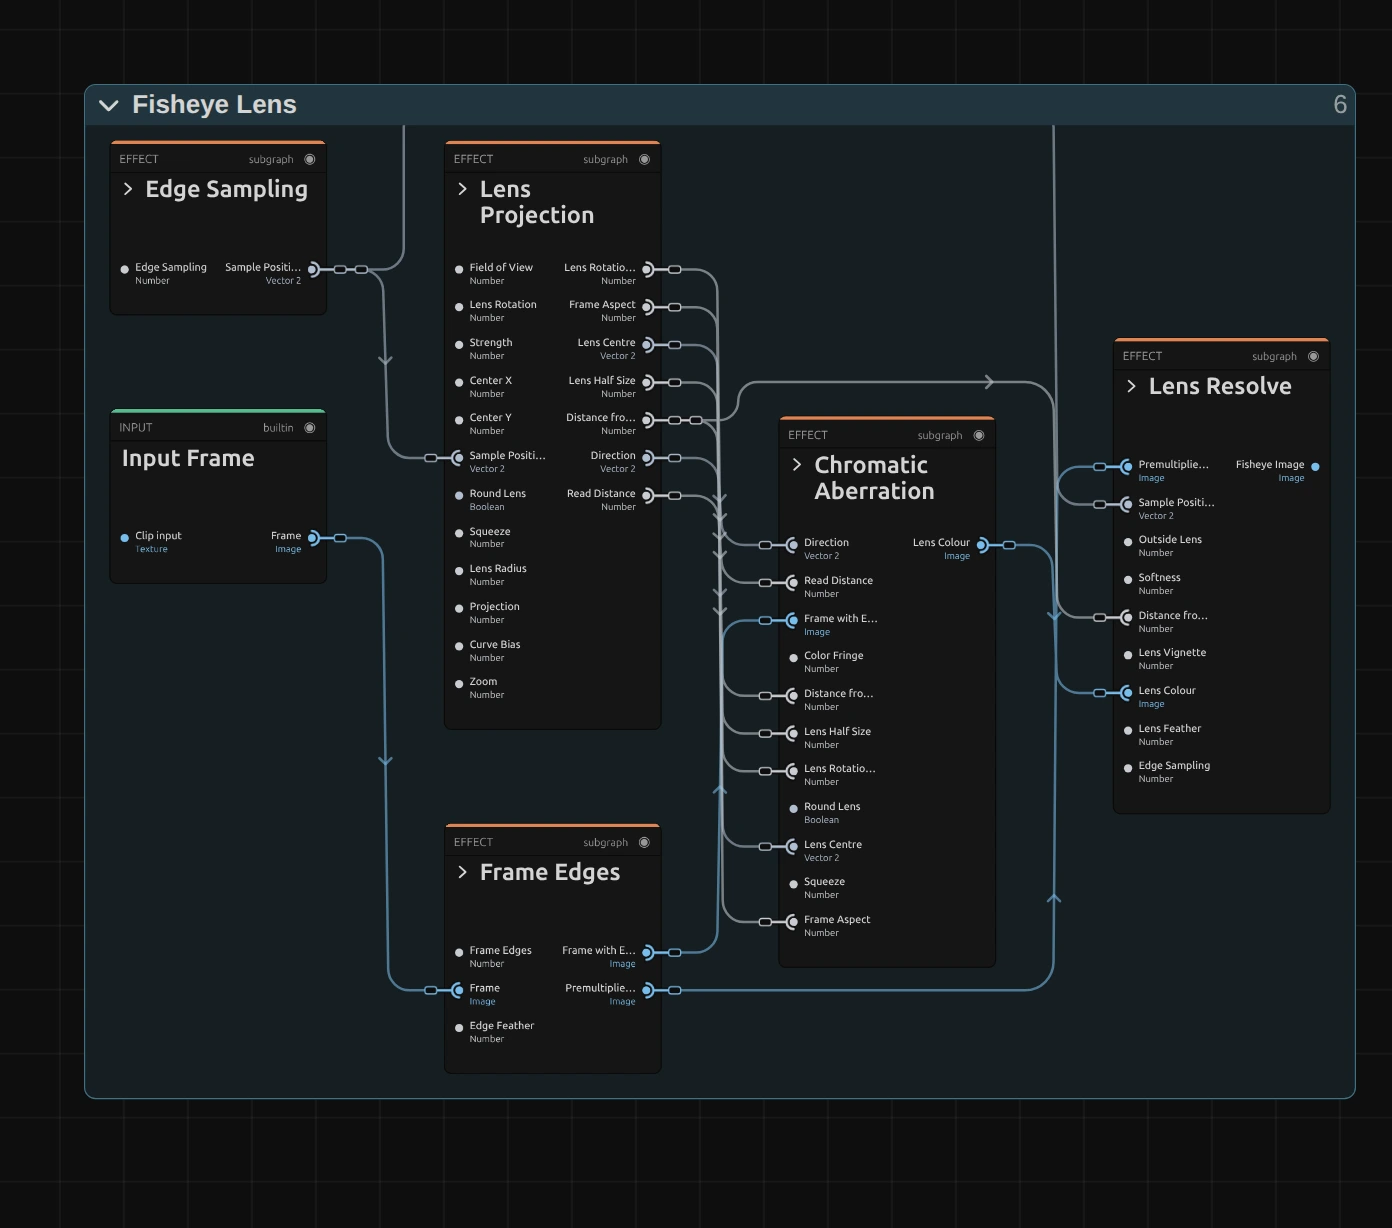
Fisheye Lens works in five stages, one folder each in the Nodes tab: Edge Sampling places each pixel’s reads a little apart, Lens Projection works out where each read looks through the lens, Frame Edges decides what is read beyond the picture, Chromatic Aberration reads red, green and blue at their own places, and Lens Resolve adds the vignette, blends the lens with what is outside it and averages the reads. All of it runs in one pass. The picture leaves out the Fisheye Parameters, Constants and Coordinates & Resources folders: the controls arrive at the stages under their card names. Click a folder’s header to open it.
Edge Sampling
Section titled “Edge Sampling”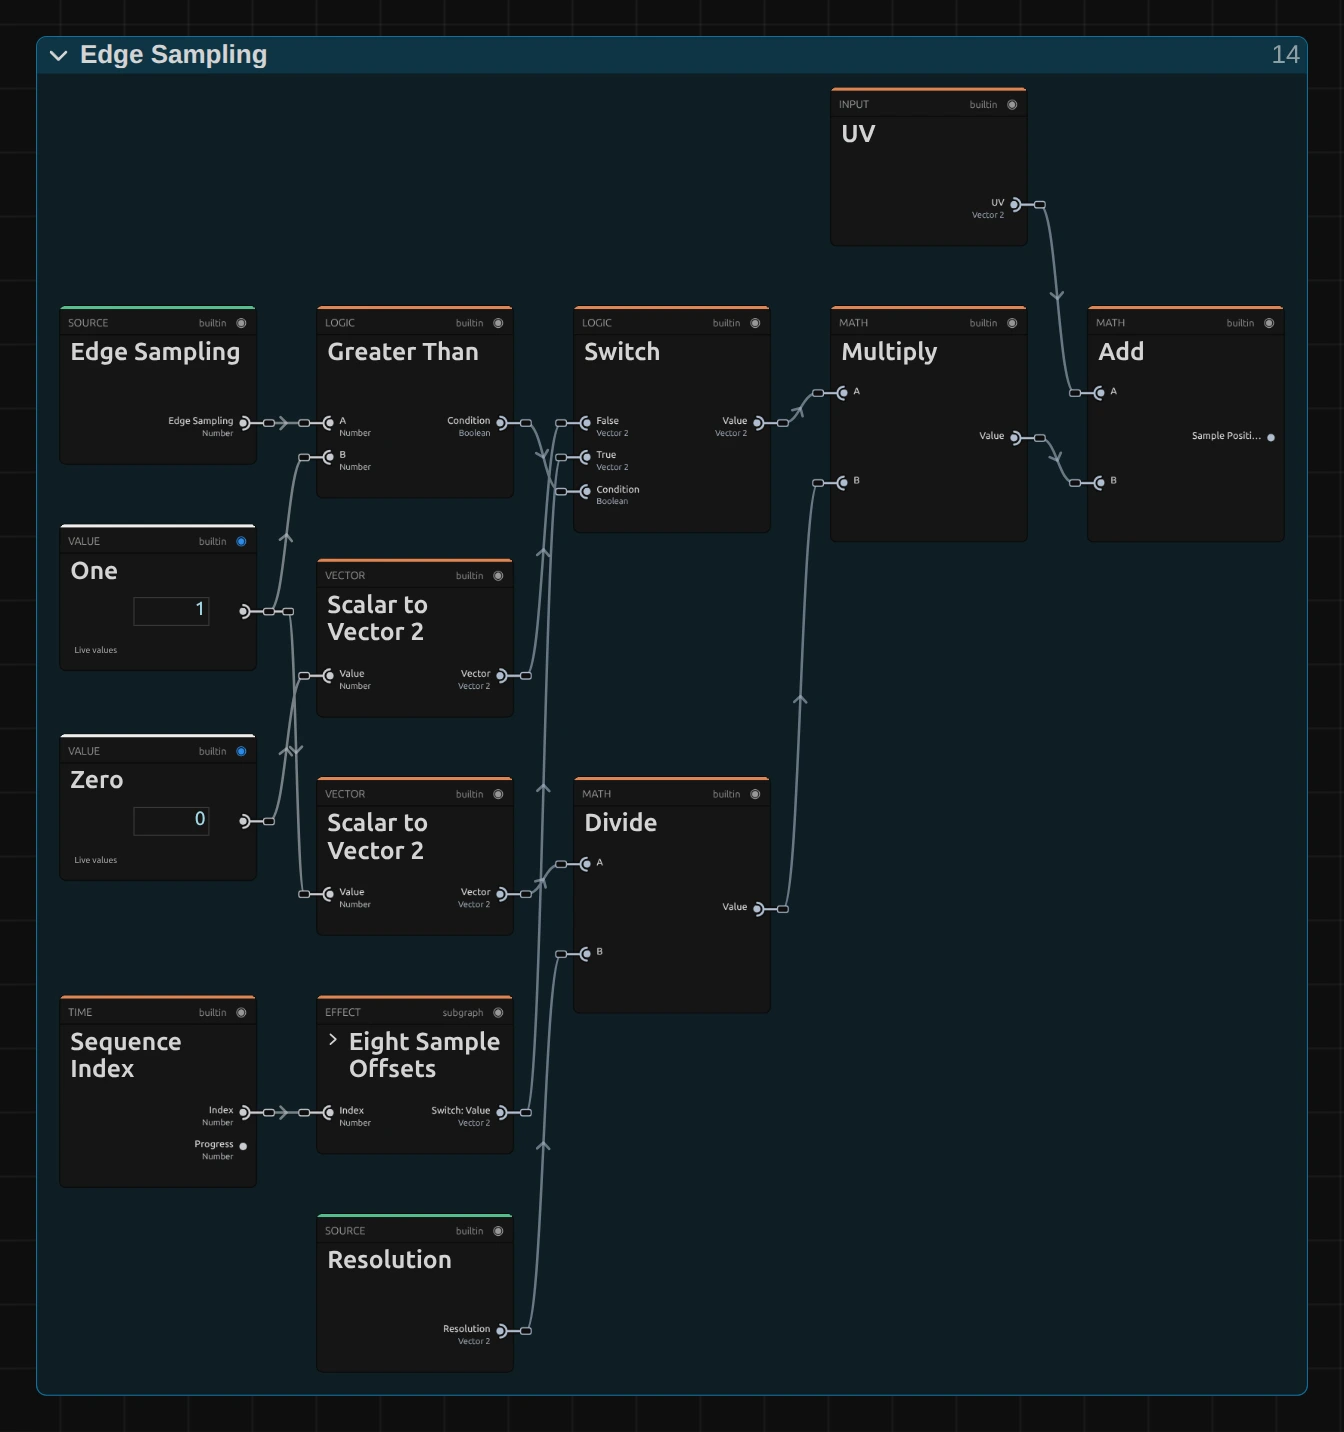
Sequence Index counts the reads of one pixel, 0 to Edge Sampling − 1.
Eight Sample Offsets – picks the read’s offset from a fixed pattern of eight points within the pixel. They come in opposite pairs, so every even count stays centred on the pixel. Its › opens the pattern.
Switch – with Edge Sampling at 1 (Greater Than compares it with One), the single read takes no offset and sits in the middle of the pixel.
Multiply – turns the offset from pixels into picture coordinates: one pixel is 1 divided by the Resolution.
Add – the pixel’s own position plus the offset: the Sample Position every later stage works from.
Lens Projection
Section titled “Lens Projection”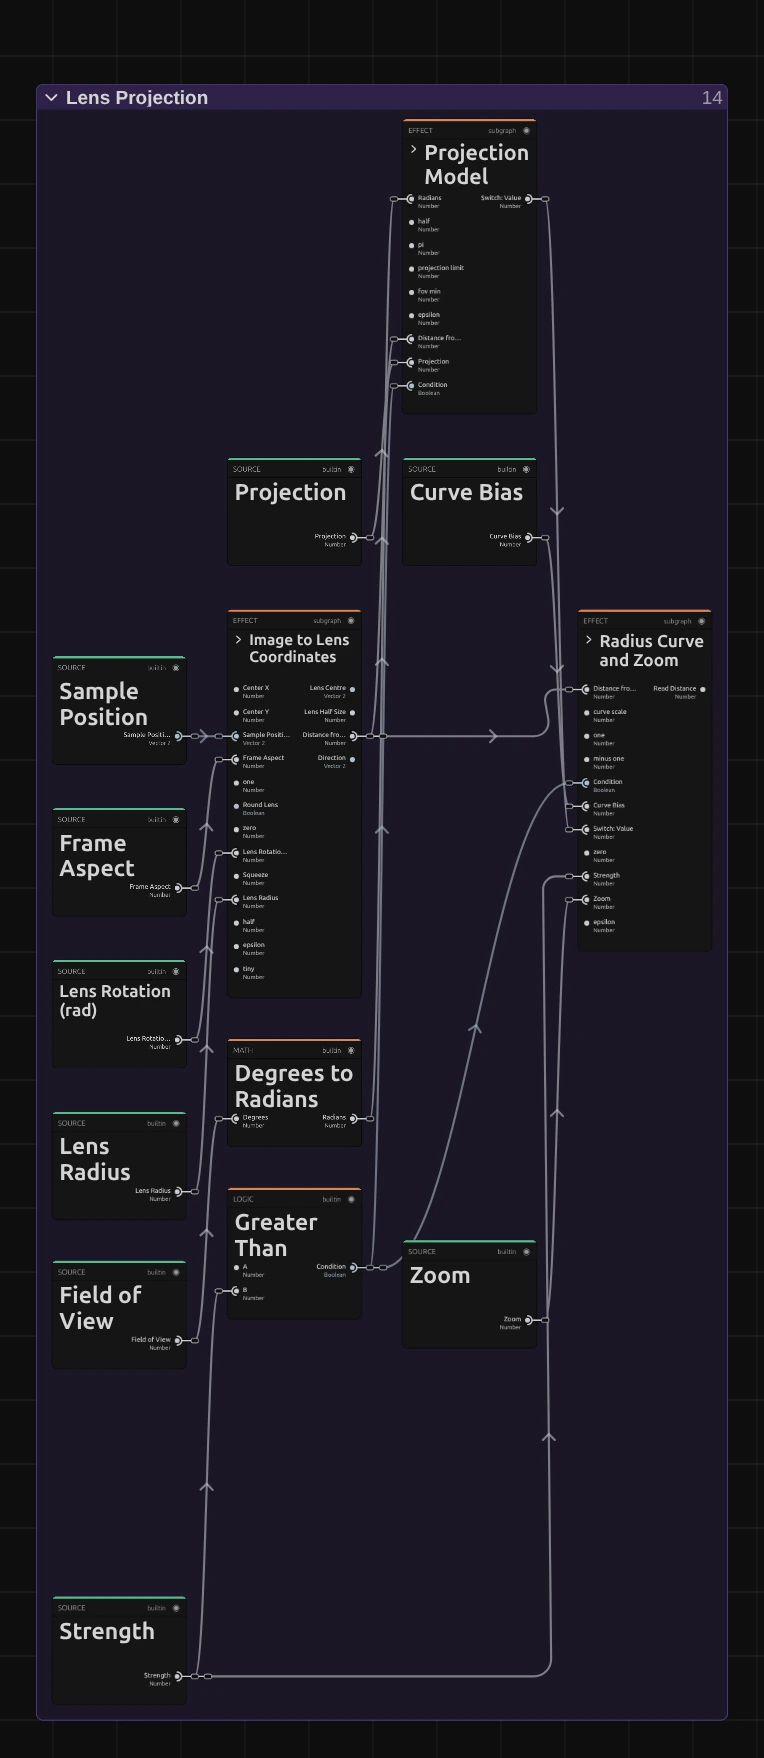
Image to Lens Coordinates – moves the read position into the lens: measured from the lens centre, made round (Round Lens), turned (Lens Rotation), squeezed (Squeeze) and scaled so the lens rim lies at 1. It hands on the distance from the centre and the direction.
Projection Model – the heart of the lens. For a positive Strength it turns the distance into a viewing angle with the chosen Projection and back into a distance of a flat picture: the middle comes closer, the edges squeeze. For a negative Strength it runs the other way. Its › opens the four models.
Greater Than – checks whether Strength is below 0 and so picks the direction of the Projection Model.
Radius Curve and Zoom – bends the result with Curve Bias, mixes it with the unbent distance by Strength and divides it by Zoom: the Read Distance.
Remix: for a lens that bends harder, open the Constants folder and set Curve Scale from 0.35 to 0.7: Curve Bias then reshapes the lens twice as strongly in both directions.
Frame Edges
Section titled “Frame Edges”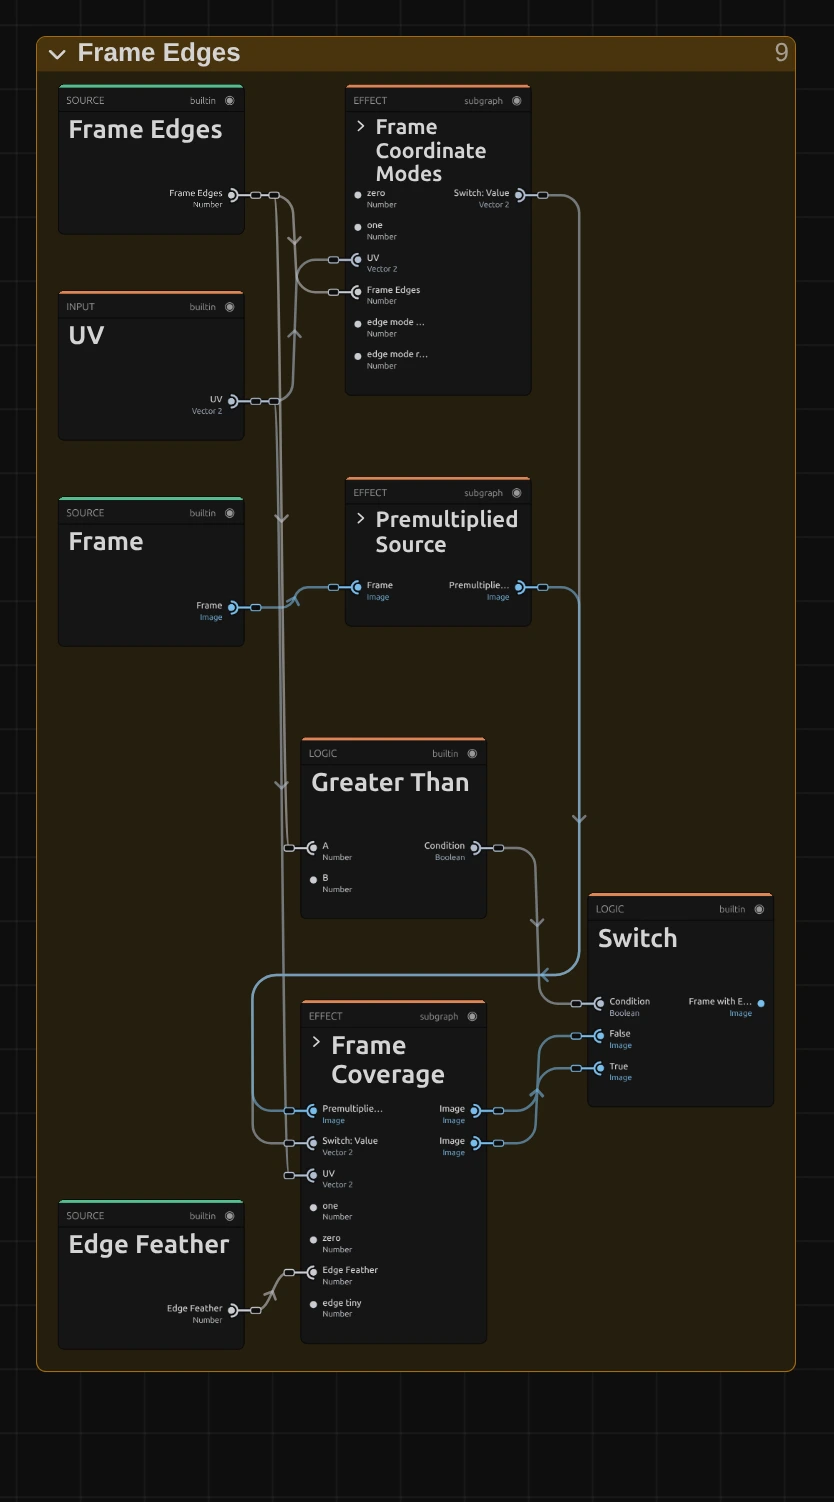
Frame Coordinate Modes – turns a read position beyond the picture into one inside it: clamped to the border, mirrored or repeated, after Frame Edges.
Premultiplied Source – multiplies each pixel’s colour by its alpha, so a cut-out figure keeps clean edges when the lens averages its reads.
Frame Coverage – for Transparent, fades the picture to nothing at its border over Edge Feather, so the empty edges have a smooth rim.
Switch – takes Frame Coverage’s picture for Transparent and the remapped picture for the other three choices.
Chromatic Aberration
Section titled “Chromatic Aberration”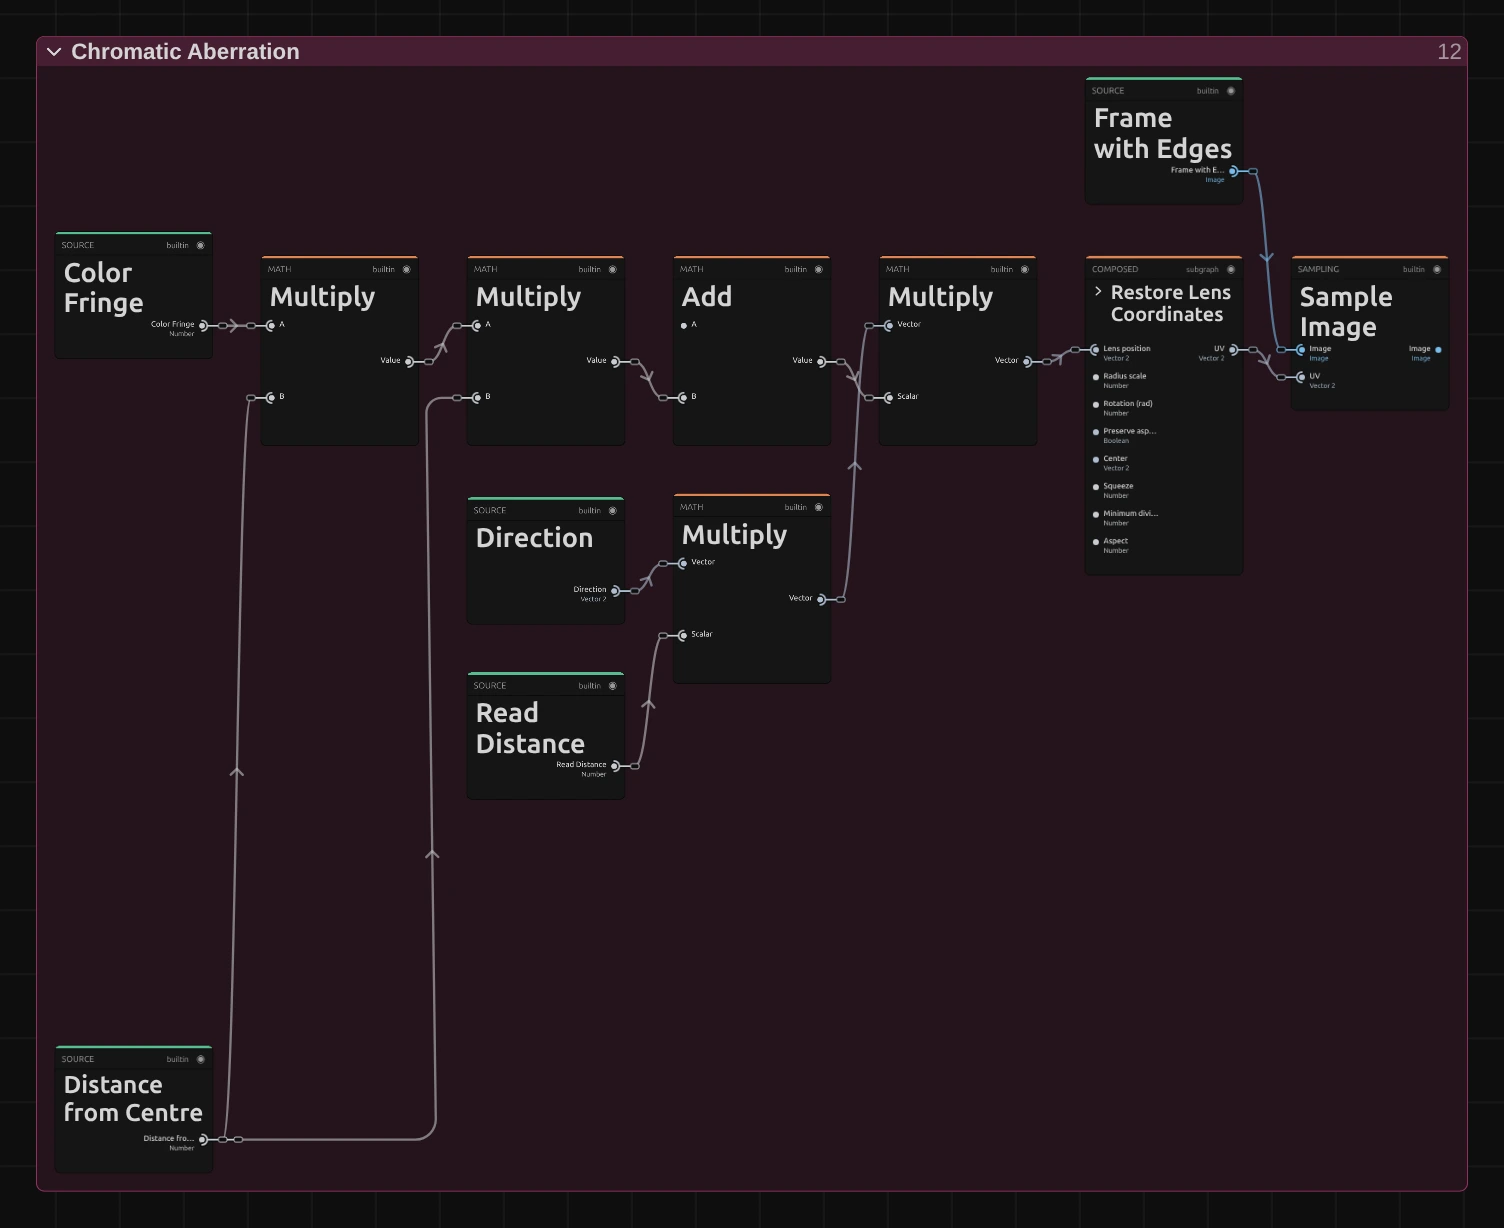
The picture shows the red read; blue mirrors it with Subtract, and green reads at the plain Read Distance.
Multiply – Color Fringe times the distance from the centre, squared: the fringe is zero in the middle and grows fast towards the rim.
Add – one plus that shift: the red read goes that much farther out than green (blue that much nearer).
Restore Lens Coordinates – turns the lens position back into a position in the picture, the reverse of Image to Lens Coordinates.
Sample Image – reads the picture from Frame Edges there.
Combine Chromatic Channels then takes red from the red read, green from the green one and blue from the blue one, with their average alpha; with Color Fringe at 0 a Switch keeps the single green read.
Lens Resolve
Section titled “Lens Resolve”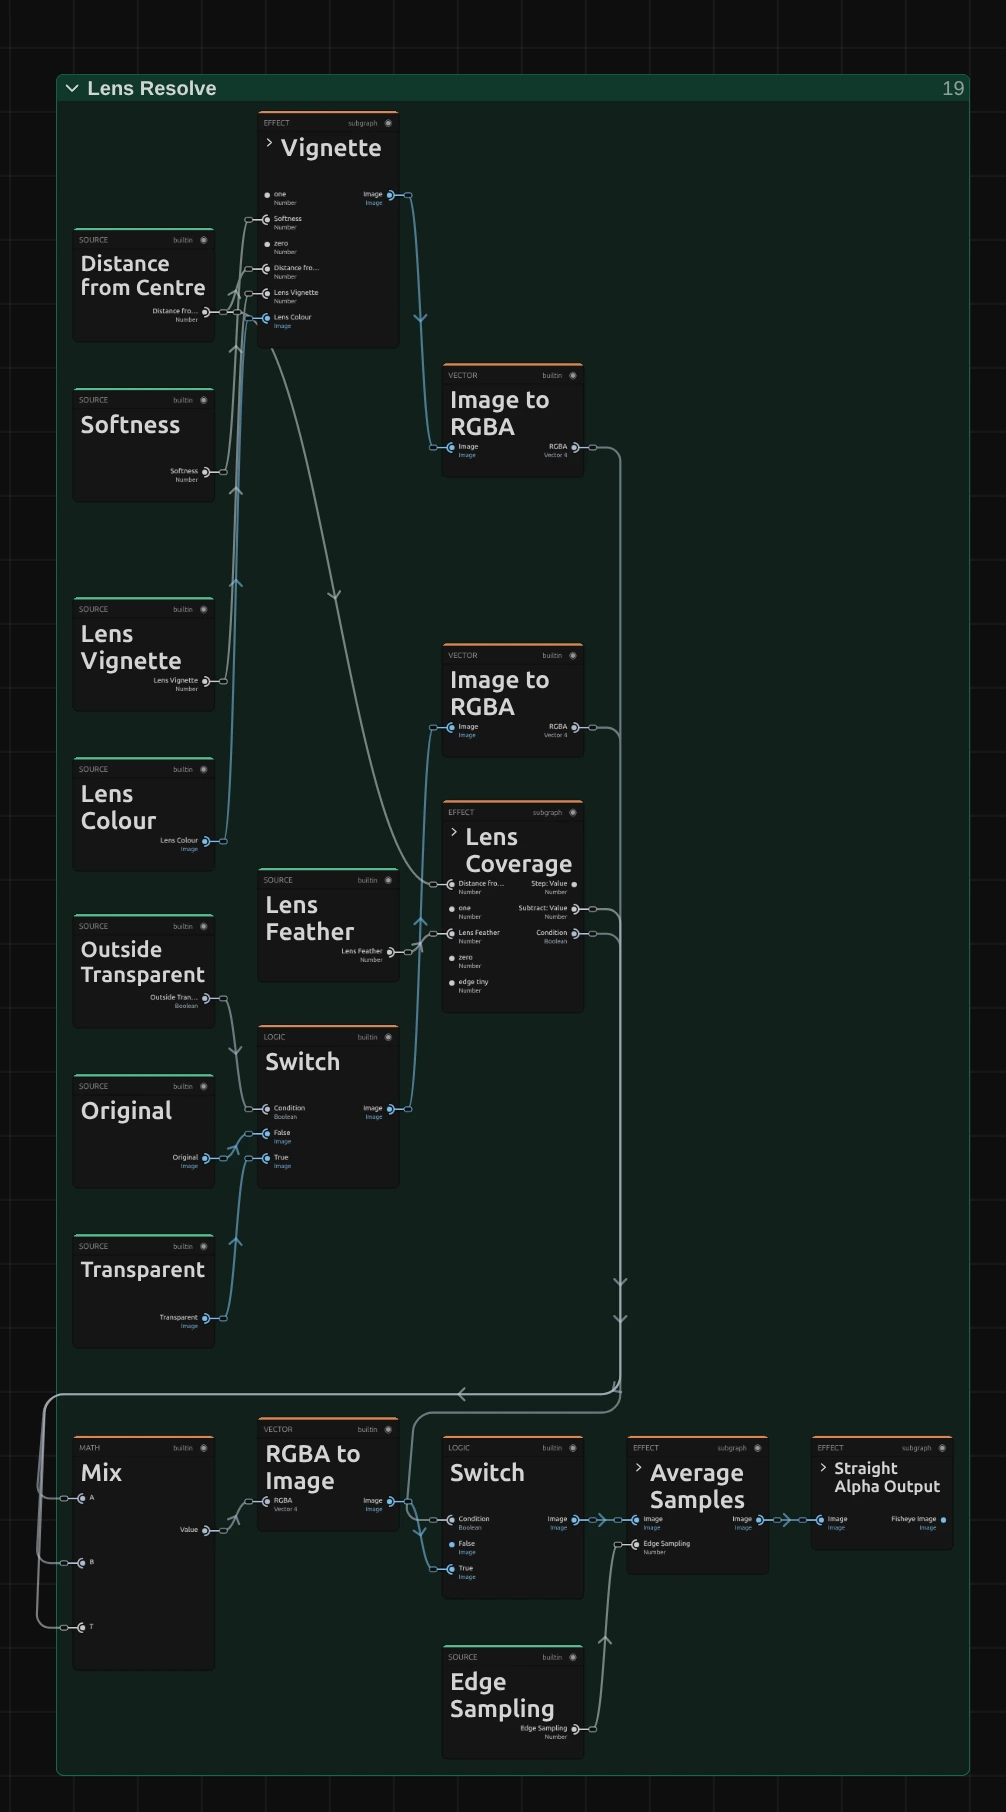
Vignette – darkens the lens picture towards the rim, by Lens Vignette, starting Softness in from the rim. It changes colour only, never transparency.
Switch – the picture around the lens: the original (Original Image) or transparent.
Mix – blends the outside with the lens picture by Lens Coverage: 1 inside the circle, fading to 0 across Lens Feather at the rim.
Average Samples – adds up the reads of Edge Sampling and divides by their number.
Straight Alpha Output – turns the averaged, premultiplied result back into a normal picture, so feathered rims lose coverage instead of turning dark.
Technical details
Section titled “Technical details”- Lens space. Lens Radius is the circle’s diameter in picture heights with Round Lens on (half of it is the radius the shader uses); Center X and Y are shares of the frame. The effect looks the same at every resolution.
- Sampling. One pass with 1 to 8 reads per pixel. Each read is premultiplied as it is taken and the average unpremultiplied, so lens and frame feathering lower coverage instead of darkening colour. Odd counts sit up to an eighth of a pixel off centre.
- Colour fringes. Each channel takes its colour from its own read and the averaged alpha, so a fringe across a cut-out never exceeds the source colour.
- Software preview and export. Without WebGPU the same recipe runs on the CPU, with the same reads.
- Warnings. Out-of-range values, unknown choices and an Edge Sampling that is no whole number are named below the effect and in the tool results.
- Saved projects. Untouched graphs of earlier recipes load as the current one; edited graphs stay as saved. A saved Edge Sampling of 2, 3, 5, 6 or 7 used to render 1 or 4 reads and now renders that many: a slightly smoother rim.
- More: Effect system: Fisheye Lens · Node Catalog · Styles and presets.