
Hue Shift
Turns every colour around the colour wheel, so orange can become green and pink yellow. Each colour keeps its brightness and its strength, so even a running colour cycle does not flicker.
Group: Color & Tone · How to add an effect
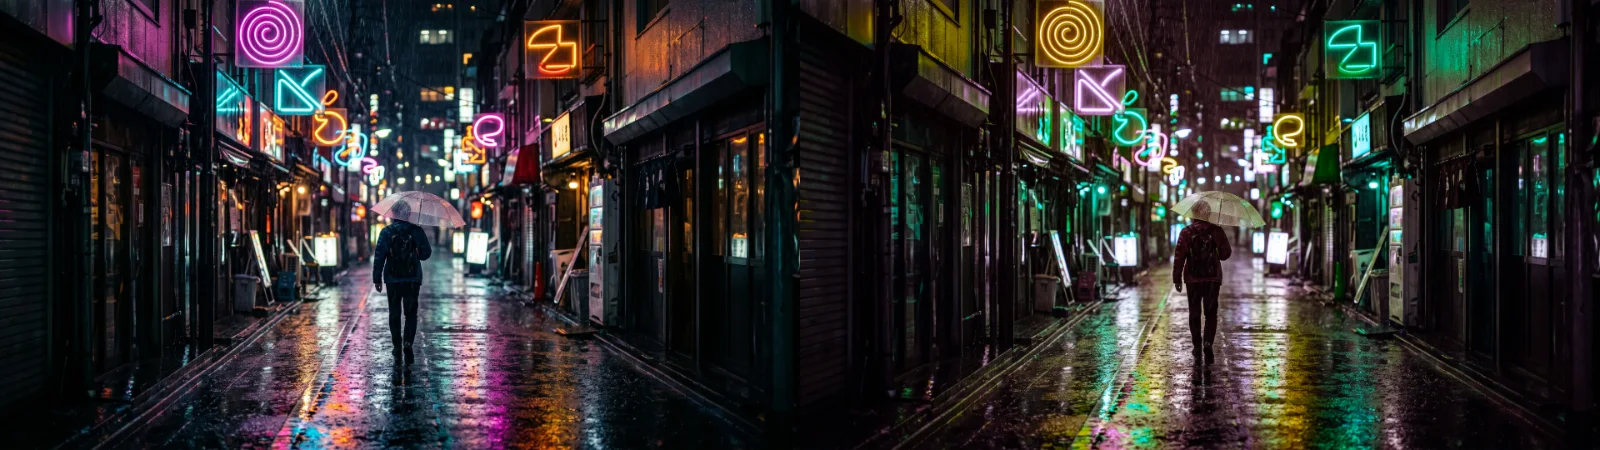
Use it for: surreal or dream-like colours · a slow colour cycle on light and neon · a costume or a set piece in another colour, when it stands alone in the picture.
- Shift – how far every colour turns round the colour wheel.
Tip: for a colour cycle, keyframe Shift from 0° to 360° (type 360 in the field; the slider stops at 180°). Since 360° looks exactly like 0°, a looped clip cycles without a jump. For a gentle wobble, keyframe −20° and 20°: the colours swing a little either way through the original.
Presets
Section titled “Presets”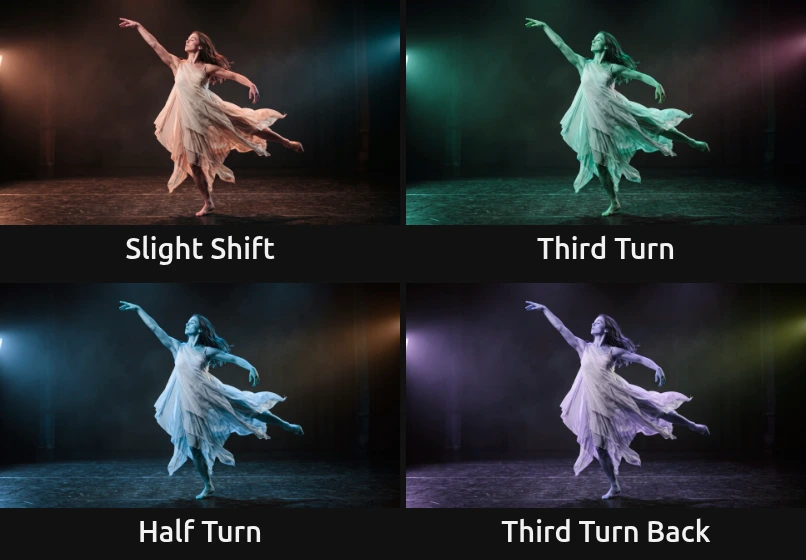
Pick one in the Preset row of the effect card. It sets Shift in one undo step, and the row then shows its name until you change the value. A keyframed Shift keeps its keyframes, and the card says so.
Slight Shift – a small step back round the wheel (−20°). Warm stage light and skin turn rosier, a blue sky and the sea lean towards turquoise. Close enough to the original to pass for real light, for a scene that should feel slightly off.
Third Turn – a third of the way round (120°): warm light, skin and wood turn a cool mint green, and blue turns red. Neon and stage light take on colours they never had.
Half Turn – half the way round (180°): every colour becomes its opposite. Warm stage light turns an icy blue, a blue sky orange. Skin turns blue as well, so it suits a dream or a nightmare more than a portrait.
Third Turn Back – a third of the way back (−120°): warm light and skin turn lilac and violet, blue turns green. Softer and stranger than Half Turn, like light through coloured glass.
Controls
Section titled “Controls”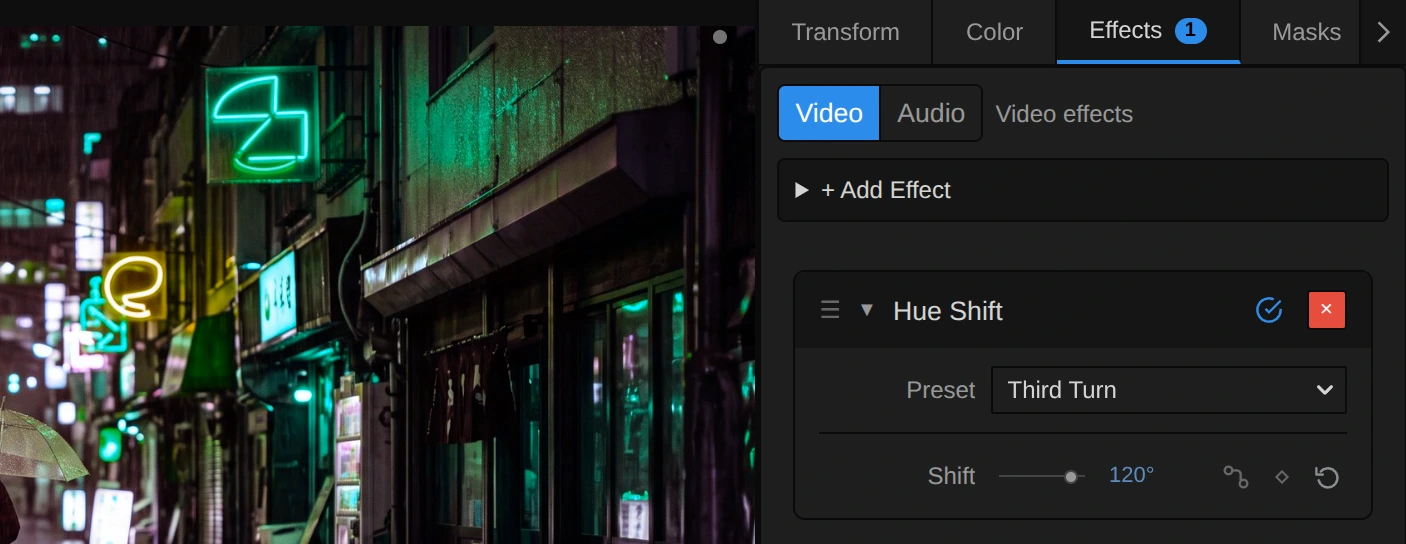
Preset – one of the four starting points above; it sets Shift.
Shift – how far every colour turns round the colour wheel. Going up, red turns orange, then yellow, green, cyan, blue, violet and back to red; going down, the other way. 10–30° either way changes the mood but still looks like real light; 120° and −120° give each colour another one; 180° gives the opposite colours. Greys, black and white have no colour, so they stay as they are, and each colour keeps its brightness and its strength. −180 to 180°, default 0°. The ends meet: 180° and −180° look the same, so the slider covers every colour, and a small shift either way is a small value. Type any value for more: 360° looks like 0°, 450° like 90°. For a running colour cycle, click the small source icon before the keyframe diamond and choose New Oscillator in the Source menu; the Nodes tab opens on the oscillator to set its speed. The row then has a line under it (Node · Source) with Go to source, and the same menu switches back to the local value or keyframes.
Node setup
Section titled “Node setup”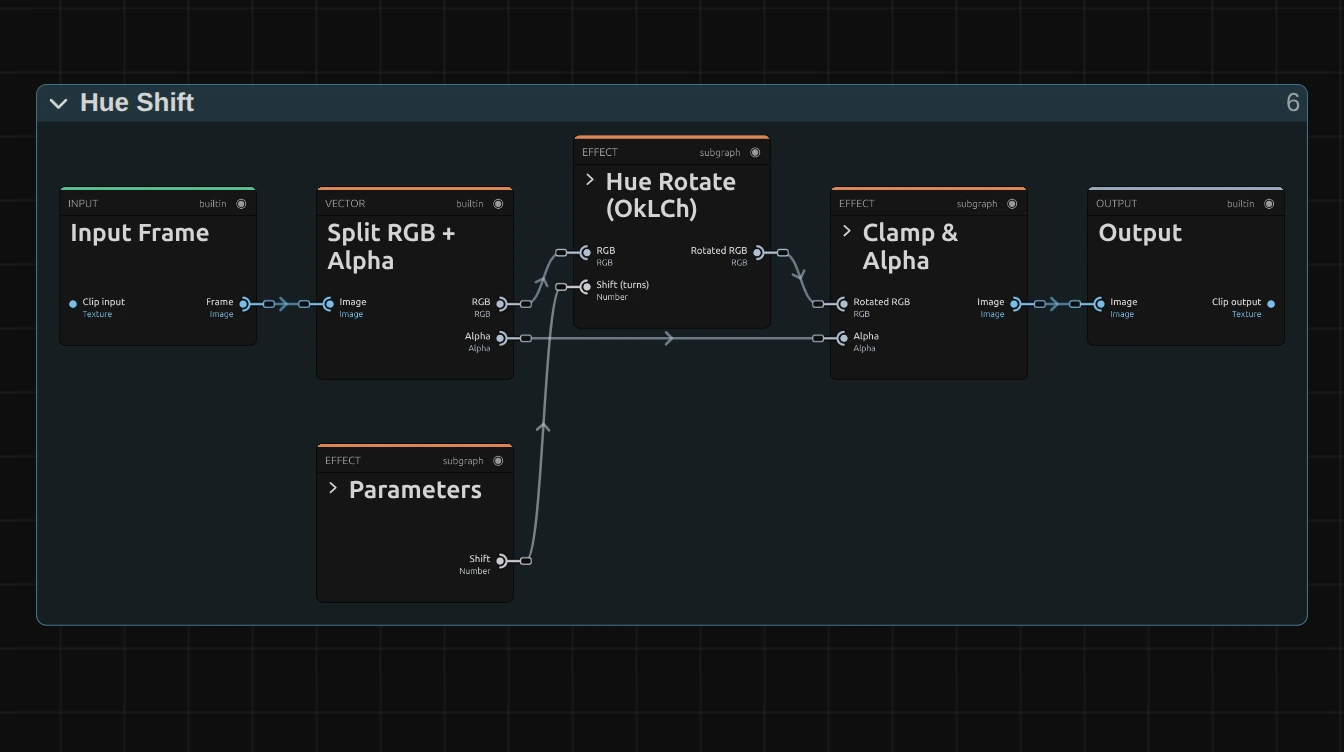
Hue Shift works in three stages (Color & Tone shows the shape all colour effects share): Parameters holds the control, the block Hue Rotate (OkLCh) does the work, and Clamp & Alpha finishes. Split RGB + Alpha takes the transparency aside first. Click a folder’s header to open it; the sections below show what is inside. The same block is in right-click → Reusable Nodes.
Parameters
Section titled “Parameters”The folder holds a single Shift card: the control’s value, in turns (0.5 is 180°). It has no Clamp: every value has a clear result, because the hue wraps round the wheel further on. So a long keyframed spin never stops at a limit.
Hue Rotate (OkLCh)
Section titled “Hue Rotate (OkLCh)”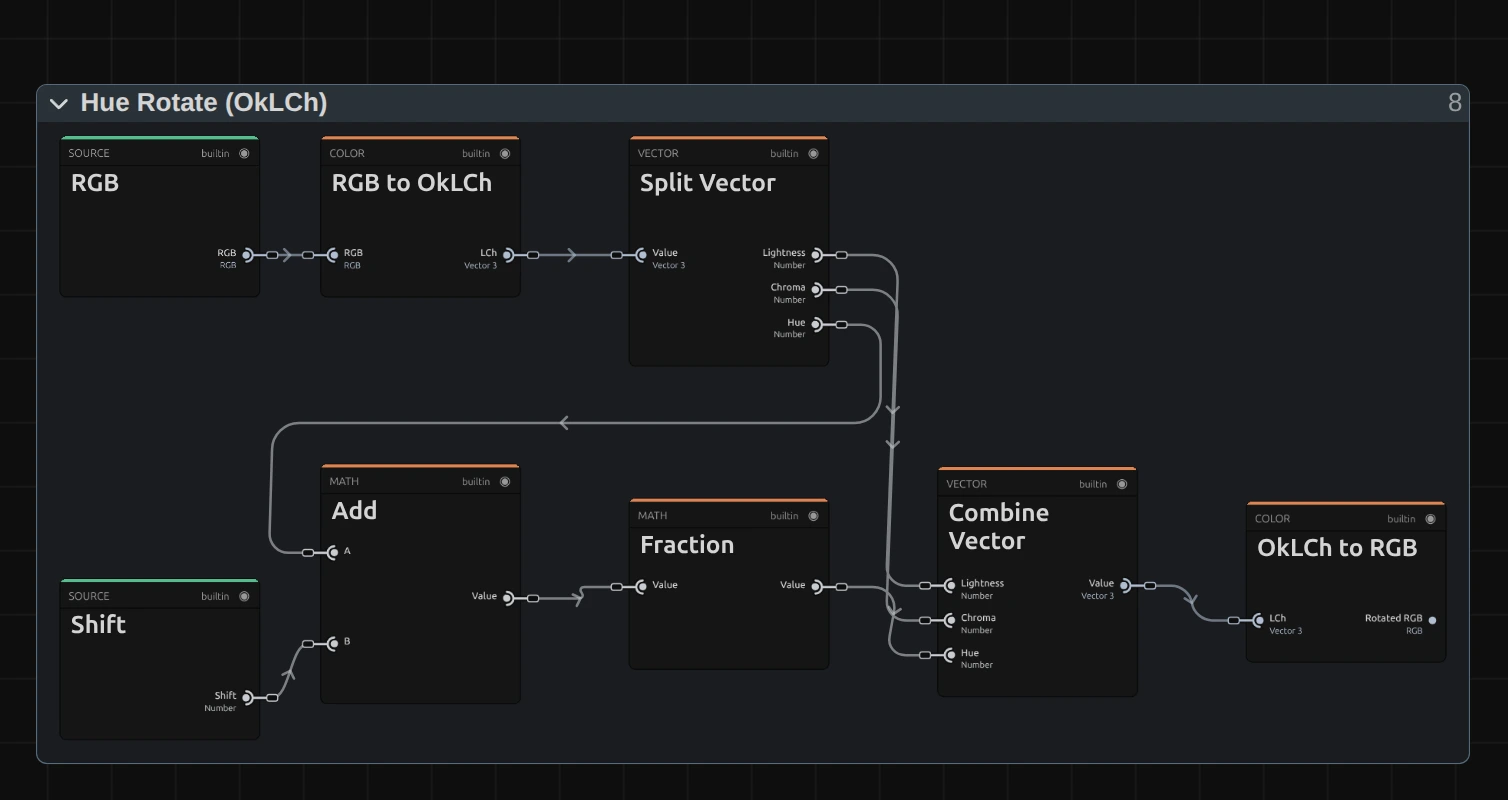
RGB to OkLCh – describes every colour as lightness, colour strength (chroma) and hue, in a colour space made to match how we see. A yellow and a blue of the same lightness there also look equally bright, which is why a turned colour does not suddenly glow or go dull.
Split Vector – takes the three apart. Lightness and Chroma go straight on to Combine Vector, untouched; only the Hue takes the detour below.
Add – adds the Shift to the hue. Both are in turns, so 0.25 moves every colour a quarter of the way round.
Fraction – keeps only the part after the decimal point, so the hue wraps round the wheel: 1.1 turns becomes 0.1. This is why Shift never needs a limit.
Combine Vector – puts Lightness, Chroma and the new Hue back together.
OkLCh to RGB – turns the result back into screen colours. Some turned colours cannot be shown on a screen at their old strength (a deep blue turned into yellow); they come out past the screen’s range and are cut off in the next folder.
Remix: for richer colours without any shift in hue, put a Multiply with a Value of 1.3 on the cable from Chroma of Split Vector into the Chroma input of Combine Vector. Colours the screen cannot show are cut off at the end, so stay below about 1.5.
Clamp & Alpha
Section titled “Clamp & Alpha”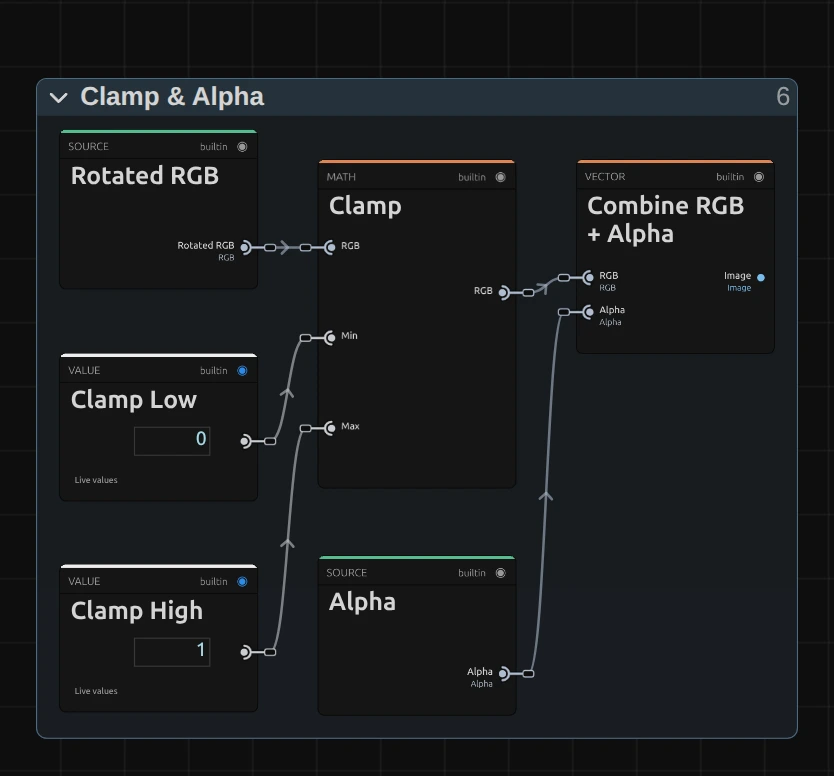
Clamp – keeps each colour channel between 0 and 1 (its Clamp Low and Clamp High cards). A turned colour the screen cannot show at full strength stops here, at its nearest screen colour.
Combine RGB + Alpha then puts the original transparency back, untouched.
Technical details
Section titled “Technical details”- Colour space. The rotation happens in OkLCh (Björn Ottosson’s Oklab in polar form): lightness and chroma stay exactly, only the hue angle moves. Colours that leave the screen’s range are clamped per channel (no gamut mapping), so a very saturated colour turned into a hue the screen shows less strongly may shift slightly in hue and brightness.
- Units. Shift is stored in turns: 0.25 is 90°. Keyframes and agent tools use turns; the inspector shows degrees. The slider runs from −180° to 180° (before 2026-10-22: 0° to 360°; the same colours, since the ends meet); typed values, keyframes (also in a Keyframe node), node cards and agent tools may go further on both sides and wrap round, so there is no limit to report (1.25 is 450°). A value past the slider’s ends puts the handle where its colour is: 240° sits at −120°, and moving the handle from there keeps the whole turns (one step right gives 241°). The parameter is declared
wraps: the property catalog, the Keyframe node andlistEffectsmark it so, and every write path takes values past the slider’s ends. - Transparency. Only the colour is changed; the transparency passes through untouched.
- What all colour effects share (8-bit range, saved projects, adjustment layers): Color & Tone. Formulas: Effect system; blocks: Node Catalog · Styles and presets.