
Slit Scan
Shows every part of the frame from a different moment, so movement smears and folds through the picture. The classic slit-scan look of film and photography, and with 3D geometry a sculpture of time in the 3D scene.
Group: Keying & Time · How to add an effect
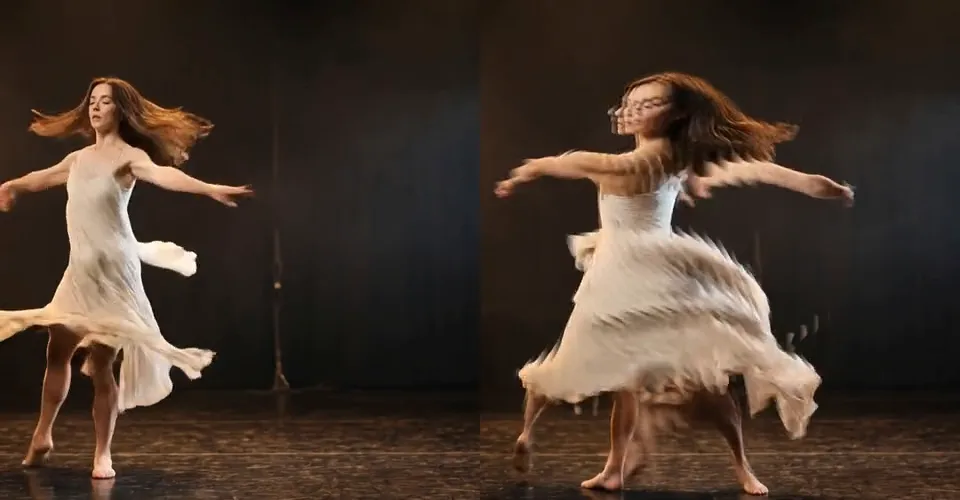
Use it for: a dancer whose body folds through time · smeared crowds, traffic or water · a memory that drags behind the present · a movement turned into a 3D sculpture (3D geometry).
- Delay – how far back in time the picture reaches.
- Profile – the shape of time across the frame: a straight scan, out from the centre, waves or rings.
- Scan direction – which way a straight scan runs.
- Time bands – hard steps instead of a smooth smear.
Tip: the further back the Delay reaches, the more a moving figure folds. Fast limbs break into a row of soft ghosts; switch on Motion compensation to turn them into one continuous smear. Slit Scan needs a video clip, and a new Slit Scan takes a moment to load its frames.
Presets
Section titled “Presets”Pick one in the Preset row at the top of the effect card. It sets the Time and Wave values (Delay, Profile, Angle, Mix, Time bands, Waves, Phase and Speed) in one undo step and leaves everything else as it is: frame storage, sampling, 3D geometry, time fields and protection keep your settings. The row shows the preset’s name until one of its values changes. A value with keyframes or a driving node keeps its animation, and the card names it.
Sweep – a straight scan from left to right that reaches 3 s back: the right edge of the frame is 3 s behind the left. Arms and skirts stretch into pleated sideways smears. The classic look; good for dance, crowds and traffic crossing the frame.
Wave Folds – time rises and falls across the frame in two soft waves that drift slowly, 2 s deep. Parts of the body fall behind and catch up again, so hands float free of the arms. Dreamlike and restless.
Radial Bloom – the centre is now and the corners are 3 s back. A figure in the middle stays readable while everything around it smears outwards. Good for a soloist in the centre of the stage.
Time Rings – rings of time around the centre that slowly close in on it, 2 s deep. Bodies break into turning arcs; the strongest and most abstract look.
Time Steps – the straight scan of Sweep cut into twelve upright strips, each from a single moment up to 2 s back. The figure is assembled from slices that do not quite fit, like a stop-motion strip.
A new Slit Scan starts as Sweep, so the Preset row shows its name.
Controls
Section titled “Controls”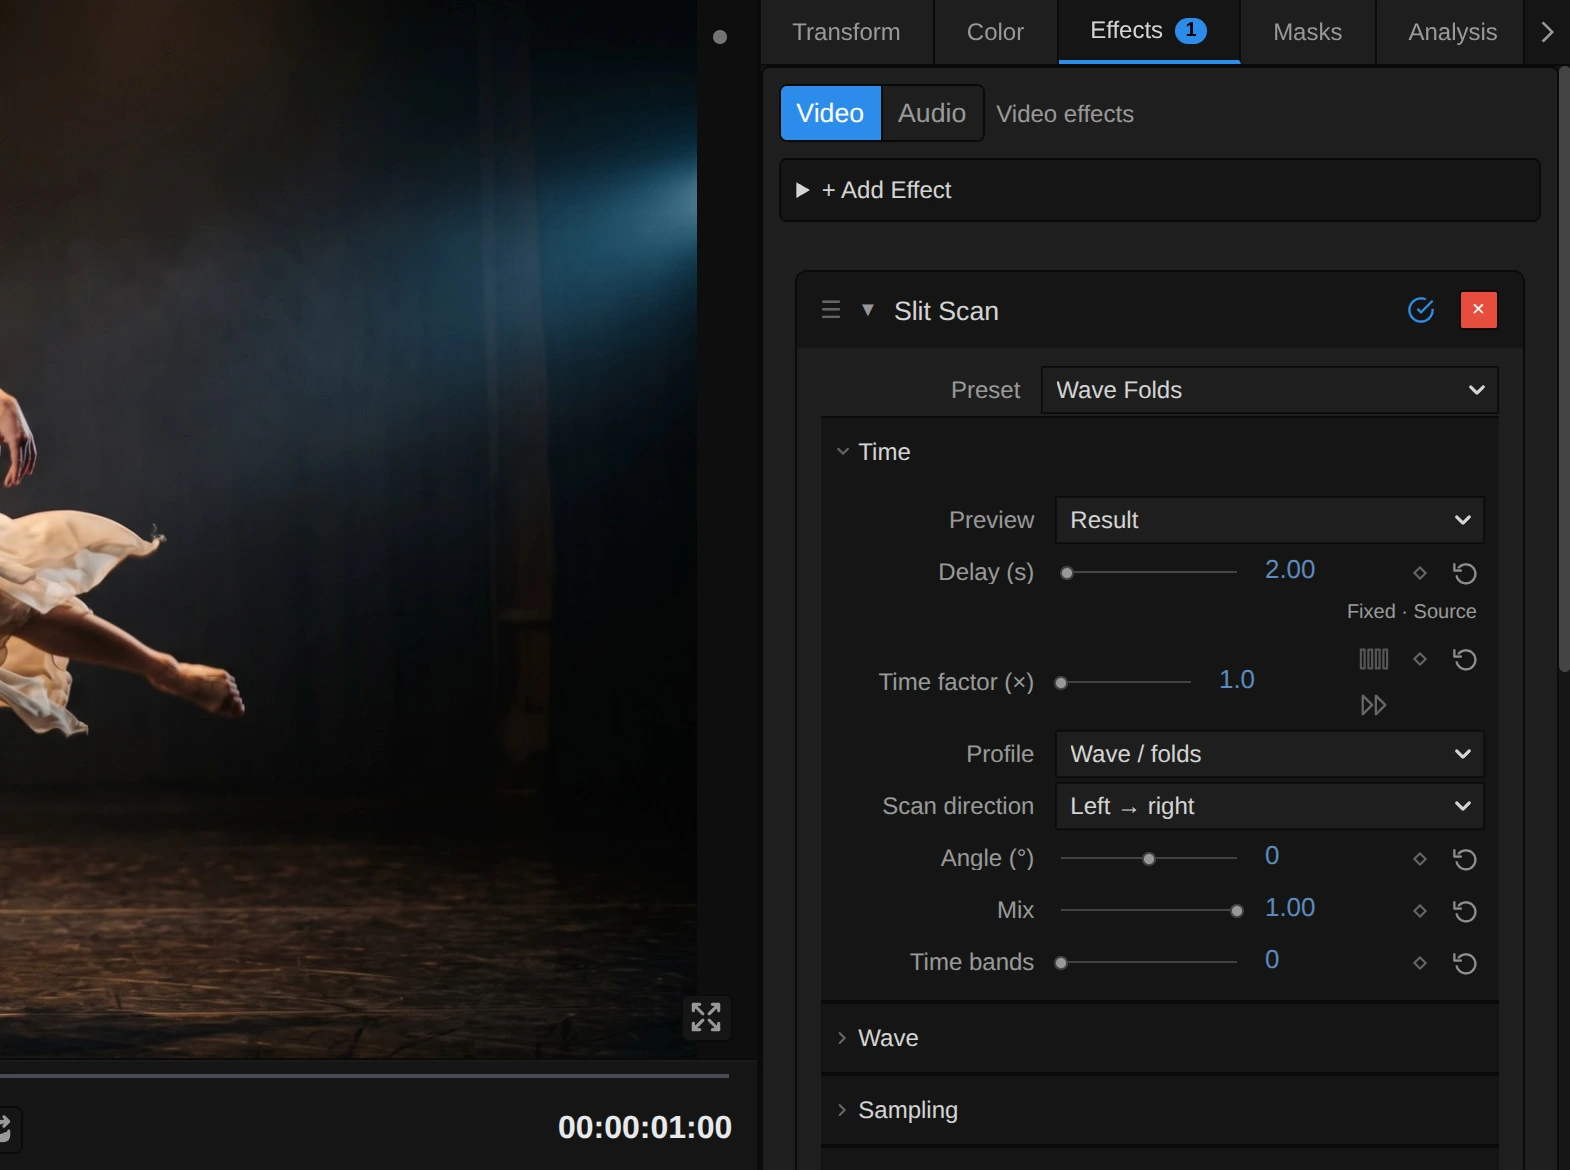
The card opens on Time. Wave shapes the two wave profiles; the sections below it start closed, and most projects never need them, so they are folded here too: click a name to open it. Sections with a switch in their header (Motion compensation, 3D geometry, Object stabilization, Time field source, RGB time, Protection mask, Subject protection, Protected center) do nothing while switched off.
Preview – what the preview shows. Result is the effect; Time map shows how far back each pixel reaches, black for now and white for the full Delay, so you can see the Profile before you judge the picture; Protection mask shows the protected areas. Only the preview changes: the export always renders the result. Result, Time map, Protection mask, default Result.
Delay (s) – how far back in time the picture reaches at the far end of the Profile. 0 shows the plain clip; 0.5 s bends fast movement; 1–3 s fold a dancer through herself; 10 s and more turn people into streaks. Frames before the start of the source video do not exist: there the picture holds the first frame. A longer Delay needs more frames in memory and loads longer. It can be keyframed or driven by a node: the small Fixed · Source button under the row says where the value comes from now (Fixed, Keys or Node) and opens the choice of source. 0 to 60, default 3 (it was 1 s, where a figure in the middle barely changes; saved projects keep their Delay).
Time factor (×) – multiplies how far back the source is read, for windows longer than a minute: at Delay 1 s and Time factor 4 the far end reaches 4 s of the source, while the Profile, protection and time fields keep their shape. The clip’s speed and length stay as they are. The bar button (Match sample resolution) sets the factor at which every sample of the scan reads a frame of its own; the ▷▷ button (Bypass slowdown) plays the clip that many times faster instead, so it gets shorter on the timeline while the sound stays. 1 to 100, default 1.
Profile – the shape of time across the frame. Linear scan runs from one edge to the other; Out from center is now in the middle and furthest back at both edges; Wave / folds rises and falls in waves along the scan; Radial scan is now at the centre and furthest back in the corners; Time rings puts circles of time around the centre. The presets loop above shows four of them. Linear scan, Out from center, Wave / folds, Radial scan, Time rings, default Linear scan.
Scan direction – which way the scan runs, as a quick menu for Angle: the side named first is now, the other side furthest back. It reads Custom angle when Angle is not one of the four. Left → right, Top → bottom, Bottom → top, Right → left, default Left → right.
Angle (°) – the direction of the scan in degrees: 0° runs left to right, 90° top to bottom, 180° right to left, and anything in between runs diagonally. It shapes Linear scan, Out from center and Wave / folds; Radial scan and Time rings spread from the centre, so the card dims it there. −180 to 180, default 0.
Mix – blends the slit-scan picture over the plain clip. 1 is the full effect; 0.5 lays the past over the present as a ghost; 0 is the plain clip. Transparency blends too. 0 to 1, default 1.
Time bands – cuts the smooth time map into hard steps. 0 is smooth; 2 and more give that many bands, each showing one moment, from now to the full Delay. Few bands look like a strip of photographs, many like coarse stairs. A value above 0 up to 1 renders as smooth like 0, and the card says so; 1.5 gives 2 bands. 0 to 64, default 0.
These three controls shape the Wave / folds and Time rings profiles; in the other profiles the card dims them.
Waves – how many waves of time fit across the frame (for Time rings: how many rings from the centre to the edge). 0.5 gives one broad swell, 2 soft folds, 6 and more narrow slices. 0.1 to 10, default 2.
Phase – shifts the waves along the scan, as a share of one wave: 0.5 swaps the near and far parts. Keyframe it to slide the folds across the picture on a cue. 0 to 1, default 0.
Speed (cycles/s) – how fast the waves travel on their own: 0 holds them still, 0.25 drifts slowly, 1 races. Positive values move the waves towards the start of the scan, so rings close in on the centre; negative values run the other way. It follows the timeline time, so the export matches the preview. −2 to 2, default 0.15.
Sampling
Sampling
Section titled “Sampling”How the frames of the past are stored and read. The defaults suit almost every clip.
Frame storage – where the past frames live. GPU history keeps every frame the scan needs in GPU memory: the fastest and the default. Hybrid streams them within a bounded memory and is the fallback when a window does not fit; GPU cache is the older cache. GPU cache, Hybrid · bounded GPU memory, GPU history · resident video volume, default GPU history · resident video volume.
History memory – how much GPU memory the history may use; shown for GPU history. A long Delay on 4K footage needs more; when it does not fit, the effect switches to Hybrid and says so. 640 MiB, 1 GiB, 2 GiB, 4 GiB, default 4 GiB.
Temporal sampling – how a moment between two frames is read. Blend adjacent frames mixes the two nearest frames, which softens steps into overlapping ghosts; Nearest frame takes one frame and shows hard steps. Blend adjacent frames, Nearest frame (no blending), default Blend adjacent frames.
Export processing – how the export reads the source: Shared source frames decodes each frame once for many output frames (faster); Individual frames renders frame by frame. Shown for GPU history and Hybrid. Individual frames, Shared source frames (Hybrid), default Shared source frames (Hybrid).
Samples – how many different moments the scan reads across the frame. More samples give a finer smear; the card limits it to the longer side of the source in pixels. 2 to 8192, default 1920.
Scan smoothing (px) – softens the scan where it stretches the picture apart, along the measured motion. 0 is off; 1–2 px smooths torn edges. 0 to 4, default 0.
Seam smoothing (px) – a light filter on the finished picture that blurs the seams between moments, but not across colour edges. Start around 1–2 px; it acts on Result with linked RGB time. 0 to 8, default 0.
Seam edge protection – shown when Seam smoothing is above 0: how strongly colour edges stop the seam filter. 0 to 1, default 0.65.
Stretch threshold (×) – how much the scan must stretch the picture before Scan smoothing acts. The eye button shows these areas in red in the preview. 1.01 to 16, default 2.
Motion compensation
Motion compensation
Section titled “Motion compensation”Motion compensation (section switch) – shifts every frame the scan reads along the measured motion (DIS optical flow) to the exact moment it needs, so fast limbs become one continuous smear instead of a row of ghosts. It needs GPU history; the status row says when it cannot work, and the export then renders individual frames. The first use measures the motion and takes a while; the result is saved with the project. off or DIS optical flow, default off.
Flow strength – how far the frames are shifted along the motion: 0 none, 1 as measured, 2 twice. 0 to 2, default 1.
Preview quality
Preview quality
Section titled “Preview quality”Quality – Small preview works on 160 px frames for quick work on long Delays; Full size uses the original frames. The export always uses full size. Small preview · 160 px, Full size, default Full size.
Preview quality – with Full size and GPU history: Adaptive shows a lighter picture while you play, scrub or edit and the full one when you stop; Full resolution always renders it fully. Full resolution, Adaptive · playback / scrub / edits, default Adaptive · playback / scrub / edits.
3D geometry
3D geometry
Section titled “3D geometry”Switch the section on to place the Slit Scan picture into the shared 3D scene as a surface. Orbit, pan and dolly the scene camera to look at it from the side; the Reference view button (↶) brings the preview back to the original view. While the geometry prepares, the section shows its progress and the preview shows the flat picture; the export waits for the finished geometry. Switching the section off returns the clip to 2D.
Representation – what the 3D surface is. Reference time surface is a relief: every point moves back along its view ray by how far in the past it lies. Motion-deformed surface also carries every point sideways along the measured motion (the section starts with this one). Free motion band is an experimental band through the centre that follows the motion, for straight scans. Space-time slice builds points from a baked depth video (below). 2D image, Reference time surface, Free motion band, Motion-deformed surface, Space-time slice (observed depth), default 2D image.
Reference projection – the camera the surface is built for: Perspective like the original camera, Orthographic without perspective. Perspective, Orthographic, default Perspective.
Depth time source – which time sets the depth: the continuous requested moment, or the real source frames the sampler blended (blended pixels use their weighted age). Continuous requested time, Sampled source frames, default Continuous requested time.
Mesh quality – how many columns the surface has; rows follow the aspect ratio. Playback and scrubbing use at most 128 columns, a paused picture and the export the chosen number. 128 columns, 256 columns, 512 columns, 1024 columns, 2048 columns, default 256 columns.
Time depth / sec – how deep one second of the past lies in the scene. Negative values bring the past towards the camera. −5 to 5, default 0.25.
Motion deformation – how far the Motion-deformed surface follows the measured motion: 0 none, 1 as measured, 2 exaggerated. 0 to 2, default 1.
Untracked regions – where tracking fails: Keep time surface fills in the plain relief, Leave gaps shows the holes. Keep time surface, Leave gaps, default Keep time surface.
Flow depth – adds depth from the measured motion, towards or away from the camera. 0 is off. −2 to 2, default 0.
Geometry smoothing – smooths the surface without blurring the picture, avoiding large jumps in time and motion edges. 0 to 4, default 0.
Space-time slice
Space-time slice
Section titled “Space-time slice”First bake a depth video in Tracking → AI Depth Map, select it in the Slit Scan card and bake a source window of up to eight seconds. The slice is a 2.5D picture for a fixed camera: hidden surfaces stay empty, and thin cuts can show gaps between the points.
Space axis – the axis of space the cut runs along: across, up or into the depth. X, Y, Depth Z, default X.
Tilt (°) – at 0° the cut selects one moment; at 90° it is a plane in space with time running along the chosen axis. 0 to 90, default 0.
Length / second – how long one second of time is in the scene. 0.01 to 5, default 0.25.
Slice position – where along the axis the cut lies. −10 to 10, default 0.
Slice thickness – how thick the cut is; thin cuts show detail, thick ones fill gaps. 0.001 to 2, default 0.06.
Relative depth – scales the baked depth. 0 to 2, default 0.5.
Point size – the size of the rendered points. 0.001 to 0.1, default 0.025.
Object stabilization
Object stabilization
Section titled “Object stabilization”Holds a tracked object still before the scan reads the past, so only its own movement smears and not the camera’s. Pick an existing tracking asset of the same source, or mark the object with a clip mask and click Track mask & stabilize; uncovered image borders become transparent.
Reference (source s) – the moment of the source the object is aligned to. 0 to 86400, default 0.
Strength – how much of the correction applies. 0 to 1, default 1.
Rotation – Lock rotation removes the object’s turning; Keep rotation lets it turn. Lock rotation, Keep rotation, default Lock rotation.
Scale – Lock size removes zooming in and out; Keep size changes keeps it. Lock size, Keep size changes, default Lock size.
Time field source
Time field source
Section titled “Time field source”Replaces the Profile with a picture of its own: bright parts reach further back (with Map channel and Invert map deciding what counts). The menu at the top of the section offers ready-made fields such as Color Time, Time Fog and Mask Time.
Field source – where the field comes from: an external image or video, the clip itself, noise, a clip mask or the measured motion. Edge strength (Sobel) reaches back along the outlines in the picture, and Shape target (tracked 2D motion) stretches a tracked object through time. External image / video, Effect input, Noise, Clip mask, Source motion and 2 more, default External image / video: the two more are Edge strength (Sobel) and Shape target (tracked 2D motion).
Map alignment – how an external video lines up with the clip: freely on the timeline, or frame by frame with the depth video it was baked from. Timeline (free), Depth source, default Timeline (free).
Map mix – blends from the Profile (0) to the field (1). 0 to 1, default 0.
Map start (timeline s) – where on the timeline an external video starts. −3600 to 3600, default 0.
Map channel – which part of the field picture sets the time: brightness, transparency, one colour or hue, saturation or value. Luminance, Alpha, Red, Green, Blue and 3 more, default Luminance: the three more are Hue, Saturation and Value.
Invert map – swaps near and far. Off, On, default Off.
Shape target
Shape target
Section titled “Shape target”For the Shape target field: stretches a tracked object through time towards a target shape.
Anchor X – the point of the object that stays in the present, across. 0 to 1, default 0.5.
Anchor Y – the same point, up and down. 0 to 1, default 0.5.
Target stretch (×) – how far the object is stretched; 1 leaves it as it is. 0.1 to 8, default 1.
Time coherence – how much neighbouring pixels keep similar moments, at the cost of a less exact fit. 0 to 1, default 0.25.
Motion field
Motion field
Section titled “Motion field”For the Source motion field: fast movement reaches further back.
Motion value – Magnitude uses how fast a pixel moves; Directed velocity how fast it moves in one direction. Magnitude, Directed velocity, default Magnitude.
Direction (degrees) – the direction Directed velocity measures. −180 to 180, default 0.
Minimum (UV/s) – the speed that counts as now. −10 to 10, default 0.
Maximum (UV/s) – the speed that counts as the full Delay. −10 to 10, default 0.25.
Confidence threshold – below this certainty of the measurement, a pixel falls back to the Profile. 0 to 1, default 0.1.
Field shaping
Field shaping
Section titled “Field shaping”Input minimum – the field value that counts as now. 0 to 1, default 0.
Input maximum – the field value that counts as the full Delay. 0 to 1, default 1.
Gamma – bends the field: below 1 more of the picture reaches far back, above 1 more stays near now. 0.01 to 10, default 1.
Hue mapping – for a hue channel: Periodic wave runs once round the colour circle without a jump; Direct ramp maps red to now and violet to far back, with a seam at red. Periodic wave, Direct ramp (seam), default Periodic wave.
Hue phase – turns the colour circle before mapping. 0 to 1, default 0.
Field noise
Field noise
Section titled “Field noise”Noise scale – the size of the noise: small values give large clouds, large values fine grain. 0.1 to 100, default 4.
Noise seed – another pattern of the same noise. 0 to 1000, default 0.
Drift X (UV/s) – how fast the noise drifts sideways. −1 to 1, default 0.02.
Drift Y (UV/s) – how fast it drifts up or down. −1 to 1, default 0.01.
Noise type – Smooth clouds or Hard cells with sharp edges. Smooth, Hard cells, default Smooth.
Field combination
Field combination
Section titled “Field combination”Noise strength – how much noise is laid over the field (or the Profile). 0 to 1, default 0.
Combine noise – how the noise joins it. Mix, Add (centered), Multiply, Minimum, Maximum, default Mix.
RGB time
RGB time
Section titled “RGB time”Reads red, green and blue each from its own moment, so moving parts split into colour fringes.
Channel times – Linked reads all channels together; Separate RGB gives each its own offset (without seam smoothing). Linked, Separate RGB (no smoothing), default Linked.
Red offset (s) – how much earlier (positive) or later the red channel is read. −60 to 60, default 0.
Green offset (s) – the same for green. −60 to 60, default 0.
Blue offset (s) – the same for blue. −60 to 60, default 0.
Time map channel – which channel Preview → Time map shows. Base / alpha, Red, Green, Blue, default Base / alpha.
Protection mask
Protection mask
Section titled “Protection mask”Clip mask – a mask of the clip whose inside stays in the present, for example a face that should stay sharp. None or a mask of the clip, default None.
Mask feather – softens the mask’s edge. 0 to 200 px, default 30 px.
Subject protection
Subject protection
Section titled “Subject protection”Protection strength – how much the protection mask holds its area in the present: 1 fully, 0.5 halfway back. 0 to 1, default 1.
Protected center
Protected center
Section titled “Protected center”Keeps a circle in the present, for example a performer in the middle.
Center X – the centre of the circle, across. It is also the centre of Out from center, Radial scan and Time rings, and moves the start of a straight scan. 0 to 1, default 0.5.
Center Y – the same, up and down. 0 to 1, default 0.5.
Radius – the size of the protected circle, in picture heights. 0 is off. 0 to 1, default 0.
Feather – how softly the circle fades into the scan. 0.001 to 1, default 0.15.
Node setup
Section titled “Node setup”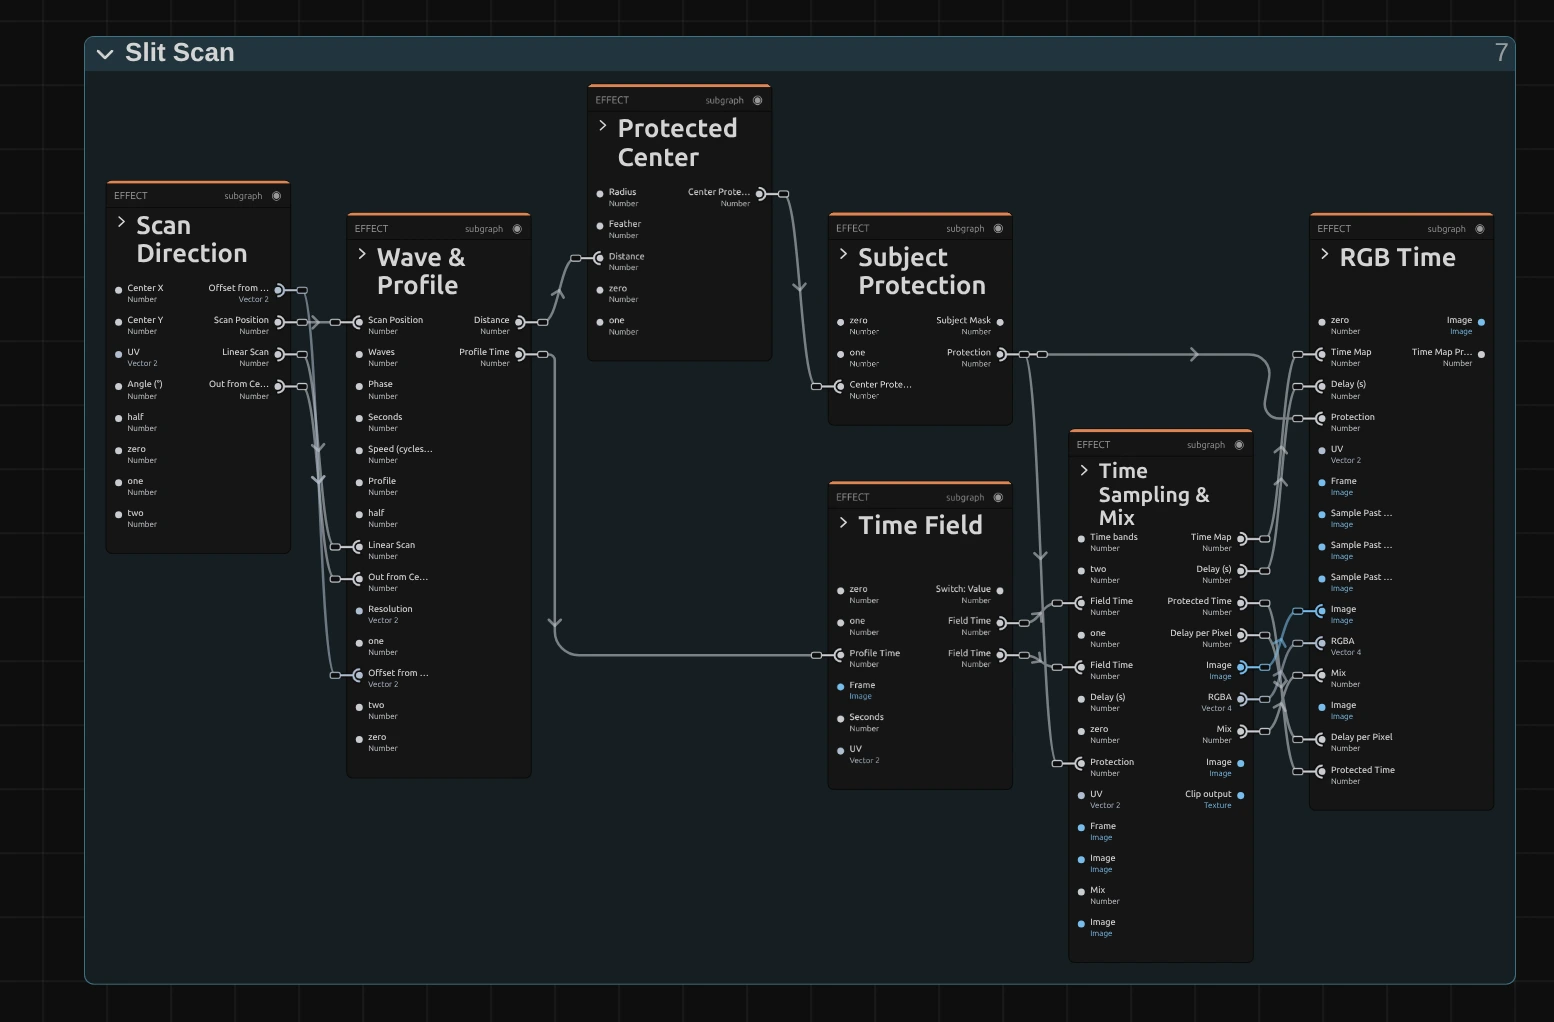
Slit Scan is built around one node, Sample Past Frame, which reads the clip at the same spot a number of seconds earlier, once per pixel. The stages before it decide that number for every pixel. Scan Direction finds where a pixel lies along the scan; Wave & Profile turns that into the time map, from 0 (now) to 1 (the full Delay), in the shape of the Profile; Protected Center and Subject Protection hold protected areas in the present; Time Field can replace the shape with a picture or noise; Time Sampling & Mix turns the map into seconds and reads the past; RGB Time can read each colour channel at its own moment. Click a folder’s header to open it; the sections below show what is inside each. How to open the graph: The node setup.
Scan Direction
Section titled “Scan Direction”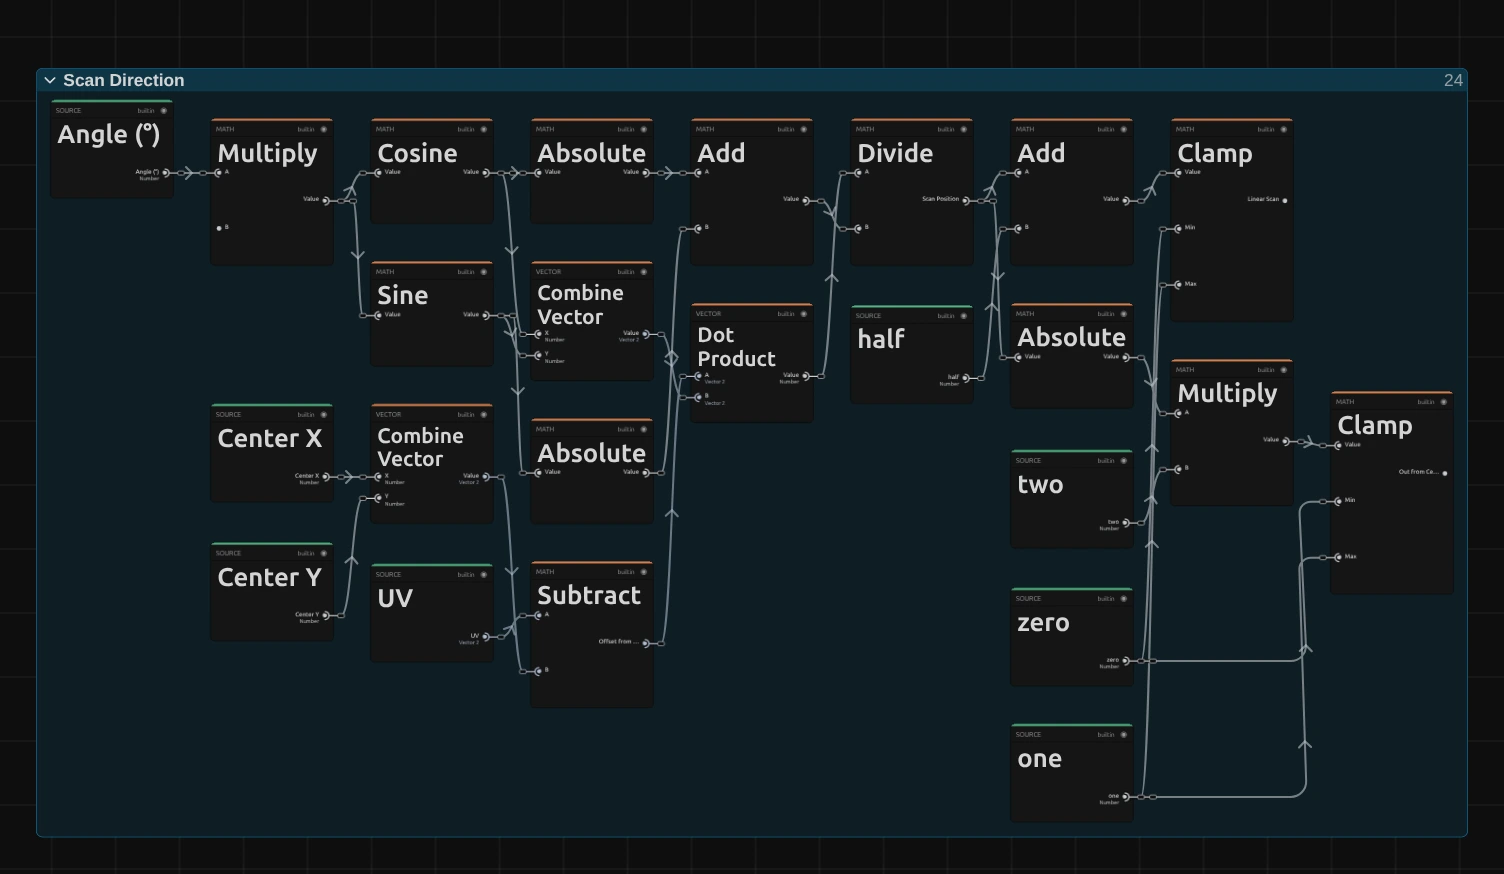
Subtract – the pixel’s place (UV) minus the centre (Center X and Y): the pixel as seen from the middle of the frame.
Dot Product – multiplies that with the scan axis, which Cosine and Sine make from Angle: how far along the scan the pixel lies, whatever the direction.
Divide – divides by the span of the frame in that direction (Absolute and Add of the axis), so the scan reaches exactly from edge to edge, also diagonally. Its output is the Scan Position the next folder reads.
Clamp – adds a half and keeps the result between 0 and 1: the linear scan, 0 at the near edge and 1 at the far one. Absolute, Multiply by two and the second Clamp make Out from center from the same position.
Wave & Profile
Section titled “Wave & Profile”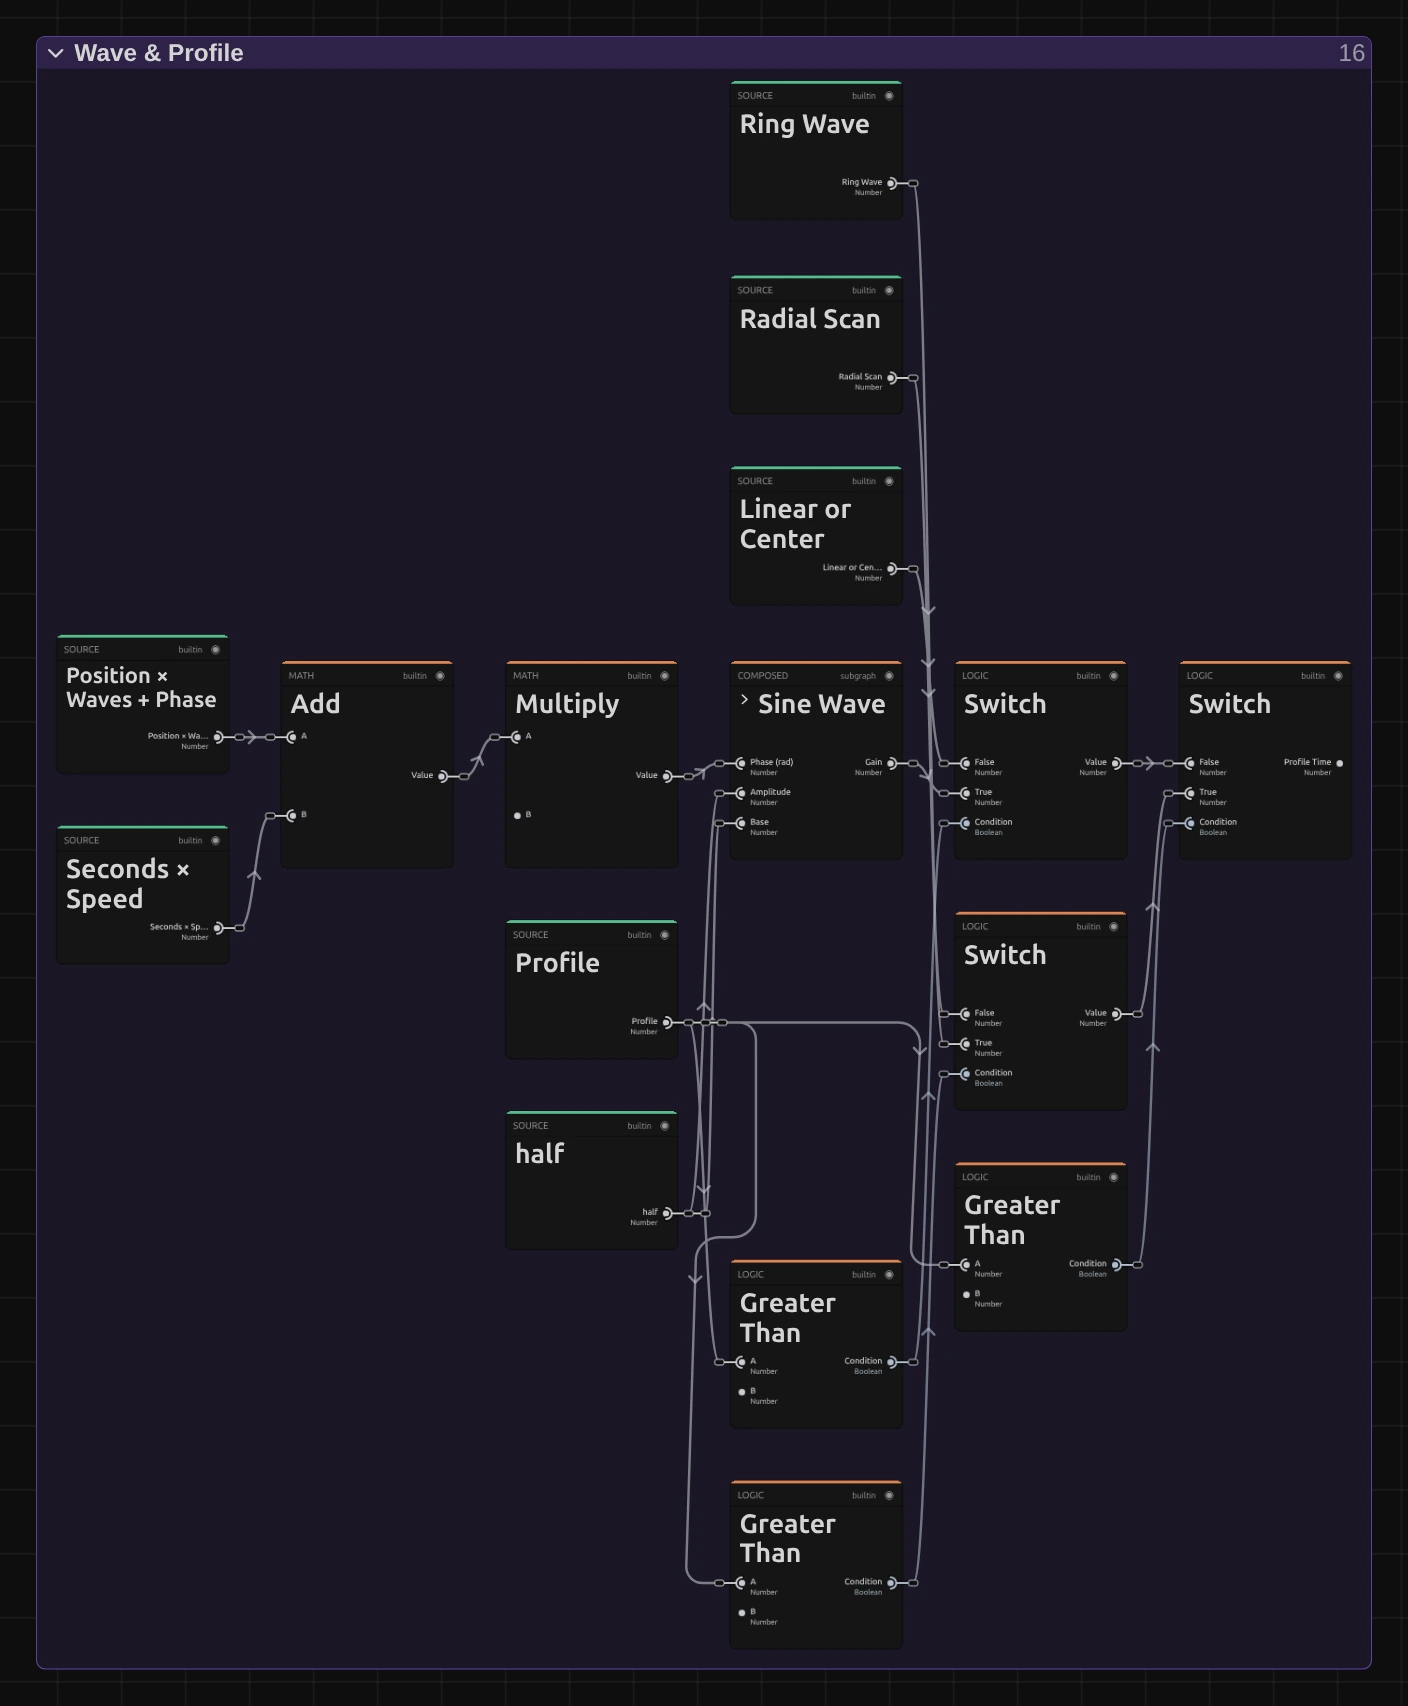
Add – the place on the wave: the Scan Position times Waves plus Phase, plus the seconds of the timeline times Speed, so the wave travels on its own.
Multiply – times 2π (a value from Constants), so one wave is one full turn.
Sine Wave – turns that into a soft rise and fall between 0 and 1: the Wave / folds profile. Time rings do the same with the distance from the centre (Ring Wave).
Switch – three Switches, each told by a Greater Than card which Profile you chose, pick the linear or centre scan, the wave, the radial scan or the rings. The last one hands on the Profile Time.
Protected Center
Section titled “Protected Center”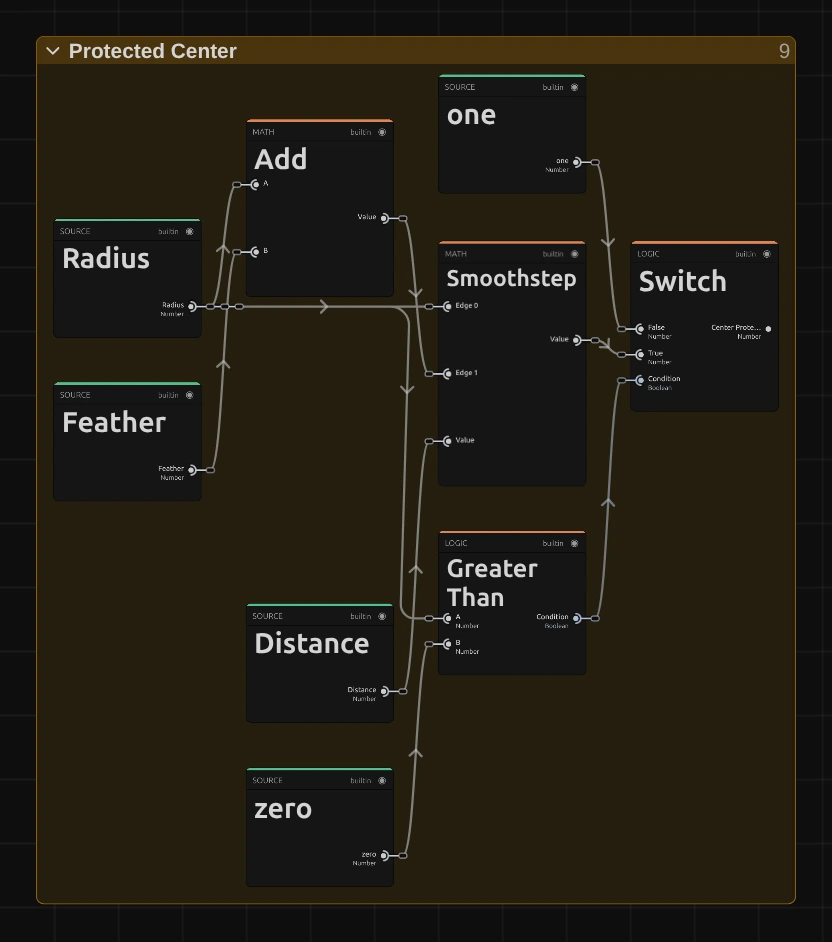
Smoothstep – 0 inside the circle of Radius around Center X and Y, rising to 1 over the Feather width: the Distance of each pixel from the centre, turned into a soft-edged circle.
Greater Than – checks whether Radius is above 0. Without a circle nothing is protected.
Switch – hands on the Center Protection: 1 everywhere while Radius is 0, else the soft circle. Time Sampling & Mix multiplies the time map with it, so the circle stays in the present.
Time Field
Section titled “Time Field”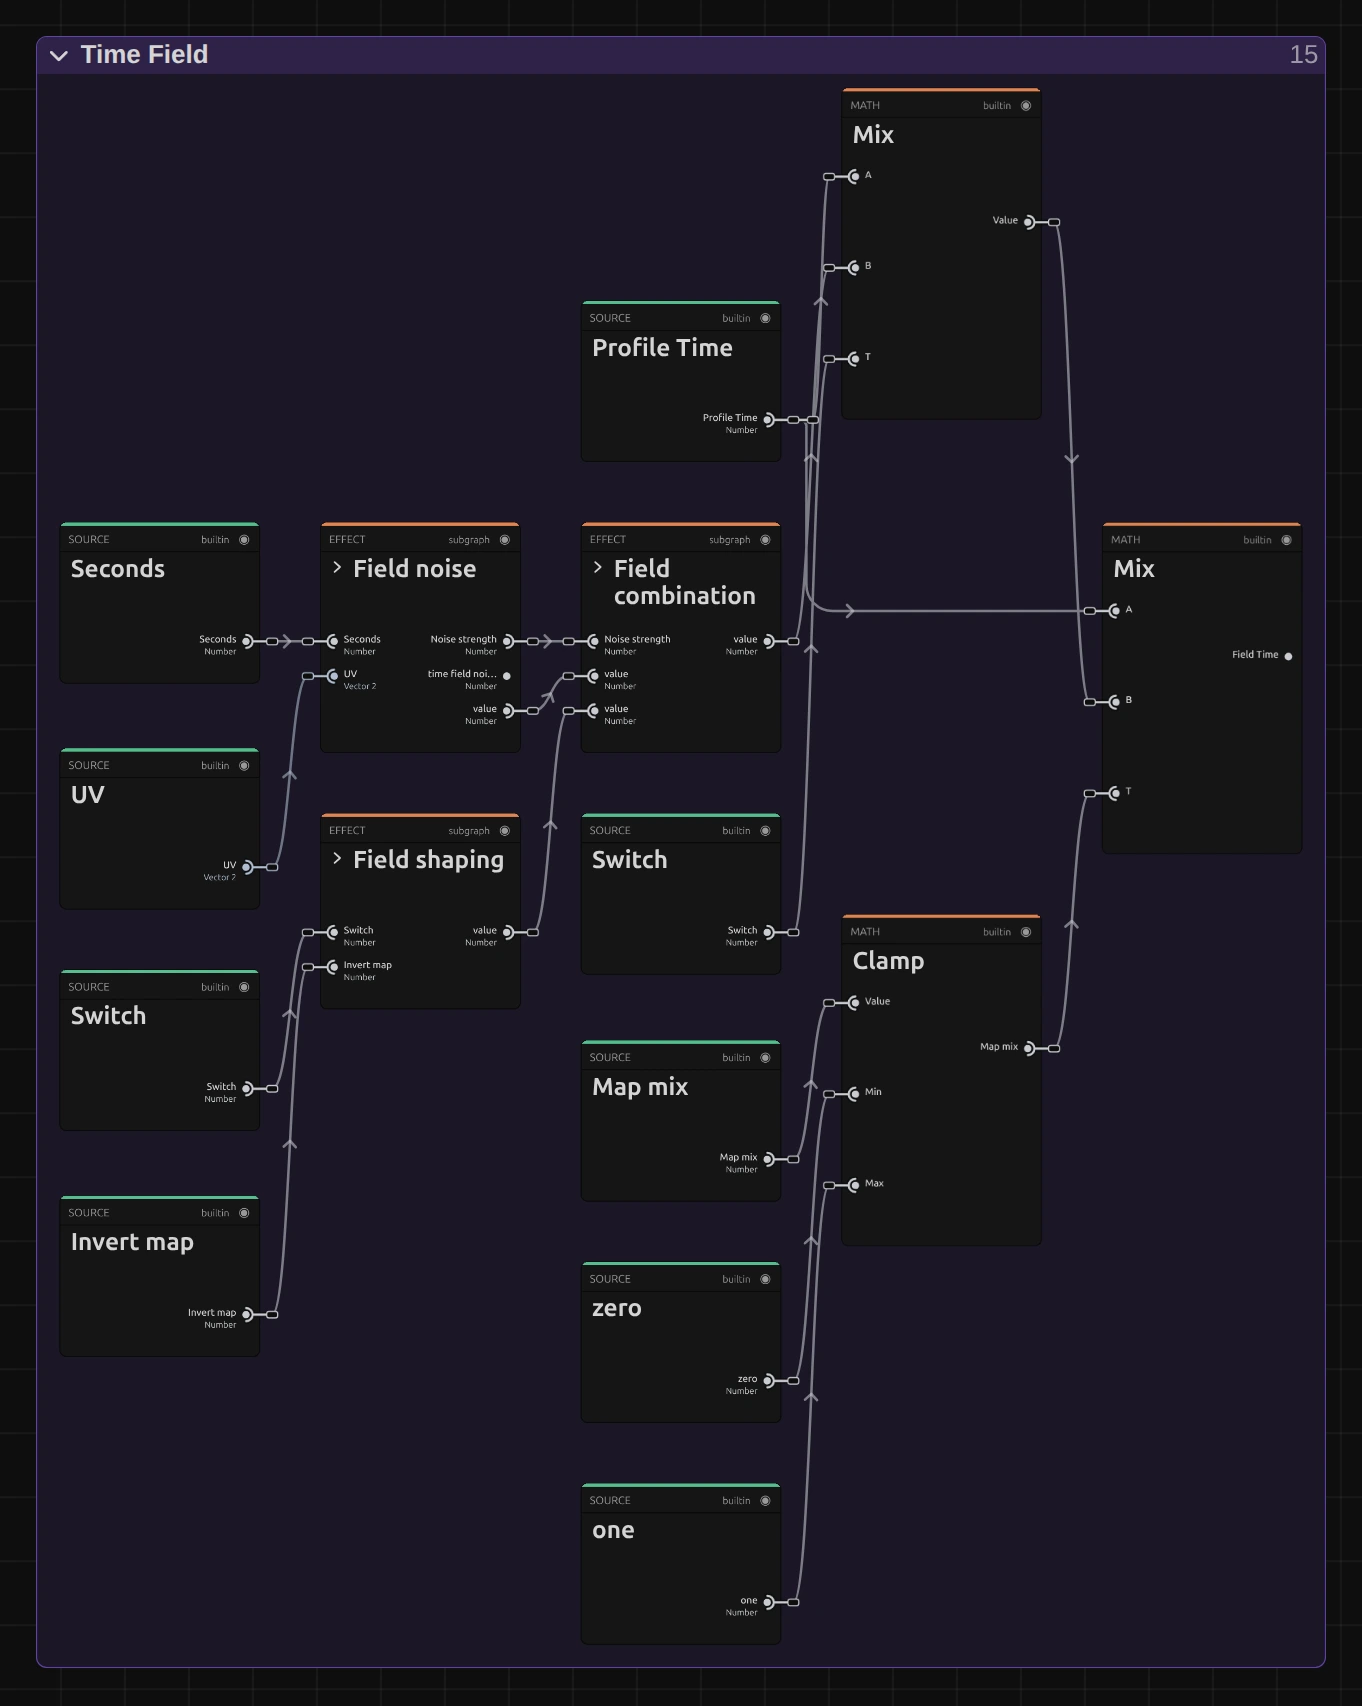
Field shaping – the field picked by Field source (an image, the clip itself, a mask, the motion, the outlines or a tracked shape), mapped to 0 to 1 by Input minimum, Input maximum and Gamma, and turned over by Invert map.
Field combination – mixes that field with the drifting noise of Field noise, by Noise strength and the way Combine noise sets.
Mix – the first Mix uses the field only where its source has weight (a mask’s coverage, for example), and the Profile Time elsewhere.
Mix – the second Mix blends the field into the Profile Time by Map mix: at 0 the field does nothing. Its output, the Field Time, goes on to Time Sampling & Mix. A twin of it serves the banded path.
Subject Protection
Section titled “Subject Protection”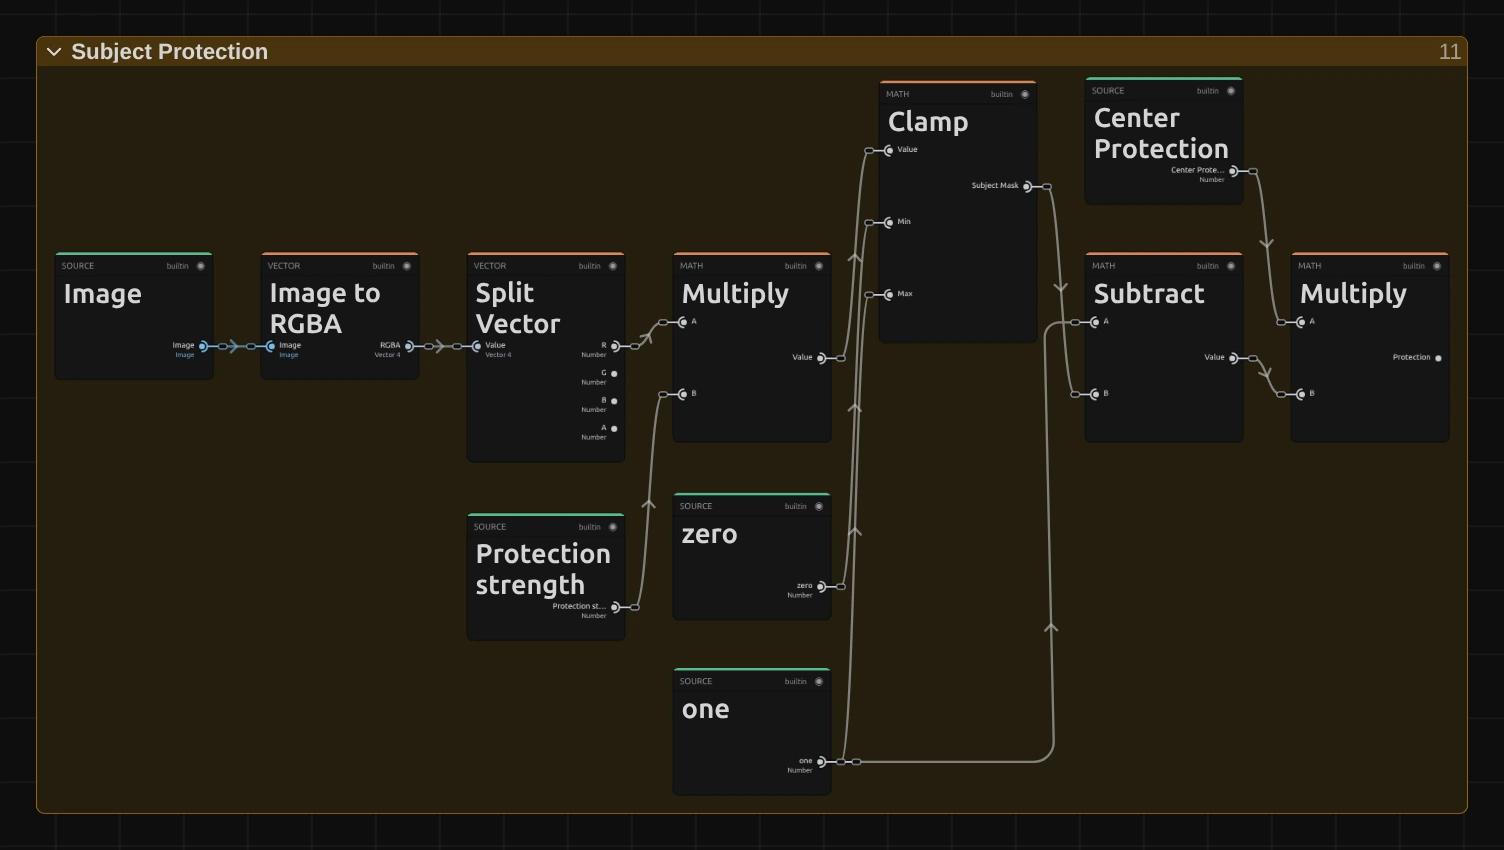
Multiply – the subject mask (an AI segmentation or a clip mask) times Protection strength; Clamp keeps it between 0 and 1. That is the Subject Mask the preview shows.
Subtract – one minus the mask: 1 away from the subject, 0 on it.
Multiply – combines this with the Center Protection into one Protection: 0 wherever the subject or the circle is, so those parts stay in the present.
Time Sampling & Mix
Section titled “Time Sampling & Mix”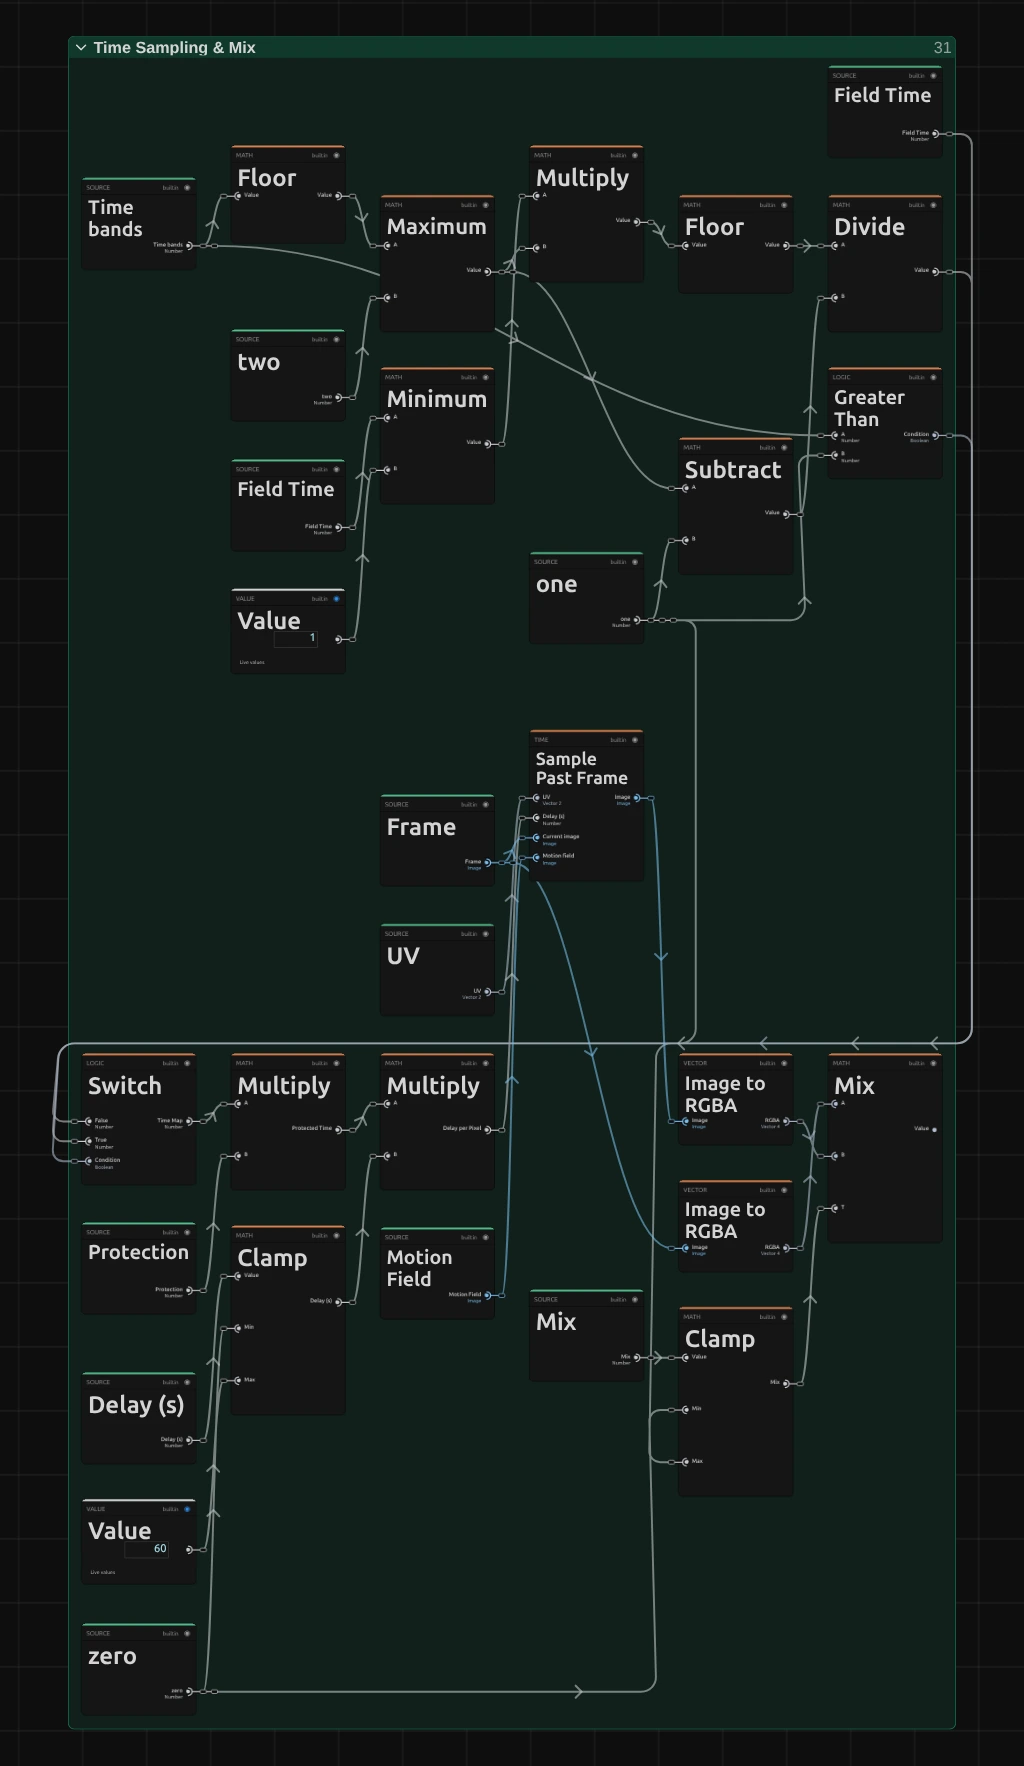
Divide – for Time bands: Floor and Multiply find the band a pixel lies in, and Divide turns the band number into its moment, from 0 for the first band to 1 for the last.
Switch – Greater Than checks whether Time bands is above 1 and chooses the stepped time or the smooth Field Time. Its output is the Time Map.
Multiply – the first Multiply sets protected areas back to now (Protection); this second one multiplies by the Delay, which Clamp keeps between 0 and 60: the Delay per Pixel in seconds.
Sample Past Frame – reads every pixel of the clip at its own moment in the past, from the stored frames, shifted along the Motion Field when Motion compensation is on.
Mix – blends the past picture over the original Frame by Mix (Clamp keeps it between 0 and 1).
Remix: for time that speeds up towards the far end of the scan, add a Multiply, plug the Time Map into both of its inputs and its output into input A of the first Multiply instead of the Time Map.
RGB Time
Section titled “RGB Time”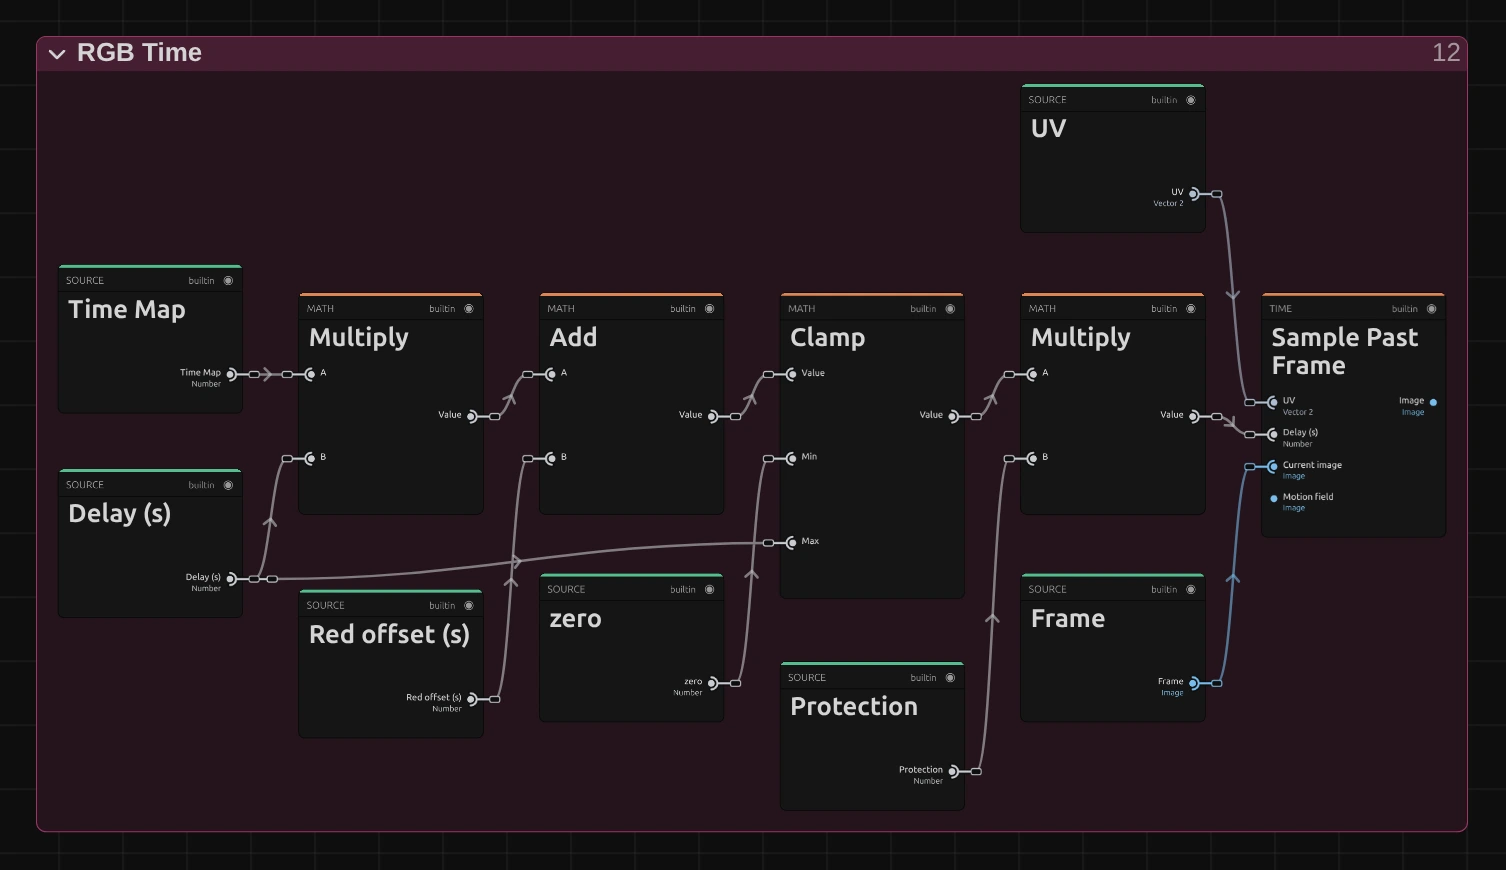
Multiply – the Time Map times the Delay: how far back this pixel reaches, in seconds.
Add – adds the Red offset, so red reaches further back (or less far) than the picture as a whole.
Clamp – keeps the result between now and the full Delay.
Sample Past Frame – reads the clip at that moment (after a Multiply by the Protection, so protected areas stay in the present) and keeps its red channel. Green and blue do the same with their own offsets; Combine Vector joins the three, and a Switch uses them only while Channel times is on.
Technical details
Section titled “Technical details”- Presets. Slit Scan’s Preset row is its own: its presets set only the Time and Wave values. The shared preset row of other effects returns every control a preset does not name to its default, which would switch off a Slit Scan’s 3D geometry, time field and motion compensation. Falling time and Center out are no longer presets: set Scan direction → Top → bottom or Profile → Out from center.
- Delay. 0 to 60 s; the graph clamps a value outside, and the card says so. Before the start of the source video the picture holds its first frame.
- Source. Slit Scan needs a video clip, not a still image or a nested composition. Its history comes from the original video’s own timestamps (trims, speed changes and reverse clips included); effects before Slit Scan in the stack are not part of its history.
- Loading. The first load of the frame window takes a few seconds; until it is ready the preview shows the plain clip. Playback keeps the last complete picture while missing frames load; the export waits for every exact frame.
- Memory. History memory is a budget, not a measurement of free GPU memory. A window that does not fit switches to Hybrid streaming and the card says so; resolution, time window and samples stay unchanged.
- 3D geometry. New effects start with 3D geometry off. Choosing a 3D representation turns on the clip’s 3D mode; choosing 2D image or switching the section off turns it off. The geometry follows trims, reverse and speed changes; missing source data is reported, not guessed. Motion analysis is saved with the project (
Cache/motion) and reused. The 3D representations are new: the complete editor and export checks are still in progress. - Saved projects. Slit Scan graphs saved with the radial profiles in the Protected Center folder are regrouped on load, so Radial scan and Time rings render (they showed Wave while that folder was muted). Saved effects keep their values; the presets changed names and two were retired, which only changes what the Preset row shows.
- More: Effect system: Slit Scan (time fields, shape targets, stabilization, motion compensation) · Temporal frame access · Node Catalog.