
Halftone
Prints the picture as a grid of round dots that grow in the dark parts, like a newspaper photo or a pop-art poster.
Group: Print & Halftone · How to add an effect
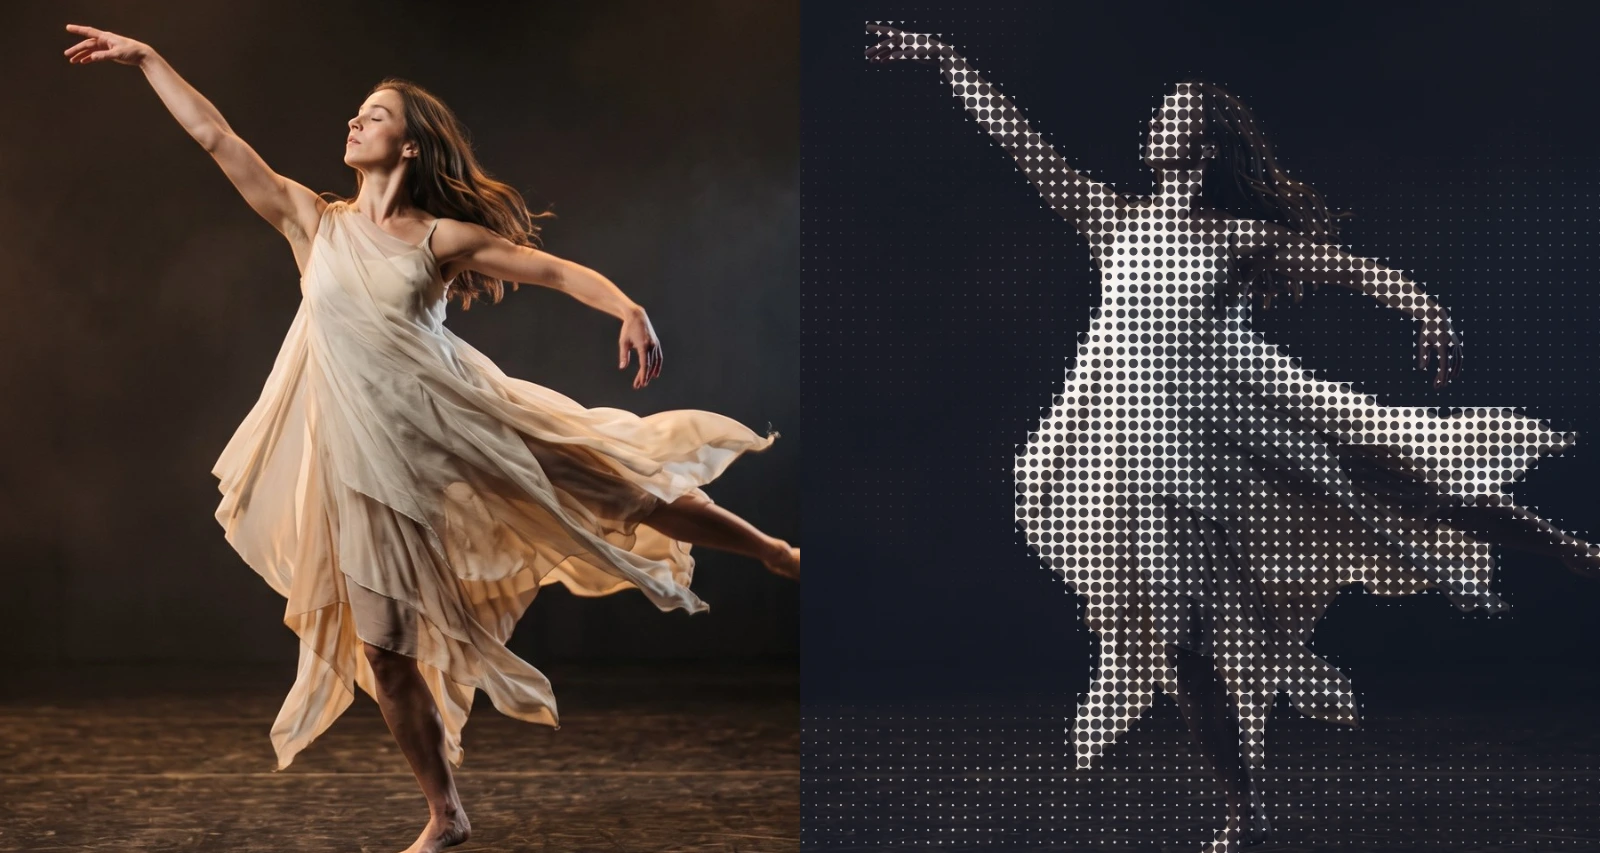
Use it for: a printed, archival feel for a memory or a document scene · comic and pop-art looks · a graphic dot pattern on a gauze in which the figure still reads.
- Dot Size – how large the dots are.
- Angle – how the grid of dots is turned.
- Ink and Paper – the two colours of the print.
- Amount – how much of the print covers the picture.
Tip: keyframe Amount from 0 to 1 to let a scene turn into print on a cue, or Dot Size from 6 to 40 px so the picture breaks up into ever larger dots.
Presets
Section titled “Presets”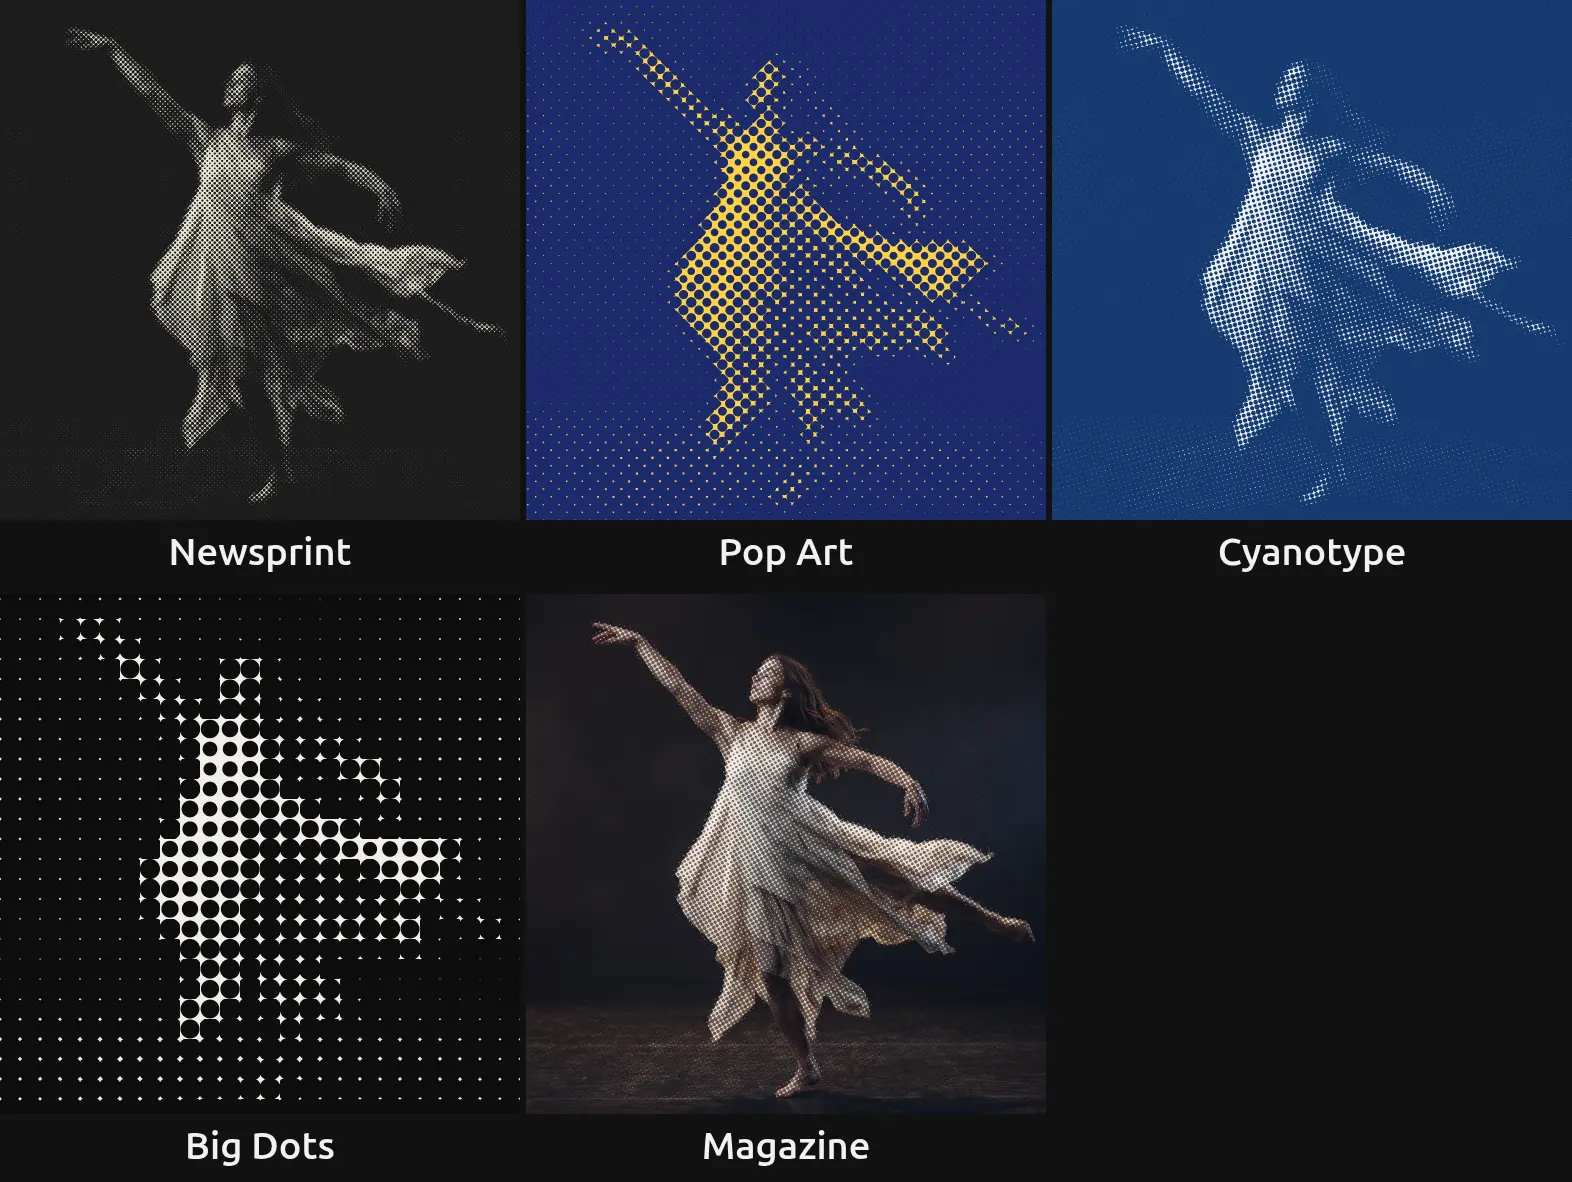
Pick one in the Preset row of the effect card. It sets all controls at once, in one undo step, and the row then shows its name until you change something. A control with keyframes keeps them, and the card says so.
Newsprint – small black dots at 45° on greyish newsprint: a press photo from a daily paper. Good for archive material, a past event or a letter read aloud.
Pop Art – large navy dots on yellow paper, like a comic panel or a pop-art print. Loud and graphic; strong for a title or a dream.
Cyanotype – Prussian blue on pale paper, with a slightly turned screen: an old sun print or blueprint. Calm and cool.
Big Dots – very large upright dots, black on white: the figure becomes a picture of circles that still reads from the back row. Made for large projection surfaces.
Magazine – a fine screen over the picture’s own colours, like a printed magazine page. The quietest preset: the picture stays, the print shows close up.
Controls
Section titled “Controls”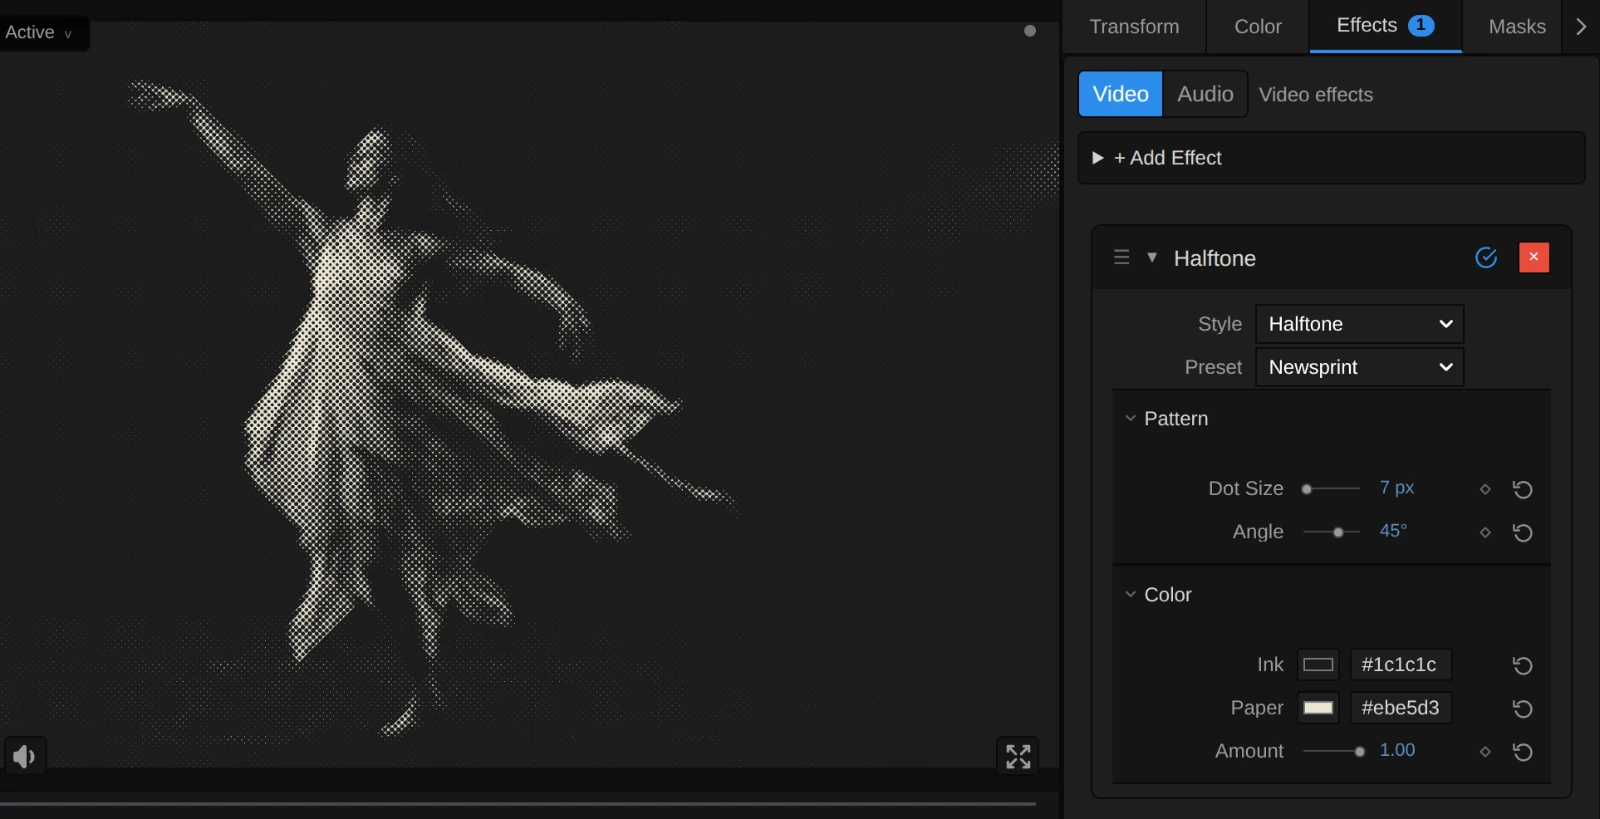
Style – switches to another look of the same engine, for example Riso, Dithering, Pixel Poster or Crosshatch. A control you changed keeps its value and keyframes when the new look has the same control, also under another name (Dot Size is Pixel Poster’s Block Size); the others start at the new look’s defaults. Riso’s Registration is not a dot size, so it opens at its own default.
Pattern
Section titled “Pattern”Dot Size – how far apart the dots sit, and so how large the largest dot gets. 4–8 px gives a fine press screen that reads as a photo from a few metres away, 14 a clear pattern of dots, 30 and more turns a figure into a graphic of large circles. Every cell of the grid prints one round dot, so detail smaller than a cell disappears. It counts pixels of a 1080p picture, so a 4K export shows the same dots as the preview, only sharper. Below 2 px (from keyframes or a tool) it renders 2 px, and the card says so. 2 to 80 px, default 14 px.
Angle – how the grid of dots is turned, counter-clockwise. 0° gives straight rows and columns, 45° the diagonal screen of black-and-white newspapers, 15° or 75° looks like one ink of a colour print. The dots stay round at every angle. The grid looks the same every 90°, so 45° and −45° match. −180 to 180°, default 0°.
Ink – the colour of the dots. Dark inks read best; deep blue, red or brown tint the whole print. With an ink lighter than the paper, the print turns into a negative. It takes a colour, default #111827.
Paper – the colour between the dots, which fills the light parts of the picture. A warm off-white looks like real paper, a bright yellow or pink like a pop poster. It takes a colour, default #f8fafc.
Amount – how much of the print covers the picture. At 1 there are only ink and paper; 0.5 lays the dots over the picture’s own colours, like a magazine page; 0 switches the print off. Keyframe it to fade between picture and print. 0 to 1, default 0.75.
Node setup
Section titled “Node setup”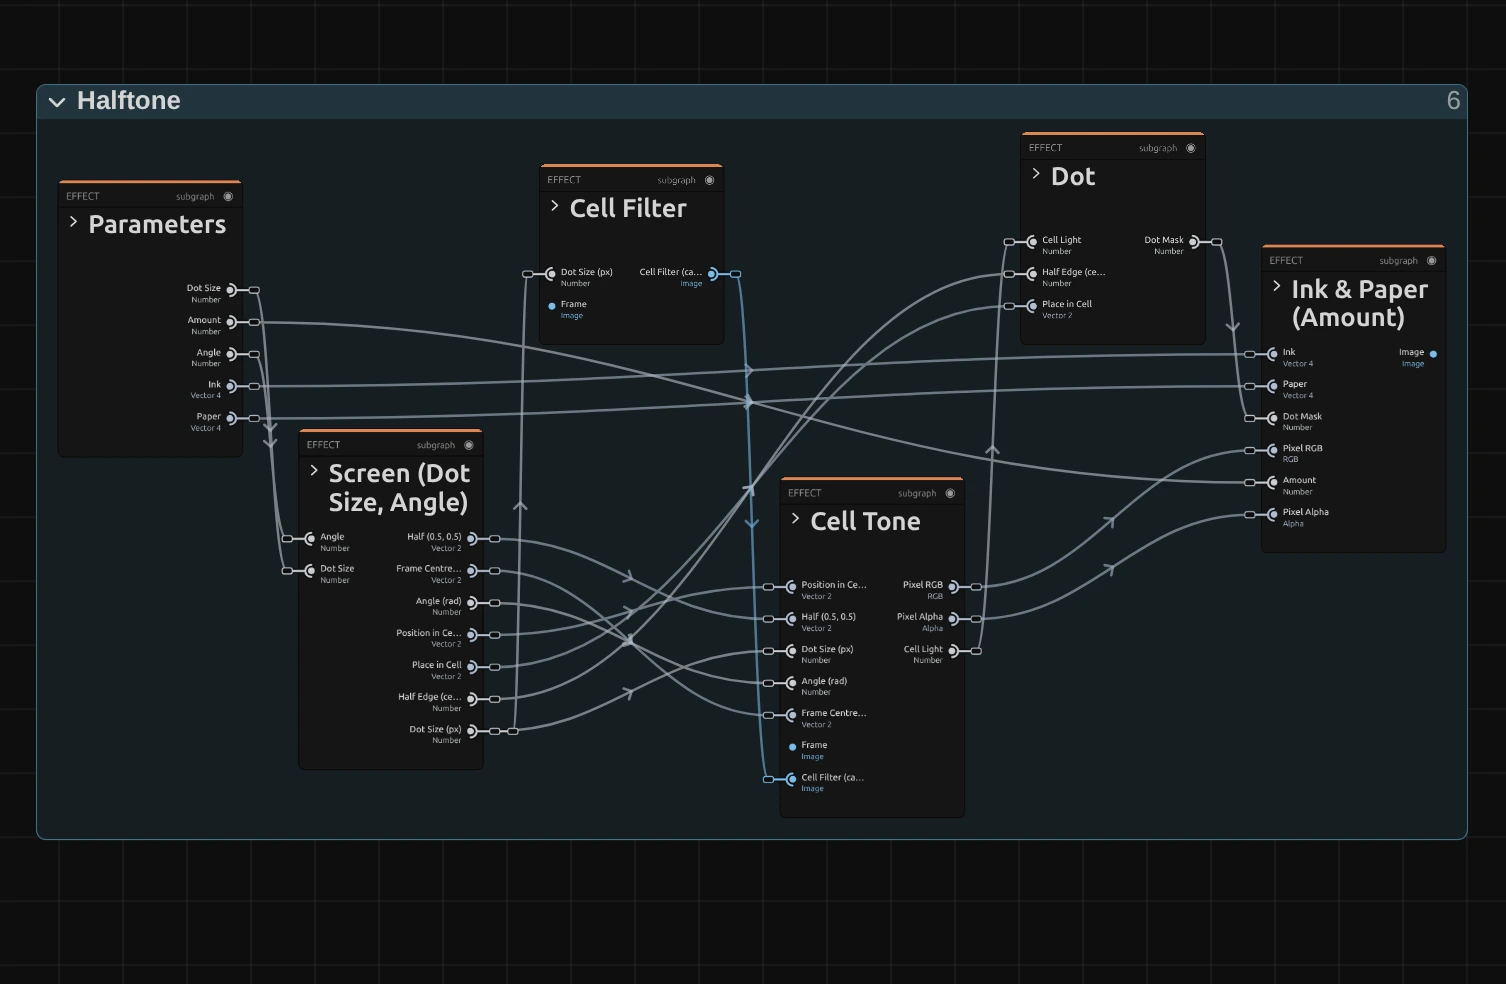
Halftone works in five stages, one folder each in the Nodes tab: Screen turns the grid by Angle and cuts the frame into cells of Dot Size, Cell Filter averages the picture over boxes of half a cell, Cell Tone measures how light each cell is from four points of that average, Dot draws the round dot that covers just that much of its cell, and Ink & Paper colours it and mixes it with the picture by Amount. Click a folder’s header to open it; the sections below show what is inside. Its Style menu switches to other looks of the same pattern engine, such as Pixel Poster or Crosshatch.
Screen
Section titled “Screen”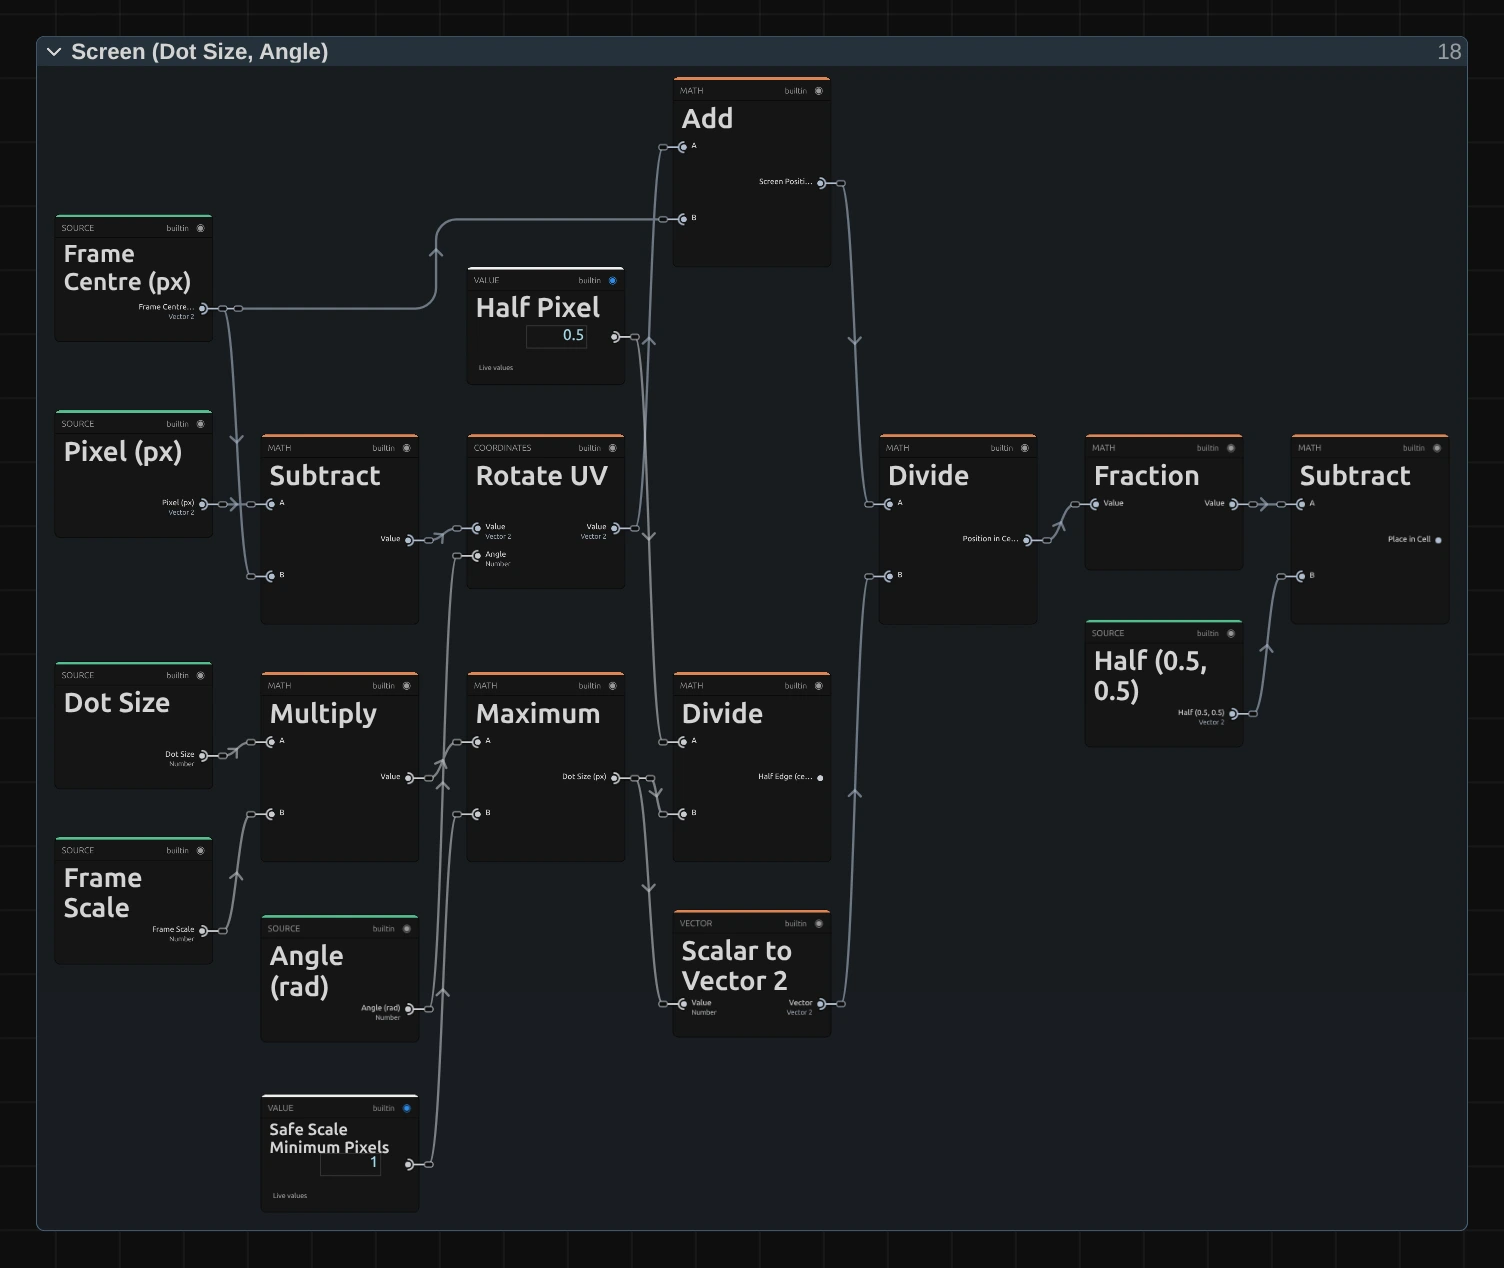
Rotate UV – turns every pixel’s position around the middle of the frame by Angle (Subtract moves the middle to 0, Add moves it back). It turns pixels, not the frame’s 0–1 coordinates, so the cells stay square on a wide frame and the dots stay round.
Maximum – the dot size in pixels of this frame: Dot Size times the frame’s scale (Multiply), and never less than one pixel (the card with the 1).
Fraction – Divide cuts the turned position into cells of that size; Fraction keeps what is after the point: where the pixel sits inside its cell, from 0 to 1. Subtract takes Half off, so the middle of the cell is 0.
Half Pixel – 0.5, divided by the dot size in pixels: half a pixel, measured in cells. The Dot stage softens every dot’s edge by that much on each side, so an edge is one pixel soft at any Dot Size: large dots stay crisp and small ones do not shimmer.
Remix: open the Constants folder and set Half Pixel from 0.5 to 4: every dot edge now fades over eight pixels, and the print looks like a soft, out-of-focus screen.
Cell Filter
Section titled “Cell Filter”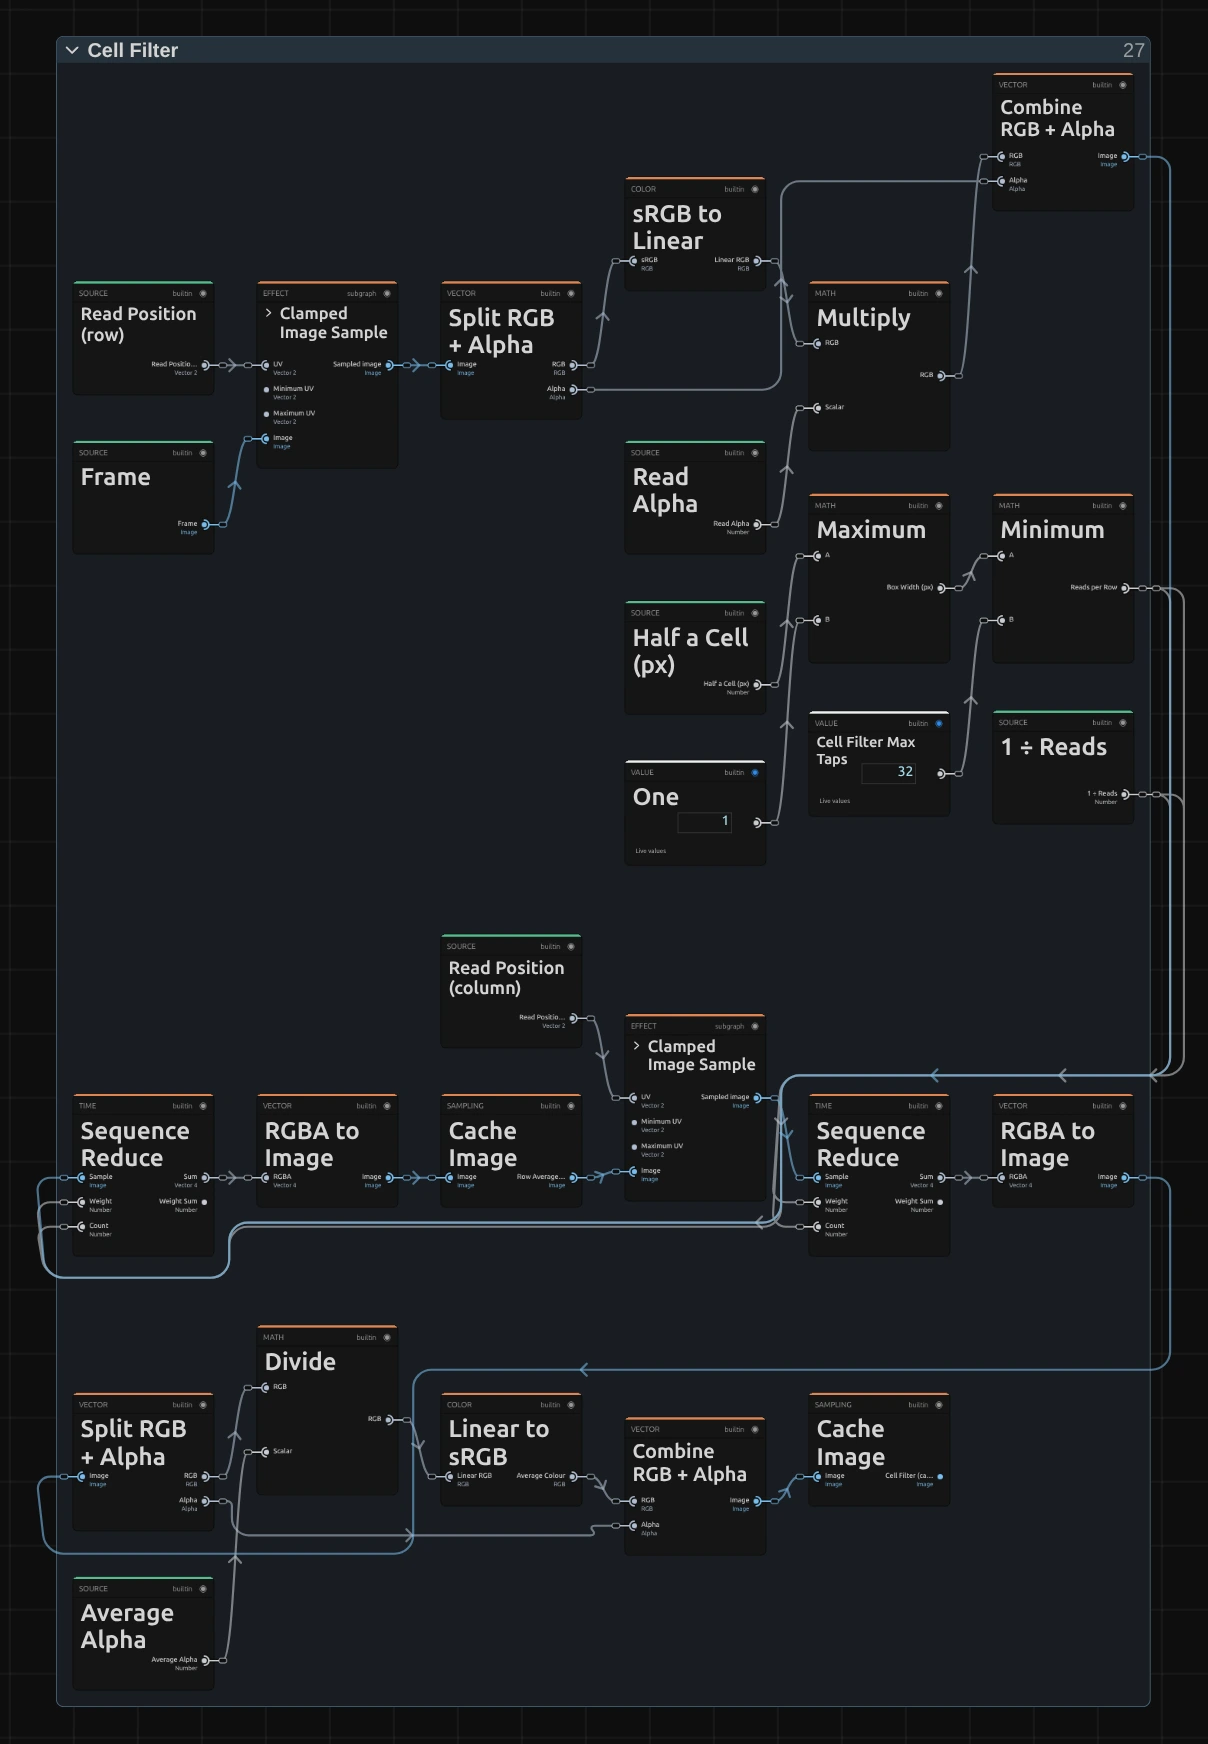
Four points can miss what lies between them, and on moving footage a dot would jump each time an edge crosses one. So Cell Tone does not read the picture itself but this copy of it, in which every pixel holds the average of a box half a cell wide around it. The four points of a cell then lie in the middle of four such boxes, which together cover the whole cell: the tone is the cell’s own average light, and it changes smoothly as the picture moves.
Minimum – Maximum first gives the Box Width: Dot Size in pixels times 0.5 (Cell Filter Share), rounded to whole pixels and never less than one. Minimum takes that, but at most 32 (Cell Filter Max Taps): how many reads a row takes. Wider boxes spread their 32 reads evenly.
Clamped Image Sample – reads the frame at one point of the row around the pixel (Read Position), kept inside the frame. sRGB to Linear turns it into light and Multiply weights it with its alpha, so a transparent pixel adds nothing.
Sequence Reduce – runs that read for every point of the row and adds them up, each weighing 1 ÷ Reads: the row’s average.
Cache Image – keeps the row averages as a picture, so the second Clamped Image Sample and Sequence Reduce can average them down a column: together the average of the whole box.
Linear to sRGB – Divide by the average alpha turns the weighted light back into a colour, and Linear to sRGB stores it the way Cell Tone reads a picture. Combine RGB + Alpha puts the average alpha back on.
Cache Image – keeps the finished Cell Filter, worked out once per pixel per frame, for the four reads of Cell Tone. At a Dot Size of one or two pixels the box is a single pixel and the filter is the picture itself.
Remix: open the Constants folder and set Cell Filter Share from 0.5 to 0.1: each point reads only a small spot again, thin bright details drop out of the cells and the dots flicker on moving footage. That is how the four points behaved without the filter.
Cell Tone
Section titled “Cell Tone”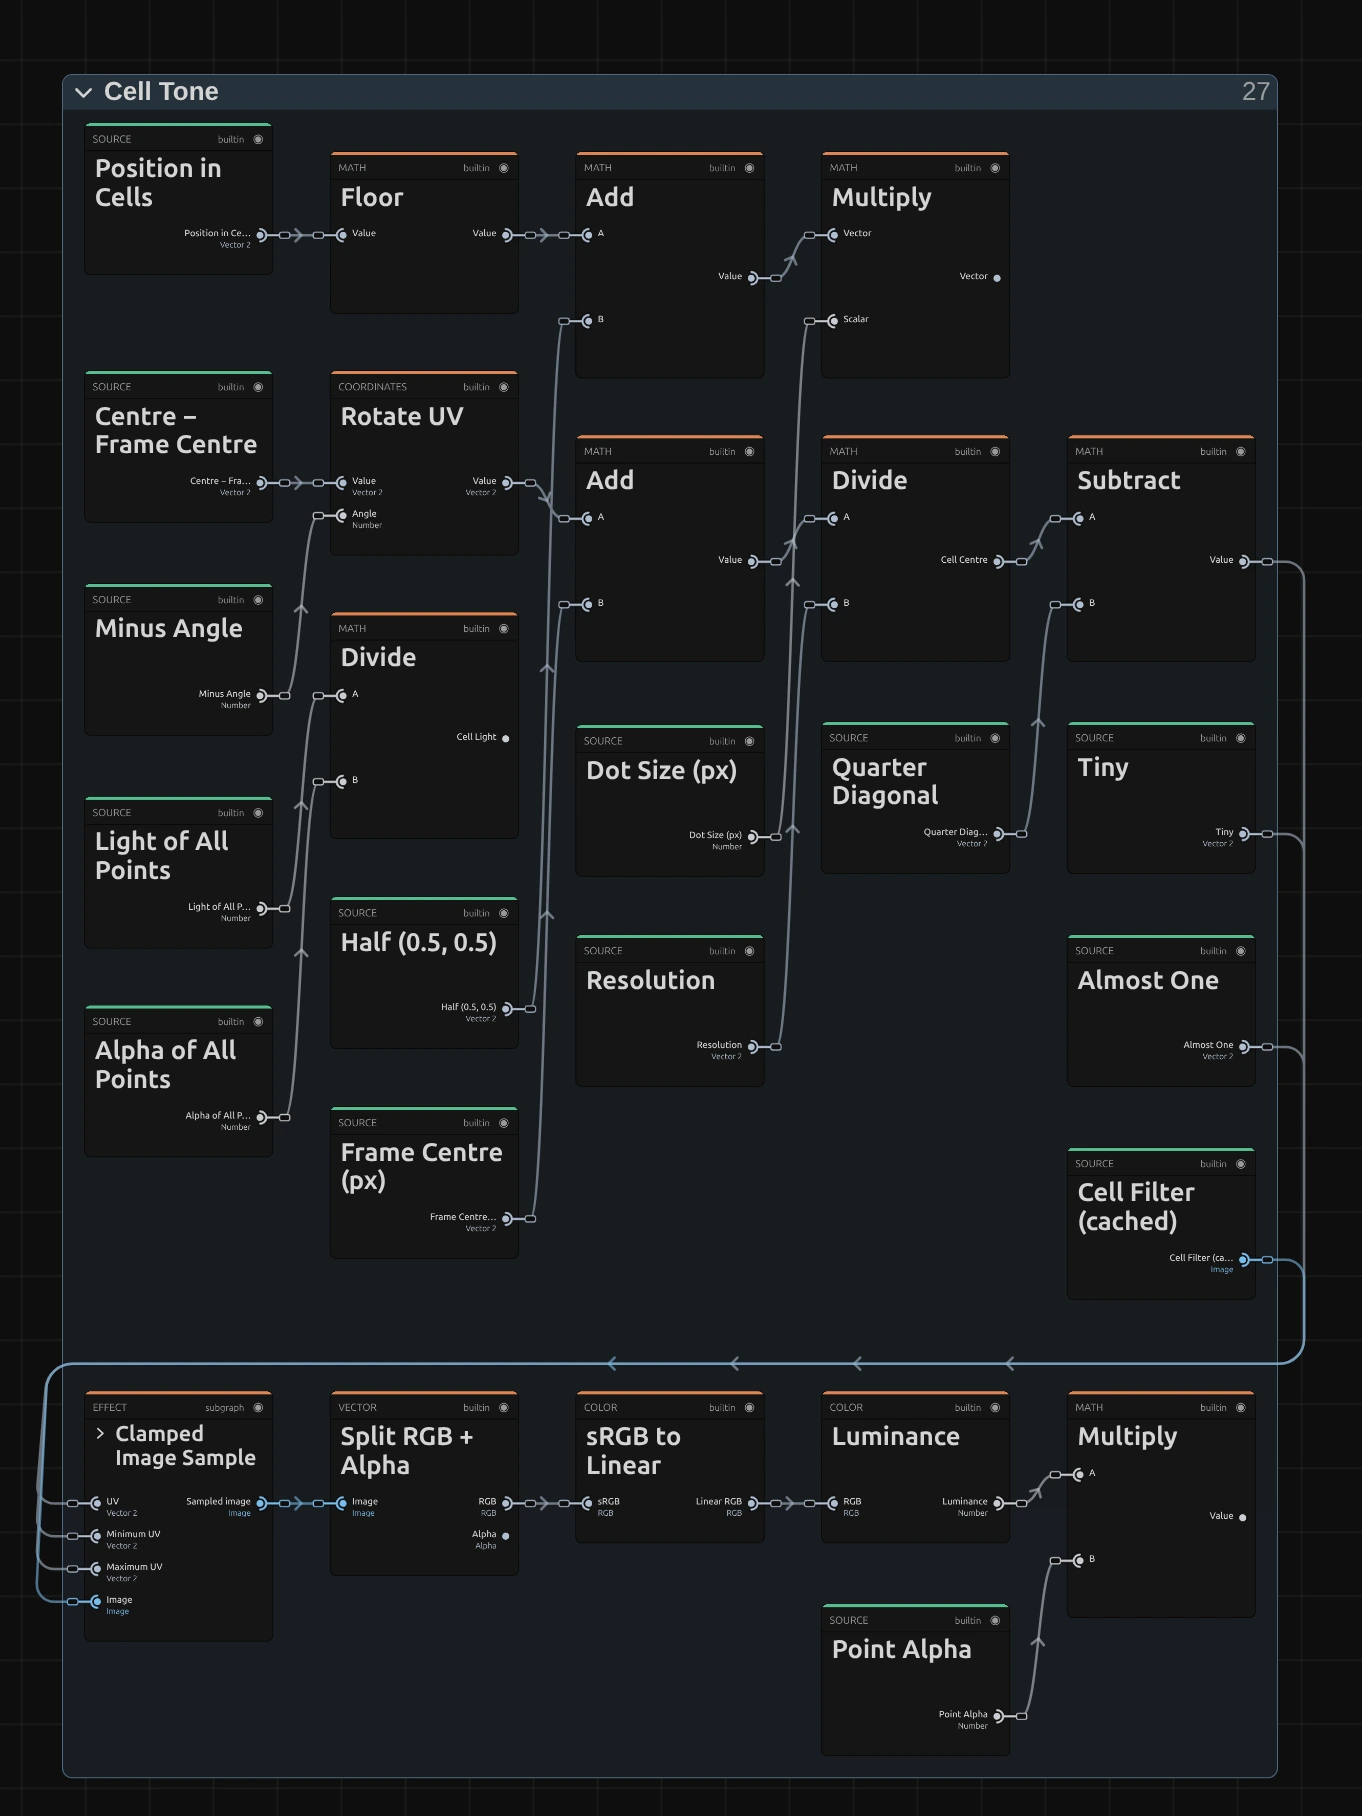
Floor – which cell the pixel is in. Add takes it to the middle of that cell, Multiply turns it into pixels, and Rotate UV turns it back by minus Angle into the picture; Add and Divide by Resolution give the place to read.
Subtract – one of four reading points, a quarter cell from the middle along the cell’s diagonals (Quarter Diagonal). The other three points, in the folder, are built the same way.
sRGB to Linear – turns the colour the Cell Filter holds there into light as it adds up on a screen, and Luminance takes its brightness.
Multiply – weights that light with the point’s alpha, so a transparent point does not count. Divide then splits the light of all four points by their alpha: the cell’s average light, because the four boxes of the Cell Filter cover the whole cell. The pixel’s own light joins in at 5 %, so a cell whose points all lie outside a cut-out figure still has a tone. Every pixel of a cell reads the same value, which is why each cell prints one clean dot.
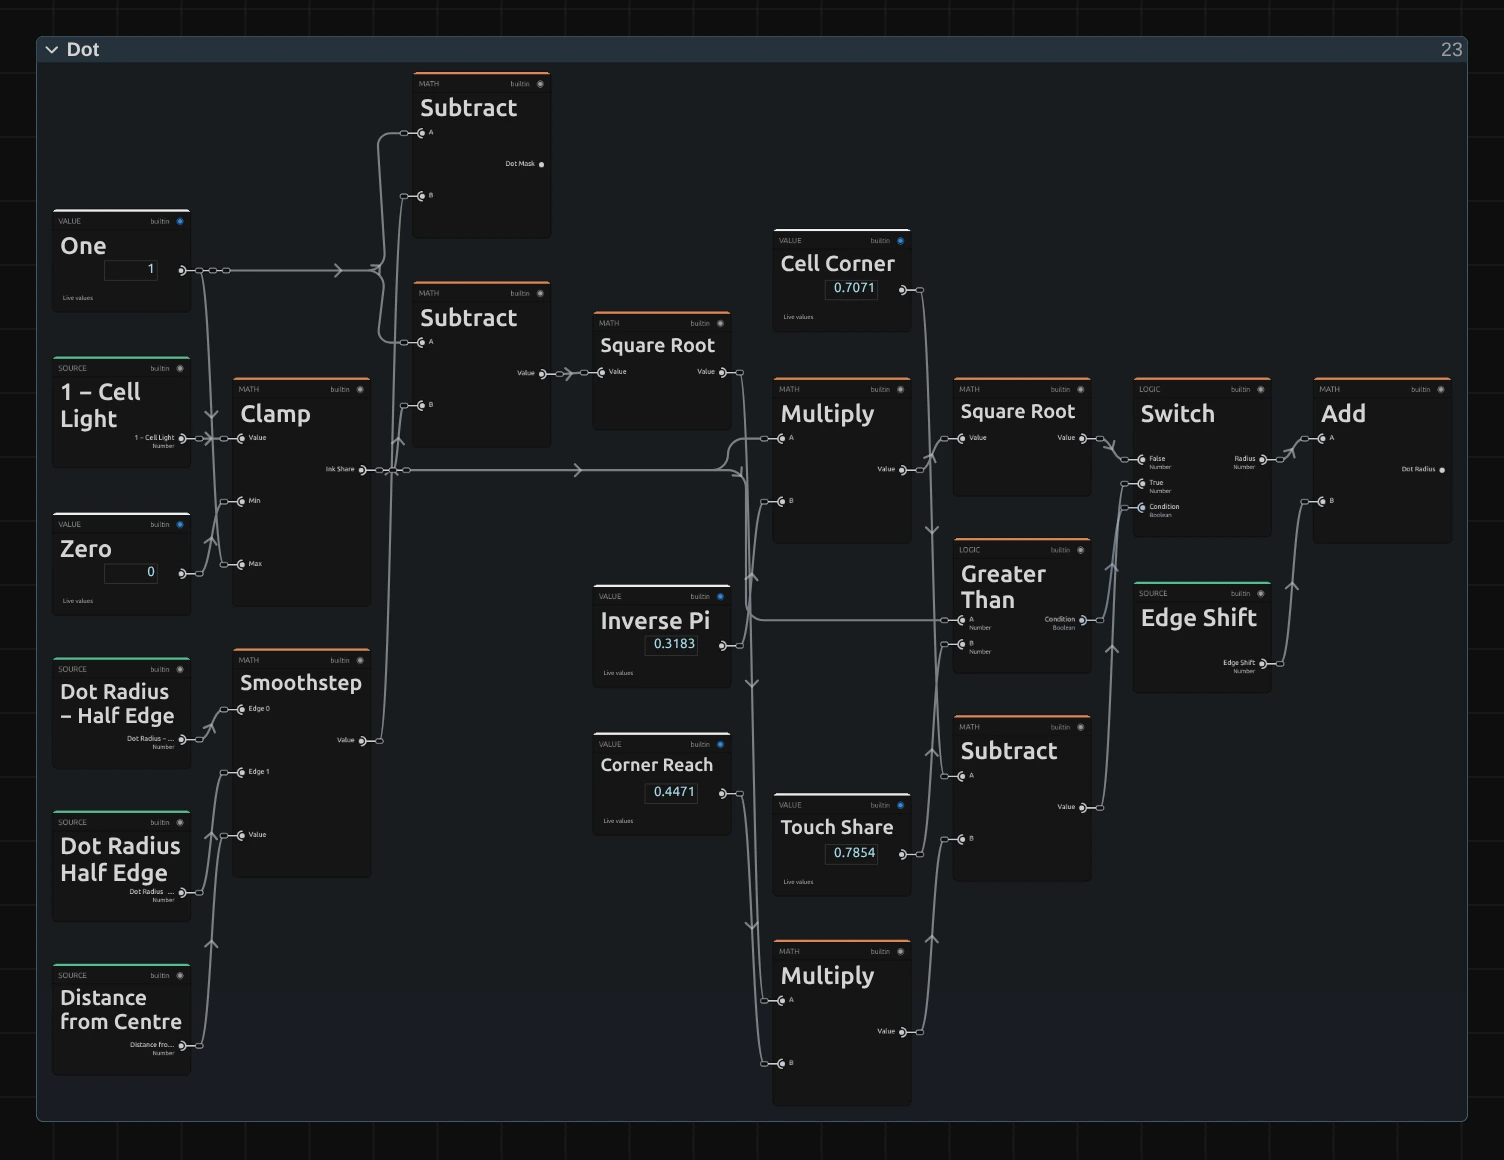
Clamp – one minus the cell’s light, kept between 0 and 1: the share of the cell that should be ink. White needs none, black all of it.
Square Root – a round dot with the radius √(share ÷ π) covers exactly that share of its cell (Inverse Pi, 0.3183). That holds until neighbouring dots touch, at a share of π ÷ 4 (Touch Share, 0.7854).
Subtract – once the dots touch, only the paper at the cell’s corners is left: Cell Corner 0.7071 minus Corner Reach 0.4471 × √(1 − share). At a share of 1 the radius reaches the corners and the cell is solid ink.
Switch – takes the first radius below the Touch Share and the second above it (Greater Than decides). Add then shifts it by up to half an edge (Edge Shift), so pure white leaves no speck and pure black no gap.
Smoothstep – compares each pixel’s distance from the middle of its cell with the radius, softened by half an edge on each side: 1 inside the dot, 0 outside, one soft pixel between. Subtract from One turns that into the Dot Mask.
Ink & Paper
Section titled “Ink & Paper”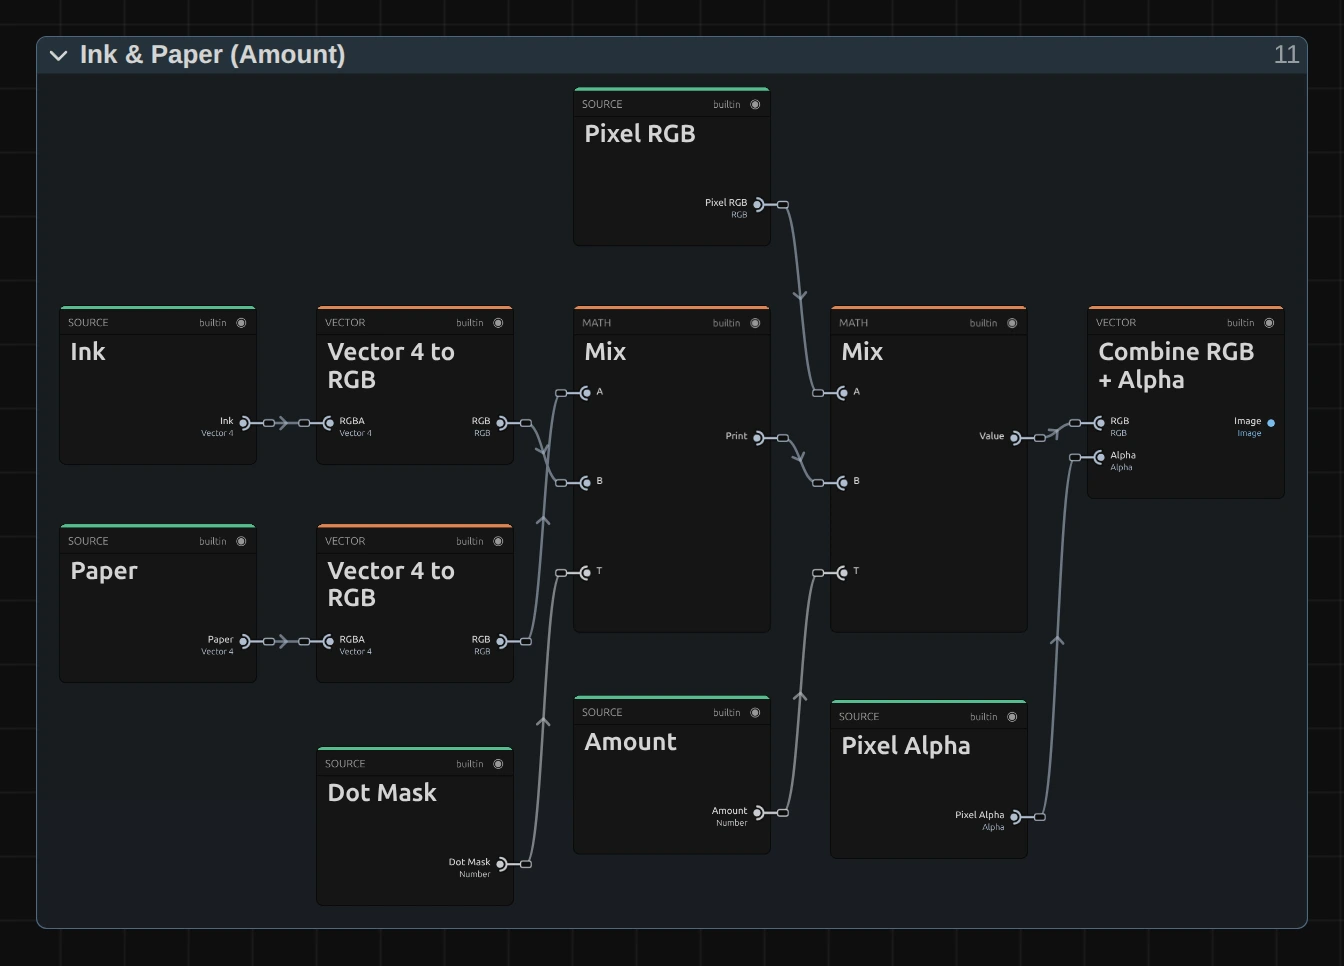
Print – the first Mix: Paper where the Dot Mask is 0, Ink where it is 1 (Vector 4 to RGB takes each colour’s RGB).
Over the Picture – the second Mix lays the print over the pixel’s own colour by Amount: 0 keeps the picture, 1 shows only the print.
Combine RGB + Alpha – puts the pixel’s own transparency back on, so a cut-out figure keeps clean edges and empty areas stay empty.
Technical details
Section titled “Technical details”- Size. Dot Size counts pixels of a frame whose shorter side is 1080: a 4K export, a portrait 1080 × 1920 frame, a lower Preview Quality and the thumbnails show the same dots. A cell is never smaller than one pixel of the frame being drawn, so small dots can come out coarser in a preview at 1/4 quality than in the export (Dot Size 2 at 1/4 quality is half a preview pixel and draws a whole one, twice as coarse as the export); the card says so, for the preview as well as the export.
- Tone. Each cell’s light is the average of the whole cell in linear light (four reads of the Cell Filter, each the average of a quarter of the cell), and its dot covers exactly that share of the cell (to about 1 %). On moving footage a dot grows and shrinks smoothly as edges cross the cell. Seen from a distance, ink and paper mix back to the picture’s brightness; black prints solid, white stays clean paper.
- Edges. Dot edges are one output pixel soft at every Dot Size. A 4K export is sharper than the preview, not different.
- Transparency. The print keeps each pixel’s own alpha, and transparent reading points do not count towards a cell’s tone, so a cut-out figure gets no dark rim.
- Time. Halftone does not move by itself: a paused picture needs no extra rendering. On moving footage the grid stays in place and the dots grow and shrink with the picture.
- Saved projects. A project stores each effect’s node setup, so a Halftone saved before this recipe keeps its own look: dots that follow the picture inside each cell, softer edges at large sizes, sizes in pixels of the frame, and dots stretched into ovals when Angle is not 0° on a wide frame. A Halftone from a project saved without node setups (before September 2026) or in a custom Look saved without one before 22 October 2026 gets that same earlier setup; Looks saved since keep the recipe the clip showed. Add the effect again for the round dots described here.
- More: Effect system · Node Catalog · Styles and presets.