
AI Edge Fill
Fills the empty edges a lens or perspective correction leaves on a still photo with AI-made scenery. The frame is full again, without cropping.
Group: Lens & Distort · How to add an effect
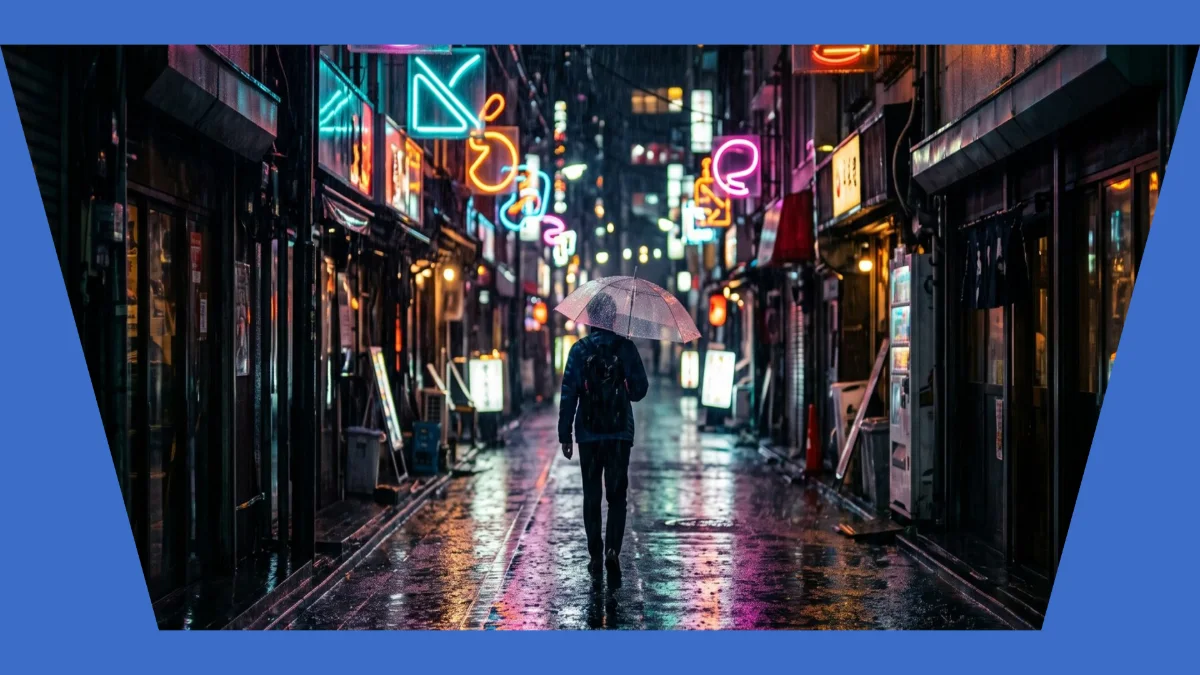
Use it for: a straightened photo of the set or the house that has to fill the whole projection · keeping every pixel of a photo after a strong correction · a background plate wider than the photo you have.
- Scene – what the empty edges should continue: a room, a stage, a street or your own words.
- Fill – sends the photo to the AI service once; the result is saved with the project.
- Seam Blend – matches the colour of the added edges to the photo beside them.
It works on stills, including Canon raw photos (CR2): put it after Lens Correction and Guided Perspective and before every other effect. The empty edges are the transparent areas a correction leaves, like the blue ones in the picture above; the effect also fills a photo that is smaller than the frame. Generating uses the cloud AI service and its credits. Playback and the export use the saved fill and send nothing again.
Tip: finish the corrections and the photo’s position first, then generate. When you change one of them later, the card says the fill no longer matches and asks you to generate again.
Presets
Section titled “Presets”AI Edge Fill has no presets in the Preset row yet. Its starting points are the four scenes of the Scene menu in the card (Room, Stage, Street, Landscape), since a good fill needs mostly the right scene.
Controls
Section titled “Controls”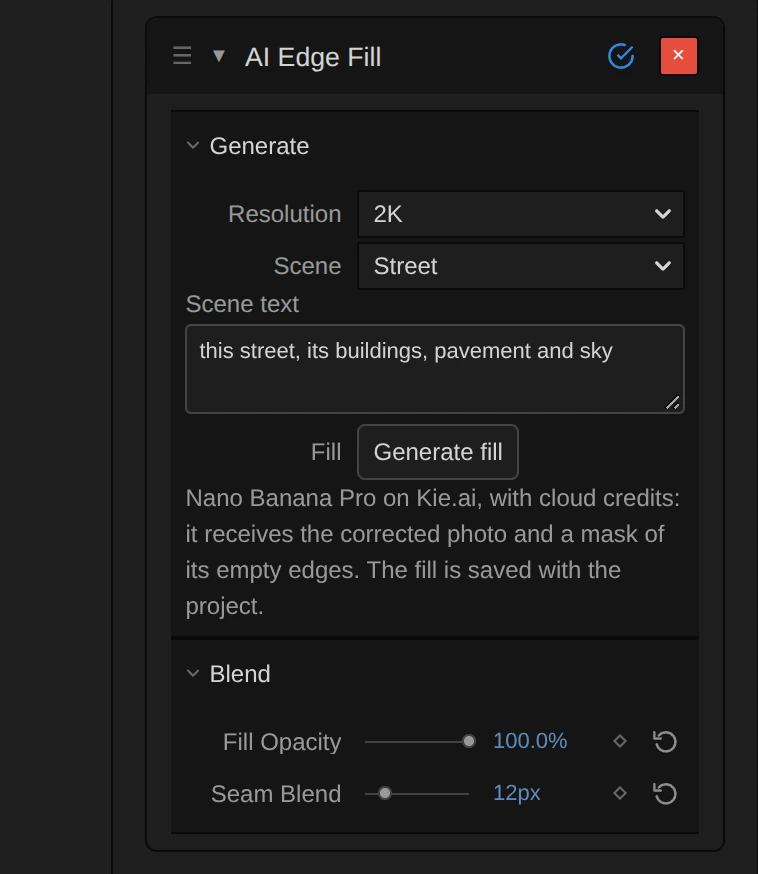
The card has two sections. Generate prepares and sends the request; its rows are locked while a request is running. Blend decides how the saved fill meets the photo; its two sliders work at any time, need no new fill and can be keyframed.
Generate
Section titled “Generate”Resolution – how large the generated picture is. 2K suits most frames; 4K costs more and takes longer, but gives the added edges more detail on a 4K export. The photo itself always keeps its own resolution, and the fill is scaled to the export size. 1K, 2K or 4K, default 2K.
Scene – a starting point for the scene text: Room (its walls, ceiling and floor), Stage (a theatre stage, its floor, black masking and lighting rig), Street (its buildings, pavement and sky) or Landscape (its ground, horizon and sky). Picking one fills the text below; the menu shows Own words once you change it. Room, Stage, Street, Landscape or Own words, default Room.
Scene text – what the fill should continue, in a few plain words, such as “this rehearsal room with mirrors and a wooden floor”. The card wraps it in a fixed request that tells the AI service which pixels to replace (the magenta areas and the mask) and to keep the photo, its framing and its size, so you never edit those sentences. A fill made with an earlier version may carry a whole prompt of its own: the card then shows it as Full prompt, sends it unchanged, and Use scene text goes back to the scene. Any words, default this room, walls, ceiling and floor.
Fill – the button that sends the request. The card sends the corrected photo, placed as in the frame, with its empty areas marked magenta, and a black-and-white mask of them, waits for the picture and saves it with the project. While a request is open, it reads Resume task: that fetches the same result again after a lost connection, without paying twice. Once a fill is saved, it reads Regenerate fill, and a Reset row appears whose Clear fill removes the fill (one undo step). It is greyed out when the clip is no still photo or when another effect than a correction comes before AI Edge Fill, and the card says why. Generate fill, Resume task or Regenerate fill, default Generate fill.
Fill Opacity – how strongly the added edges show, from 0 (the empty edges come back) to 100 (fully filled). It never touches the photo itself. Keyframe it to let the frame grow from the photo on a cue. 0 to 100 %, default 100 %.
Seam Blend – matches the colour of the added edges to the photo beside them. The AI service often returns the scene a little warmer, darker or more saturated than the photo; Seam Blend measures that difference along the photo’s edge and shifts the fill by it, fully right beside the photo (also at its corners) and fading out at this distance, so the fill keeps its own detail and no visible line remains. 12 hides a slight colour step, 30–64 a strong one; 0 shows the fill exactly as generated. It measures pixels of the composition. 0 to 64 px, default 12 px.
Node setup
Section titled “Node setup”AI Edge Fill is one fixed shader with its own card: it has no node graph to open. For every pixel it reads the photo; where the photo is opaque it keeps it, and where it is empty or partly transparent it shows the saved fill behind it, shifted towards the photo’s colour near the edge (Seam Blend) and as strong as Fill Opacity.
Technical details
Section titled “Technical details”- Service. Nano Banana Pro on Kie.ai through the editor’s cloud AI service; it is no local model, and the request needs a login with cloud credits. The service receives two pictures of at most 1600 px on the long side: the photo placed in the frame with its empty areas in magenta, and a mask (white: empty). Results that change the aspect ratio are rejected.
- Photo pixels. Only transparent pixels take the fill; the photo keeps its resolution and colour even where the model changed it. Seam Blend reduces colour steps, not mistakes in the generated structure.
- Frame. The effect covers the whole composition, so margins outside the photo are filled too; bypassing it returns the photo to its own size. Tilted 3D planes and an enabled composition camera are not supported, and generating refuses masks, colour correction or keyframed geometry before it.
- Saved fill. The PNG is stored as a required project artifact. A started request keeps its task id, so Resume task never starts a second generation; Discard pending task in the Reset row allows a fresh request but does not cancel a job the service already started.
- Saved projects. Seam Blend used to replace the fill beside the photo with copies of the photo’s edge pixels, in four rings; it now shifts the fill’s colour and keeps its detail. Saved fills look smoother along the seam: a bug fix. The labels changed (Generation Size is now Resolution), not the stored values. A saved prompt sends the same request as before: the old default prompts are the Room scene word for word, a prompt written by hand stays a Full prompt. A fill made after a Lens Correction whose look changed visibly with its 2026-10-22 bug fixes (barrel correction from about Distortion −29, Fit entire photo with a smaller Scale) is marked as made before the update: the card says so and asks you to generate again. A fill task that was already running when you updated still finishes and is marked the same way.
- More: Effect system: AI Edge Fill · Lens Correction · Guided Perspective.