
Vector Engraving
Draws the picture with rows of wavy engraved lines: heavy and deeply waved where it is dark, fine and almost straight where it is light. For banknote portraits, old prints and bold op-art waves on stage.
Group: Lines & Engraving · How to add an effect
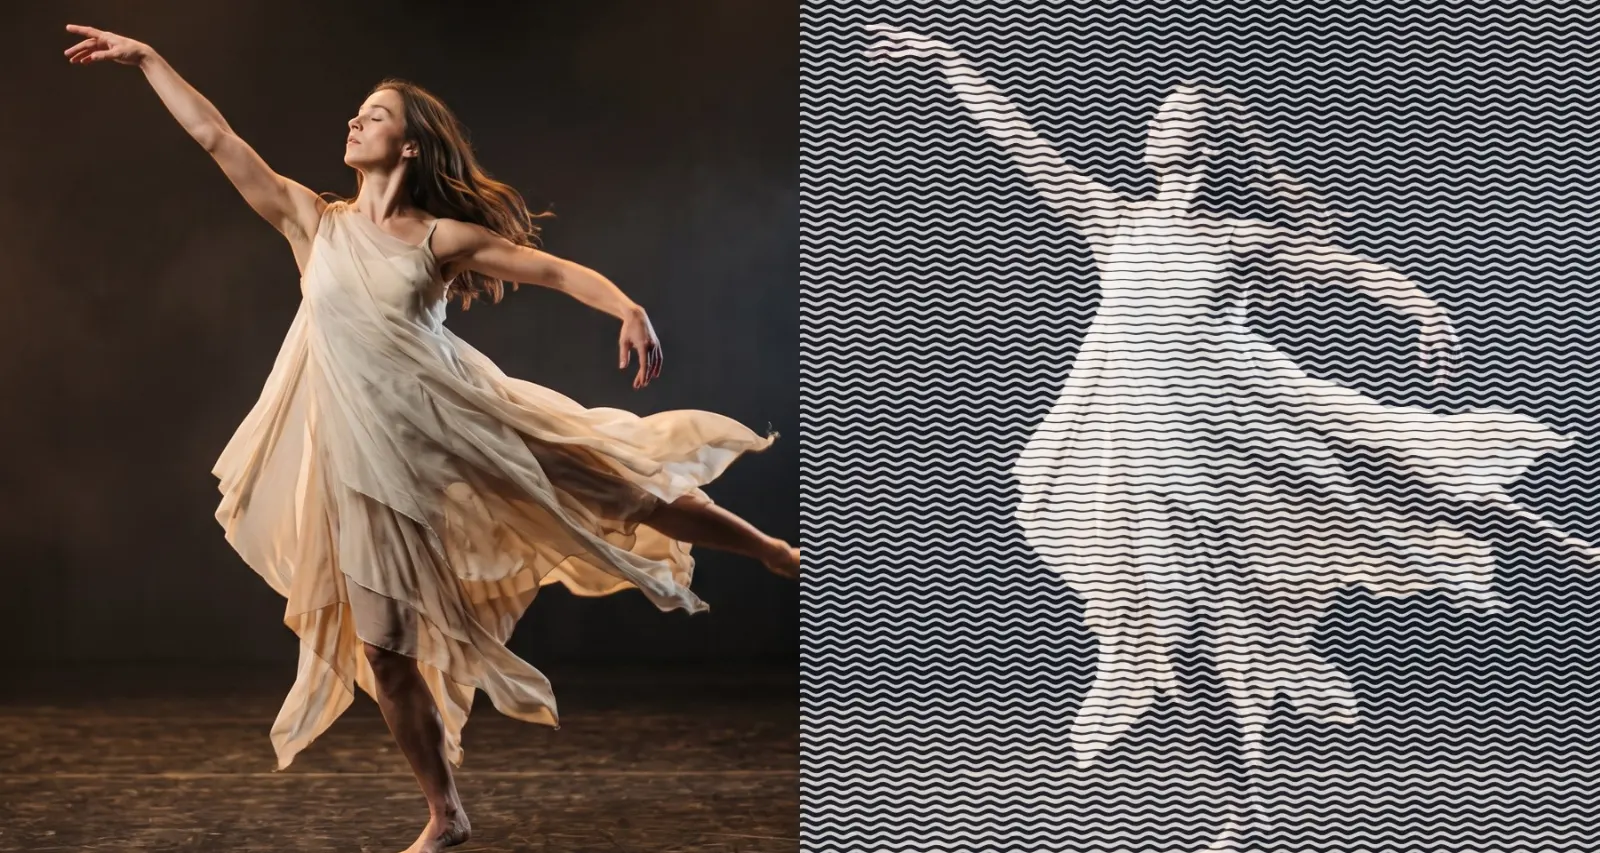
Use it for: a face or a figure that turns into a banknote portrait · an old print for a memory or a document · bold op-art waves on a gauze or a backdrop.
- Line Spacing – how fine the engraving is.
- Line Weight – how heavy the lines get in the shadows.
- Angle – the direction of the lines.
- Ink and Paper – the two colours of the print.
Tip: keyframe Angle slowly from 0 to 90 over a scene: the lines turn while the picture stays where it is.
Presets
Section titled “Presets”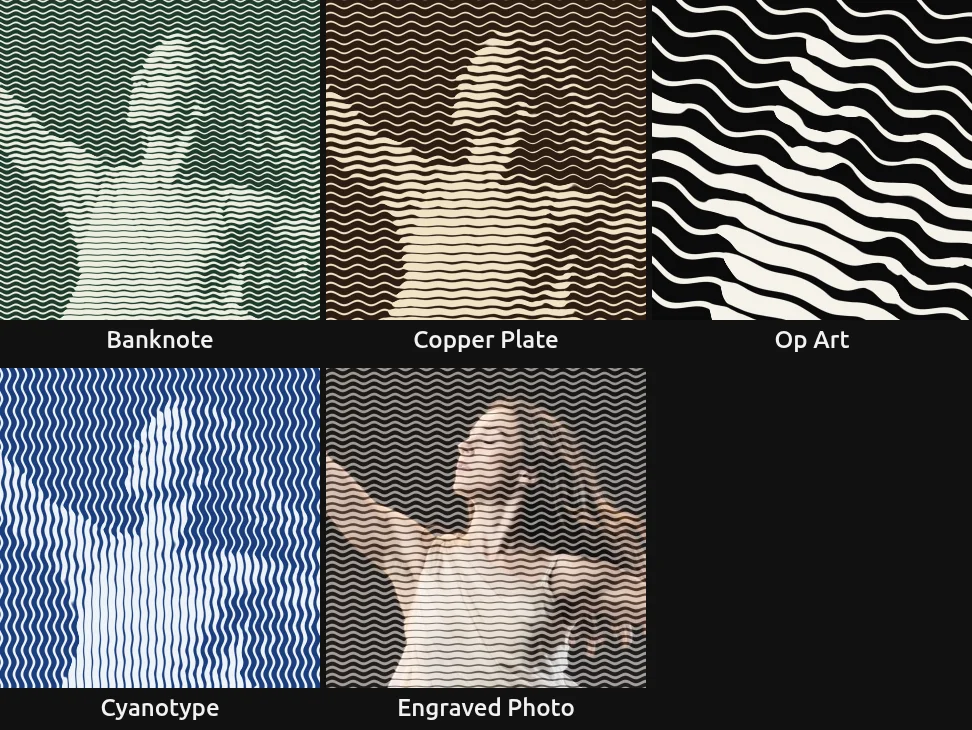
Pick one in the Preset row of the effect card. It sets all controls at once, in one undo step, and the row then shows its name until you change something. A control with keyframes keeps them, and the card says so.
Banknote – fine, dark-green lines on pale paper, like the portrait on a bank note. The lines are so close that the picture reads almost as a photo from a few metres away.
Copper Plate – brown ink on warm cream, with lines that swell to solid ink in the shadows: an old copper-plate print. Strong for a memory or a historical scene.
Op Art – wide black waves on white, slanted by −20°. The figure becomes a graphic poster that still reads from the back of a large hall.
Cyanotype – upright Prussian-blue lines on white, like a sun print: the dark stage fills with deep blue and the light figure stays white with fine blue hairlines.
Engraved Photo – fine lines over the picture’s own colours, half and half: the picture stays and an engraving lies over it. The quietest preset.
Controls
Section titled “Controls”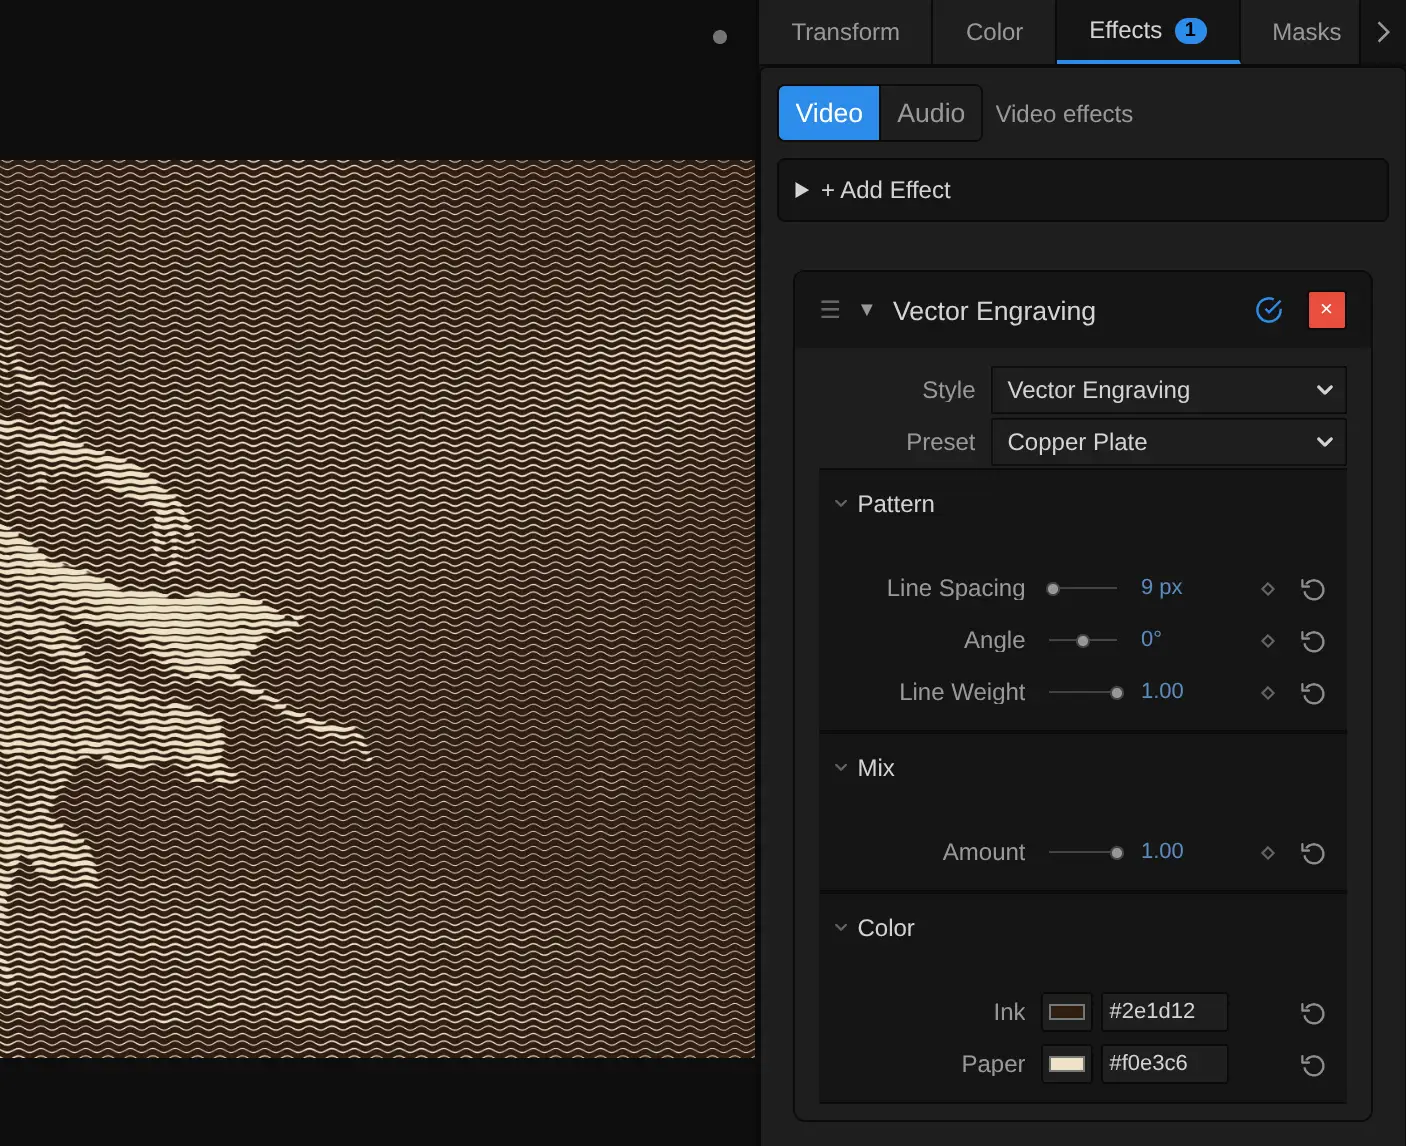
Preset – sets every control at once to one of the five starting points above.
Style – switches to another look of the same engine, for example Crosshatch, Halftone or Contour Map. Line Spacing, Angle, Amount, Ink and Paper keep the values and keyframes you set in looks that have the same control, also under another name (Halftone’s Dot Size). Line Weight carries over to and from Crosshatch, where it does the same. A control that means something else in the new look starts at that look’s default, and the row under the menu says so: Contour Map’s Band Density counts bands. Undo brings the old value back.
Pattern
Section titled “Pattern”Line Spacing – how far apart the lines sit, and so how fine the engraving is. 5–8 px gives a fine banknote engraving that reads as a photo from a few metres away, 10 a clear print that keeps a face, 25 and more bold op-art waves; detail smaller than the spacing disappears. It counts pixels of a 1080p picture, so a 4K export shows the same engraving as the preview, only sharper. Below 3 px (from keyframes or a tool) it renders 3 px, and the card says so. 3 to 80 px, default 10 px.
Angle – the direction of the lines, turned about the centre of the frame. 0 runs them across, 90 stands them upright, 45 lays them diagonally; the spacing stays the same at every angle and on every frame shape. A value past ±180 simply turns on round. −180 to 180°, default 0°.
Line Weight – how heavy the lines get in the shadows. At 0 every line keeps one thin, even width, and a dark area shows only deeper waves; 0.7 thickens the lines clearly in the dark parts; at 1 each line starts as a hairline in the light and swells in black until only thin gaps of paper remain, like a copper-plate print. Values outside 0 to 1 (from keyframes or a tool) render as 0 or 1, and the card says so. 0 to 1, default 0.7.
Amount – how much of the engraving covers the picture. At 1 there are only ink and paper; 0.5 lays the lines over the picture’s own colours; 0 switches the engraving off. Keyframe it to let the engraving appear on a cue. 0 to 1, default 0.75.
Ink – the colour of the lines. Black or a dark brown reads like printing ink, a dark green like a bank note. With an ink lighter than the paper the engraving turns into a negative: the dark parts fill with light lines. It takes a colour, default #111827.
Paper – the colour between the lines, which fills the light parts of the picture. A warm cream looks like old paper, a pale green-grey like a bank note, a deep blue like a cyanotype. It takes a colour, default #f8fafc.
Node setup
Section titled “Node setup”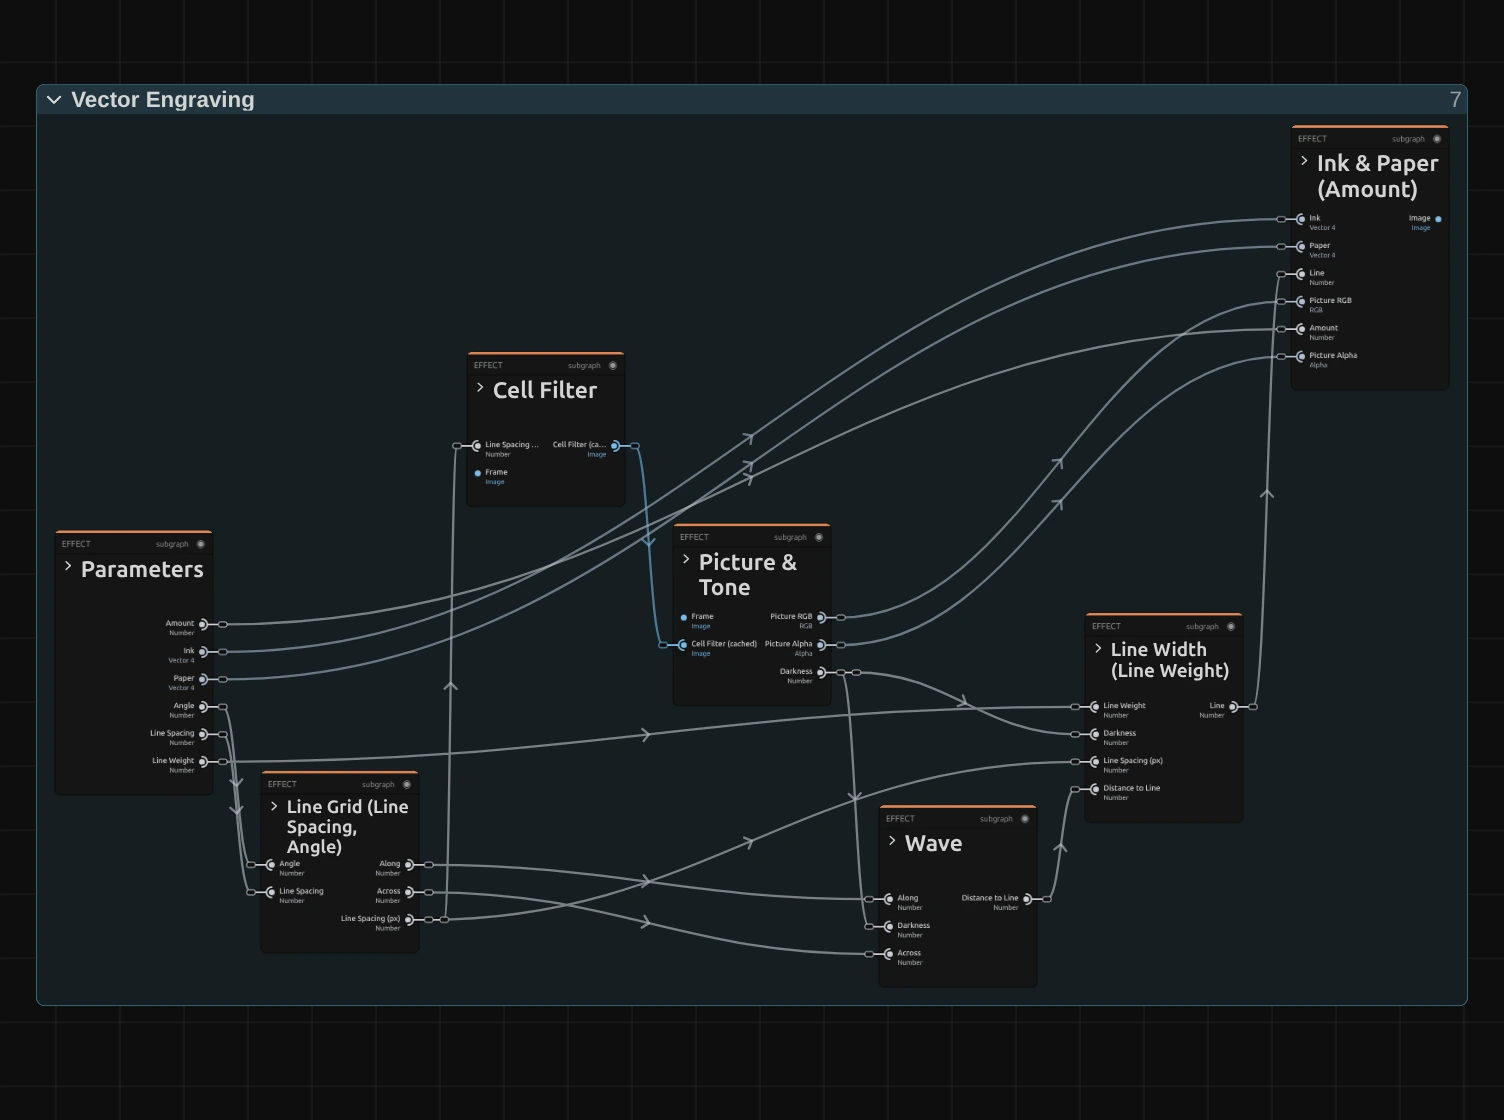
Vector Engraving works in six stages, one folder each in the Nodes tab: Line Grid turns the frame and divides it into rows of lines, Cell Filter keeps a copy of the picture averaged over half a line spacing, Picture & Tone reads the picture and how dark it is, Wave bends each line by that darkness and measures the distance to it, Line Width works out how wide the line is drawn there, and Ink & Paper colours the result and mixes it with the picture. Click a folder’s header to open it; the sections below show what is inside. Vector Engraving is one look of the pattern engine that the Lines & Engraving looks share; its Style menu switches between them.
Line Grid
Section titled “Line Grid”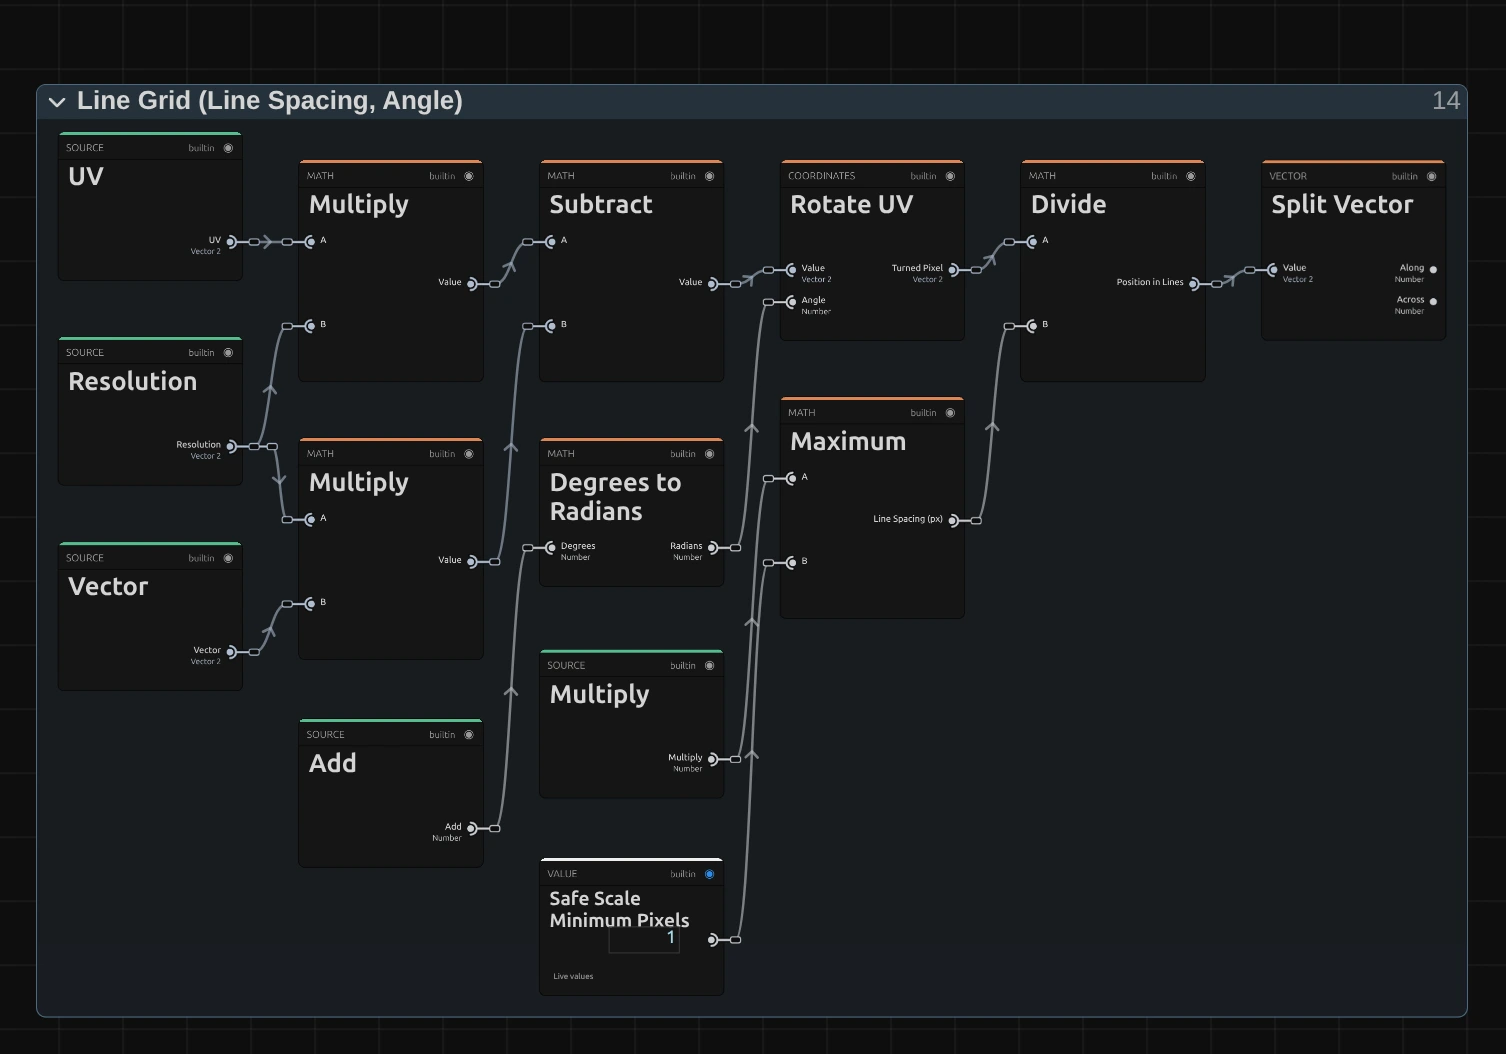
Rotate UV – the pixel’s place (UV times Resolution) minus the frame centre (Resolution times 0.5, Subtract), turned by the Angle (Degrees to Radians). It turns real pixels, so the lines keep their spacing at every angle on a wide frame.
Maximum – the line spacing in pixels of this frame: Line Spacing times the frame’s size compared with 1080p (the Multiply card), and never less than one pixel.
Divide – the turned pixel divided by that spacing: its position counted in line spacings.
Split Vector – hands on the two parts: Along runs with the lines, Across counts the lines, one whole number per line.
Cell Filter
Section titled “Cell Filter”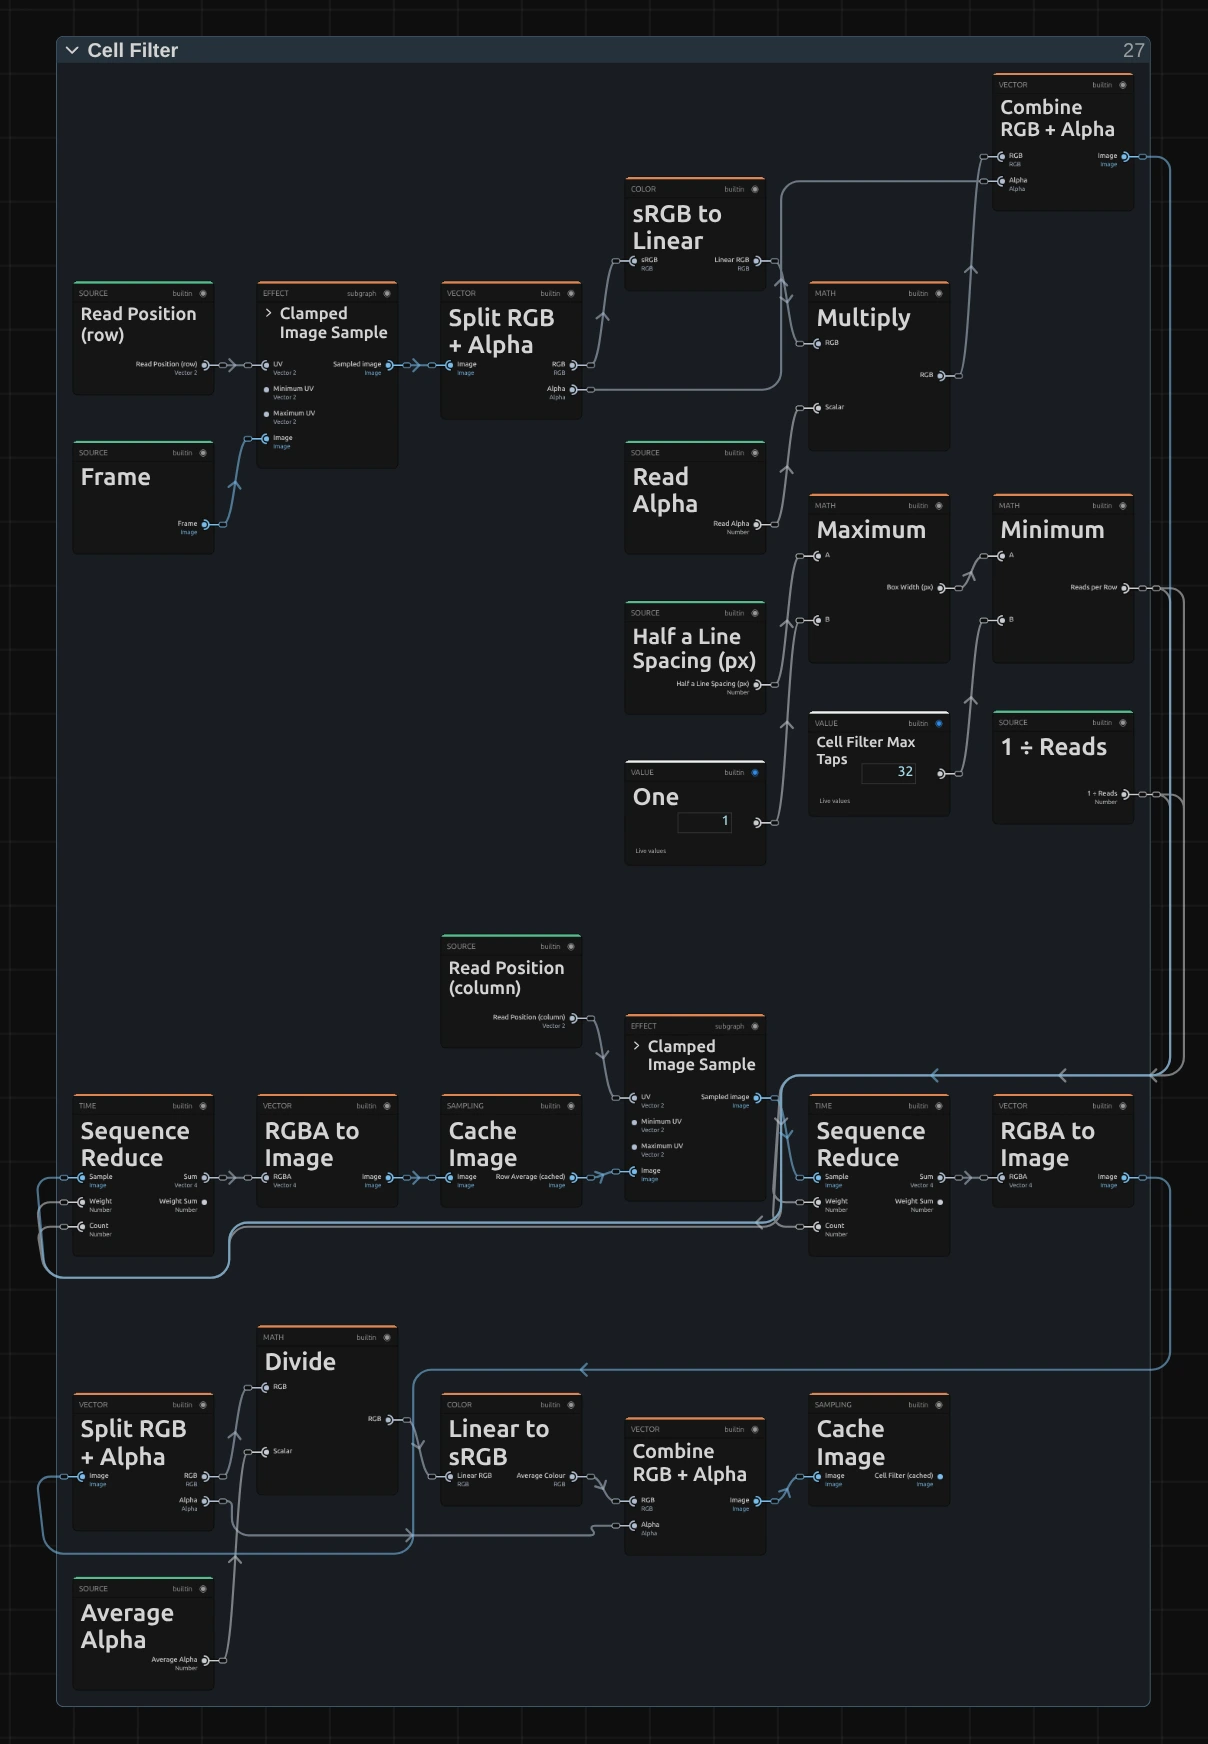
A line reads the darkness at each of its pixels. Read from the picture itself, fine detail such as hair or a lace edge would make the line width flicker from pixel to pixel, and on moving footage the lines would shimmer. So Picture & Tone reads this copy of the picture instead, in which every pixel holds the average of a box half a line spacing wide around it: the lines swell and thin smoothly and stay calm when the picture moves. It is the same filter as in Halftone.
Minimum – Maximum first gives the Box Width: Line Spacing in pixels times 0.5, rounded to whole pixels and never less than one. Minimum takes that, but at most 32: how many reads a row takes. Wider boxes spread their 32 reads evenly.
Sequence Reduce – reads the frame at every point of the row around the pixel (Clamped Image Sample, in linear light weighted with its alpha, so a transparent pixel adds nothing) and adds them up, each weighing 1 ÷ Reads: the row’s average.
Cache Image – keeps those row averages as a picture of their own, worked out once per frame. A second Sequence Reduce averages them down a column, so together they give the average of the whole box.
The last Cache Image keeps the result, turned back into colour (Divide by the Average Alpha, Linear to sRGB): the Cell Filter that Picture & Tone reads.
Picture & Tone
Section titled “Picture & Tone”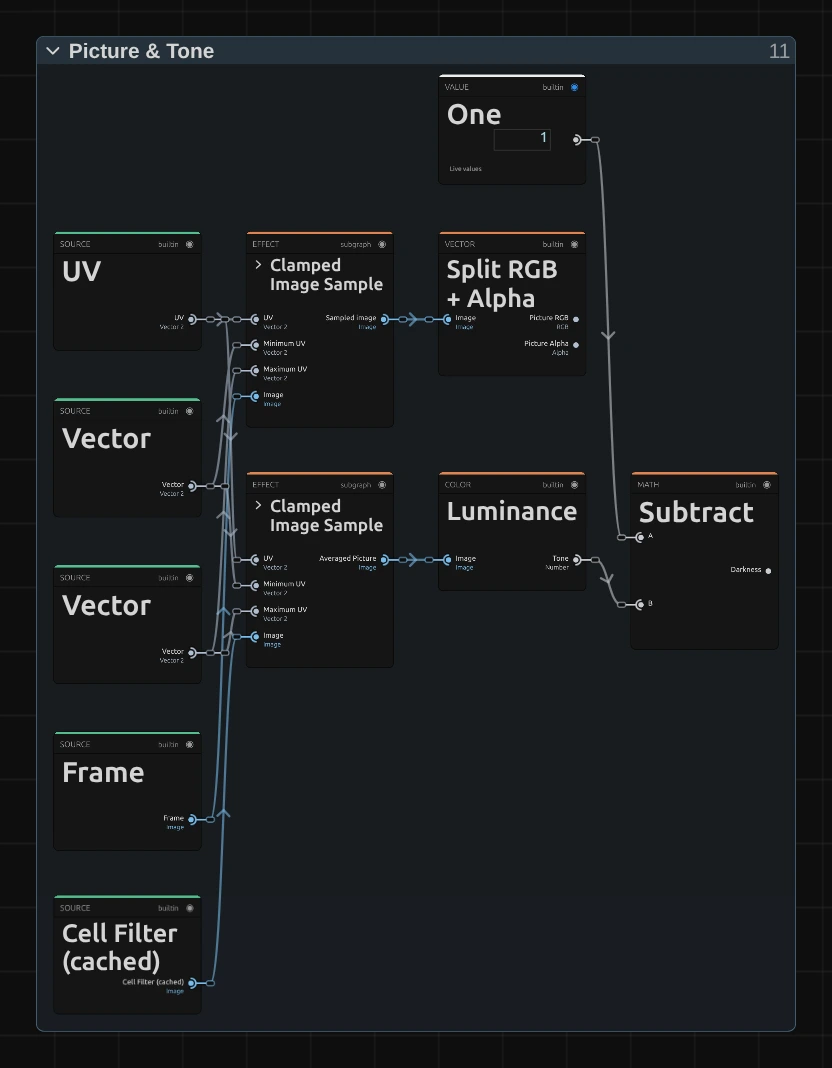
Clamped Image Sample – reads the Cell Filter at the pixel, kept just inside the frame. The other Clamped Image Sample reads the input picture itself; Split RGB + Alpha splits it into its colour, which Amount mixes back in at the end, and its transparency, which the result keeps.
Luminance – the brightness of the averaged picture, from 0 for black to 1 for white.
Subtract – One minus that brightness: the Darkness, 0 on white and 1 on black. It decides how deep the wave runs and how wide the line is drawn.
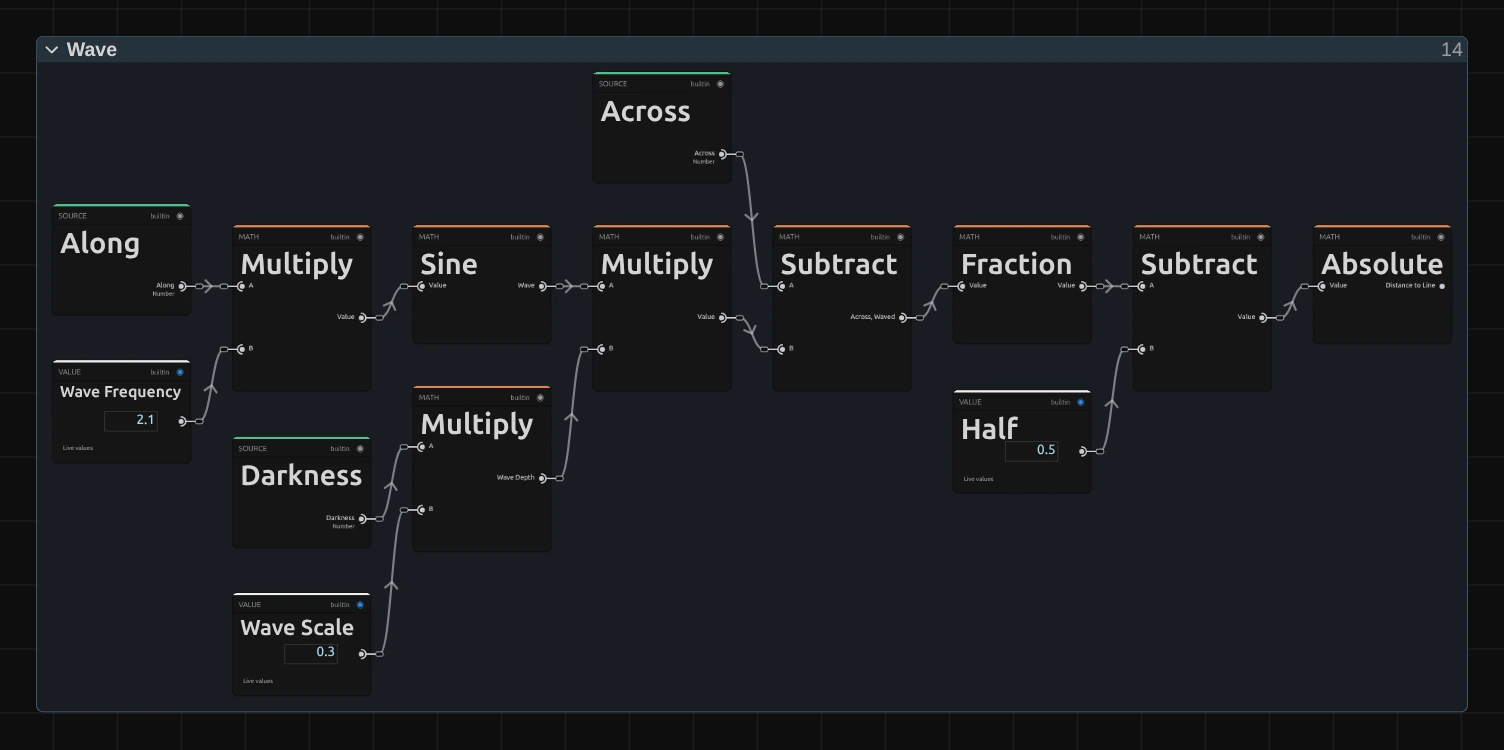
Sine – a wave along the line: Along times Wave Frequency (2.1), so one wave runs about every three line spacings. It runs along the whole line, so the lines never break.
Multiply – Darkness times Wave Scale (0.3): how deep the wave runs. On white it is 0 and the line runs straight; in black it swings by 0.3 of the spacing up and down. The next Multiply joins depth and Sine.
Subtract – Across minus that wave: the rows bent into waves.
Absolute – Fraction keeps what is after the point and Subtract takes Half (0.5) off, so the line runs where the result is 0. Absolute turns it into the distance to that line, from 0 on the line to 0.5 midway to the next.
Remix: open the Constants folder and set Wave Scale from 0.3 to 0: the waves flatten, and only the width of the lines draws the picture, like a classic line engraving. Wave Frequency at 6 gives tight ripples instead.
Line Width
Section titled “Line Width”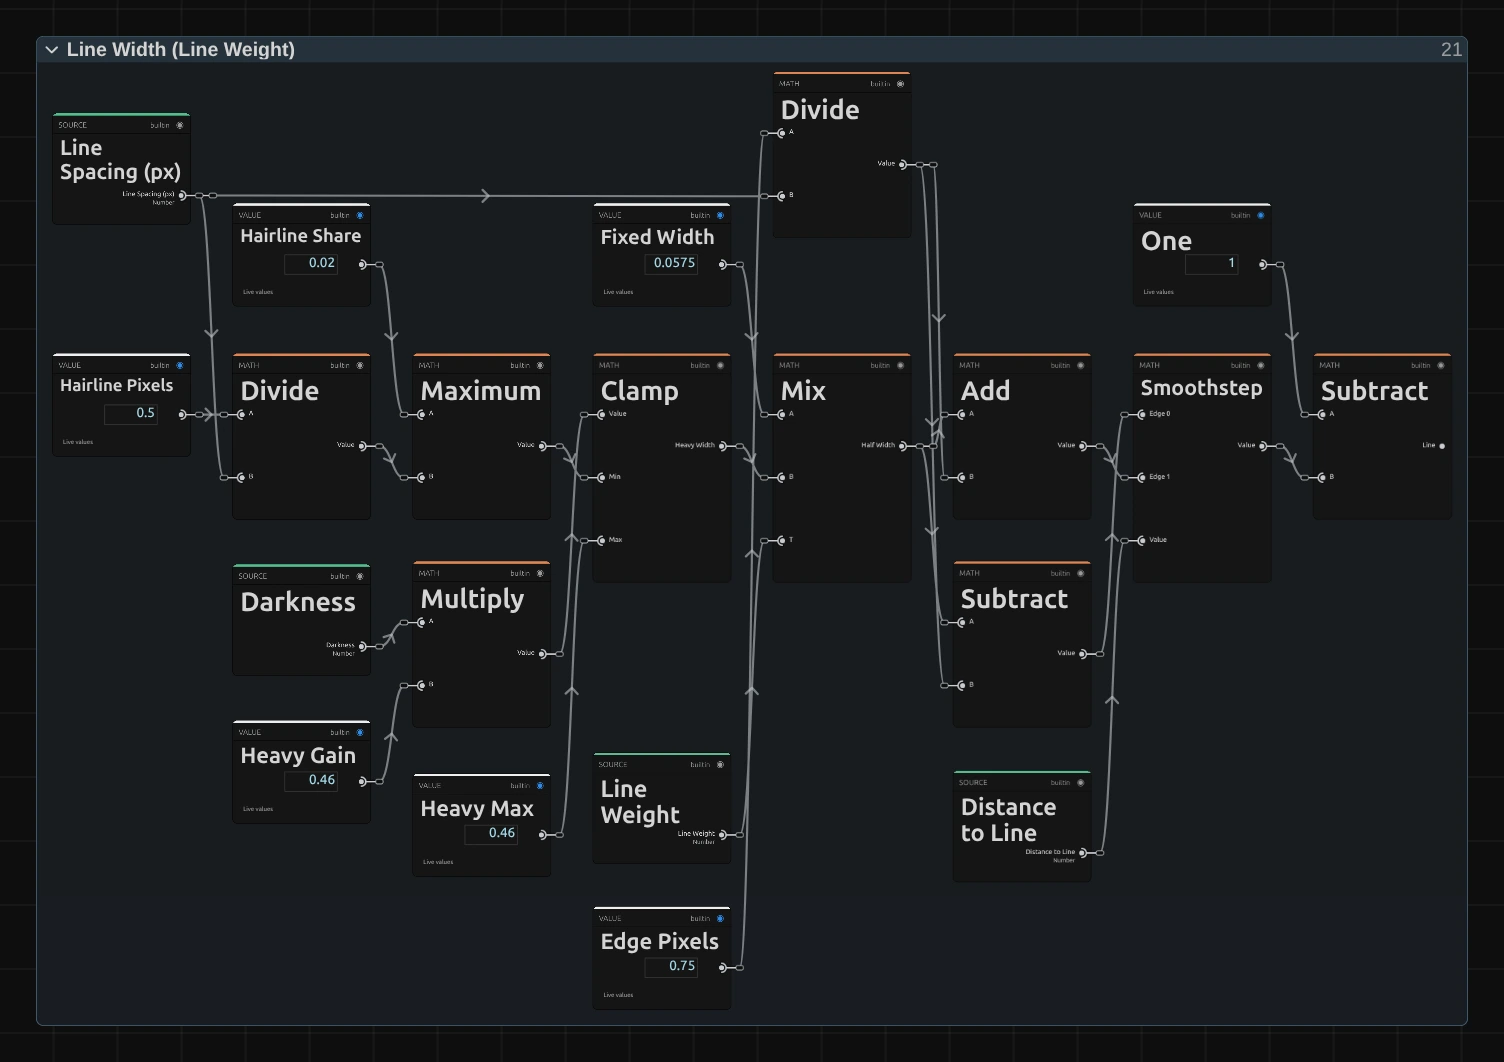
Maximum – the hairline: Hairline Pixels (0.5) divided by the line spacing in pixels, but at least Hairline Share (0.02 of the spacing). A line on white keeps half a pixel on each side, so highlights still carry a continuous line, as on a real engraving.
Multiply – Darkness times Heavy Gain (0.46), which Clamp keeps between that hairline and Heavy Max 0.46: the half width a line has at Line Weight 1, a hairline on white and 0.46 of the spacing in black, where neighbouring lines almost touch.
Mix – blends Fixed Width (0.0575), the even width of Line Weight 0, with that heavy width, by Line Weight (kept between 0 and 1 before it enters the folder): the half width of the line at this pixel.
Divide – Edge Pixels (0.75) divided by the line spacing in pixels: Edge Soft, about one pixel of soft edge at any spacing, so a fine engraving draws no stair-steps and a wide one stays crisp.
Smoothstep – compares the Distance to Line with that half width, softened on each side by Edge Soft (Subtract and Add): 0 inside the line, 1 outside, with a soft edge. Subtract from One turns it round, so Line is 1 on the line.
Ink & Paper
Section titled “Ink & Paper”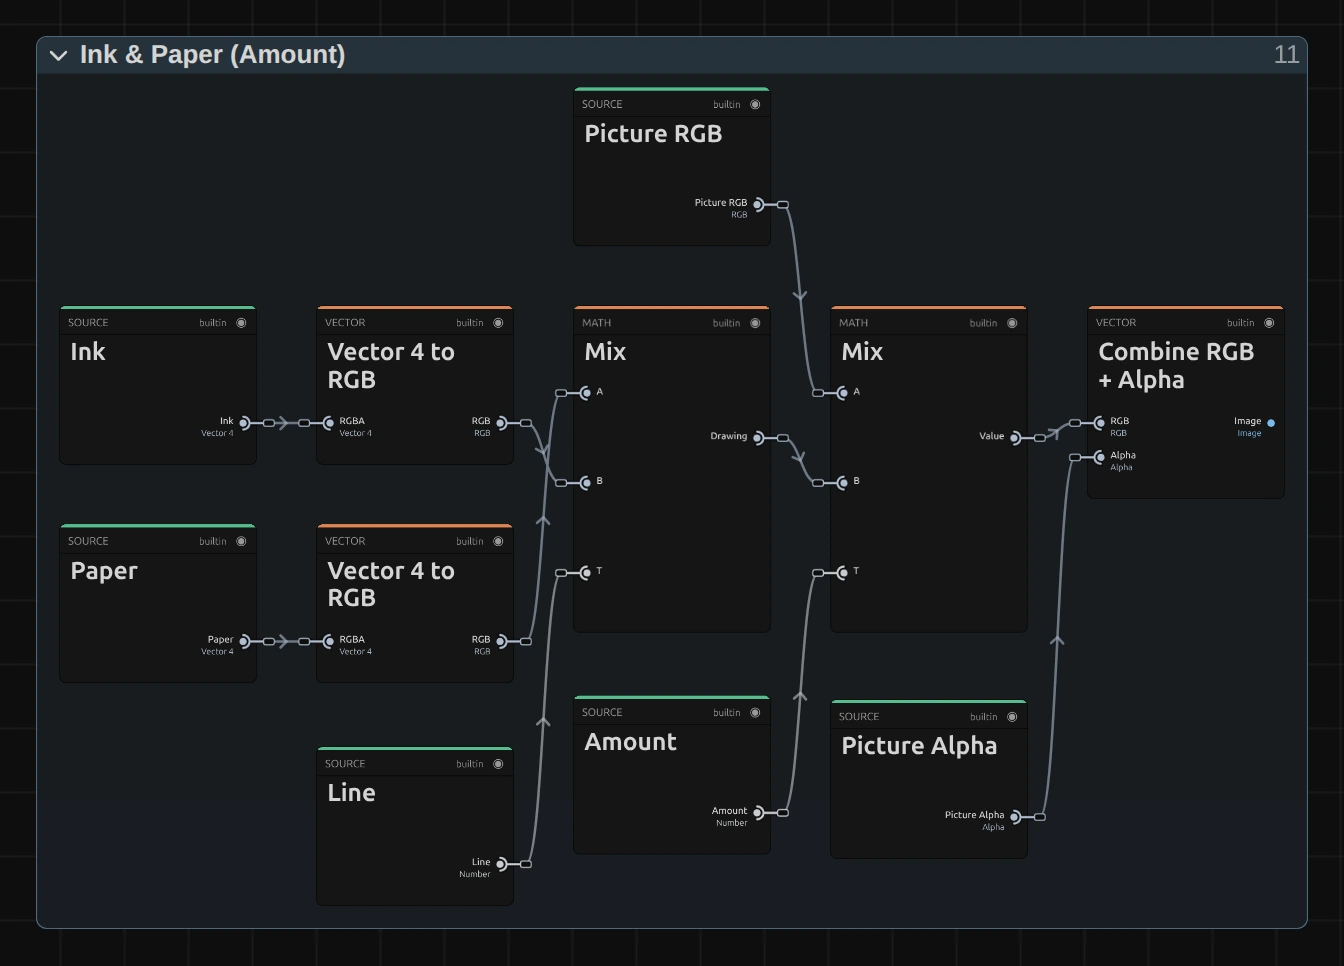
Mix – Paper where the Line is 0, Ink where it is 1, in between on the soft edges: the engraving. The second Mix blends the picture’s own colour (Picture RGB) with it by Amount.
Combine RGB + Alpha – joins the result with the picture’s own transparency (Picture Alpha), so a cut-out figure keeps its outline.
Technical details
Section titled “Technical details”- Size. Line Spacing counts pixels of a frame whose shorter side is 1080: a 4K export, a portrait 1080 × 1920 frame, a lower Preview Quality and the thumbnails show the same engraving. A spacing is never thinner than one pixel of the frame; below 3 px Line Spacing renders as 3. The card says when either happens.
- Lines. The darkness comes from the picture averaged over half a line spacing (Cell Filter), so the lines swell smoothly and stay calm on moving footage. Every line edge is about one pixel of the output frame soft at any spacing, and the hairline in the light is at least a pixel wide, so a fine engraving draws no stair-steps and highlights keep a continuous line.
- Transparency. The engraving keeps the picture’s transparency, so a cut-out figure keeps clean edges and transparent parts stay transparent; a transparent neighbour never darkens the lines. The preview and the export match; the look does not move by itself.
- Saved projects. A Vector Engraving saved before Line Weight existed opens with Line Weight 0 and keeps its thin, even lines. Two bug fixes change how it looks: the waves no longer break at every line spacing and run longer and calmer, and an Angle other than 0 now turns the lines in pixels, so they keep their spacing instead of stretching on a wide frame. The line edges were a share of the spacing soft and are now one pixel soft, and the hairline is at least a pixel wide. Line Spacing was called Scale; the value is the same, and a project that never set it keeps the old 14 px (new cards start at 10 px).
- More: Effect system · Node Catalog · Styles and presets.