
Dithering
Turns the picture into big pixels of a few flat colours in a checked pattern, like an early computer screen.
Group: Print & Halftone · How to add an effect
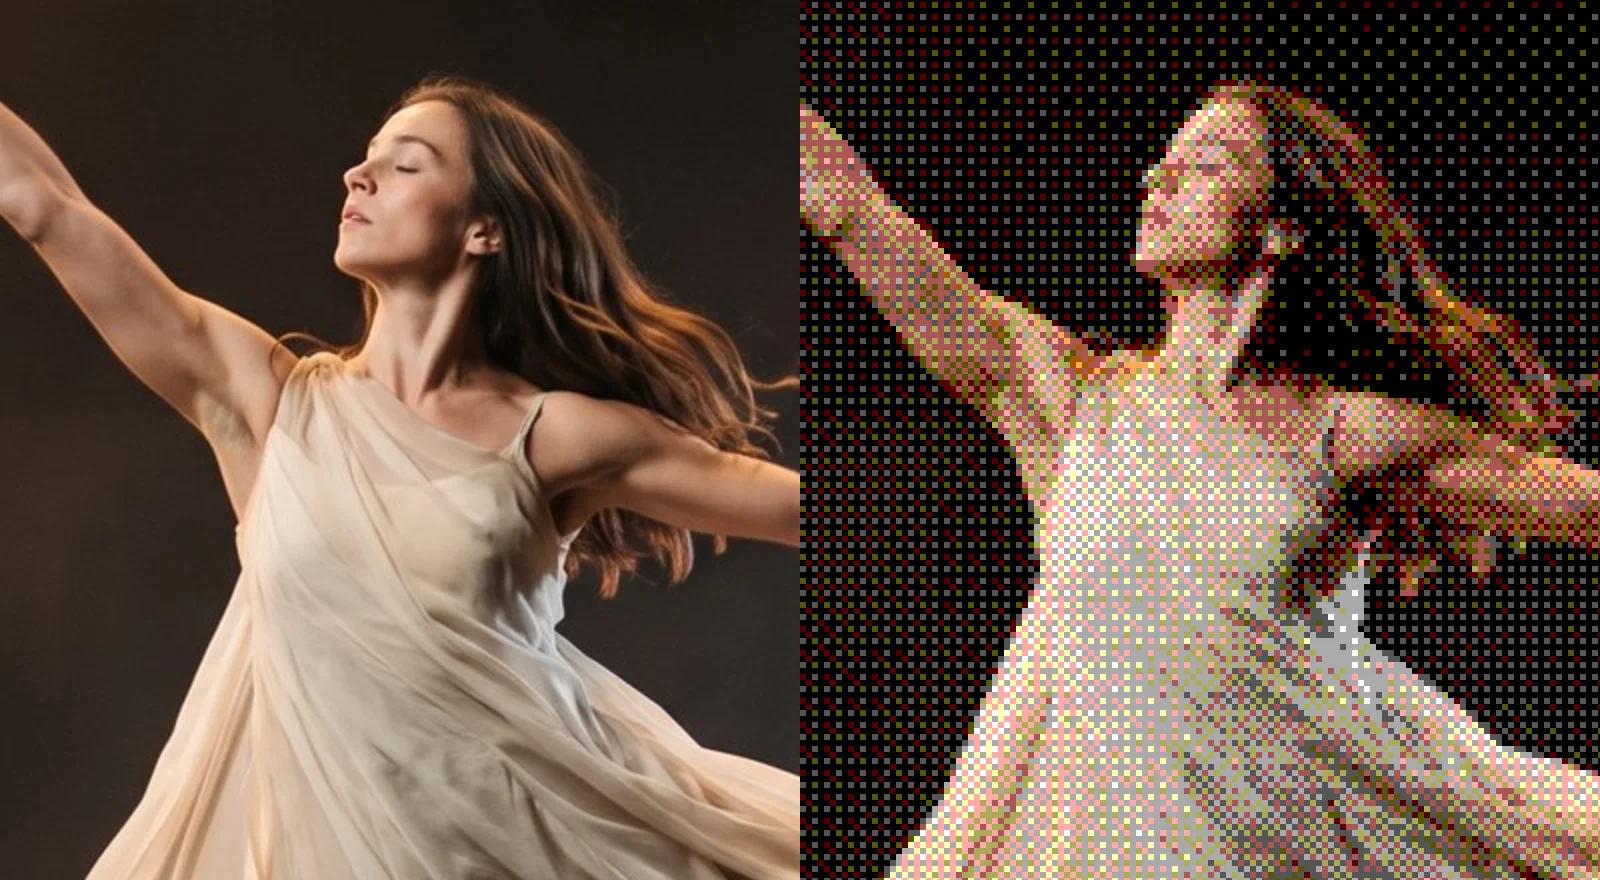
Use it for: a retro computer or game look · a memory, a dream or a digital world · a graphic texture on a projection that still reads from the back row.
- Pixel Size – how large the pixels are.
- Levels – how many colours there are.
- Amount – how much of the effect covers the picture.
Tip: keyframe Pixel Size from 1 to 12 px to let a scene fall apart into ever coarser pixels, or Levels from 16 down to 2 so its colours drain away. For two inks, like a one-bit screen, use Dither Studio; for large flat blocks, Blockify.
Presets
Section titled “Presets”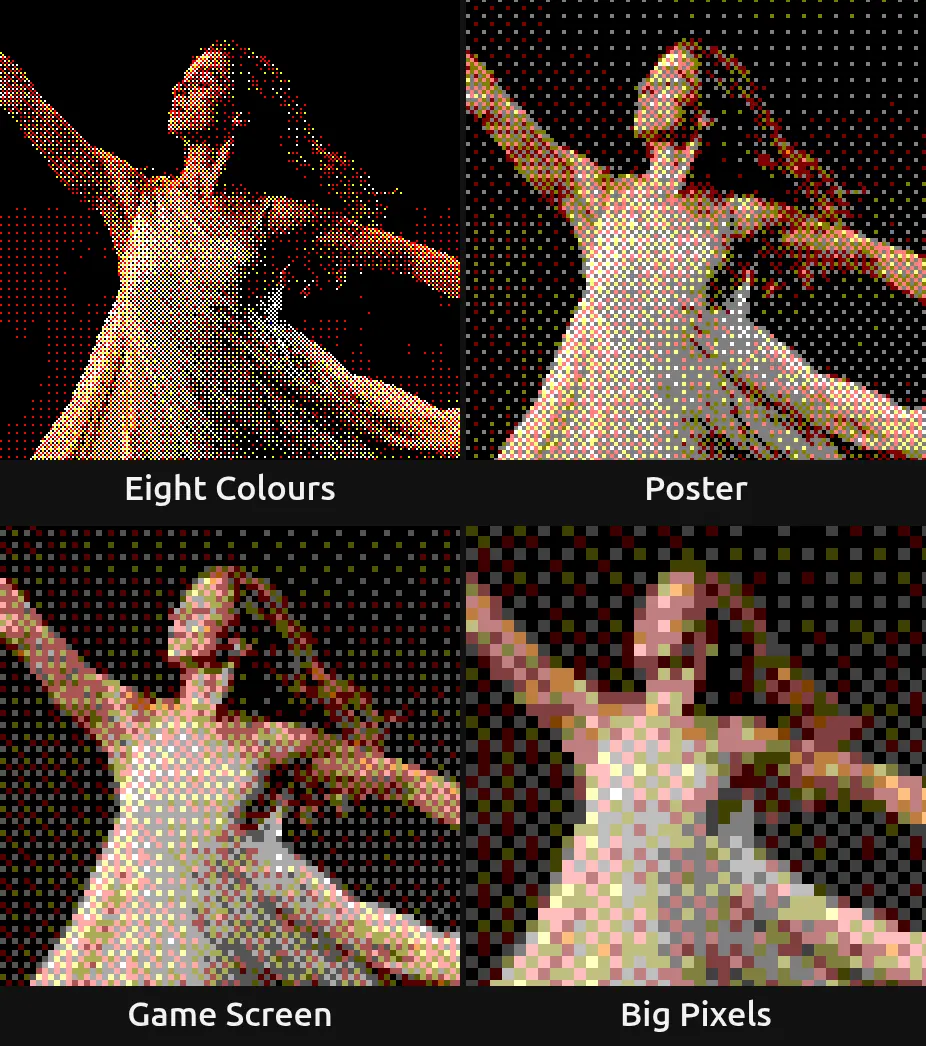
Pick one in the Preset row of the effect card. It sets all controls at once, in one undo step, and the row then shows its name until you change something. A control with keyframes keeps them, and the card says so.
Eight Colours – fine two-pixel dots in just black, white and the six pure colours, like an early colour printer. Loud and graphic; a light figure on a dark stage glows out of the black.
Poster – three steps per channel (27 colours) on 4 px pixels: a flat, posterised print with hard colour steps. The dark stage turns into a coarse coloured checker, the figure into a few flat tones.
Game Screen – chunky pixels in 64 colours: a game console screen. The figure stays easy to read, its details turn into blocks.
Big Pixels – very large pixels in 125 colours: the figure becomes a mosaic that reads from the back row. Made for large projection surfaces.
Controls
Section titled “Controls”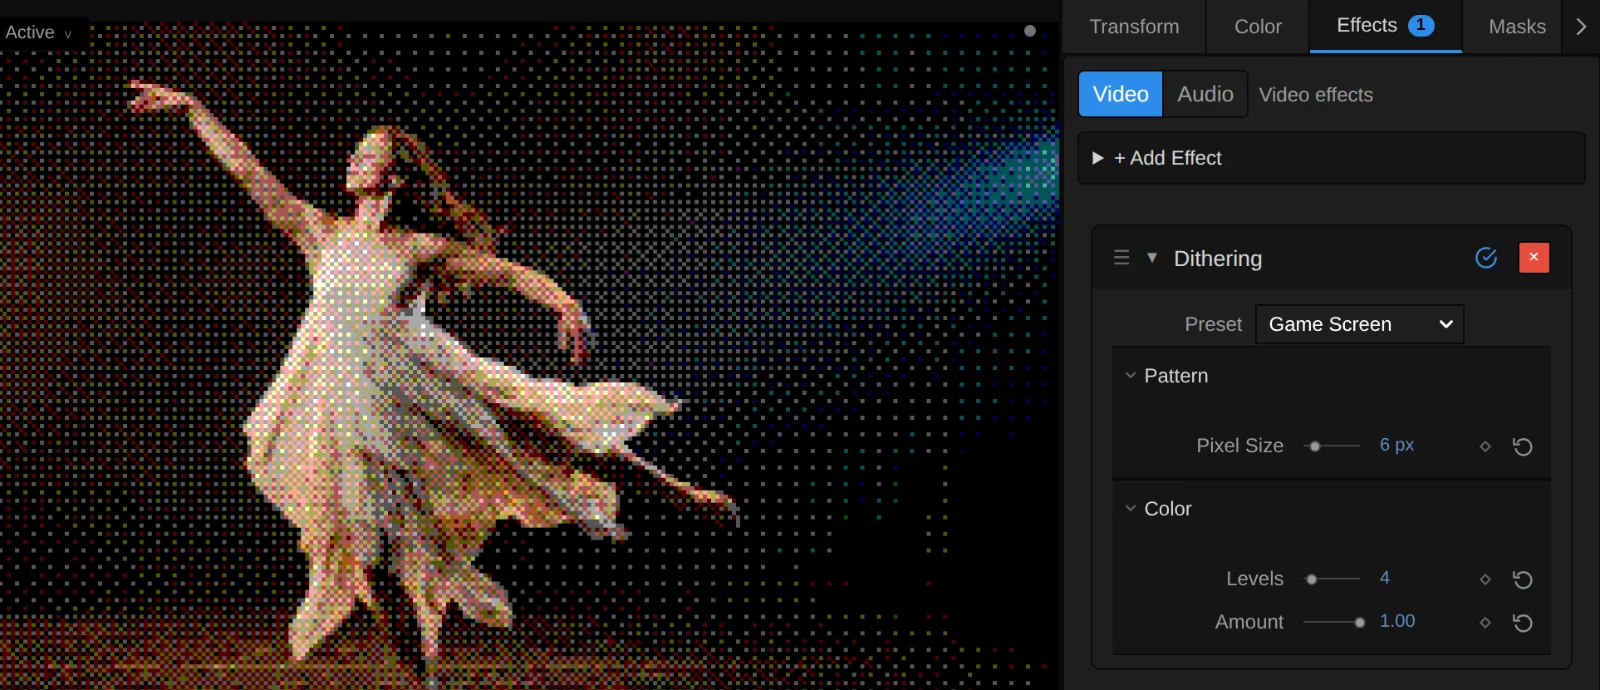
Style – switches to another look of the same engine, for example Dither Studio, Halftone or Pixel Poster. A control you changed keeps its value and keyframes when the new look has the same control, also under another name (Pixel Size is Halftone’s Dot Size); the others start at the new look’s defaults. Levels is Dithering’s own: it stays for a switch back.
Pattern
Section titled “Pattern”Pixel Size – how large the pixels are. Each pixel shows one colour of the picture, and its neighbours form the checked pattern, so the pattern grows with it. 1 px gives a fine grain that blends into a photo from a few metres away, 3 to 6 px a clear retro screen, 12 and more turns a figure into a mosaic. It counts pixels of a 1080p picture, so a 4K export shows the same pattern as the preview, and it always draws whole pixels: where a size does not fit the frame, the card says what renders. Below 1 px (from keyframes or a tool) it renders 1 px, and the card says so. 1 to 24 px, default 3 px.
Levels – how many steps each colour channel has, and so how many colours the picture may use: 2 gives black, white and six pure colours, 4 gives 64 colours, 6 the 216 of the early web. Few levels look loud and graphic, many levels quiet and close to the picture. The pattern mixes neighbouring steps so that, from a distance, every part keeps its brightness. A dark stage that is not quite black turns into a visible checker of grey and coloured pixels over the whole backdrop, the most visible thing on a projection. More Levels make it finer and calmer; grading the stage to true black before Dithering removes it. Below 2 it renders 2, and the card says so. 2 to 16, default 4.
Amount – how much of the dithered picture covers the original. At 1 there are only the few colours; 0.5 lays the pattern softly over the picture’s own colours; 0 switches it off. Keyframe it to let a scene turn into pixels on a cue. 0 to 1, default 1.
Node setup
Section titled “Node setup”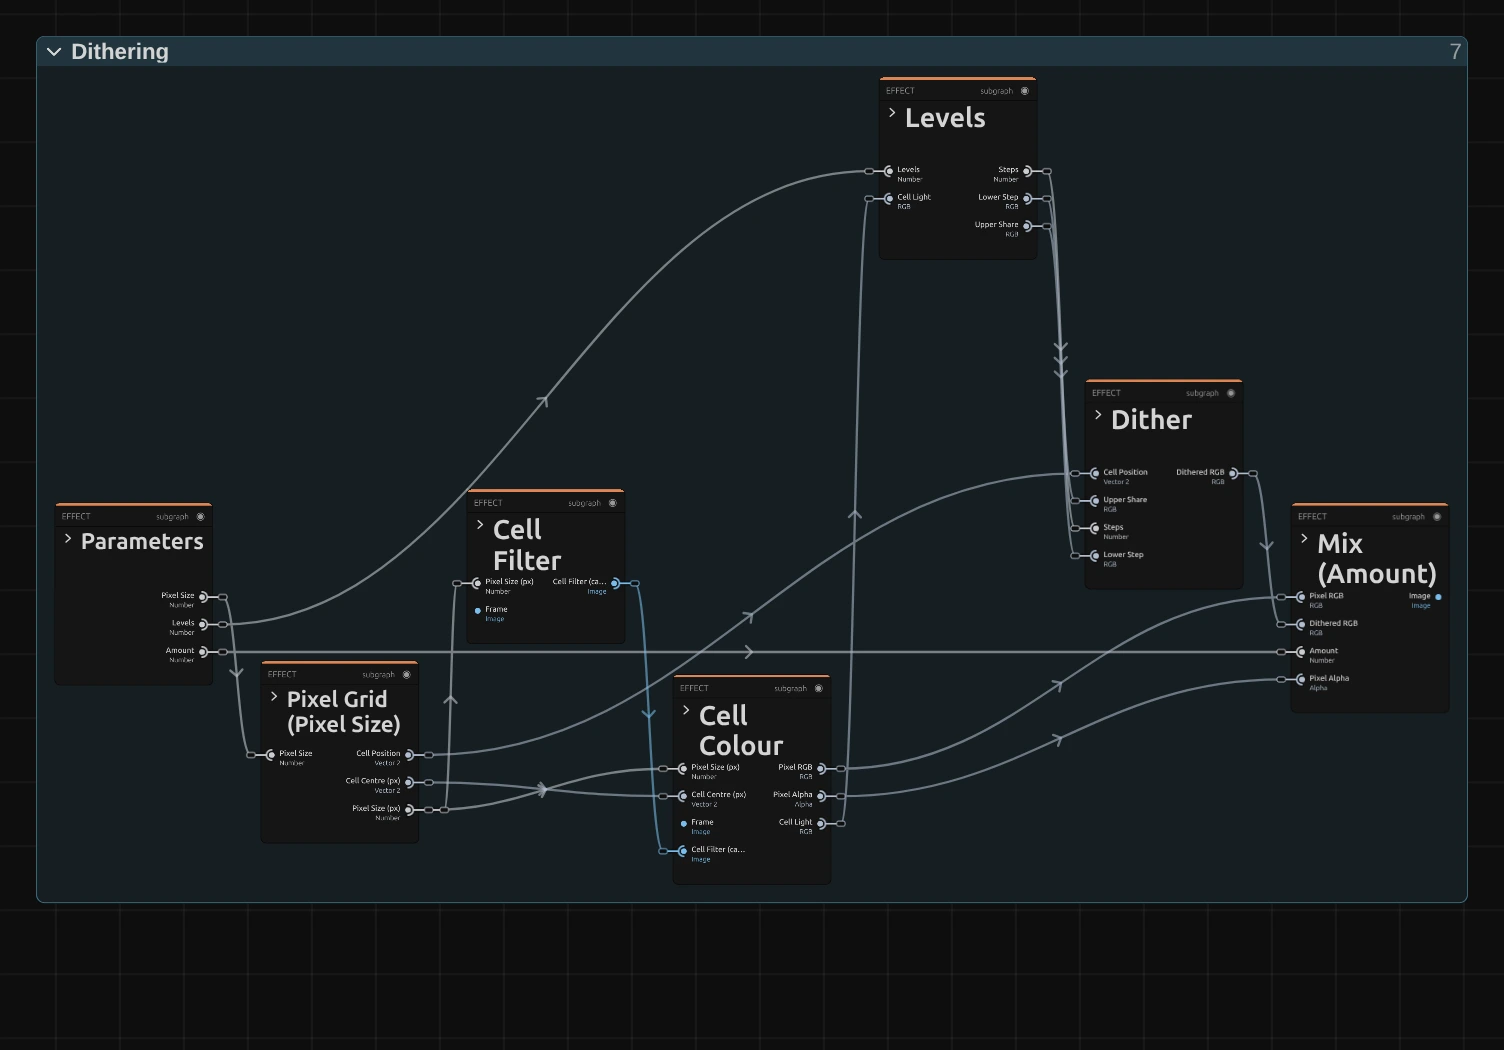
Dithering works in six stages, one folder each in the Nodes tab: Pixel Grid cuts the frame into cells of Pixel Size, Cell Filter averages the picture over boxes of half a cell, Cell Colour reads one colour for each cell from four points of that average, Levels finds the two steps of Levels that colour lies between, Dither lets the cell’s place in a 4 × 4 pattern decide which of the two it shows, and Mix lays the result over the picture by Amount. Click a folder’s header to open it; the sections below show what is inside.
Pixel Grid
Section titled “Pixel Grid”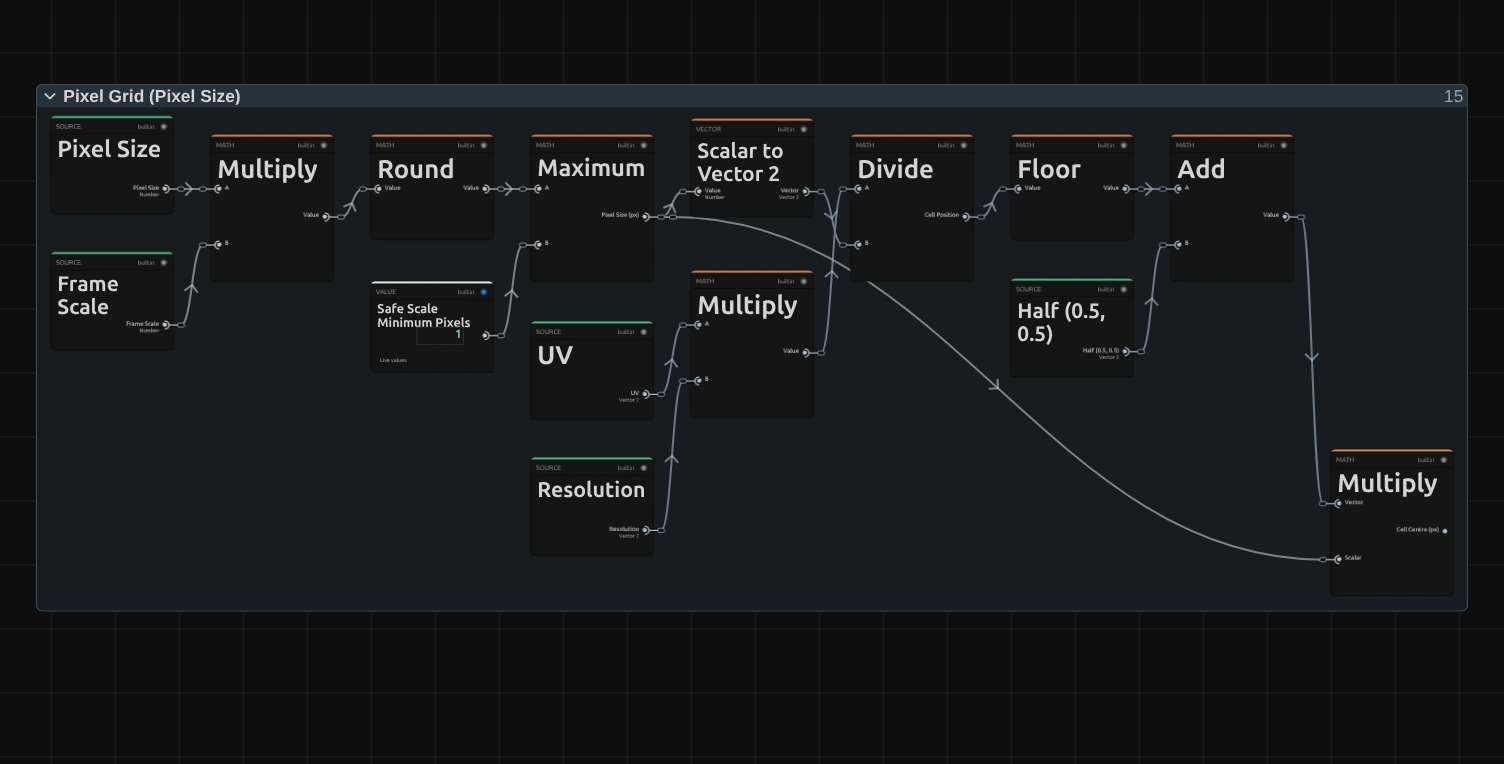
Round – Pixel Size times the frame’s scale (Multiply; 1 on a 1080p frame, 2 on 4K) is the size in pixels of this frame, rounded to whole pixels: a cell of one and a half pixels cannot be drawn and would beat into a plaid. Maximum keeps it at one pixel or more.
Divide – the pixel’s place (UV times Resolution) divided by that size: the Cell Position, counted in cells. The Dither stage reads it for the pattern.
Floor – drops what is after the point: the number of the cell, the same for every pixel in it.
Multiply – Add moves to the middle of the cell (Half), and Multiply turns it back into pixels: the Cell Centre, where Cell Colour reads the picture.
Cell Filter
Section titled “Cell Filter”The picture averaged over boxes of half a cell, in linear light and weighted by alpha. The four reads of Cell Colour lie in the middle of four such boxes, which together cover the cell, so each cell shows the average colour of all its pixels and changes smoothly on moving footage. The same as Halftone › Cell Filter, sized by Pixel Size instead of Dot Size.
Cell Colour
Section titled “Cell Colour”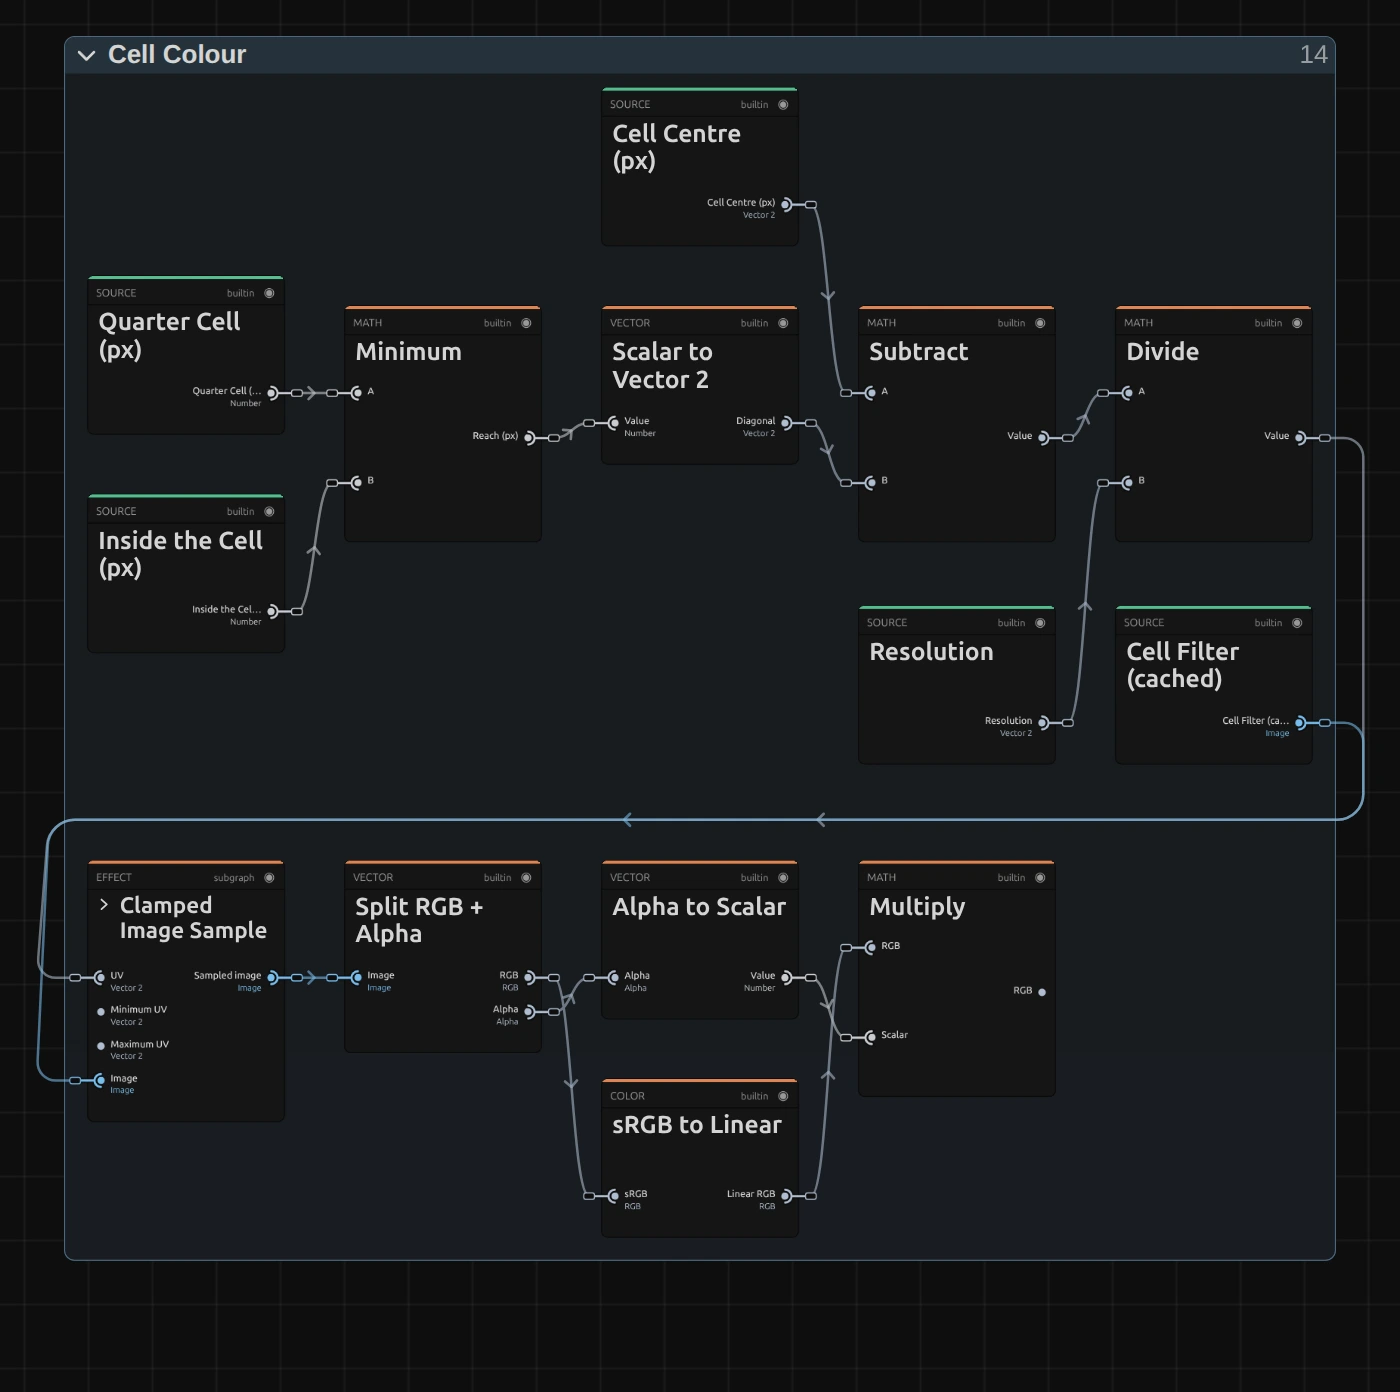
Minimum – how far from the centre the four points lie: a quarter cell, but never further than the cell’s own pixels reach (Inside the Cell), so a one-pixel cell reads exactly its pixel. Each point reads the Cell Filter, the average of a quarter of the cell, so the four together give the average of the whole cell.
Subtract – one reading point: the Cell Centre minus the Diagonal, divided by Resolution. The other three points, in the folder, sit on the other corners of the same square.
sRGB to Linear – turns the colour the Cell Filter holds there into light as it adds up on a screen, so the average of a cell is as bright as its pixels together.
Multiply – weights that light with the point’s alpha, so a transparent point does not darken the cell. Add sums the four points (Light of All Points) and their alpha (Alpha of All Points).
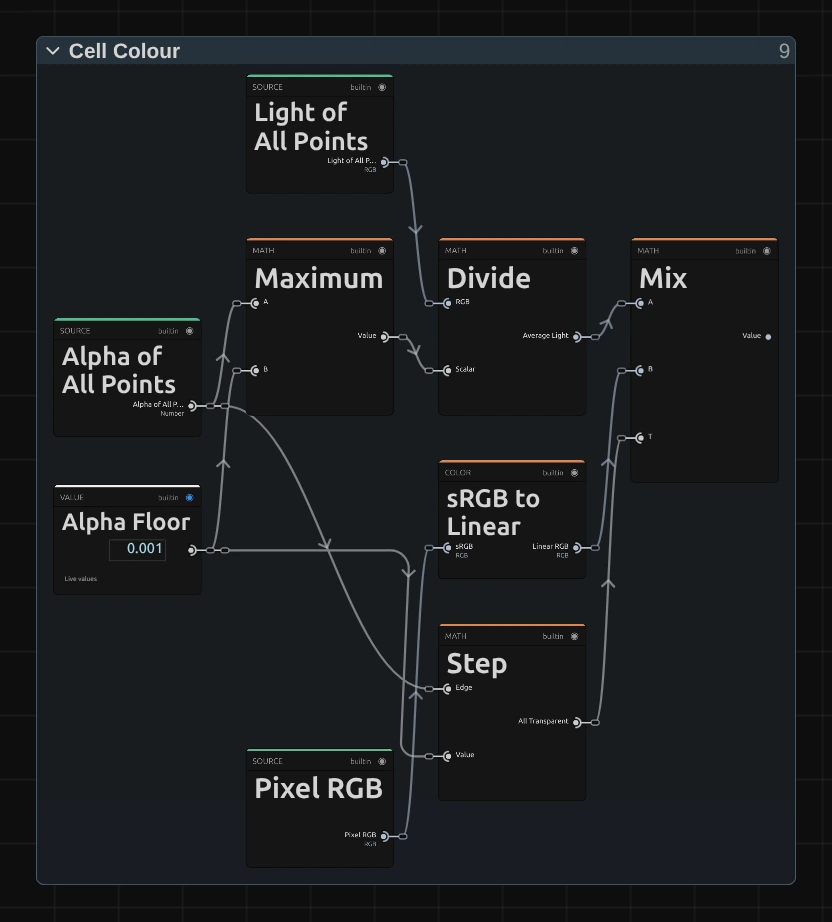
Divide – the light of all four points divided by their alpha: the cell’s average colour, in light. Every pixel of a cell reads the same four points, so the whole cell gets one colour.
Mix – where all four points are transparent (Step: their alpha is at most the Alpha Floor of 0.001), a thin opaque line between them would turn black; Mix then takes the pixel’s own colour instead. A Clamp keeps the result between 0 and 1.
Levels
Section titled “Levels”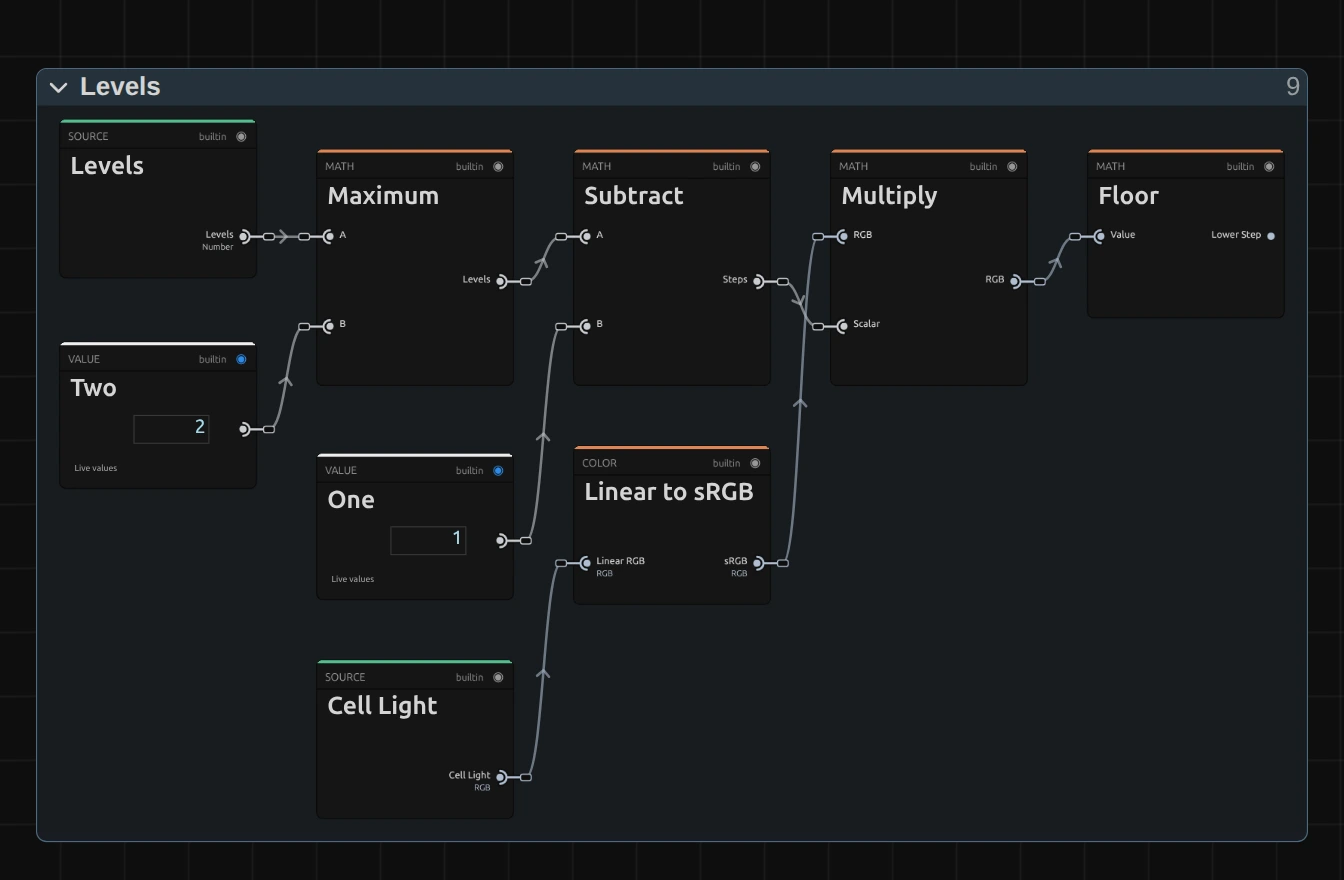
Maximum – keeps Levels at two or more; below that the card says what renders. Subtract takes one off: four levels have three steps between black and white.
Multiply – Linear to sRGB turns the cell’s light back into a screen value from 0 to 1, and Multiply counts it in steps: 0.5 with three steps is 1.5.
Floor – the step just below: the Lower Step of each channel. The steps are even in screen values, as on an old computer: 0, ⅓, ⅔ and 1 for four levels.
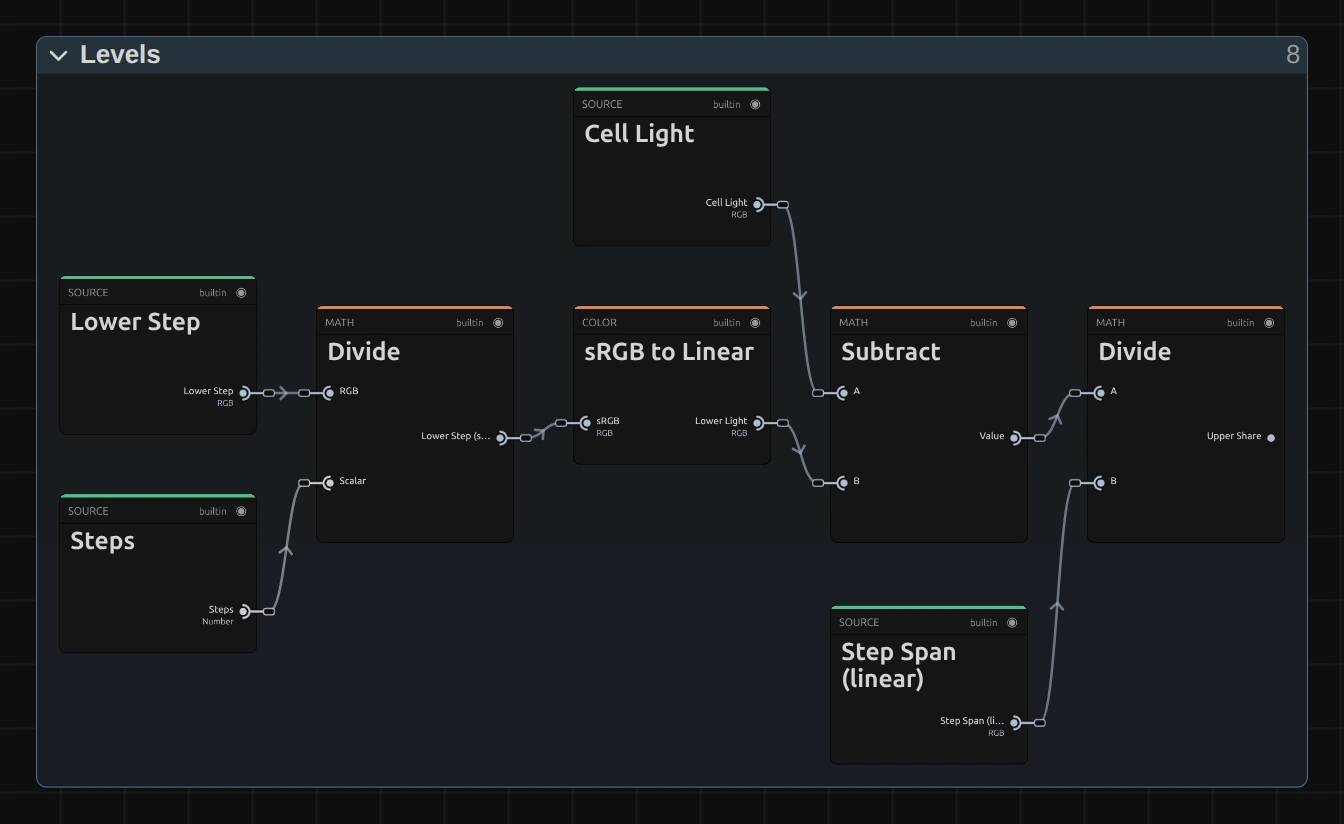
sRGB to Linear – the lower step (Divide by the Steps) as light; the upper step is built the same way, in the folder.
Divide – the cell’s light above the lower step, divided by the light between the two steps (Step Span): the Upper Share, from 0 to 1. Measured in light, not in screen values, so the pattern keeps the picture’s brightness. Because the steps are equal in screen values, the first step above black is already fairly bright in light: a dark, not quite black stage becomes a visible checker of grey and coloured pixels instead of a flat dark tone.
Dither
Section titled “Dither”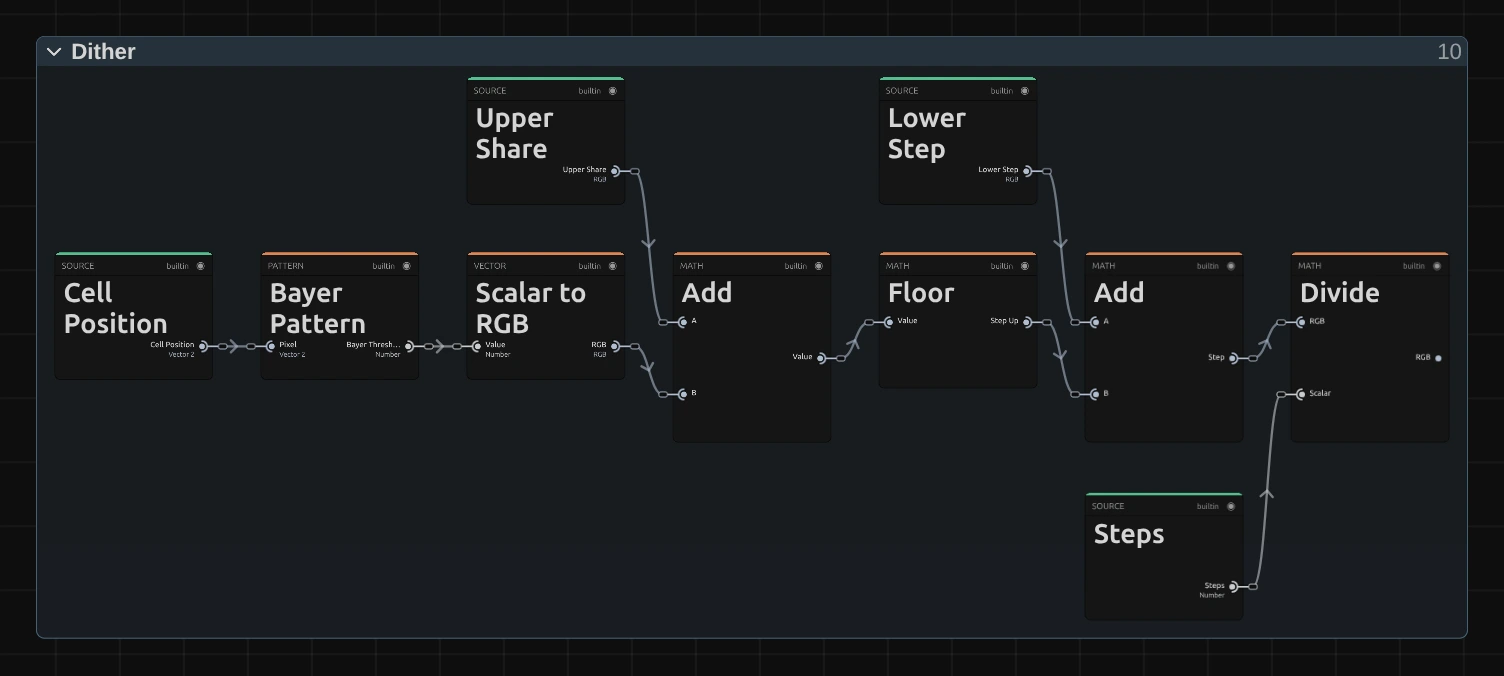
Bayer Pattern – gives every cell one of 16 thresholds from a 4 × 4 pattern, spread so that neighbouring cells differ as much as possible. That spread is the checked look of dithering.
Add – the Upper Share of each channel plus the cell’s threshold.
Floor – 1 where the two reach 1, else 0: a share of 0.25 steps up in 4 of every 16 cells. Seen from a distance, those cells mix to the right brightness.
Divide – the lower step plus that step up (Add), divided by the Steps: the colour of the cell, one of Levels steps in each channel. A Clamp keeps it between 0 and 1.
Remix: add a Value node set to 0.5 and plug it into Scalar to RGB instead of the Bayer Pattern: every cell now rounds to its nearest step, and the picture turns into flat, posterized bands without a pattern.
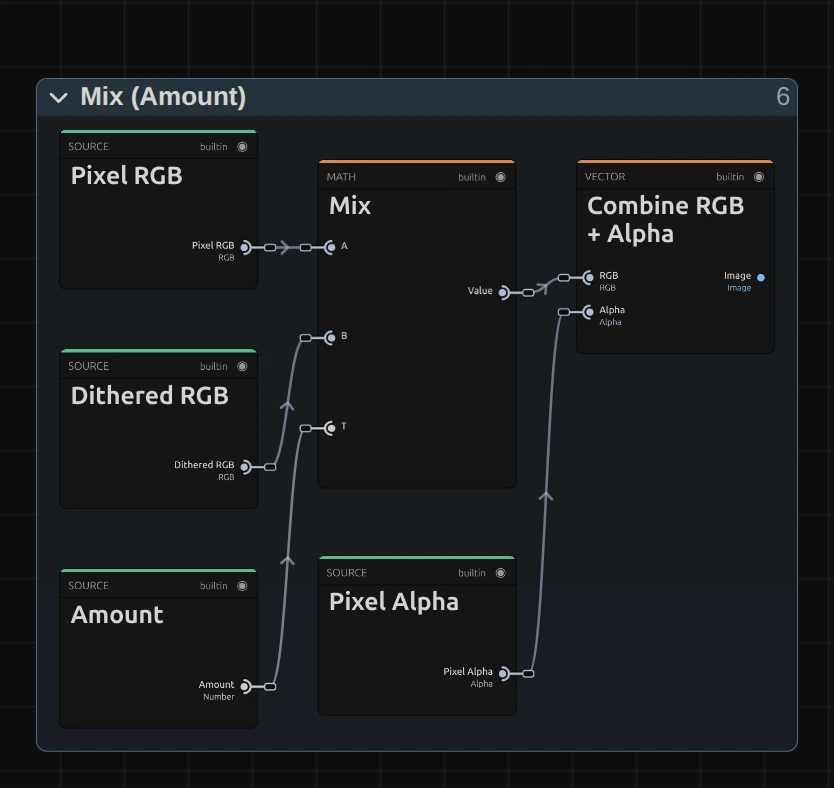
Mix – lays the dithered colour over the pixel’s own colour by Amount: 0 keeps the picture, 1 shows only the dithered one.
Combine RGB + Alpha – puts the pixel’s own transparency back on, so a cut-out figure keeps clean edges and empty areas stay empty.
Technical details
Section titled “Technical details”- Size. Pixel Size counts pixels of a frame whose shorter side is 1080, rounded to whole pixels of the frame being drawn: a 4K export shows the same pattern twice as large in pixels, a portrait 1080 × 1920 frame the same as a landscape one. On a frame where the size is not whole it renders the nearest whole size, and the card says so: 3 px at half Preview Quality are 1.5 pixels, so the preview draws 2-pixel cells while the 1080p export draws 3, and the card names both.
- Tone. Each cell’s colour is the average of all its pixels in linear light (four reads of the Cell Filter), and the share of the upper step is measured in light: over one 4 × 4 tile of cells, the dithered light matches the cell’s light to a 32nd of a step. Black stays black and white stays white at every Levels.
- Colour reads. Every cell is averaged over all its pixels: four reads of the Cell Filter, each the average of a box half a cell wide (up to 32 reads per row and column, spread evenly in wider boxes). On moving footage a cell’s colour changes smoothly as an edge crosses it.
- Transparency. Transparent reads do not count towards a cell’s colour, so a cut-out figure gets no dark rim; every pixel keeps its own alpha.
- Time. Dithering does not move by itself: a paused picture needs no extra rendering. On moving footage the grid stays in place and the cells change colour with the picture.
- Saved projects. A project stores each effect’s node setup, so a saved Dithering keeps the look it was saved with. One saved before Levels existed, without a node setup, keeps its earlier look exactly (Pixel Size in pixels of the frame): the pattern stepped each pixel’s own colour, black areas showed a few grey pixels. Its card hides Levels and says so; add the effect again for the version described here. A custom Look keeps the node setup it was saved with in the same way.
- More: Effect system · Node Catalog · Styles and presets.